-
Posts
28,248 -
Joined
-
Last visited
-
Days Won
399
Content Type
Profiles
Forums
Events
Everything posted by robcat2075
-
Good looking lightning bolt! I agree that finding some way to make it pulse from the root to the tips is worth investigating.
-
If she has a prop it gives you natural reasons to not do symmetrical poses. And whatever the prop is it adds a hint of back-story to her. A cup of coffee, an ipod, a book, a microscope... any of them could be there and each of them would suggest something different about her and her monologue.
-
It's one of those benches they put at bus stops so you can't sleep on it. Looks cool, whatever it is.
-
My inclination is to hit the accents in speech with head and body motion rather than try to do it with the lips. I feel that head motion also reduces the look of a static head with a jaw flapping at the bottom. But head nods and twitches are hard to do well and that tactic can get old too.
-
The environment map solution will work in many situations. If you absolutely need accurate, interacting reflections from the scene, a little picking and choosing may be needed. To get just the central object you will need to turn off everything except that object when you render. But then I expect you wont' get the reflections on it you need. So... Render it once, full scene (with alpha). this gets you your object, the surroundings and the reflections of the surroundings and the alpha you dont' want. then do another render of just the object with alpha ON. This will get the alpha shape you really want. Then in Photoshop (or any paint app that lets you edit alpha channels), copy the alpha from the second render onto the alpha of the first. Resave the first AfterEffects can also do this trick of using the alpha for one source as the alpha for a second source, but I forget the exact steps. It may even be possible to do this in A:M Composite. There is a Post effect called "Channel Select" that gives you access to the R, G, B or alpha channel of an image. I haven't investigated that much.
-
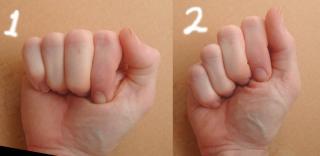
I think the body language is mostly working although my suggestion would be to not do such a long shot with only hand gestures. Find something else for her to be doing even if it's only handling a cup of coffee while she's talking. The mouth shapes often seem like too much too fast. A lot of syllables in speech don't really need a complete mouthshape change. In real life our mouthshapes are very indistinct I picked out a few here... a, b, c, and e seem overly stretched and an over complicated shape. b and c are a bit odd with the mouth so open while the teeth are closed I think a lot of people tend to bring the mouth corners too high for smile poses like in d. I find good smiles hard to do on most characters. In general they are all very big even when she's not talking loudly and when she gets to a spot where she really is shouting like in f she ends up with a smaller mouth than when she was talking at a lower level. the other thing that bothers me is the lips are very black and the whole arrangement starts to hint of a moustache and goatee rather than lips. The arm pose in g is called the "W" pose and most animators will regard that as a cliche to be avoided. You only do it once though. The hand are rather stiff ,as you note. Avoid poses where the fingers form a flat plane with the palm of the hand like in a and d and e. Animators call those "paddle hands". (animators seem to like to give disparaging titles to things). Avoid poses where the hands make a straight line with the arm. Avoid poses where the fingers sit evenly spaced like in a, b and e The fist poses in f and h and are very squarish, like in 1 below. Try something like 2.
-
As i understand it, 8 bits represents values from 0 (black) to 1(full white) in 256 steps 16 or 32 bit integers still represent 0 to 1 but with more steps. but floating point can represent values greater than 1.0 so, for example, your HDRI global illumination map can make the image of the white sun be much brighter than a white cloud. I think floating point can also do negative values although I can't think of a use for that.
-

Render test Clip from for my presentation
robcat2075 replied to jason1025's topic in Work In Progress / Sweatbox
Thanks for the lo-res. That looks good! -
This Technical Introduction to OpenEXR covers the various compression options available in OpenEXR.
-

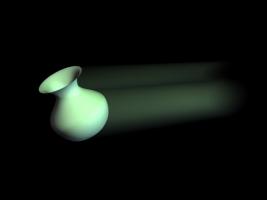
Representing action movement with blur
robcat2075 replied to Eric2575's topic in Work In Progress / Sweatbox
-

Representing action movement with blur
robcat2075 replied to Eric2575's topic in Work In Progress / Sweatbox
Composite a multipass frame with 100% motion blur with a non-motionblur frame. The non-blur frame must be the frame after the mo-blurred frame. -
OpenEXR is A:M's high dynamic range format. It is a floating point format. All the others are conventional 8 bit formats. Make sue you download the v15j+ update
-

Render test Clip from for my presentation
robcat2075 replied to jason1025's topic in Work In Progress / Sweatbox
I'm afraid it's a bit too much res for my PC to play smoothly so i can't judge the motion , but the renders look real nice. I'm sure the HD res is a time eater, but I'm still wondering if the lighting is as efficient as it could be. I think Wendy Carlos summed up the problem 40 years ago, "Every parameter you can control, you must control." -
Here's a quick go at fluttering paper MoneyDrop5H.mov Here's the PRJ MoneyDrop_08_simmed_5_secs.zip the bills are all parts of the same model. A cloth material is applied to it. They are dropped into the midst of a "fan" force that blows them to the left.
-
Yes, a decal will always appear on both sides of the patch it is applied to. It is possible with compositing to have different sides appear on a single thickness patch and that would simplify the cloth simulation approach. The initial cloth tutorial is in the TAoA:M booklet. I recommend that as a starter.
-
Explain that more. I'm not sure what you mean by "thin enough" This sounds like this might be a job for a cloth simulation. Cloth could be made to be flexible like paper and could be dropped and blown about by forces. No bones required.
-
60! Slow down!
-
Remember that the ground plane is a model and you must delete it or turn it OFF so it does not obscure your background.
-
Rendering with an alpha channel will make the background transparent in applications that can use an alpha channel. I believe flash can do that. You have to render to a format that can support alpha channels. Targa sequence or Quicktime with "Animation" codec. Turn Alpha ON in the Buffers section of your render settings.
-
When you say "install a font" that's not something A:M does, that's something your OS does. You install a font on your computer and then all your apps (including A:M) can use it . I'm not sure what the Mac font process is.
-
Sorry, I didn't read the fine print! Well, that's why they don't look like my streaks... they're not streaks.
-
It takes a lot of them to blend together, so it's not fast. Your streaks might be over large, but hard to know without lots of trial and error.
-

Can hair be rendered out separately
robcat2075 replied to Eric2575's topic in Work In Progress / Sweatbox
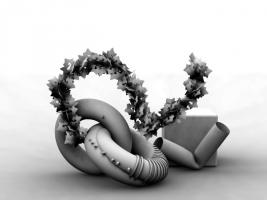
Here's another attempt. The self jittering lights seem to have too many clumps in their jitters so i went back to a spiral path rig that spins from the top of a hemisphere to the ground. that isn't really random either but gets me a fairly even distribution of lights. This has somewhat better occlusion on the small details than the above version. I level adjusted this to deepen the AO look. -
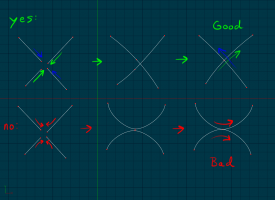
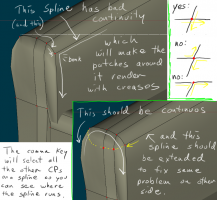
Splines always need to connect and cross with an "X" intersection, like in the top sequence. If they meet and turn away from each other, like in the bottom half, you get a crease. If they aren't crossing like an "X", break them apart and reattach them to make them like that. Here's another markup I did a while ago when some one had a similar question.
-
I got that by the end of the sequence. I like the way that seemingly cliche detail at the beginning turns out to be something else by the end.


