robcat2075
-
Posts
28,298 -
Joined
-
Last visited
-
Days Won
407
Content Type
Profiles
Forums
Events
Everything posted by robcat2075
-
If I delete Bill from the Chor and then drop another copy of him back in, he shades normally. Of course that loses all the animation, but it tells me something has been set in the chor (rather than in the model) that is creating the flat shading. If I look in the Chor>Shortcut to Bill 03>Options I find that "Flat Shaded" is ON. Turn that OFF and he will shade like Doris. I used to have a cat named "Doris" but we had to change it to "Boris"
-
OK, NOW I see it! I remember that one! The "beam" is probably a thin cylinder with a bone at each end. The bone at the letter end is on a path constraint, using the spline at the edge of the letter as a "path". A new path constraint is probably used for each letter. If you wanted to bring this to Live Answer Time we could rough it out.
-
I can download it but QuickTime wont' open it.
-

Image Contest, Matt Campbell's workthru
robcat2075 replied to John Bigboote's topic in Work In Progress / Sweatbox
Here's a brief definition from Wikipedia: "Features of Googie include upswept roofs, curvaceous, geometric shapes, and bold use of glass, steel and neon. Googie was also characterized by Space Age designs symbolic of motion, such as boomerangs, flying saucers, atoms and parabolas, and free-form designs such as "soft" parallelograms and an artist's palette motif. These stylistic conventions represented American society's fascination with Space Age themes and marketing emphasis on futuristic designs." I'm not sure what a soft parallelogram is. If I Google that I get pictures of cellphones. -
That's great! I guess some stagehand was ready to throw him that trombone when he needed it.
-
Summer 2017 Image Contest! New Deadline Sept 22!
robcat2075 replied to robcat2075's topic in Contests/Challenges
Until today you had three more weeks to get your entry in, but not anymore. Now you have five weeks! New Entry Deadline: September 18, 2017 Also added... Rule 5a Pre-voting Exhibition Gallery -
Image Contest, Matt Campbell's workthru
robcat2075 replied to John Bigboote's topic in Work In Progress / Sweatbox
I believe this style is called "Googie" architecture. -
So, over on the trombone forum I also say that having a conical trombone is possible like having a triangle with parallel sides is possible, and someone helpfully points out that in some non-plane geometry it is possible. Fine, I say, all you have to do is get to the universe where that works on a trombone. It's probably the universe where Spock has a mullet, I say, thinking there is no such thing. And then someone comes up with this...
-
I look forward to your report.
-
Very impossible. A truly conical bore instrument that you can also change the length to change the pitch is pretty much a geometric impossibility. Like having a triangle that also has two parallel sides. It's remarkable how much discussion there is over there when the trombone hasn't changed much in 400 years.
-
Over on the trombone forum someone was lamenting that you can't have a slide trombone with a conical bore from one end to the other.

-
"Paint fall" Image Contest WIPs
robcat2075 replied to robcat2075's topic in Work In Progress / Sweatbox
Problem #2... re applying the decal doesn't fix it! -
another prop for summertime project
robcat2075 replied to johnl3d's topic in Tinkering Gnome's Workshop
Mmmm... are those zucchini? -
I think that would be a job for a "transparency" map.
-
How about if the bottom edge were more ragged instead of cleanly cut? How about if there were a visible part at the top? How about if there were different shades of gray in the hair?
-
"Paint fall" Image Contest WIPs
robcat2075 replied to robcat2075's topic in Work In Progress / Sweatbox
Here's a clearer view...
-
"Paint fall" Image Contest WIPs
robcat2075 replied to robcat2075's topic in Work In Progress / Sweatbox
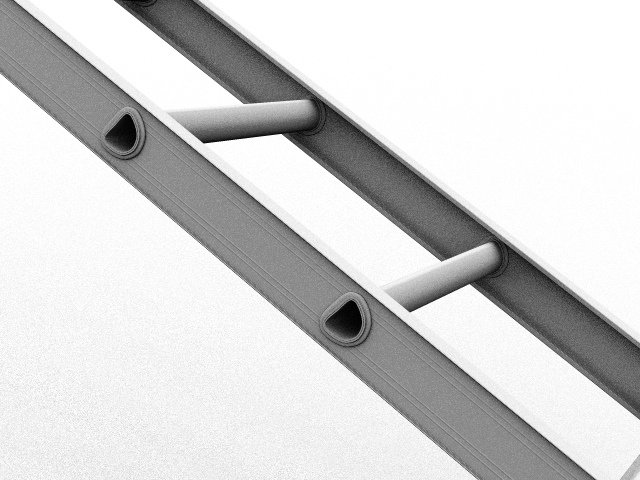
Here's an odd problem. I used a bump map to make the thin ridges that run the length of the ladder rail.. But if I copy and flip that left rail to make the rail on the right side the bump map shades inverted on some patches, even though all patches are still facing outward...
-
Old hands will have lots of veins, bulging knuckles, thin bones
-
But it's good to have a job, right? Thanks, for the many things you do!
-
Summer 2017 Image Contest! New Deadline Sept 22!
robcat2075 replied to robcat2075's topic in Contests/Challenges
You have three weeks and six days to enter your Image Contest image! -
Simon, You probably don't want yet another multi-part tutorial on decaling faces, but i have one. Perhaps portions of it will be useful to you.... It Can't Be Decaled!
-
Does it still look like that if you got to Tools>Customize>Appearance and change the color scheme?
-
For reasons not clear to me, Flatten unwraps around the selection's Z axis After you select your CPs, go to a side view, choose the traNslate manipulator so the axis gnomon will show, grab the red handle of the gnomon and rotate the gnomon so that the blue axis is vertical, then do Flatten. My experience with flatten is that the last patches on the side tend to get distorted by the stretch. You should include one more set of patches past the ones you intend to decal in your Flatten selection, then hide them before you apply your decal.
-
"Paint fall" Image Contest WIPs
robcat2075 replied to robcat2075's topic in Work In Progress / Sweatbox
That's true, but it's the first thing that shows up when I do a search on "Summer Image Contest" It's about half way down the page when i click on "View New Content". And there's a link to it in my signature. Let me know if you still can't find it after you click on this direct link -
D'oh!