robcat2075
-
Posts
28,244 -
Joined
-
Last visited
-
Days Won
399
Content Type
Profiles
Forums
Events
Everything posted by robcat2075
-

Using Terrain plug-in as a pose?
robcat2075 replied to R Reynolds's topic in Work In Progress / Sweatbox
I'll note that a sliding decal is done not with an traditional decal but with a "Projection Map" material. -
Using Terrain plug-in as a pose?
robcat2075 replied to R Reynolds's topic in Work In Progress / Sweatbox
Crazy idea... What if the ground was stationary patches and giant decals for displacement and color were sliding on it to create the illusion of movement? The downside is that displacement is slow to render. See Fucher's post, below... -
Using Terrain plug-in as a pose?
robcat2075 replied to R Reynolds's topic in Work In Progress / Sweatbox
How would you get all the edges of neighboring tiles to be matching elevations? -
Welcome back! When you get some questions, this is the place to ask. I like your rolling lime!
-
Correct. That is TSM2 0% is the default length of the leg Greater than 0% is longer Less than 0% is shorter TSM2 normally creates a 0 to 100 slider that lengthens the leg a large amount. I found that not useful and edited the Pose to just do slight scaling on a -10 to +10 scale thanks!
-
Getting AimAt and Path Constraints for Camera in Chor
robcat2075 replied to RS3D's topic in Open Forum
Here is a run-through of what Rodney and Gerald mentioned... clip4270CameraonPathAimAt.mp4 This video demonstrates Aim At constraint Path constraint Compensate mode button re-ordering constraints forcing Save -
Welcome back! you can right-click in the model window and choose Plugins>Export for a list of export options. OBJ export was in v15 but later versions give you the option for more subdivisions than 4x4
-
If you wanted to bring this to Live Answer Time I think we could make a substantial improvement in how that horse is working.
-
Here is a brief screen capture that shows such a thing at work... clip4267LegScaling.mp4 thanks!
-
And just to further clarify... the knee "pop" we were talking about is not the "IK knee pop" one usually thinks about as "knee pop" What we are looking for is a way to slightly scale the length of the thigh and calf (but not the foot that is a child of the calf) to fine tune where the knee is during walks.
-
Eventually, i got an extra, bargain bin, no-box CD drive from the computer store and left the A:M CD in that drive all the time.
-
How to turn off dynamics in Real Time? [solved]
robcat2075 replied to robcat2075's topic in Animation:Master
OK, I discovered what the problem was. The "computing dynamics" message was not about dynamic constraints. It was about some hair in the scene. But I had done a "reset settings" on A:M previously so the "Draw" tool bar with "Show particles/fur" button I would normally have visible was not there to remind me that hair was ON and the hair itself wasn't obvious in the part of the scene I was examining. Shift+8 to toggle hair ON/OFF. -
It's all a matter of degree, of course, and a trade off between accuracy and convenience. that said... it just doesn't look right to have the feet sliding sideways while that horse turns a corner. It's OK to modify the model and resave a version that works better for that shot... and just use it for that shot. But... gun to my head... if I absolutely HAD to get this shot out somehow without fixing the feet... I'd find a way to frame it so the feet are not so obvious.

-
How to turn off dynamics in Real Time? [solved]
robcat2075 replied to robcat2075's topic in Animation:Master
The Chor Properties>Dynamics>Display While Simulating ON/OFF switch doesn't seem to turn off the computing of dynamics wait time. -
update: solved. See post #4 Is there a switch that stops A:M from "Computing Dynamics" when I'm scrubbing through the timeline? Something besides turning off every dynamic constraint in the models.
-
Definitely looks like a Normals problem
-
How is that horse rigged? Does it not have IK feet? Or is this a walk cycle and you are moving the model while it cycles?
-
As far as I know, splitpatch is just a simple geometric subdivision. They are usually not very visible after the simulation and they typically end up in places that would be a crease in the cloth anyway. Probably, but i don't have a program to do that. The most significant problem with SplitPatch is that it will sometimes create what looks like a single continuous spline but it is really two or more separate splines that share endpoints.
-
Looks like I had "Allow Embedding" off even though the embedding seemed to work when I tested the page.
-
On the fence, and a couple questions about A:M
robcat2075 replied to TwoCatsYelling's topic in New Users
A:M itself is single core for most things including rendering. There is a multi-core setting in the Options panel but multi-core is only used on internal house keeping things like like spline and patch management, and not renders. NetRender lets you make use of all your cores, of course, when you have more than one frame to render. But inside A:M, one core is doing the rendering for what you see on screen. Keekat has a complicated Material on him with lots of nested gradients that makes him Final Render tediously slowly. If you want to see a fast result onscreen, do Shift-Q and right drag a bounding box around any part of the screen to get quick feedback on a lighting change or anything else that doesn't show in real-time renders. Or, if the KeeKat material is not crucial you can delete it and replace it with something simpler. Here is an alternate KeeKat material that has a similar look but is faster rendering... KeeKatSimpleFur.mat -
On the fence, and a couple questions about A:M
robcat2075 replied to TwoCatsYelling's topic in New Users
Welcome back to A:M! If you ever have questions, this is the place to bring them! Oddly enough, the cat in my name is not about cats, although I am a cat (and dog) person. -
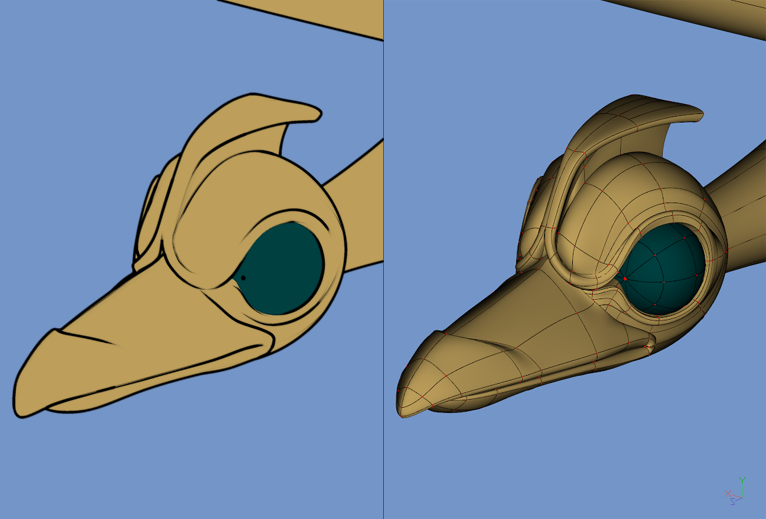
Here's another old toon project from 2004. I was trying to make model that would toon-render to look like the giant bird Taarna rides in "Heavy Metal"
-
On the fence, and a couple questions about A:M
robcat2075 replied to TwoCatsYelling's topic in New Users
The workflow has been the same since v11, which is good. You should find no surprises there. That is a rather old item. It's not like modern terrain generators that grow trees and everything. -
On the fence, and a couple questions about A:M
robcat2075 replied to TwoCatsYelling's topic in New Users
I recommend the annual subscription. It's inexpensive and keeps you up to date. -
On the fence, and a couple questions about A:M
robcat2075 replied to TwoCatsYelling's topic in New Users
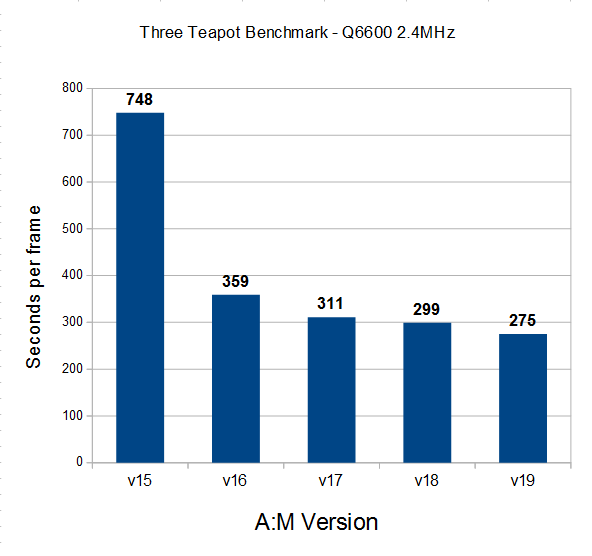
For me, it's stability and speed. In the bad old days I remember feeling like I needed to save every 2 minutes or risk losing something important. I don't have to do that now but if you're still worried, there's an automatic backup feature that will save your work every X minutes if you want that. And A:M is much faster now. It's not as fast as the competing GPU renderers out there but I'm not going to go relearn everything I do in 3D in Blender or Maya just to render faster when "rendering" is not the thing that consumes the most of my brain time anyway. NetRender is included now and works on multi-core CPUs so you don't actually need a "net" to use net render. Your 4-core CPU is now a render farm and if you want more, the cost a license for additional nodes is really cheap. Steffen Gross has done a lot of work on improving render A:M times...