-
Posts
7,863 -
Joined
-
Last visited
-
Days Won
15
Content Type
Profiles
Forums
Events
Everything posted by NancyGormezano
-
Hey! Don't forget to imagine my Backside Projection as well, as long as your mind is wandering. Interesting find. I had never tried with image that had alpha channel - but you are correct, wherever there is no data (empty channel) it appears to project white - another way (convoluted a bit) to make a white-ish render, Rotoscope in frog picture is all empty alpha channel - makes everything white (but still see bump maps). Ground is flat shaded. Frog is NOT flat shaded. Background color was black - but empty alpha channel makes it white too. AND if you can't get enough of the Toad - there are many more experiments (non-white) seen here at Oxymoron Theatre
-
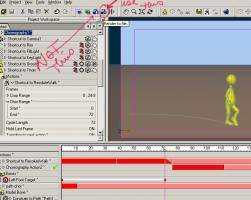
Yes - the problem is probably that you are hitting the "render animation preview" button instead of "render to file" button - so you are most likely running out of memory. (not sure if video card memory as well is getting messed) If you render to file directly - you will probably not have this problem.
-
couldn't help myself - I came down with a case of the JohnL3d Gnomatic heebie jeebies recursively rendered mouse with flat shading (front projected with white) - changed movie on layer to previously rendered movie(s), changed rotoscope to a fractal image, front projected that on flat shaded mouse mousefractalcompressed.mov
-
An all A:M solution - similar to what Paul did - but uses a layer mapped with animated movie that acts as the reality clipping plane. Layer, camera, mouse all animated just for demo purposes mousewhite8compressed.mov
-
Ok - for a quick thought - I think you have multiple concepts going on, as I'm still not sure I understand. In general I would approach something like this by analyzing the exact requirements for the imagery - rather than coming up with a general method. Brute force is usually faster. I would think about using something like After effects for compositing layers, working with alpha channels and dynamic layer masks. Not saying you can't do it all in A:M (probably can). It is not clear how the white models interact with live action models - do they do the same actions (mirror?), are they the same models, must they be seen half in real world/half in white world? If you want to do it all in A:M, then I would think about (just as you have) 1) rendering an A:M tga sequence that has your "live action textured reality models look" & presumably this sequence of imagery will then be decaled onto an A:M layer (or flat plane model) - now called a reality plane 2) add the reality plane layer object into the scene, decal that layer with previously rendered tga sequence. Animate & position that layer how you want the "plane" to cut the scene 3) "white front project " and animate the "other world" selected models as you want them to step in and out of the reality plane/layer. Render. You may need to do some rendering with alpha buffer ON in some step of the process (thus isolating models from background) - but without knowing exact requirements - it ain't clear. You can also think about using A:M composite feature for combining/layering of rendered seuqunces And that's my "off the cuff", probably "off the charts" quicky thoughts.
-
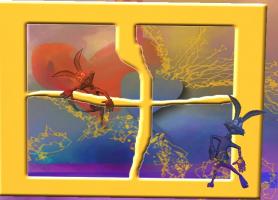
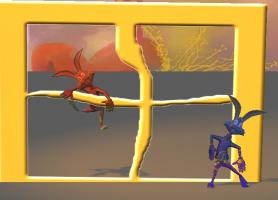
Not exactly sure what you are asking for - but in this example - the window is a layer with an image on it that has an alpha channel - the background is the camera rotoscope, and the rabbit is a front projection target. If you didn't want to see the rotoscope as background, but still have the object(rabbit) be front projected - then create a background model (walls, etc?) that obscures the ...um...background (camera rotoscope), and is NOT a front projection target (ie, the ground in the 2nd image).
-
I am not familiar with AVS Video Converter - so you might examine the settings you are using with it to do the conversion/compression and experiment with those. I don't know what settings you have available. The difference in file sizes is due to the fact that the avi (which came from A:M) is probably uncompressed. Or it could have been compressed some. The smaller QT file size is because it was definitely compressed in AVS. When one does compression - which is a necessary evil - there is usually degradation in the resultant imagery. This is a fact of life. Some compression methods work better than others for different kinds of imagery, and how much the imagery changes from frame to frame. I use mpeg4 compression, others like h264 for QT. When I now think about it, it is of course possible that the compression made it darker. One has to play with the compression settings and make compromises between file size, and quality. A good way to play with different compression methods is to render from A:M uncompressed (either to a tga sequence, or QT mov, or avi) and then experiment in your compression program. I use QT pro - only because I have it and it's relatively simple.
-
Looks very promising. But yes - dark. Conversion? to QT should not make it dark. What are your rendering settings, process steps from A:M? (compression, file type, gamma, etc). Are you rendering to QT from A:M. What version QT? When you say conversion to QT - do you mean you are compressing in QT pro in order to upload to forum?
-
Ha, ha! I usually set the angle limits to about 70 degrees but that normally overrides the grooming and spoils the effect. I've never had it override the grooming. But I always set dynamic options on hair material to Use forces but NOT use gravity. And I use spring constraint as well
-
The 11 sec club has some strict rules about frame size/aspect ratio - I forget exactly what it is - I think it's 400x 300 - you should plan your imagery for whatever they require and you will save yourself some file space, animating and rendering times.
-
That's why the neanderthals died out... Also thats why I make angle limit something smaller than 180 - say 60? - for dynamic options on hair - could also try collision detection (shudder)
-
IBL reflections on a model
NancyGormezano replied to Eric2575's topic in Work In Progress / Sweatbox
bueno! -

IBL reflections on a model
NancyGormezano replied to Eric2575's topic in Work In Progress / Sweatbox
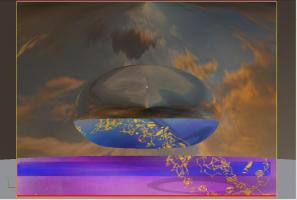
environment map on dome, sphere is 100% reflective ground is front projected ON -

IBL reflections on a model
NancyGormezano replied to Eric2575's topic in Work In Progress / Sweatbox
do you have another camera roto that is set to be ON TOP and is partially transparent? My camera roto is NOT on top. -

IBL reflections on a model
NancyGormezano replied to Eric2575's topic in Work In Progress / Sweatbox
hmmmm...very strange - what seems also funny to me is that your lighting on background buildings changed (in first post with just red sphere) when turning camera roto on/off - that shouldn't happen. I am assuming those background buildings are the environ map on the dome. I cannot duplicate your results - I have a 100% reflective sphere, floating above ground, dome with env map, front projected ground plane, camera roto. 1 sun light, IBL (color=white, no occlusion) - and it looks fine to me this is screen capture -
Task manager ABORT. I don't fool with that switch. I haven't had a need to yet. BUT I do believe it is for the purpose eventually of isolating redoing particles and leaving others baked - but when I tried it - I also ran into funnies - it's been awhile (at least a coupla weeks - and in old people years - that's awhile). Heres something else to try - I believe I have never had the funny crazy hair when I have used an image for the emitter (not 100% sure, but 99% sure)- so create an image the color(s) that you want your hair to be (any proportions - as your length & width & shape properties will scale it properly) - and use that instead of "no image" - see if that helps with crazy hair.
-
oy oy oy Don't fool with that switch yet. Abort. There was no reason to redo Bake particles to get rid of streaks. (I don't think?). The toggling between frame 1 and 0 should do it. However - if you want to re-bake - best to rt click (in chor), unbake particles then bake particles - for now. Make sure you are on frame 0 when you do. You will still probably (not always) have to toggle (after baking) between frame 0, 1,0 before rendering (to get rid of streaks).
-
Ah yes - I know that one well - the "long-crazy-WTF-is-that" hair. What I do when I get that is - before rendering -- go to frame 1 then back to frame 0 - the crazy hair seems to disappear. Then render. Also you are doing shaded - not final render - Baked Hair and baked bone dynamics do not interfere with each other - they are baked - not recalculated on the fly - this is so one can distribute the rendering as well - it's quite an improvement over ver 14. If they are not baked - they will interfere with each other.
-
I've had that happen (exceptions) sometimes, not always. I haven't had to go to helmet hair. I'm on a PC. I have 3 gb RAM. My hair dynamics are usually default spring settings, with drag changed to 20%, use forces, but don't use gravity EDIT (don't use collision detection either) - but change radius to 60 degrees or something I have found even with getting those exceptions - that if I just try and bake particles again - it works. OR ...Perhaps start clean - delete those baked particle channels (that show in the chor after it adds a "group" thing), and rebake. Perhaps A:M is having trouble writing/closing the particle file? Files are created with extension .par - (can't remember) - and indices into the file are assigned to the different particle groups/types in your chor. Do you have more than hair particles going on ? (sprites, etc) There are settings to bake some particle systems and not others. You might try doing 1 at a time (I haven't had to do that). I've had LOTS of different hair particle systems with lots of dynamics going - have not had to isolate. But I haven't tried it with sprites, etc.
-

IBL reflections on a model
NancyGormezano replied to Eric2575's topic in Work In Progress / Sweatbox
Do you have your environment sphere model active? And is the image on it mapped correctly? I am a little confused as to what I am looking at in your images - it looks to me like the background is the camera rotoscope (projected onto ground plane, and showing in the background, as there is no actual model there) ? -
I think the diagram is wonderful - I don't know how much clearer it could get. It's a great quick reference. I think the video is great as well. I generally don't like videos - because it's difficult to watch the whole thing (again) in order to find a point that one might have missed, or forgotten. I prefer written material/pictures. Videos are great for introductions to topics. Yours are terrific. I believe you are running into the fact that people have different learning styles - And there is nothing you can do to for those who expect this stuff to make sense without actually trying it to see what happens, nor do some extra "thinking" about what it means. If you were in a classroom situation - then one could flesh out what the confusion is by answering specific questions. Some new users might have to back up and actually need definitions for what those symbols mean (eg, "translate, scale, rotate, pose, etc"). I think it depends on from where they are starting, and how much they are willing to dig in. Some might want it all to make sense without doing any work on their own.
-
Have you tried?: 1) turn off hair/particles (shift 8) 2) make sure your chor length is set correctly (expand Choreography triangle - set length if not correct, do not do it in the timeline - as its sometimes doesn't correlate. 3) right click in chor - Simulate Spring Systems (this will bake the dynamic chains) 4) go to frame 0 - turn on hair - right click - Bake Particle systems 5) Save & render This worked for me when I was doing my Pass the ball entries - all 3 of which have both dynamic hair and dynamic chains.
-
the steam and title & sound looks, sounds GREAT! Very effective.
-
hmmm...either the ease (for constraint to path ) is set to something other than 0, in which case set it to 0...or the path constraint has an OFFSET? OR If the ease = 0, offsets are 0, and the range for the chor action for path constraint is correct - then you might have modified your path and added a cp and sometime there is confusion as to what really is the first cp of the path (the beginning of the path). I'm really not sure about this. Like I said, paths can be tricky...and it also depends on soooo many other things. eg. like the order of chor actions for the camera and what range of frames each chor action is in effect. Make sure the chor action in which you set the path constraint for the camera is the last chor action for the camera - bluhhh...bluh bluh maybe? Check that path constraint chor is in the range of frames you intend for it to be in force. I hope that wasn't tooooo confusing... So - perhaps if ease is not the issue...start new? - go to frame 0 - delete the path - start new path ...make sure the first cp you put down is where you want to start
-
Paths can sometimes be tricky - and sometimes it takes changing the order in which one does something - I think this will work for you: 1) frame 0 - add null to chor, create your path 2) move camera from frames 0-10 however you want. 3) on frame 11 constrain camera to path, set to translate only (important) 4) frame 11 - set aim at null constraint for camera - make sure you have compensate mode OFF (so that camera will aim at null exactly - (or else set offsets for constraint = 0) . Probably best to do steps 3,4 in this order. 5) set ease of path constraint = 0 on frame 11. Set ease of path constraint at frame N at 100% , where N = 30 = when you want the path movement to complete. 6) May the Null & Path Constraints be with You.


