-
Posts
7,863 -
Joined
-
Last visited
-
Days Won
15
Content Type
Profiles
Forums
Events
Everything posted by NancyGormezano
-
Love the boogie music - very fun animation - love the surprise elements - Ya jes' keep gettin' bettah-n-mo-bettah.
-
wow - looks terrific - very professional, great job.
-
Like Jesse said - it depends on what mood, effect, statement you are going for - I prefer the lighting on the grim one (2nd) better - but in both - I think the grunge on the lockers, etc looks a little too regular. Jake- I agree it's hard to assemble sets in actions, I also prefer to assemble in chors. And for a one person project - that works. However, when dealing with a project with many people, many chors - and people are using the same sets, in different chors - the chors get automatically updated when the assembly action changes. It's easier logistically than having to manually seek out an assembly chor, and re-integrate it into many different chors.
-
Recent jobs done with A:M
NancyGormezano replied to John Bigboote's topic in Work In Progress / Sweatbox
top-notch - the animation clearly illustrates the process and it looks terrific - especially the water/fluids. I'm having a good time filling in for the sounds as I watch your animation - first the whoosh-gushing sound of water coming from the tap, then the slogging/dripping thru the filter, and then being totally bihzzzit bug-zapped into sterility. -
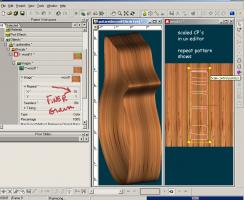
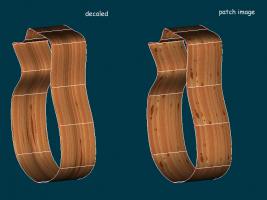
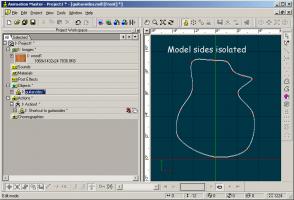
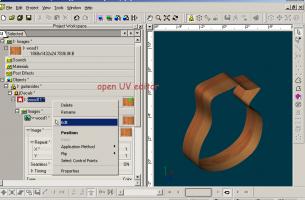
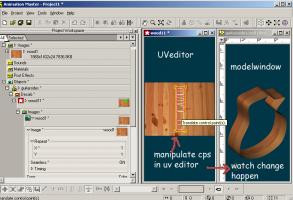
One other thing that I forgot to mention with respect to this particular model - it is probably not necessary to flatten the sides at all for decaling with a vertically striped image. try it Isolate the sides - go into a side view (4 or 6) in the model window. apply decal, find the undecaled patches and apply again. And after the apply - again - you can change the repeat pattern, and/or manipulate the mapping in UV editor In this example I decaled without flattening, then changed the repeat, and scaled, translated the cps in the uv editor Matt - in previous versions of A:M - I had noticed that there was a very, very big render hit for using patch images extensively - ie lots n lots of patches - I'm glad to hear that's no longer true...I will go back to using it more. EDIT: 2nd image illustrates more clearly the difference between decaled (without flattening) versus patch image - and using the same image for both
-
Jake - you can add additional models to an action and they will show up as action objects - you can position them - This is how complicated sets for TWO & SO & other projects have gotten assembled. Nice scary school halls - gives me the shivers...
-
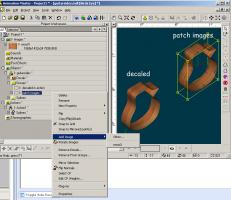
Right click on a group of cps - choose add image/wood - the entire image will be mapped to each patch in the group. Very simple, quick, very nice. But has some drawbacks. I believe it makes for longer render times (or it use to). And you will probably find you will have to rotate the images on some patches. Each patch will look the same, and you will then see the "patch sizes". You may also need to manipulate the repeat(s) per patch.
-
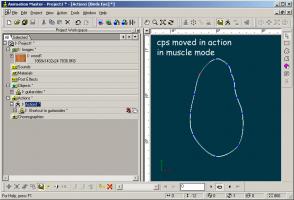
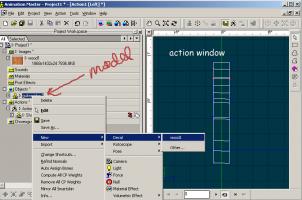
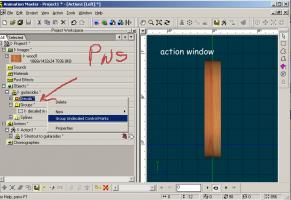
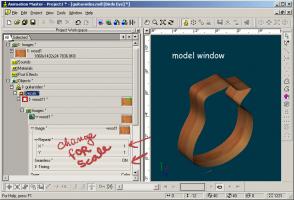
The way to "flatten" is to do it in an action - therefore not destroying your model. One also does the decaling in the action as well. I'm going to suggest a different approach than A:M flatten - so I won't be describing that procedure. In this case I would do a pseudo-flatten for the sides - ie in the action manually move the cps, and apply the decal in the action. The real A:M "flatten" is more trouble than it's worth (for this case). The objective in moving the cps in the action is to get the shape in a form such that applying a vertically striped wood pattern from the side view can be applied using a planar method, and have it be continuous. 1) in the model: group the sides, and hide everything else. 2) open a new action 3) in action window - switch to muscle mode 4) from front view in action - select cps and move them so that they sorta resemble a stretched cylindar 5) While the action window is open, and you are viewing the distorted model from the side - right click on the model (not action) in the PWS (very important) and choose new decal, image. The image will appear in the action window, make sure method is planar - choose "apply". 6) While still with action window open, right click on decals container (in the guitar model - and choose group undecaled - then select hide. double click on the decal container that was created for the wood decaled sides - and choose apply again- inorder to get those patches not decaled in the first place. 7) if you don't like the scale of the grain or image, you can manipulate the repeat pattern in the x direction for the decal image - or you can work in the uv editor to scale the mapping 8) if the above isn't clear - then please ask more questions.
-
another terrific clip - love the gag - (Looks like Yosemite in background?)
-
terrific! absolutely terrific!
-
FUNNNNEEEEEEE! Only thing is that in the beginning - it wasn't totally obvious (to me) that Pirate catches the ball - perhaps - he needs some recoiling action? I had to replay to understand what the connection was between first and 2nd cuts. BUT I love the final gag - very very funny, clever
-
more details here: http://www.hash.com/forums/index.php?s=&am...st&p=297113
-

Anti-aliasing(correct term?) in rendering possible
NancyGormezano replied to Path other's topic in New Users
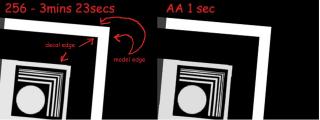
Hmmm...it's more than a pixel or 2 - I see banding across the whole thin strip - I'm putting my nose up to the pattern and I definitely see banding, striping - However, it's perfectly acceptable to me. This just says to me that the algorithym for multi-pass averaging works well for AAing, and in some cases better than the regular. 16 pass? - I don't go over 5 usually - and most cases 4 is good enough. I only did 256 passes to see if there really was a difference in going with higher passes. I had never believed there was. But I proved to myself - yes there is a difference. But not worth the extra render time for a sloth like me, but might be for those who are doing higher quality still imagery. And yes - no MP (regular) is definitely speedy quick, good enough, in this case in comparison. I don't know if it got reported - I know that it's a known problem. Don't know if it will be fixed. My reports seemed to turn into the kiss of death for a fix, especially when there's a very simple work-around. I've given up on reporting. I can live with this. -

Anti-aliasing(correct term?) in rendering possible
NancyGormezano replied to Path other's topic in New Users
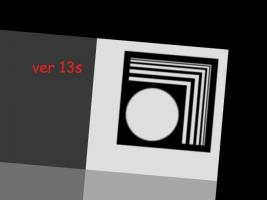
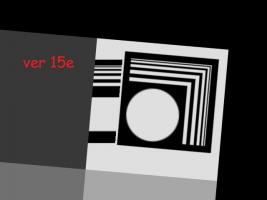
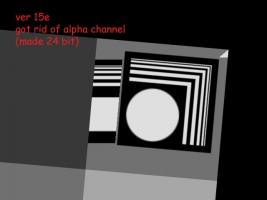
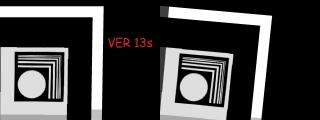
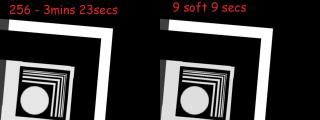
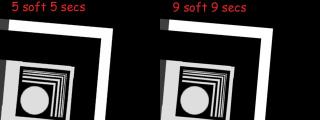
To me - ver 13s looks more or better antialiased when comparing AA Final (no multi). I guess? that AA is going on for decal in 15 - but can't really tell. As my other dirtier decal - did not get smoothed as well The problem with the gross streaking in above tests in ver 15e was due to the fact that the decal didn't cover the whole face (was not a problem in 13) - so today, I added a base all white decal to the face (covers whole face) - reapplied your decal - and streaking went away. I thought I tried that last night, however I didn't realize that you hadn't covered the face, so I had just added a base white image under your image in same decal container - and therefore the problem stayed. Now when I compare 5 pass NO soft to 5 pass SOFT to AA (no MP) - I notice that the soft option in MP appears to "smooth" model edges more than decal appearance (for this test pattern - not sure about others) - and that "anti-aliasing" for this test pattern looks more smoothed using 5 pass multi versus the AA, especially when comparing the thinnest line. Whether anyone cares about that is another story. But if this is an animation - one might? notice edge crawling. 256 passes was the best of all (not shown here) My guess is that one has to try it out for one's particular situation (and one's tolerance or pickiness) as to what works best. -

Anti-aliasing(correct term?) in rendering possible
NancyGormezano replied to Path other's topic in New Users
I feel like I'm being set up - it's a conspiracy I tell ya! Just slight differences between 13s and 15e...in AA - looks like AA is sorta similar in the 2 versions - but slightly different. Obviously something is wrong. I restarted 15 - same results. I tried removing alpha channel (made decal image 24 bit instead of 32bit) - things got worse. Tried putting a basic plain white image down first then the test pattern - made no difference. I'm going to sleep on it. And Let my computer sleep on it for now as well. -

Anti-aliasing(correct term?) in rendering possible
NancyGormezano replied to Path other's topic in New Users
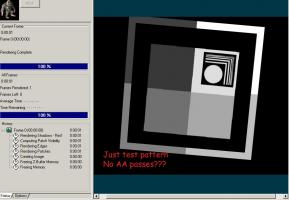
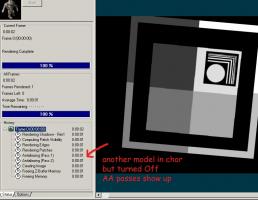
Well I tryed in v13s: 1) I'm not seeing much dif between 13s and 15e in resultant imagery using Final (no Multi). I suspect my results are worse than yours because I grabbed the compressed jpg from the forum to use as decal, rather than starting with an uncompressed tga. 2) I see the same funny in 13s as in 15e, with regard to not seeing the AA passes show up in status recording window unless there is an additional model in the chor. But I do believe AA is being done anyway. 3) In 13s (did not test in 15e - but would expect same result) - there is a big difference if I unrotate the model back to 0,0,0 from 0,0,-5 - AA looks better if model is not rotated so severely (see image) 4) The best way to compare 15e and 13s would be if you zipped your chor, model, tga (or whatever you are using) - I suspect if I used your project - I would get the same results as you. But it is interesting to see what a difference rotating more severely will do, as well as using an "dirtier, compressed" decal -
interesting Robert - perhaps there is something funny in ver 15e? - to not muck up Erics beautiful car thread anymore - I posted here: http://www.hash.com/forums/index.php?s=&am...st&p=302004
-

Anti-aliasing(correct term?) in rendering possible
NancyGormezano replied to Path other's topic in New Users
Something strange is afoot in 15e - When I render with Final (no Multi) and just the test pattern object is in the chor, it appears that no anti-aliasing is being done - but really not sure. If I add another model to the chor (but make it inactive) then anti-aliasing is computed. Not sure I can see much diff between the 2. So it just may be that it isn't being recorded in the status window. However there is a difference when I just do 1 pass - Not sure what to make out of all this as I believe the resultant AA in 15e looks different than the version you are using -
That's a great solution! and a fun clip ! In many cases, straight simple key framing is faster & gives one more control in creating the "art" of motion. And it's also fun to learn new tricks (when you have the time). You've just taught me a new-old trick, in basically no time at all. Use a path for simulating some types of "Newton-style" motion! - love it!
-
I really enjoyed using the Literig when animating bumpyman - powerful enough with squetchy parts, with minimal amount of bones, controls to sort thru. Never did test it with any IK/FK switching tho. EDIT: just tested - worked like a charm I also especially liked the Lite face rig - tho it seemed different on Bumpyman from what was posted for installation. I liked the improvement's to the Face rig on Bumpyman
-
I don't think that's true - if you look at first image I posted - the decal doesn't get AA'ed at all in the regular render, compared to the 256 pass render (and like I said before - I purposely made the decal ugly - used it straight from Robert's original jpeg post and skewed it) http://www.hash.com/forums/index.php?act=a...st&id=44048
-
I wouldn't call multi-pass brute force - just a different approach - Multi-pass will antialias all edges - including those created by decals (not sure about materials - didn't run test) - whereas the standard renderer excludes anti-aliasing of decal edges. The multi-pass method looks like an "averaging" of the passes of sorts. And the optional "soft" makes a big difference in multi-pass. If ya don't want your decals antialiased - then use standard - much faster of course than 256 passes. But aliased decal edges will exhibit edge crawl in an animation for the "right" camera angles. Eric's car doesn't look like it needs anti-aliasing of decals (not sure it has decals) - Perhaps go with regular renderer? And of course rendering at 2x the size for a still works as well. I used Robert's decal - purposely offset to create crappy edges - the resultant image was upscaled in photoshop - without resampling - just to more easily show differences in methods. 2nd imagine is just to show difference in using Soft versus NOT soft option with 5 pass multipass. Other images are just to show the difference in passes between 256.
-
You're doomed. There's no cure. There's no escape. Yay!!! for your first? non-taoA:M animation - Good One.
-
Both very nice models Myron!


