NancyGormezano
-
Posts
7,863 -
Joined
-
Last visited
-
Days Won
15
Content Type
Profiles
Forums
Events
Everything posted by NancyGormezano
-
Now you've got me curious. How often did everyone click on the vintage A:M Films link when it was in a prominent place? Probably would be better to have all the films on A:M films and not have 2 separate links. But I gather it was up to each person to move their stuff over from "old" to "new".
-
I missed it too - too bad it's not in a prominent place.
-
I have noticed that on occasion, but it seems to come back if I close, reopen or restart A:M. I believe in my case, it might have happened when my layout was "too squeezed", ie, too many panels, icons.
-
Thanks Marcos for project & Tutu...Well Done!
-
looks very cute ! great, interesting audio track!
-
very cute! I like!
-

got this idea so here is rough version
NancyGormezano replied to johnl3d's topic in Tinkering Gnome's Workshop
I found that if I played with the collision tolerance (make it less? can't remember), and played with bounce (reduce), that the Collision detection was a little less erratic. But there is some funniness that goes on. -
Hi Everyone! Old user back from the dead.
NancyGormezano replied to rusty's topic in Work In Progress / Sweatbox
As others have mentioned the color is too uniform, too overall crayola "flesh" or play-doh putty looking. Don't forget that skin tones include blues, greens, yellow, purple, crimson undertones, depending on how thick the skin, how close to the surface are the veins, as well as discolorizations for imperfections, sun damage, alcohol/drug abuse, ethnic group Here's a good tutorial for adding color to the face -
One other item - real-time playback is more responsive, faster if you close the PWS timeline and make the visible playrange in the bottom timeline = actual play range (ie don't make it scroll thru the playrange as it plays back). I also believe that rendering (unconfirmed, but I thought Martin once mentioned this) will also go faster.
-
Again, it's probably personal preference. Due to old eyes, and desk space, I only have 1 19 inch CRT monitor (currently set up for 1162 x 864). If I had 2 monitors, I would most likely have a different PWS layout. I use the bottom timeline for animating, because it allows me to isolate and observe only those channels in which I am concerned at the moment. eg, bicep, forearm, hand for just the right arm , or left. Don't have to keep scrolling up/down in the PWS to see the bones and/or other items. However the bottom timeline is trickier to get things to stick (use the "pin") and then to get them to unstick, or add new items to the group. I have also found I have to be careful when looking at changing values of properties, because the values don't always update in all panels simultaneously ie, properties panel, pws panel, timeline panel, due to refresh issues. Eventually they all usually update.
-
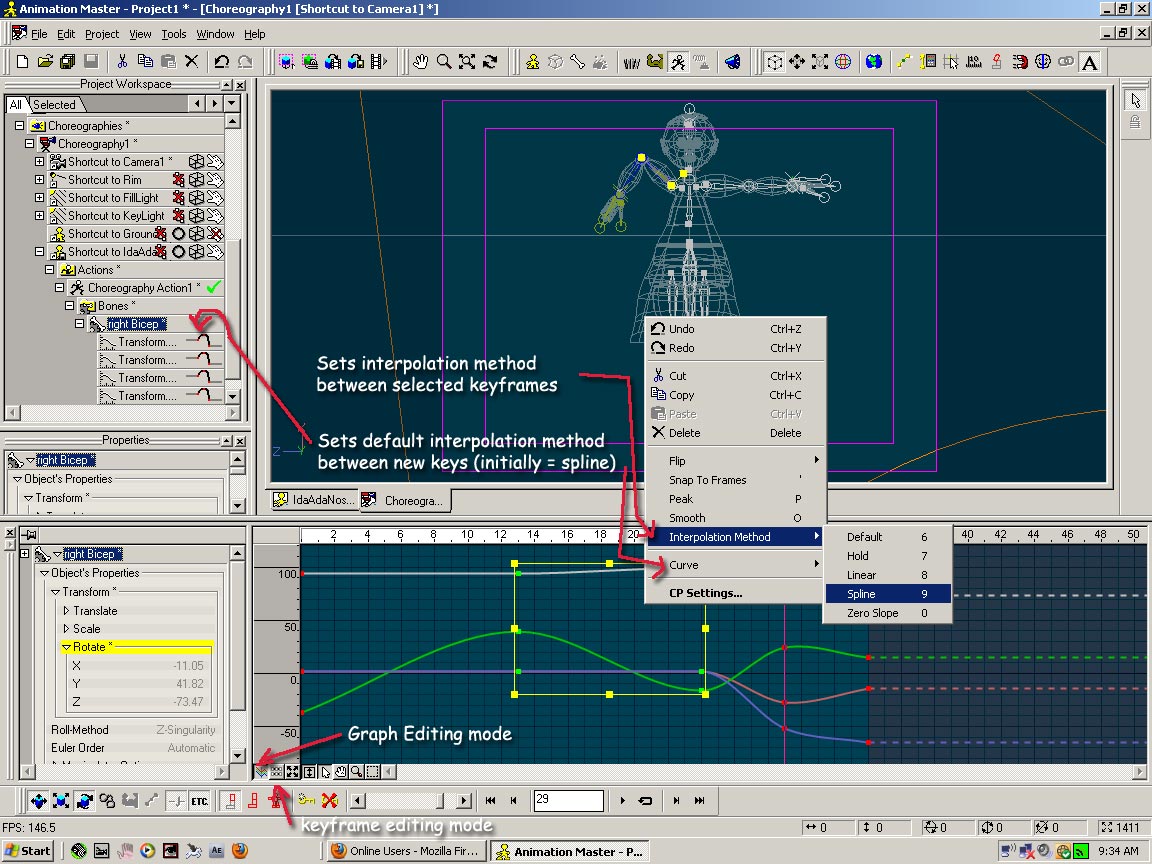
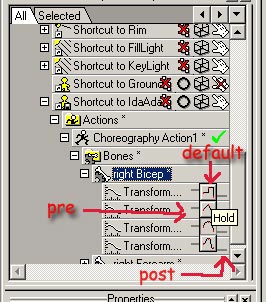
(I did not look at your project). In general: When you first set a keyframe, the default interpolation for that channel is usually set to spline. You can change the default for any channel, or for just selected key frames: by selectiing the group of keyframes, right clicking and choose the "individual method" for interpolation. You probably want linear or zero slope (to make arcs go "flat") - depending on your preference. You can also change the default method in the PWS by clicking on the icon pre, default or post, and selecting the new default for the entire curve. The buttons below - allow you to change your view of the timeline - from just seeing where any keyframes are set, but not actually see the interpolation method, versus the graph mode which allows you to better work out the timing, along with easing in,out. Just depends which phase of animating you are in, and what is more comfortable for you.

-
Ah yes, we now know exactly where the UARS fell back to Earth between 11:23 p.m. EDT on Friday and 1:09 a.m. Saturday. Me guste mucho!
-
attempting to model again and now partially rigged
NancyGormezano replied to johnl3d's topic in Tinkering Gnome's Workshop
Ah yes, the old beer can in a bubble trick... -
Thanks David! I modified my original post.
-
attempting to model again and now partially rigged
NancyGormezano replied to johnl3d's topic in Tinkering Gnome's Workshop
uhhh...beer cans? fun! -
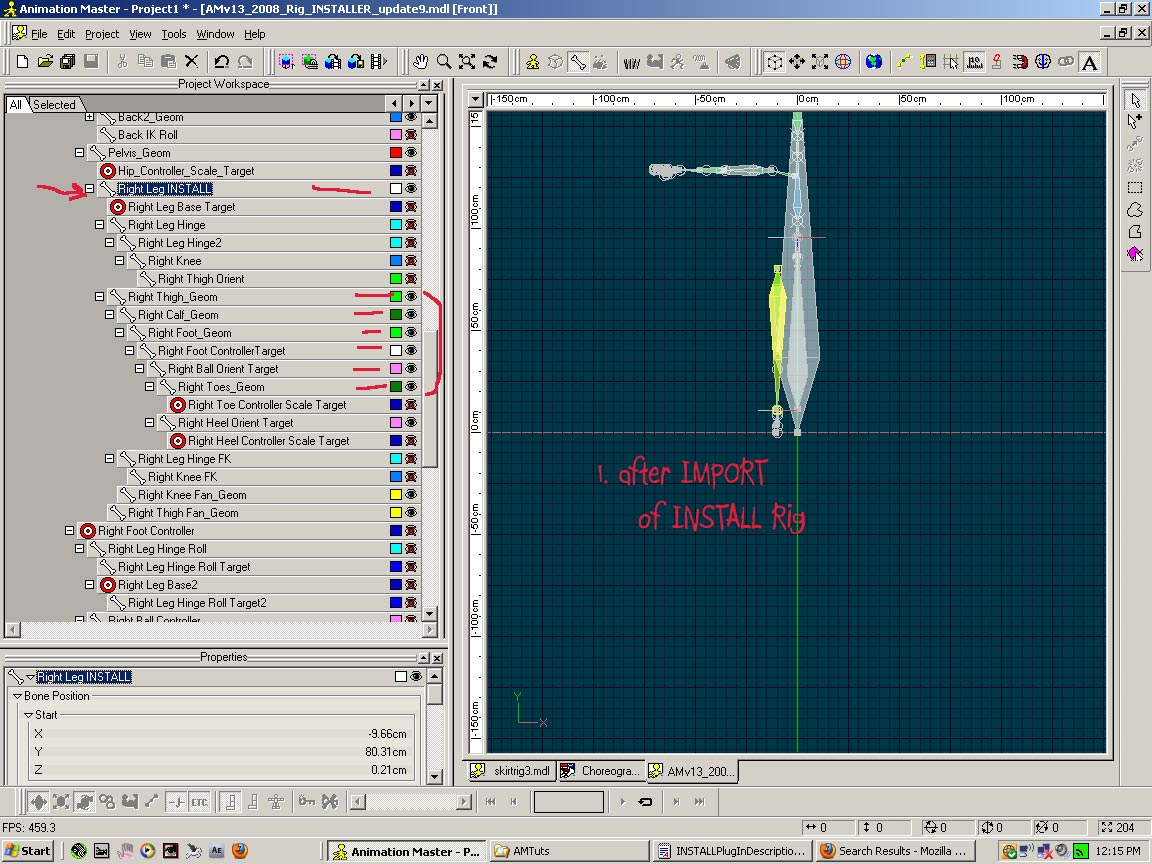
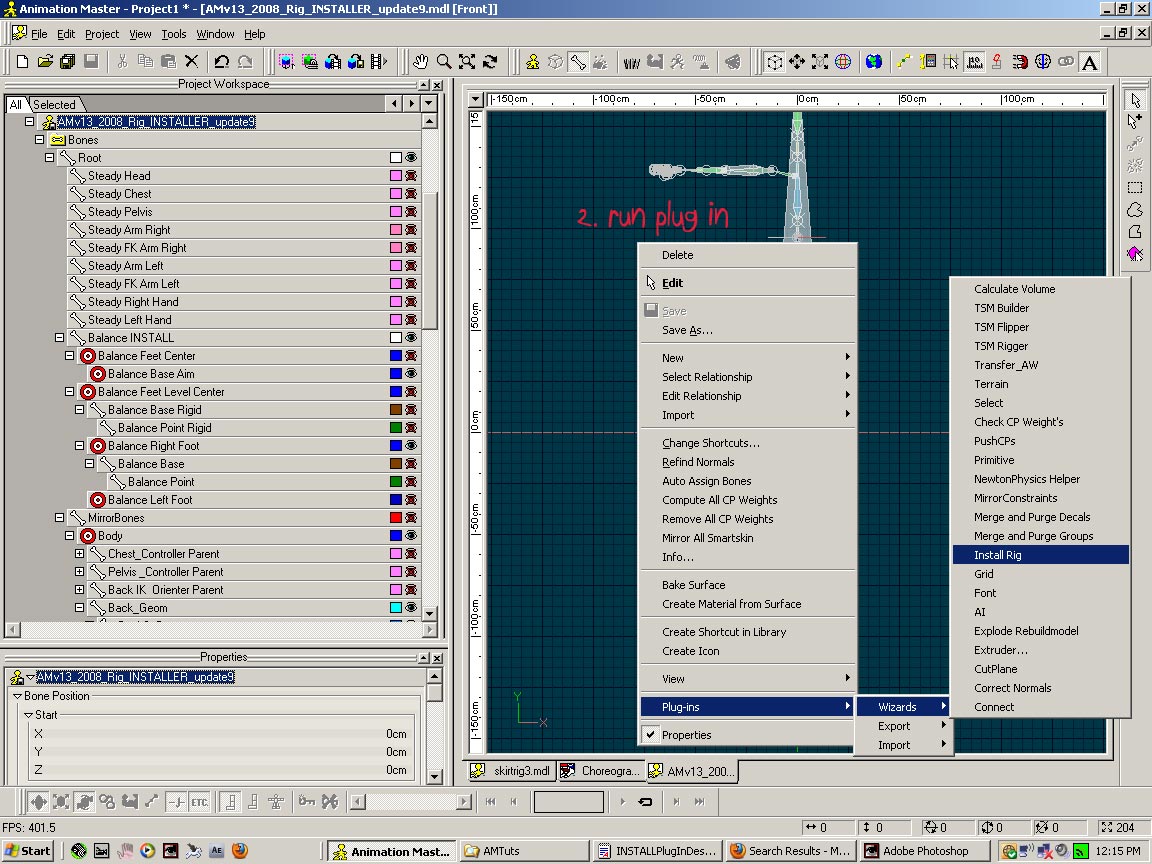
A question came up in the new users forum as to what the Install Rig Plug-in does. The video referenced does address the plug-in, but it also addresses a simple "squetching scheme" first, and then eventually demonstrates creating a complicated INSTALL rig. For my own purposes, after watching, I decided to document what I gleaned from the video, because I ...well...uh...forget...if I don't write it down. So in case this summary might be useful for others, I offer it here. Please David, Mark, correct any mistakes in my description, or add info: One uses the INSTALL RIG plugin usually when when one wants to install an already existing (usually complicated) generic rig, in multiple models. The generic rig has specially named bones that conform to the syntax assumed by the INSTALL Rig plug-in. So far, I am aware of only the 2008, Squetch generic rigs that use this convention. One doesn't normally use the plug-in when creating a rig from scratch. The existing generic rigs (aka install rigs) will have geometry bones named with convention: bonename_geom & name_INSTALL bones (that act like commands to the plug-in) with syntax: [+ ] anyname_INSTALL [bone_in_model [ /another_bone_in_model [ (attached_to_parent)][/...]] ] + more bones where [] =optional The bone_in_model name is the same name as some bone in the new model or the install rig model, eg Hips, Head, etc. If there is no bone_in_model named, the bones will be inserted in place (only the INSTALL bone will be deleted). One can also optionally indicate if the bone, when re-parented should be attached to it's parent. How to use plug-in: 1) Import the generic INSTALL rig into specific model (generic rig may or may not include poses). The new bones come in unparented, at top level of hierarchy. Usually parts are isolated, so as to make the next step easier to: 2) Position, orient the geometry & control bones of the generic rig bones to line up with the geometry of the specific model, usually by positioning, orienting the INSTALL bones (but not limited to) 3) Then in bones mode: right click in window or on model in PWS/plug-in/wizards/Install rig. The Plug-in will parent the bones according to the INSTALL command bones, delete all the INSTALL bones, unhide any bones with the string Geom (not case sensitive) in their name and hide all other bones in Bones Mode. If you have your own generic rig, you could create your own INSTALL rig or do it all by hand (with your own naming conventions): 1) import (or drag) your already existing rig into any other model, and 2) resize, reorient, reparent geometry bones, control bones and 3) hide/unhide by hand.
-
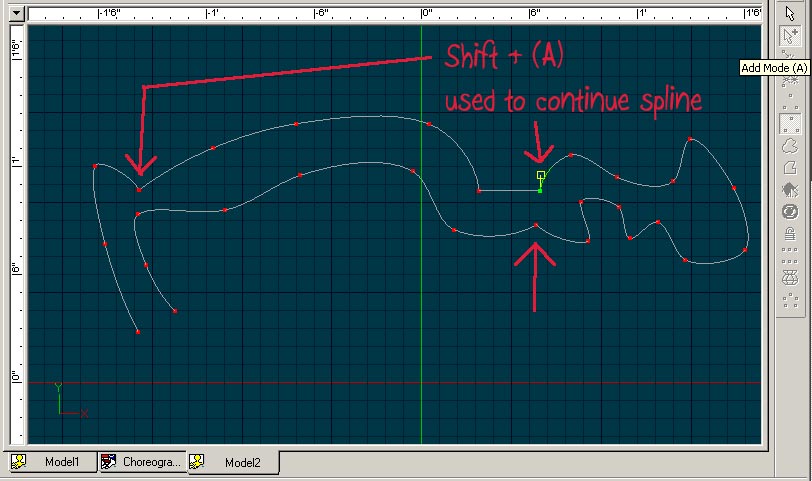
Not sure what you may be doing, or what may be happening - but have you tried hitting "page up" (for better display resolution) when the "pointy splines" start happening? The other possibility is that you are adding/continuing the spline ring by holding the shift key when you are adding a cp (A). If you want to continue the spline ring, and have it be smooth, just click on the cp (after going into "add mode" ) without the shift, and move your mouse to make the new connected cp.
-
Excellent! Fun! Loved it! EDIT: probably, as others have hinted, unpeak those splines. And/or weight those cps a little differently.
-
And one can also bake Dynamic Systems: a chain of attached bones that has a dynamic constraint applied to last bone in chain. Usual suspects for use of dynamic constrained bones are antennae, tails. Right Click in the chor window/Bake Dynamic Systems. Channels for the bones in the chain for position, rotation will appear in the chor. In previous versions it was called "simulate spring systems" Same pros as above: locks in position of the bones, so one can see & get consistent results when scrubbing in real time, as well as when rendering across cpu's. Can then animate other items in chor to interact with the baked movement. Can also edit the "baked" channels, in the event of blips, or for more "creative" movement, or for interacting with other items in chor. Can also use the baked dynamic system behavior as a "cheat template" for learning how "not dynamic constrained" other chains of bones might act for secondary motion (eg spine, head)
-
Ideas for the Next Community Project
NancyGormezano replied to robcat2075's topic in Rear View Window
looking wonderful -
I found that 15j would use the baked results when rendering (render time = 1-2 sec/pass for all frames), 16 does not seem to use them (render time increases from 1 sec to 9sec/pass).
-
Oooo...I never thought I'd be ooogling a napkin dispenser. Doesn't that look pretty! Nice render.
-
I've not fooled with fluid material particles much. However I tested for a chor length =24, deleted all your dynamic settings in the instance, and instead, changed the fluid material settings to be the same as your initial value instance settings (except left cull, recursive solving = OFF), and I was able to get it to behave more properly. I usually find that whenever particles seem to be misbehaving (hair and other things) that I have better luck if I change the properties in the original material, rather than the instance. However, even tho I could get the fluid to behave better, it appeared that rendering (1 pass) does not use the baked values, and would recompute, as the render time would go up in "computing fluid systems" particle24baked0.mov
-
baked particles: Do I turn particles off when i render?
NancyGormezano replied to robcat2075's topic in New Users
Leave it on for particles/hair to render. Jason: Your line artifact problem was that the y force value was set too high for the camera angle, ie, see your thread. Those values caused an A:M computational "blip". Turn down the y force value in your spark material until you don't get an artifact. I guess you missed that post. -
attempting to model again and now partially rigged
NancyGormezano replied to johnl3d's topic in Tinkering Gnome's Workshop
Me liking him too! (I can hear him clank, clank while he walks as well)