R Reynolds
-
Posts
176 -
Joined
-
Last visited
-
Days Won
47
Content Type
Profiles
Forums
Events
Everything posted by R Reynolds
-
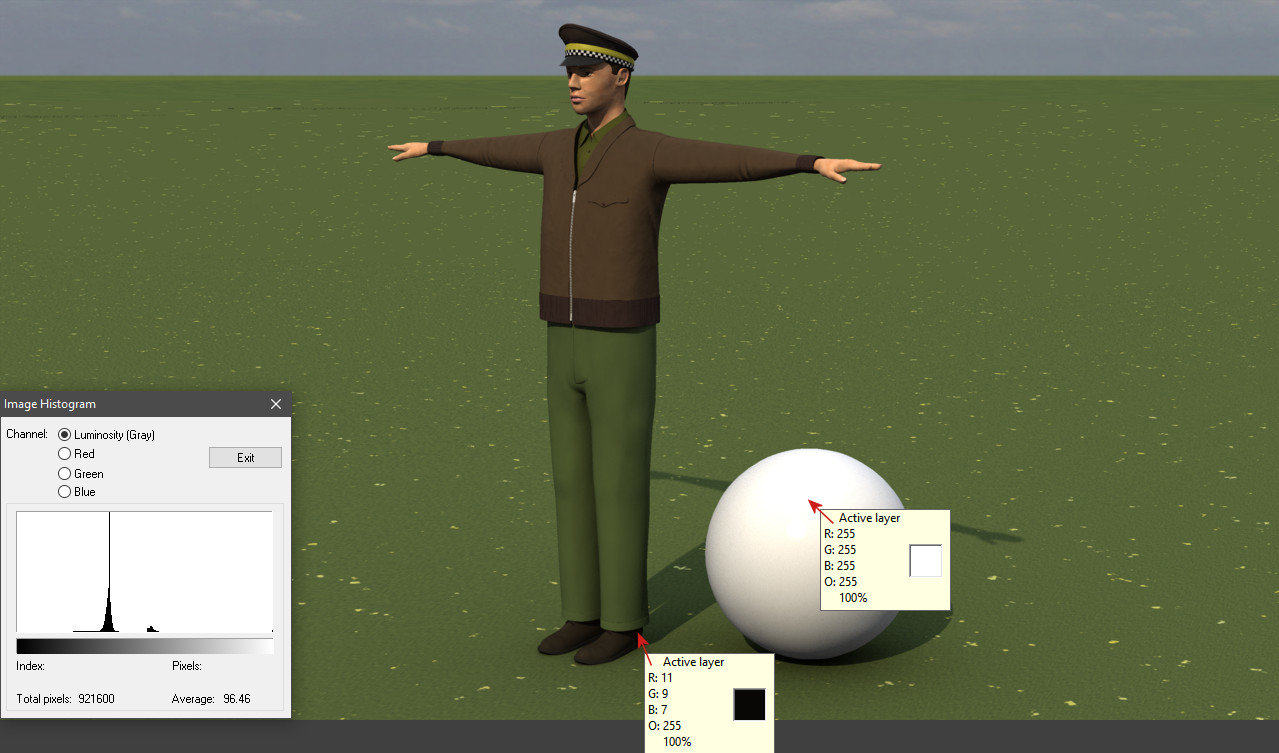
I remember going down this road with you before when I submitted my contest image. I was able to reproduce your monitor photo results almost exactly with my image also displayed beside a calibration image. But it's not like I'm going out of my way to produce dark images, it just depends on the subject matter because my lighting setup never changes. The render shows the unlit interior of a diner on a sunny day. The first attached image shows the driver of a cab (partially reflected in the diner's window) standing outside using the same sunny day lighting. Next to him is my reference white sphere. The RGB value on the sphere's surface facing the sun is 255, 255, 255 and the surrounding area somewhat saturated as I suspect it would be to your eye. The RGB value on his shadowed dark brown shoe is 11, 9, 7, so just barely visible. I chose my lighting intensities to achieve this dynamic range. All my materials' colour values are chosen by how they work when they're sitting outside in the sun next to my reference sphere. The second attachment shows the cab driver next to the calibration image on my monitor. The increased contrast comes from the imager in my cheap phone. Would you prefer to see the first Netrender image of the cab driver? As you can see, it's histogram is pretty limited as well. Perhaps I should take the monitor calibration image, decal it to a surface and render that?

-
Before I begin trying to find the source of this bug I'd like some opinions as to what might be happening. Attached are two "versions" of four sequential TIF files (545 through 548) from an on-going Netrender job. If there is a "b" (for bad) in the filename it is the first frame rendered by any one of the my four cores. If there is a "g" (for good) it was either not a Netrender first frame or it could be any frame rendered within A:M itself. I've numbered the files so you can sequentially show them bad, good, bad, etc. When I cycle through them on my monitor, the bad ones seem a bit darker and noisier but nothing that says "obviously this is what's wrong"; they're just poorer quality. All subsequent Netrender images are totally fine. The work-around is trivial but wastes some render time. Debug will take stripping down the choreography until this stops happening but I'm open to suggestions as what to change/remove first. 01_b0545.tif 02_g0545.tif 03_b0546.tif 04_g0546.tif 05_b0547.tif 06_g0547.tif 07_b0548.tif 08_g0548.tif
-
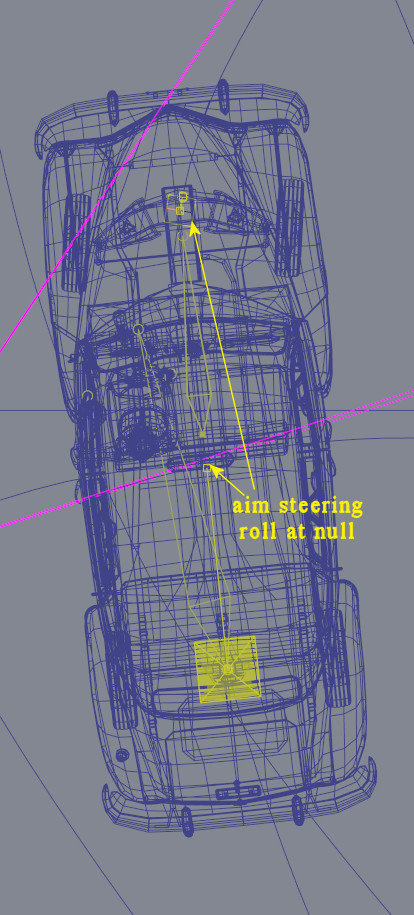
This became a good news, bad news, good news story. I successfully reproduced your example in v19e. GOOD Used the technique in a car steering project but every time the project was saved, closed and re-opened, the constraint aiming the steering bone roll handle at the null went wacky and needed repairing meaning it couldn't work using Netrender. BAD Used your technique to properly position a null under the car's front axle, then constrained a second null to translate to and orient like the front axle null, then constrained the roll handle of the steering bone to point at the second null. This always survived the project close and re-open. GOOD Thanks again for your efforts Robert.
-
That's wonderful Robert. Since I'm stuck at v19e (unless Steffen can solve the Enhance:AM issue) I'll have to use that v18 workaround forever. Thanks very much.
-
I can't supply a link because my password to the Hash server doesn't work anymore and my once-free FTP program seems to have expired. The best I can offer is this inferior quality H.264 AVC. cab_drive_by_01.mp4
-
Hmmm. I tried it after posting and had no problems. I it may be a codex problem. When I first started producing clips from PowerDirector using H.265 HEVC, VLC had no problem but when I tried the Windows native media player it gave an error message and a link to the Windows store to buy the new codex for something like $1.25. After the install, it was happy. I'll see what I can do.
-
I found that I get a slightly more believable driver response if I constrain the chest (at -50%) and skull (at +50%) to the bone that automatically aims the chassis and turns the steering wheel (see image). And about that null; for the whole rig to work it has to follow the same path as the car's model bone but stay centered between the front wheels. At present the only way I can figure out how do that is to set correctly chosen key frames for the ease of both the car and null. This is trivial if the ease timeline is a straight line from 0 to 100%. But it became trickier if the car changes speed during the chor. Can anyone suggest a way to constrain the null to the path as well as the car and keep a constant path distance between the two? cab_drive_by.mp4
-
Versions I & J can't load Enhance AM atx & trb
R Reynolds replied to R Reynolds's topic in Work In Progress / Sweatbox
To the best of my recollection there was no installation .exe for Enhance:AM. All I got were zip files containing .trb and .atx files; one of each is attached in case you can find a way to make these compatible with the new SDK. Speaking of the SDK I'm curious why a change was mandatory. Is it getting increasingly more difficult to keep A:M's code up to date? Can you foresee a time when the tools to keep A:M running just aren't available and A:M will be truly dead as a Windows program? EnhanceAM_Dirt_64.atx EnhanceAM_BlisterCombiner_64.trb -
Versions I & J can't load Enhance AM atx & trb
R Reynolds replied to R Reynolds's topic in Work In Progress / Sweatbox
I suppose it's worth a try. -
I'm moving this topic to WIP since I don't have access to the Animation Master forum. To reiterate; I've very lax in loading the latest versions and have been using 19.0e since it came out. I just installed 19.0j and upon starting AM got the error message:"Unable to load plugin" (followed by a sequential list of all the .atx and .trb files I bought from Enhance:AM) "The specified procedure could not be found". I made sure this version was looking in the correct folder.I loaded v19.0i and got the same result. I don't have ver.g or ver.h but ver.f had no problem loading them. However ver.f has a decal application crash and this is the only version that's available on the FTP, I couldn't find version f1. So I'm back to ver.e. Looking at the fixes for ver.g I see that the SDK was changed so all plug-ins need to be recompiled which explains why Enhance:AM combiners cause trouble. I'm curious as to why this was necessary. It's not like any 3rd party writing software even cares about A:M let alone recompiling something for it. By the way, you can delete the link to Enhance:AM on the 3rd party software section of the Hash website since it's dead; so no recompiling. My apologies for sounding ticked off but this new feature has made many hundreds of my materials useless. I hope the new SDK was worth it.
-
I've very lax in loading the latest versions and have been using 19.0e since it came out. I just installed 19.0j and upon starting AM got the error message: "Unable to load plugin" (followed by a sequential list of all the .atx and .trb files I bought from EnhanceAM) "The specified procedure could not be found". I made sure this version was looking in the correct folder. I loaded v19.0i and got the same result. I don't have ver.g or ver.h but ver.f had no problem loading them. Do I need to supply a sample EAM .atx and .trb file to determine what broke?
-
Looking for the $300 never expires licence option
R Reynolds replied to MAYAman's topic in Animation:Master
I just went to the store and selected Hash, Inc. Software (3). The center choice is the one I've always purchased.
-
Adding action objects with multiple actions
R Reynolds replied to R Reynolds's topic in Animation:Master
Thanks for your efforts Robert. I don't think I had ever used that frame block view of a chor. After watching your experimentation I decided to start from scratch to see if I could reproduce it using a new project, chor and just the tree trunk and branch model ... and I couldn't … still had the same problem. After playing around fruitlessly with the various parameters you suggested I wondered whether my problem was related to the fact that I was using the same model as an action object in both actions. And sure enough when I made the second action with a renamed copy of the branch model, everything worked as you had shown and as I had expected in the first place. So I'll have to re-think my plan to populate a distant tree with only one branch model. Thanks again. -
Adding action objects with multiple actions
R Reynolds replied to R Reynolds's topic in Animation:Master
I'm sorry Robert I don't know to what your referring...red bar...getting compressed? If it helps, here's two screen grabs showing either one or the other action object sets being visible.
-
I'm attempting to add parts to a model in a choreography using multiple actions, each action containing many action objects. When I add the first action, all the objects within it appear in the chor. But if I add another action, the previous one disappears. I read the manual about action objects and assumed the problem was related to "Hold last frame", "Transition to next action" and "Blend method". I thought the best combination was ON, ON & ADD. However I can only see one of the actions if the "Hold last frame" of the other is turned OFF. What am I missing?
-
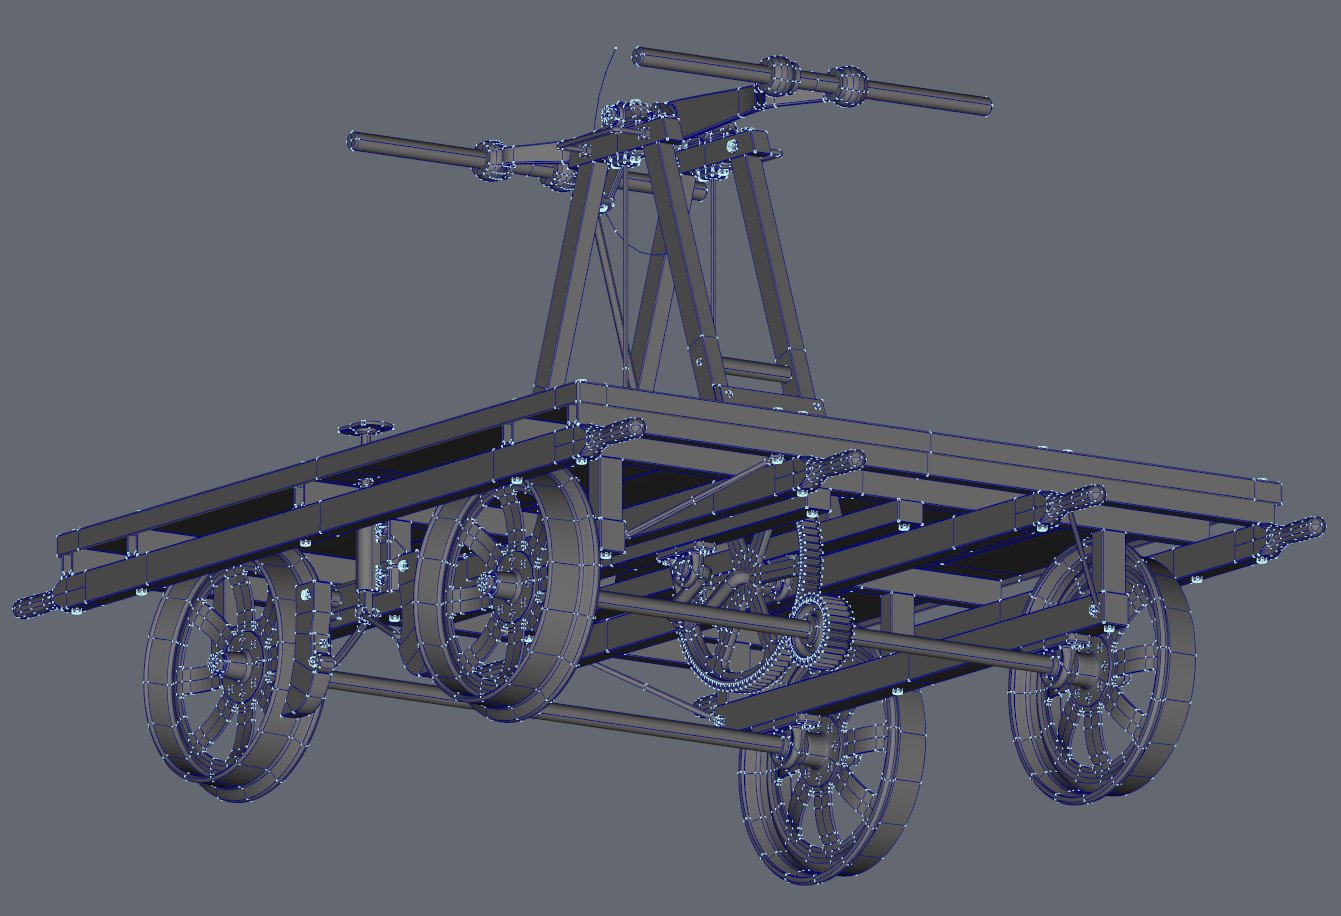
Making the Solid Spoked Wheel
R Reynolds replied to robcat2075's topic in Work In Progress / Sweatbox
Nice modeling, Robert. It looks to me like your making a one of those old, railroad hand (pump) cars. It probably comes too late but if you can use any more detailing, I can offer all parts from this one.
-
I'm working on a continuous 2 min. "shot from a drone" clip of my locomotive traveling for 1 mi.(1.6 km) to check for smoke and steam dynamics/densities and various lo-res cheats on the stone ballast that embeds the railroad tracks. It begins as a long shot, moving to a close-up and ending as a "running along beside" medium shot. The surrounding countryside is made up of twenty-one instances of the same one tenth of a square mile mesh arrayed along either side of the track. To add variety to each landscape instance I plan on applying a different pose to each one. The left ten instances shown already have some poses applied. While I was styling another pose, mostly using Magnet mode, I thought this might be a good time to use the Terrain plug-in. It makes fine looking meshes but the only way I can see to get that formed mesh into an action is to add it to the original mesh model and then match that shape in the model's pose, one CP at a time - all 4096 of them; do-able but mind numbing. Anyone have any better suggestions?
-
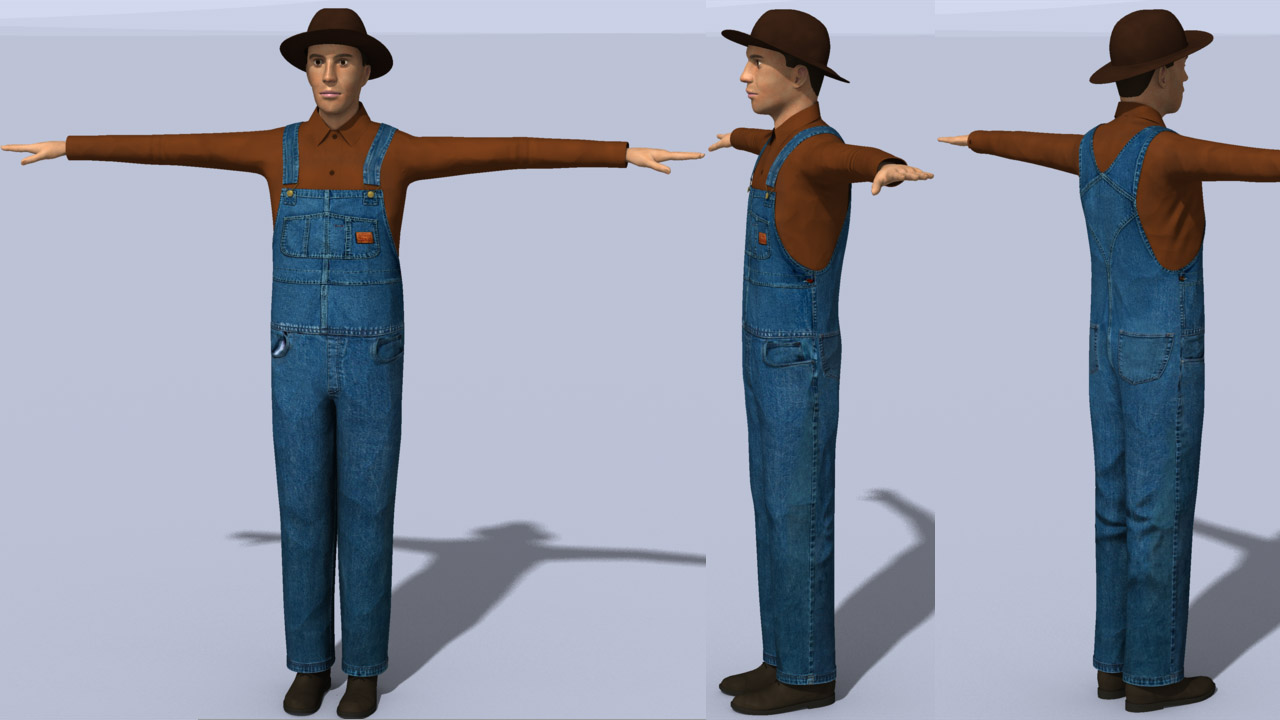
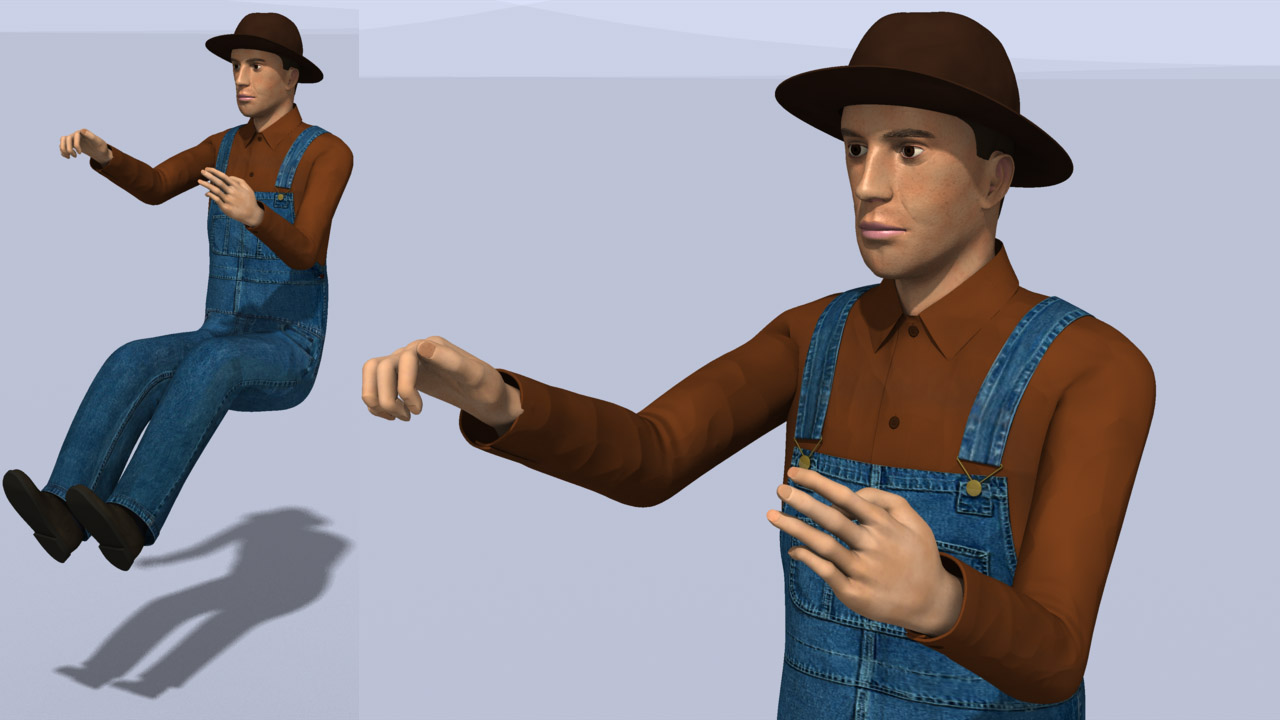
I decided it was time to get someone to drive my various vehicles. This guy will perform two roles. The first will be to drive around the pickup truck https://www.hash.com/forums/index.php?showtopic=48329 . With a change of hats, an added mustache and a pair of goggles he's ready to be a locomotive engineer. My thanks to Mechadelphia for the Saucy Rig. The skin and cloth textures were chosen to make a reasonable impression at a distance, so they tend to break down upon close inspection. The stretching in the coverall decals comes from only flattening and applying a front and rear decal. I suspect I'd get less warping if I had gone for left front, right front, left rear and right rear. But this good enough for an "extra" who happens to be driving the real stars, i.e. the vehicles. composite_a.tga composite_b.tga
-
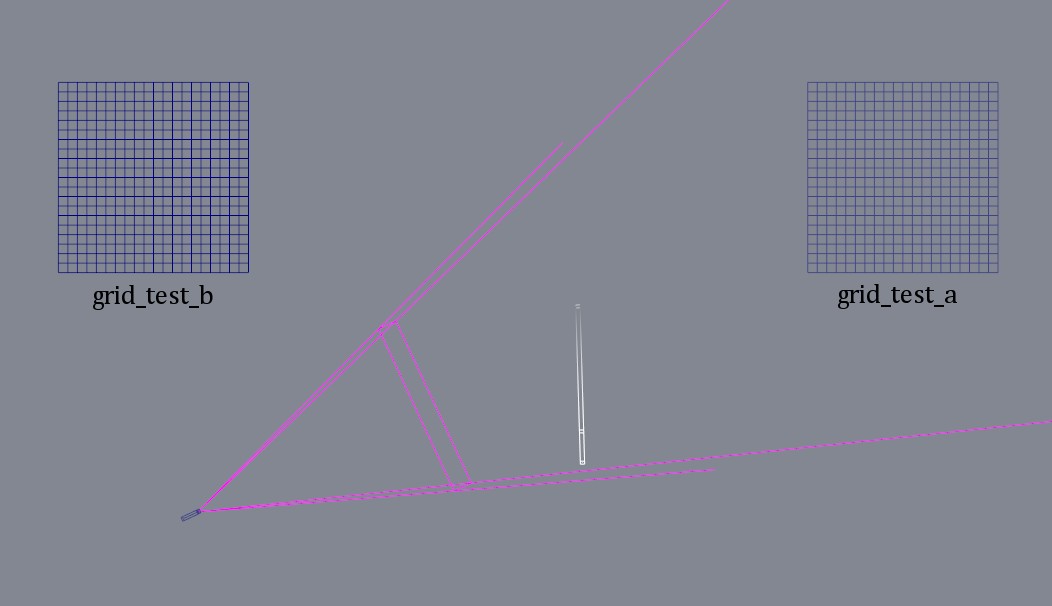
I've discovered a bug that crashes A:M v19.0 on my Win10 machine under very specific circumstances. Before I submit a bug report, I'd appreciate someone to check my work to make sure I'm not missing something. All required files should be in the zip file including the following image showing the chor layout (top view). Thanks Open displ_bug_test.prj displ_bug_test.cho shows grid_test_a.mdl within the camera's field of view while grid_test_b.mdl, located at X=550, is outside the camera's view both models are identical and have displ_bug_test.jpg decaled to both of them as displacement maps the chor uses sky_small.jpg for image based global ambience with intensity = 100 and occlusion = 100 performing a screen render of grid_test_a from the camera view crashes A:M to get a successful screen render you can do any one of the following turn off grid_test_b.mdl in the chor or re-set the decal on grid-test_b.mdl to be a bump map or re-set global ambience occlusion to 0 or move grid_test_b.mdl to an X value outside of the span from approx. 350 to 650 displ_bug.zip
-
This is probably going to be too detailed for some but I'm trying to avoid the forgotten feature syndrome. I find that when I get comfortable with a new (to me) feature I tend to move on to the next thing with no documentation. When I want to re-use that feature sometime in the future (a month? a year?) I have to re-learn it all over again (I'm looking at you Stride Length). So this thread is mostly a tutorial for my future self. There's a zipped file at the end that some may find useful. In v19 Steffen added the ability to add a series of images to sprites so this seemed like an ideal time for my steam locomotive actually steam. The following image encapsulates everything I've tried so far which barely scratches the surface considering how many sprite variables there are. To improve render turnarounds I used a stripped down version of my locomotive and tender, just enough to get the smoke plume's shape, scale, colour and shadows to be convincing.The first smoke sprite image I tried came on the Extras DVD with the Particles tutorial. Using this image I learned that sprites only accept images with an alpha channel and that the image works best if the image's colour channel is just a simple grey field. Using this image I was also able to determine a simple way to get a parabolic shape to the plume emitted from a fast moving object. The trick was to have the emitters be a series of flat angled louvers within the smokestack which are aimed forward at about 45 deg. A high enough "Inital velocity" and a bit of "drag" yield a reasonable plume shape. There's also a conical force named "wind" constrained to the loco to further shape the plume, add some turbulence and provide a cross-wind so the shadows fall on the side of the tender. A web search yielded a number of smoke images that I thought were slightly more believable along with a 6 image series showing the development of a puff of smoke. These images are shown in the collage on the lower left numbered 1, 5, 9, 13, 17 and 21. It seemed like a 6 step evolution would be too abrupt to be believable so I used variable percentage layers in PSPro to generate in-betweens to get a three step dissolve between each original keyframe. To see if this was worth the effort I set up a test of just my smokestack with one emitting louver active and a strong wind. To "calibrate" my plume I generated 21 numbered images that were also colour coded in groups (red, orange, yellow, green, magenta, blue) to really show the distribution of the images. This is the center test plume labelled 21 frame distribution. Replacing the numbered image sequence with the 6 original keyframes produces the upper test plume. Using my 21 smoke image sequence produces the lower test plume. The difference is not obvious for a fast moving plume but it might be more convincing in a calmer environment. The image in the upper corner is a still from attached test clip. The locomotive smokestack uses five emitting surfaces. The front, left and right emitters use a material with the center image to the right of the still with a light grey colour. The center emitter uses the 21 image sequence with a medium grey colour. The rear emitter uses the bottom image and a darker grey to suggest the steam's self shadowing. The mp4 files is a 16 sec clip of my test locomotive including the initlal emission of the plume so you can see how its shadow develops. Considering how little I've tweaked all the parameters, the result is pretty convincing. smoke_frames.zip contains all 21 tga smoke frames shown in the image with alpha channels. As I said, in my opinion these work best as sprites if the colour channel is one or two simple shades of grey. smoke_frames.zip JF6_smoke_c.mp4
-
This is my very first video output from A:M that I consider better than a "work in progress" so I put it in the showcase. It's from my back lot - a 16 sec. pan from right to left as the streetcar enters and exits the shot. After 8 sec. the shot looks like this; I'm satisfied with everything in this shot although it could probably be improved with more passing vehicles and pedestrians...all in good time. street_car_drvby.mp4
-
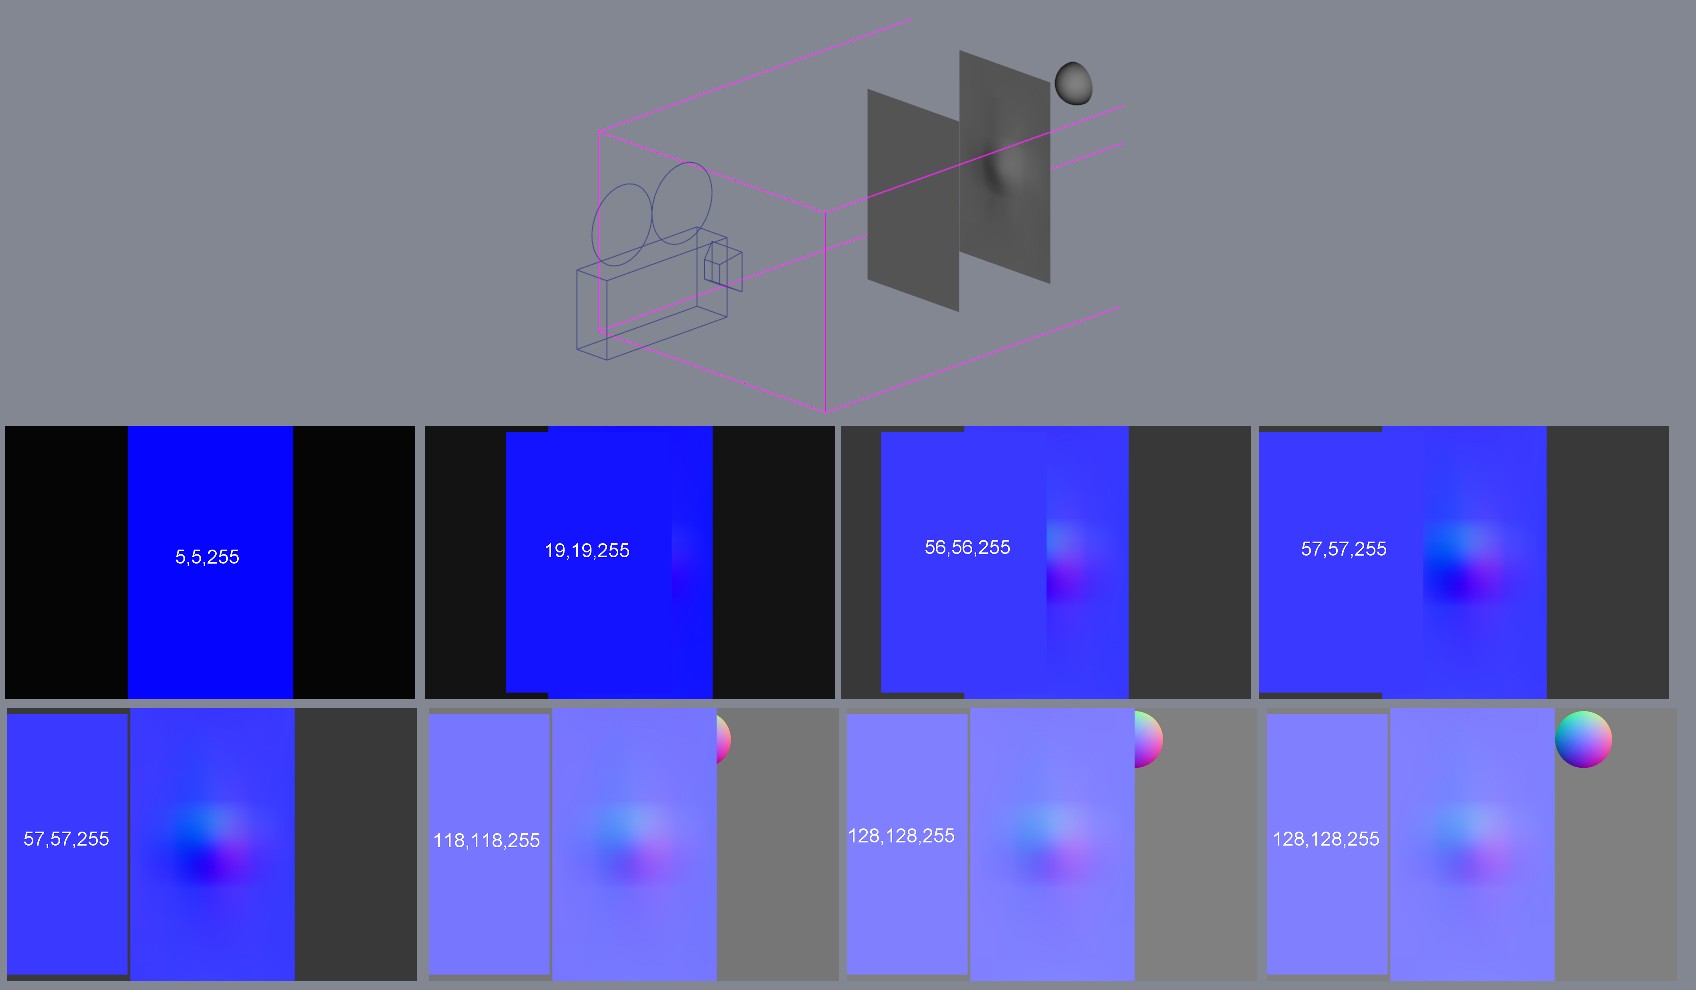
Ever since the MakeNormalMap.atx material was replaced by the Surface Normal buffer in the render engine I've always had unpredictable results. I couldn't seem to get a flat plane that was orthogonal to the camera to return a consistent color of 128, 128, 255. Sometimes it did but many times a flat plane would come up short on the red & green channel. So in the course of generating wrinkle maps for the seats in the street car, I ran more than a few tests and have found the answer; to get the correct colours the algorithm needs a full range of surface normals in the image. The following images are my proof. The top image shows the chor layout; a camera orthogonal to a flat plane. Behind the flat plane is a mildly deformed plane and behind that is a hemisphere. The first image is the normal buffer output looking at just the flat plane. The normal buffer assigns a colour of 5,5,255 Moving the flat plane to the left to expose part of the deformed plane produces the second image. The normal buffer assigns a colour of 19,19,255 The third image has half the deformed plate showing and the normal buffer assigns a colour of 56,56,255 With 75% of the deformation showing in the fourth image the flat plane registers as 57, 57, 255 as it does when the entire dented surface is showing in the fifth image. In the sixth image the hemisphere is moved out from behind the plane to expose about one quarter of it and the flat planes now register as 118, 118, 255 With half the hemisphere exposed to the camera (seventh image) flat surfaces now have the correct value of 128, 128, 255. As is the case when the entire hemisphere is exposed. So my suggestion for generating correct normal maps from any surface is to have a "calibration" hemisphere within the field of view. But keep it fairly large, if it's too small (like about half the size shown) the red/green channels start to fade.
-
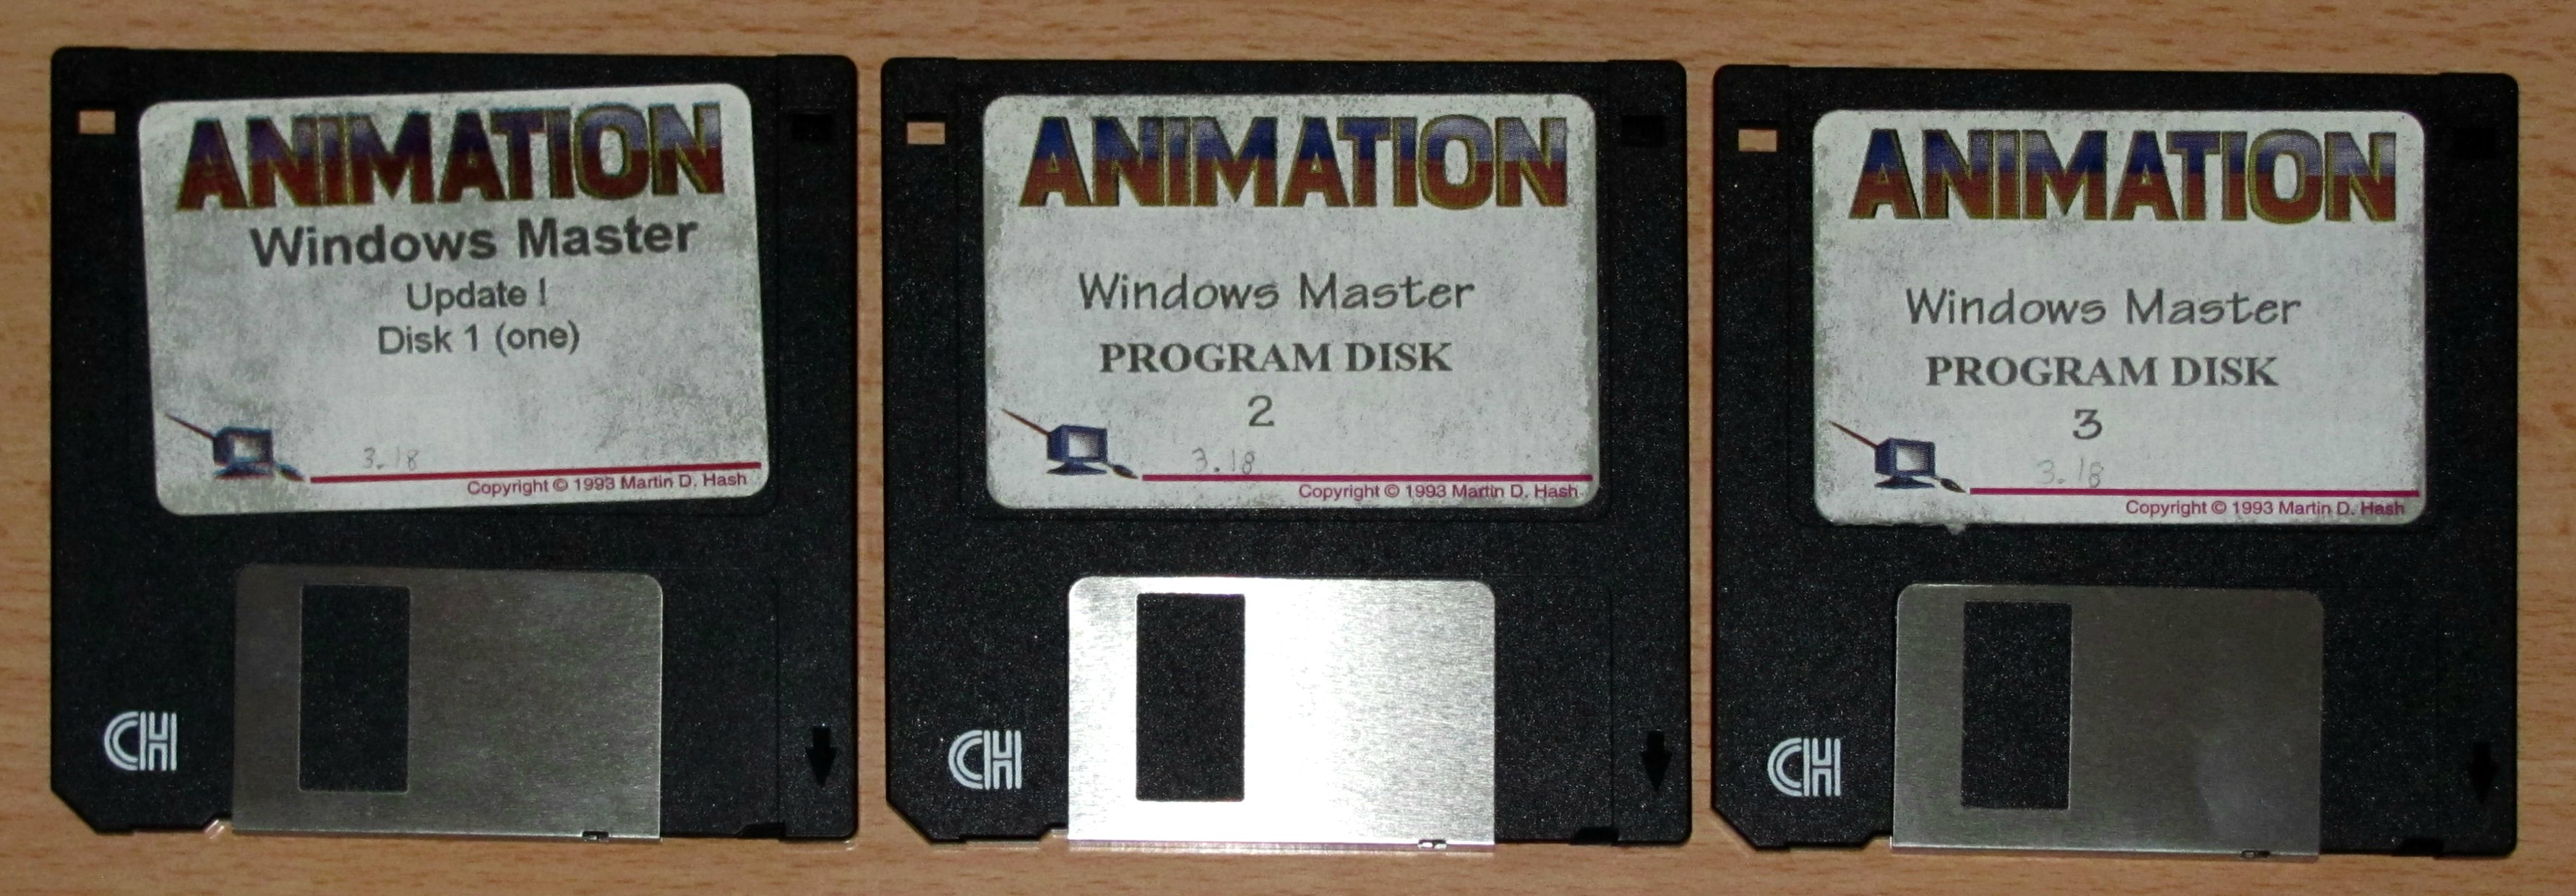
Since I no longer have any 3.5 in. disk drive readers, it made sense to throw out the more than 100 diskettes that I found in a box today. Among the obsolete sound card drivers and Windows XP recovery disks I found my first A.M. installation, circa 1993. It's frightening to think that someone born the day I received these could be out of university by now. I'll add them to my stack of installation CDs just for completeness.
-
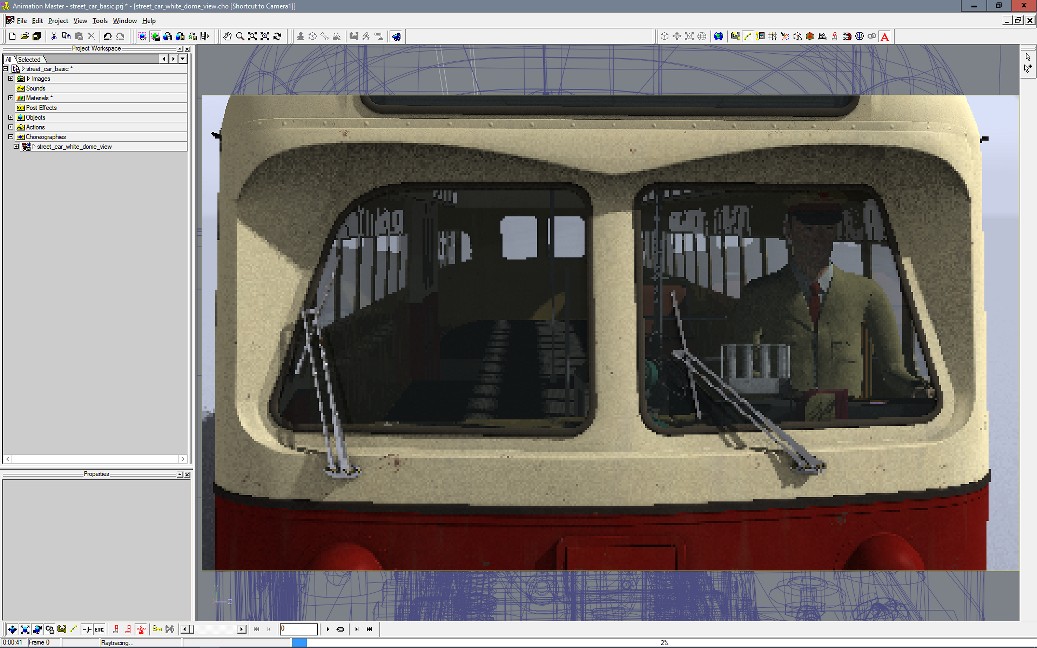
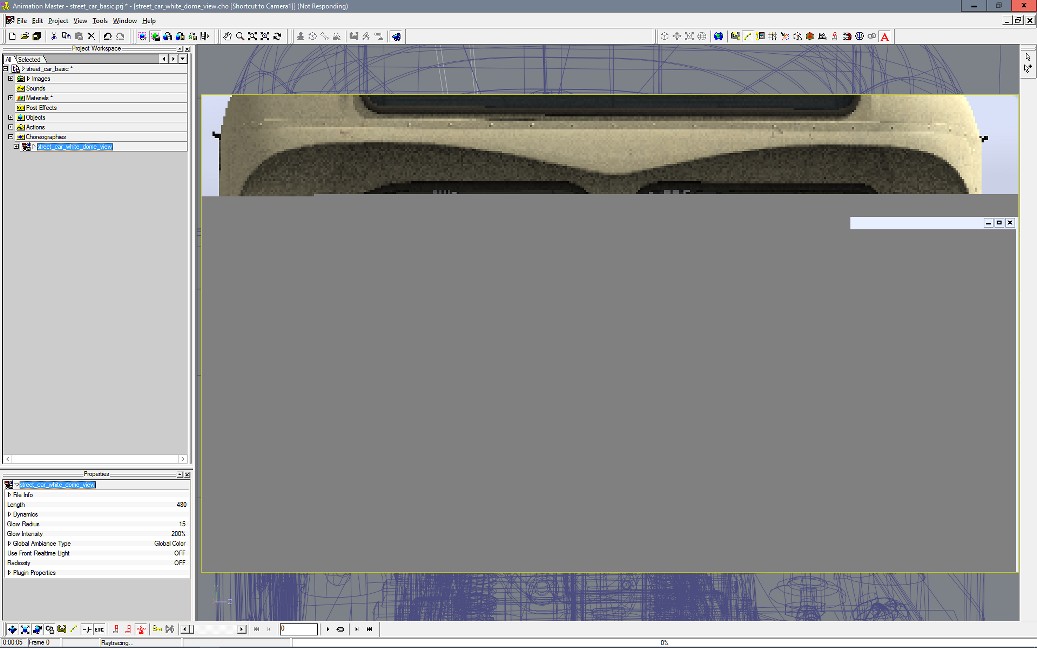
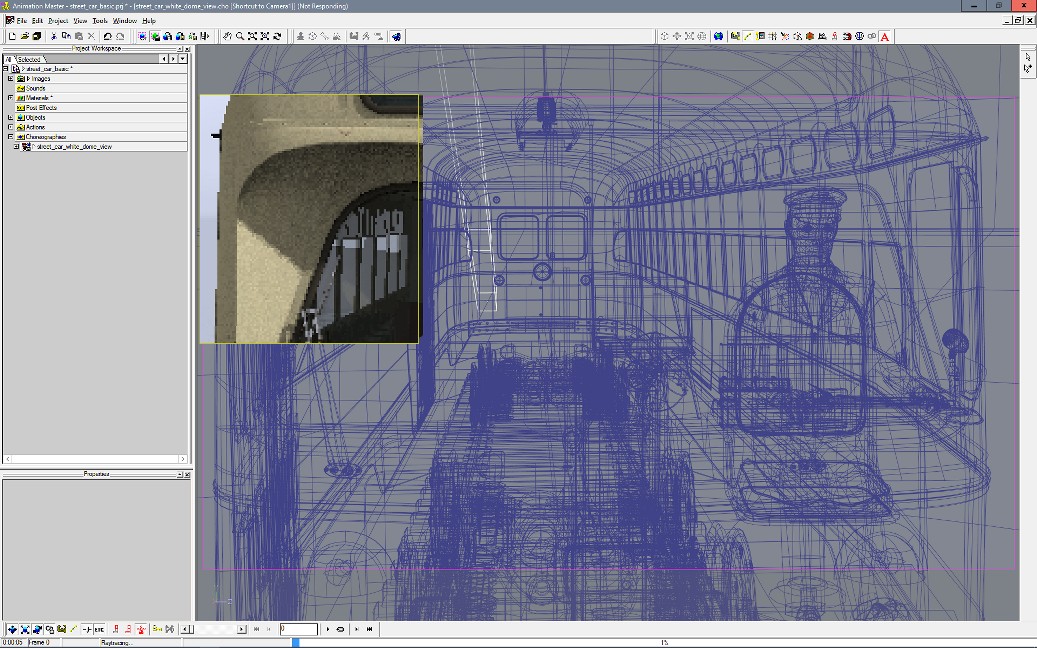
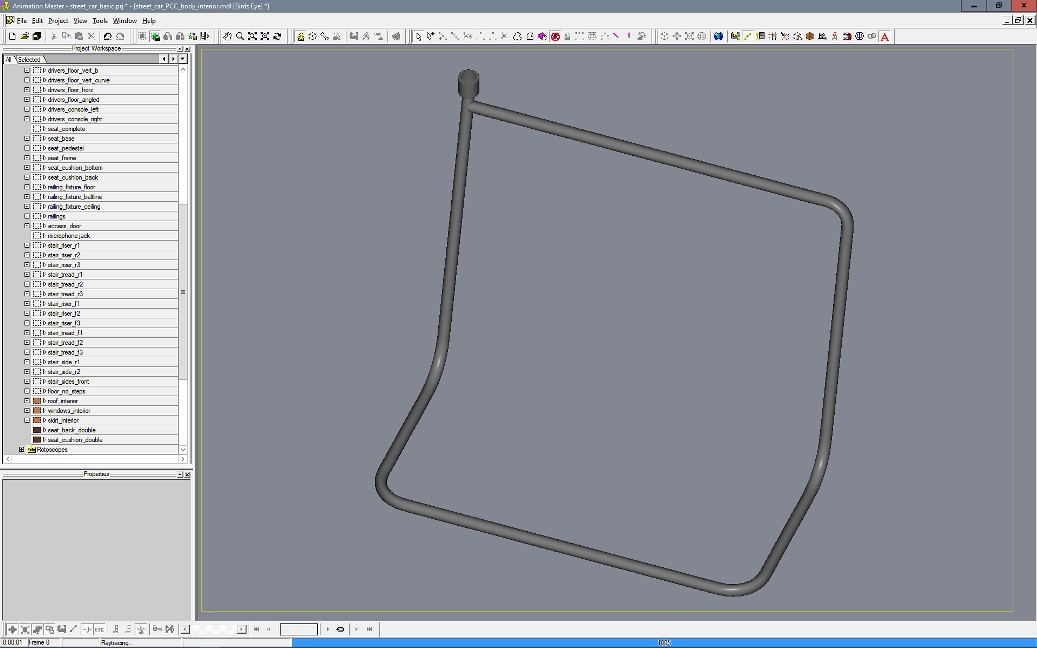
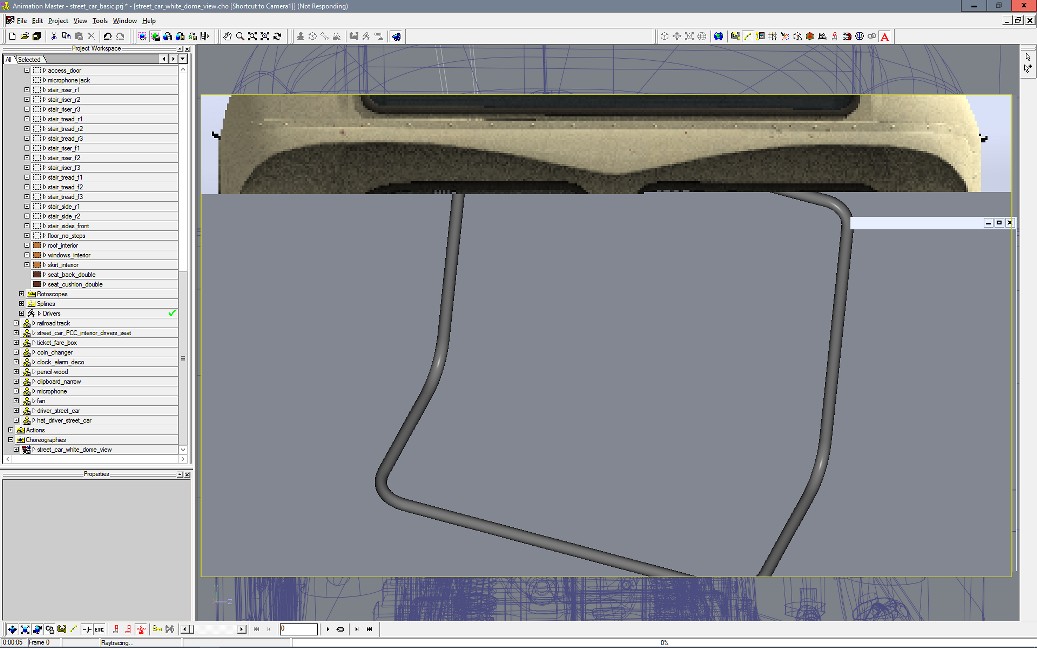
This thread began here ( https://www.hash.com/forums/index.php?showtopic=48030&hl= ) but I didn't want to hijack Marcos' topic. I was complaining about the a lock mode screen render freezing up with the Win10 busy icon spinning uselessly in front of me with no way to interrupt the process. Gerald suggested; Not in my case, other than waiting for the "non-render" to finish it can only be interrupted by killing A:M in the Task Manager. This behaviour started with v18 and seems to be related to the new feature of storing the screen image of a high patch count model into a memory buffer. Start with only A:M running on the computer and I want to screen render the street car in a .cho file. I outline the rectangle I want to render and the result after the first pass is this; This works perfectly and can be stopped at any time by hitting Esc. Now I open up another program (I've tried Edge, Firefox and PSPro) full screen then switch back to the .cho file. Outline the same rectangle and the after a few seconds the result is this; The render freezes and the Win10 busy icon starts spinning and will continue to spin (unless I kill A:M in Task Manager) until enough time has passed for all five passes to be completed. After which the wire frame is displayed. Now if I hit the spacebar the render proceeds and responds to Esc as usual. One way I've found to kind of sidestep this issue is to start with smaller outlined render rectangles. If I start with smaller ones; they render nicely and can be escaped. At a certain size the render locks up but it takes less time to "finish" the five passes. Once enough memory has been grabbed by A:M I can do a complete screen render with no issues. I've found that it's also dependent on the patch count of the model. If it's something simple like this seat frame; I can jump back and forth between other programs at will with no problems. But if I switch to the .cho file and try to do the entire street car, full screen, I get this; Once again I'm locked up. Personally, if putting the screen image into a memory buffer was a selectable feature, I'd turn it off most of the time. Changing views while modeling and having a previous view show up while I surround it with the mouse window is just too disconcerting for this old dog who hates learning new tricks.
-
I've been using v18.0p for a month or so now and I've noticed that pasting even small chunks of patches takes what seems to be an unusually long time. For instance, a copy of the side window on this fare box: It's only four patches but when you hit Cntl-V it takes more than 15 sec. of the rotating "working" icon before it actually pastes a copy of those four patches. In v17 this same process takes less than a second. Is there a v18 switch I'm unaware of that is creating extra "bookkeeping" to go on in the background?