R Reynolds
-
Posts
176 -
Joined
-
Last visited
-
Days Won
47
Content Type
Profiles
Forums
Events
Everything posted by R Reynolds
-
I just tried installing v19m. I find moving and joining cp's in a small 600 patch model in wireframe mode to be painfully slower compared to v19e (still my favorite). It reminds me of the performance you get in v19e with a multi-thousand patch model with real time shading turned on. The cp's pausing between moves in large discreet increments as all the patches are constantly refound. Am I missing a new option that needs to be turned off?
-
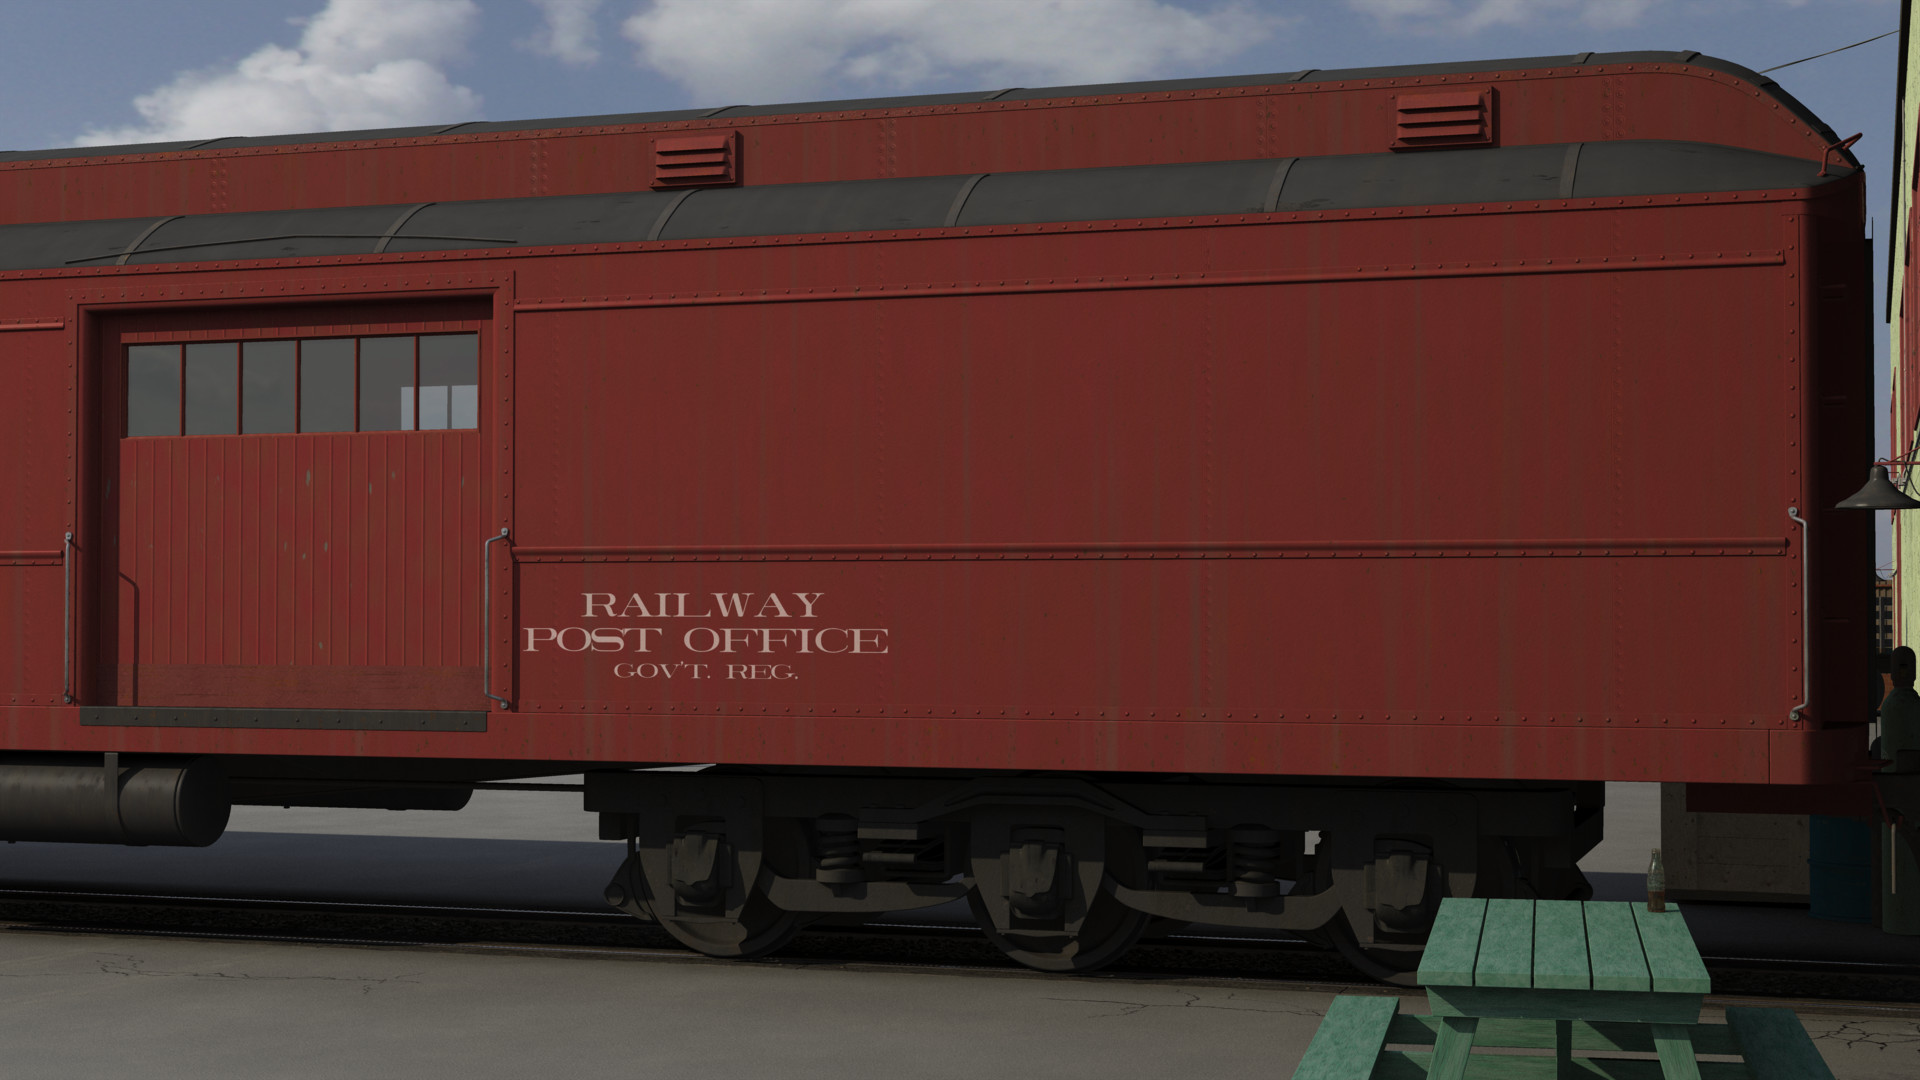
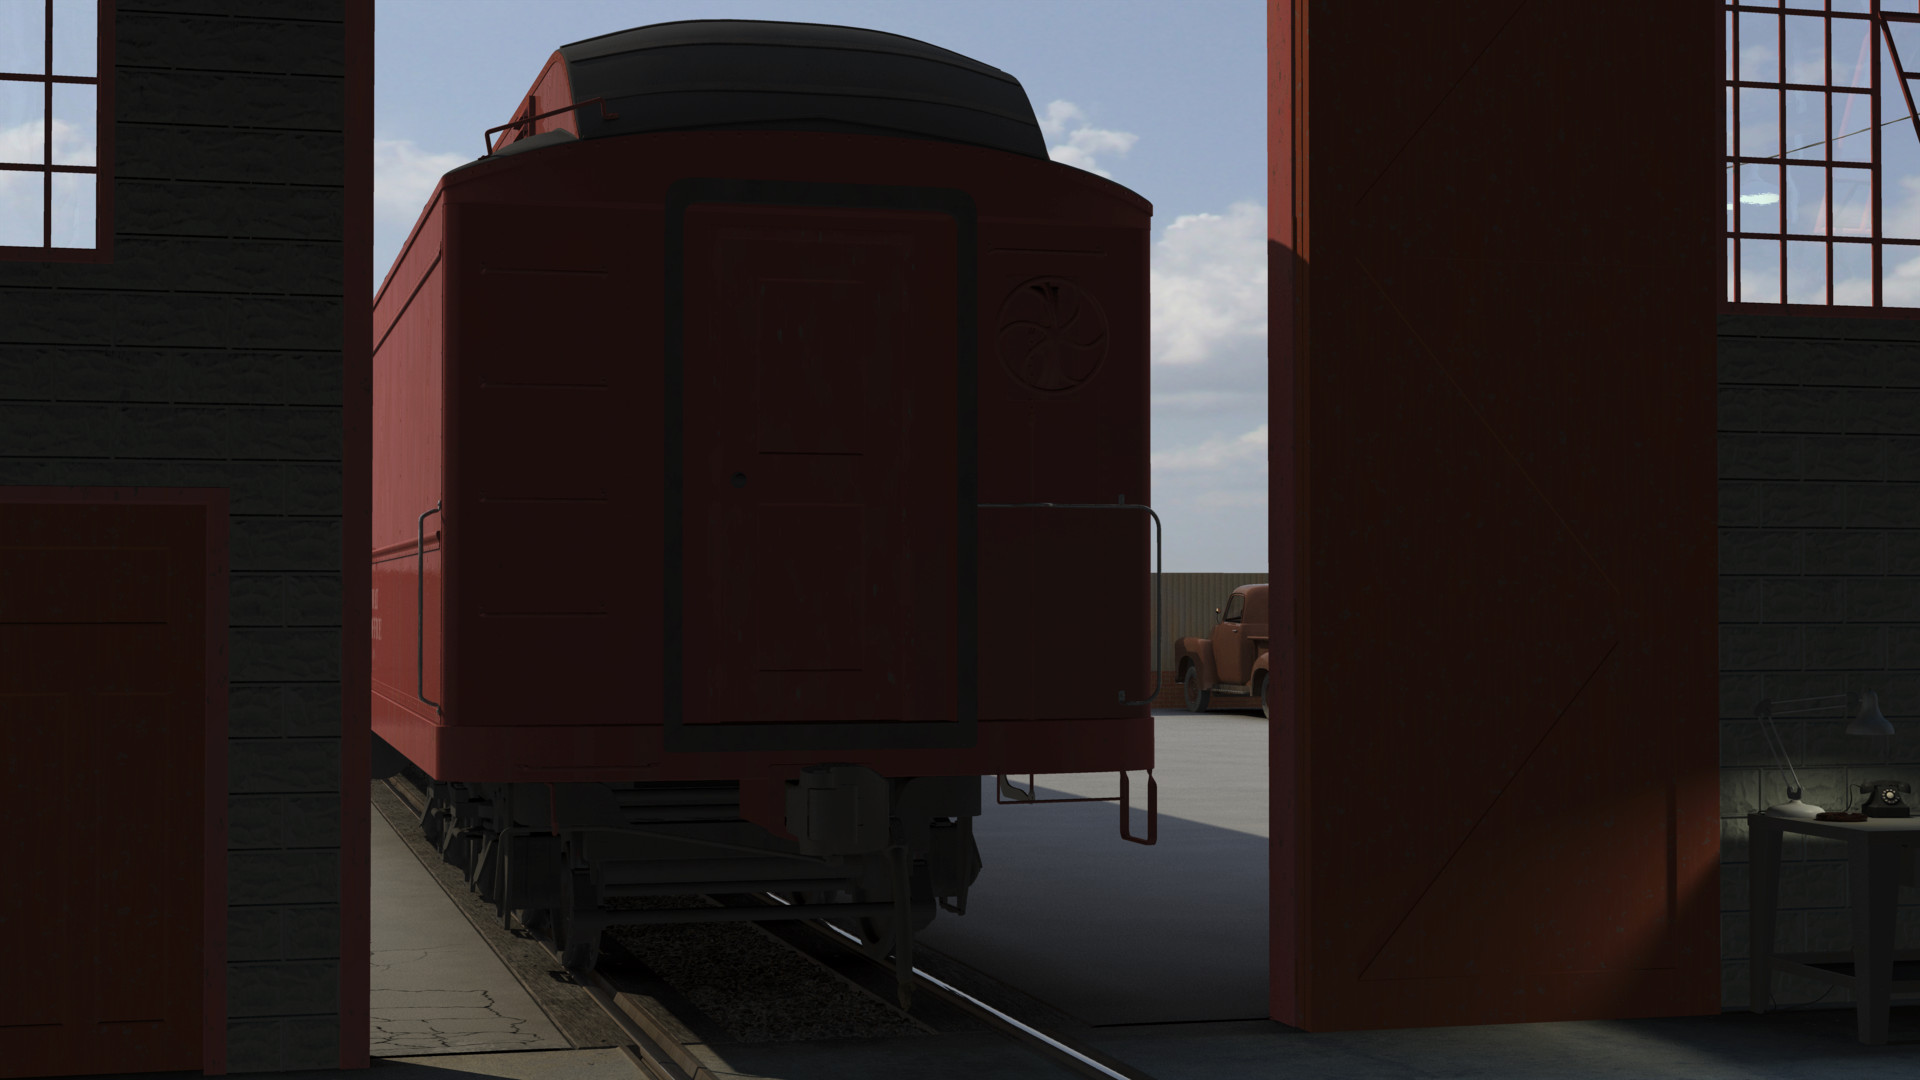
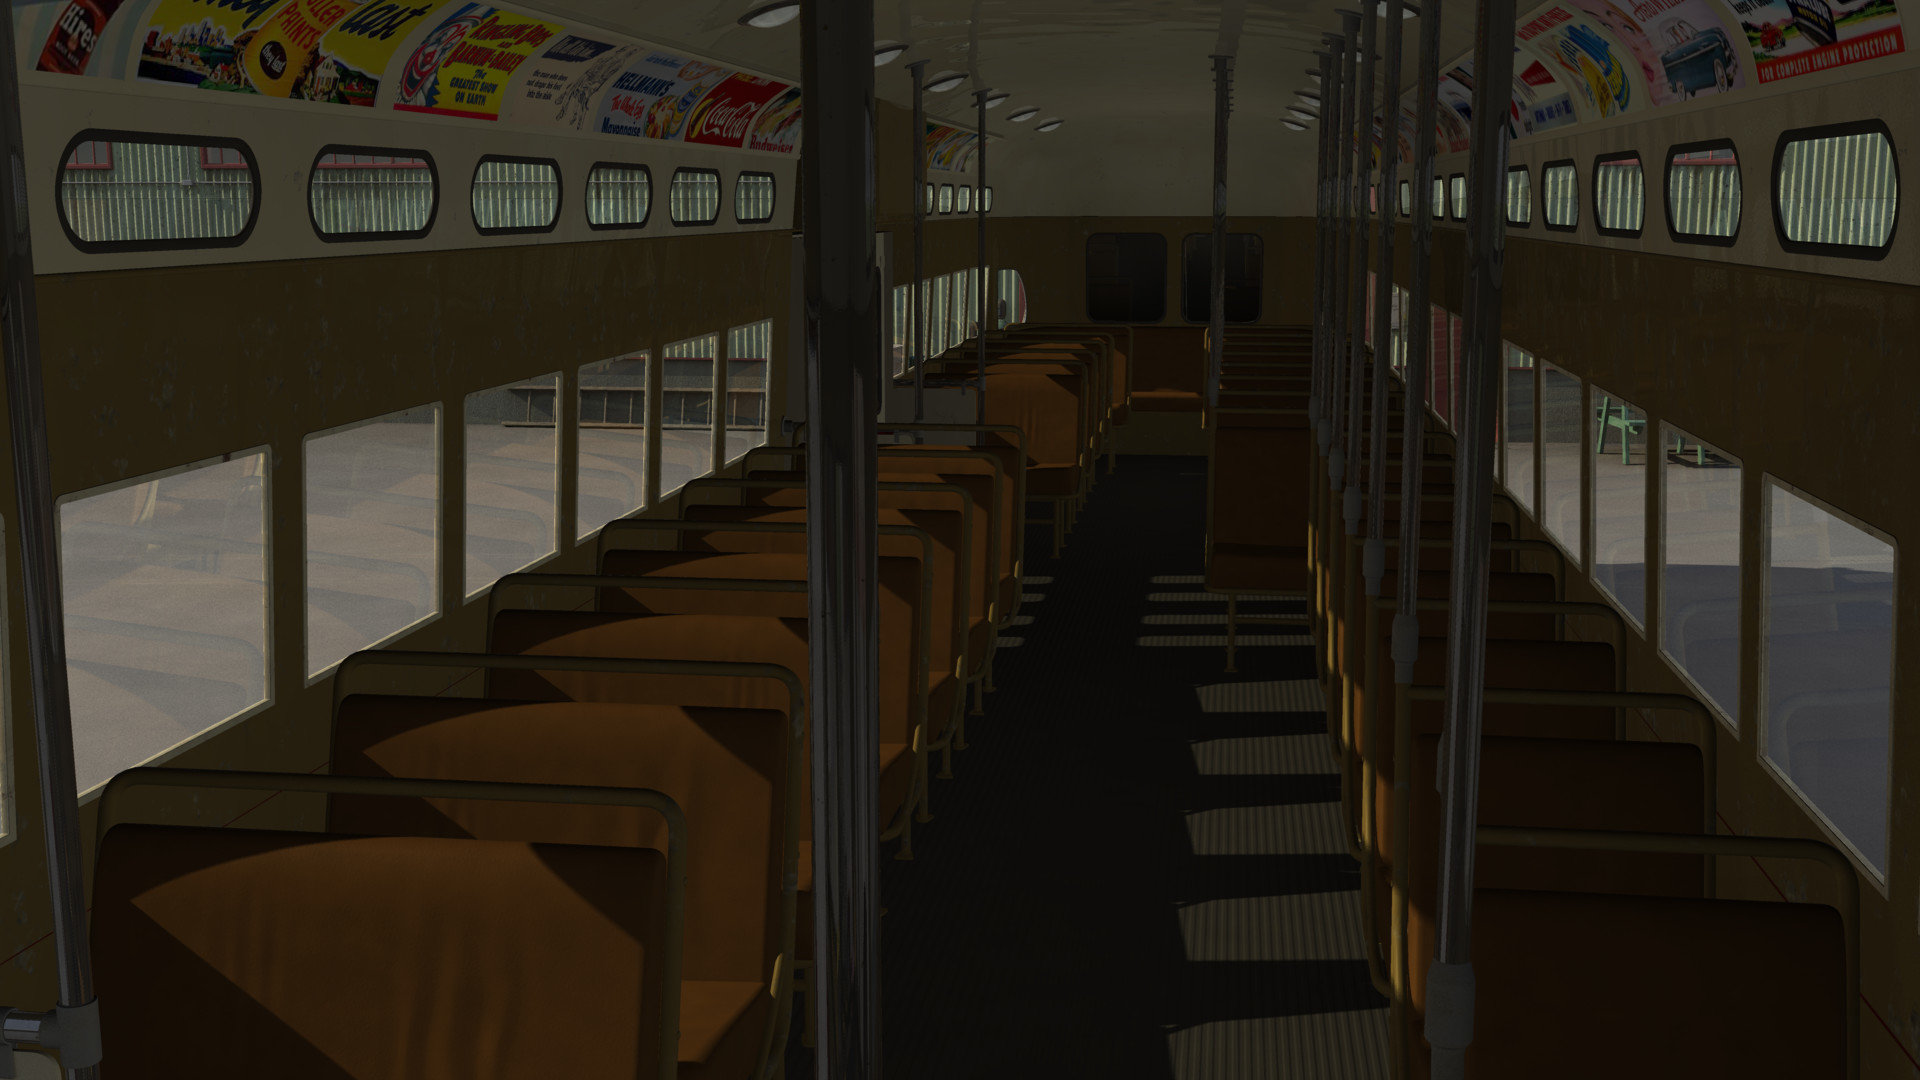
This is a combination car. It's name comes from its dual application. The first third of the car has enough seats to carry twenty passengers while the remainder is used as a mail car. Since it's a modified passenger car it uses Pullman trucks which were designed for a smoother ride.

-
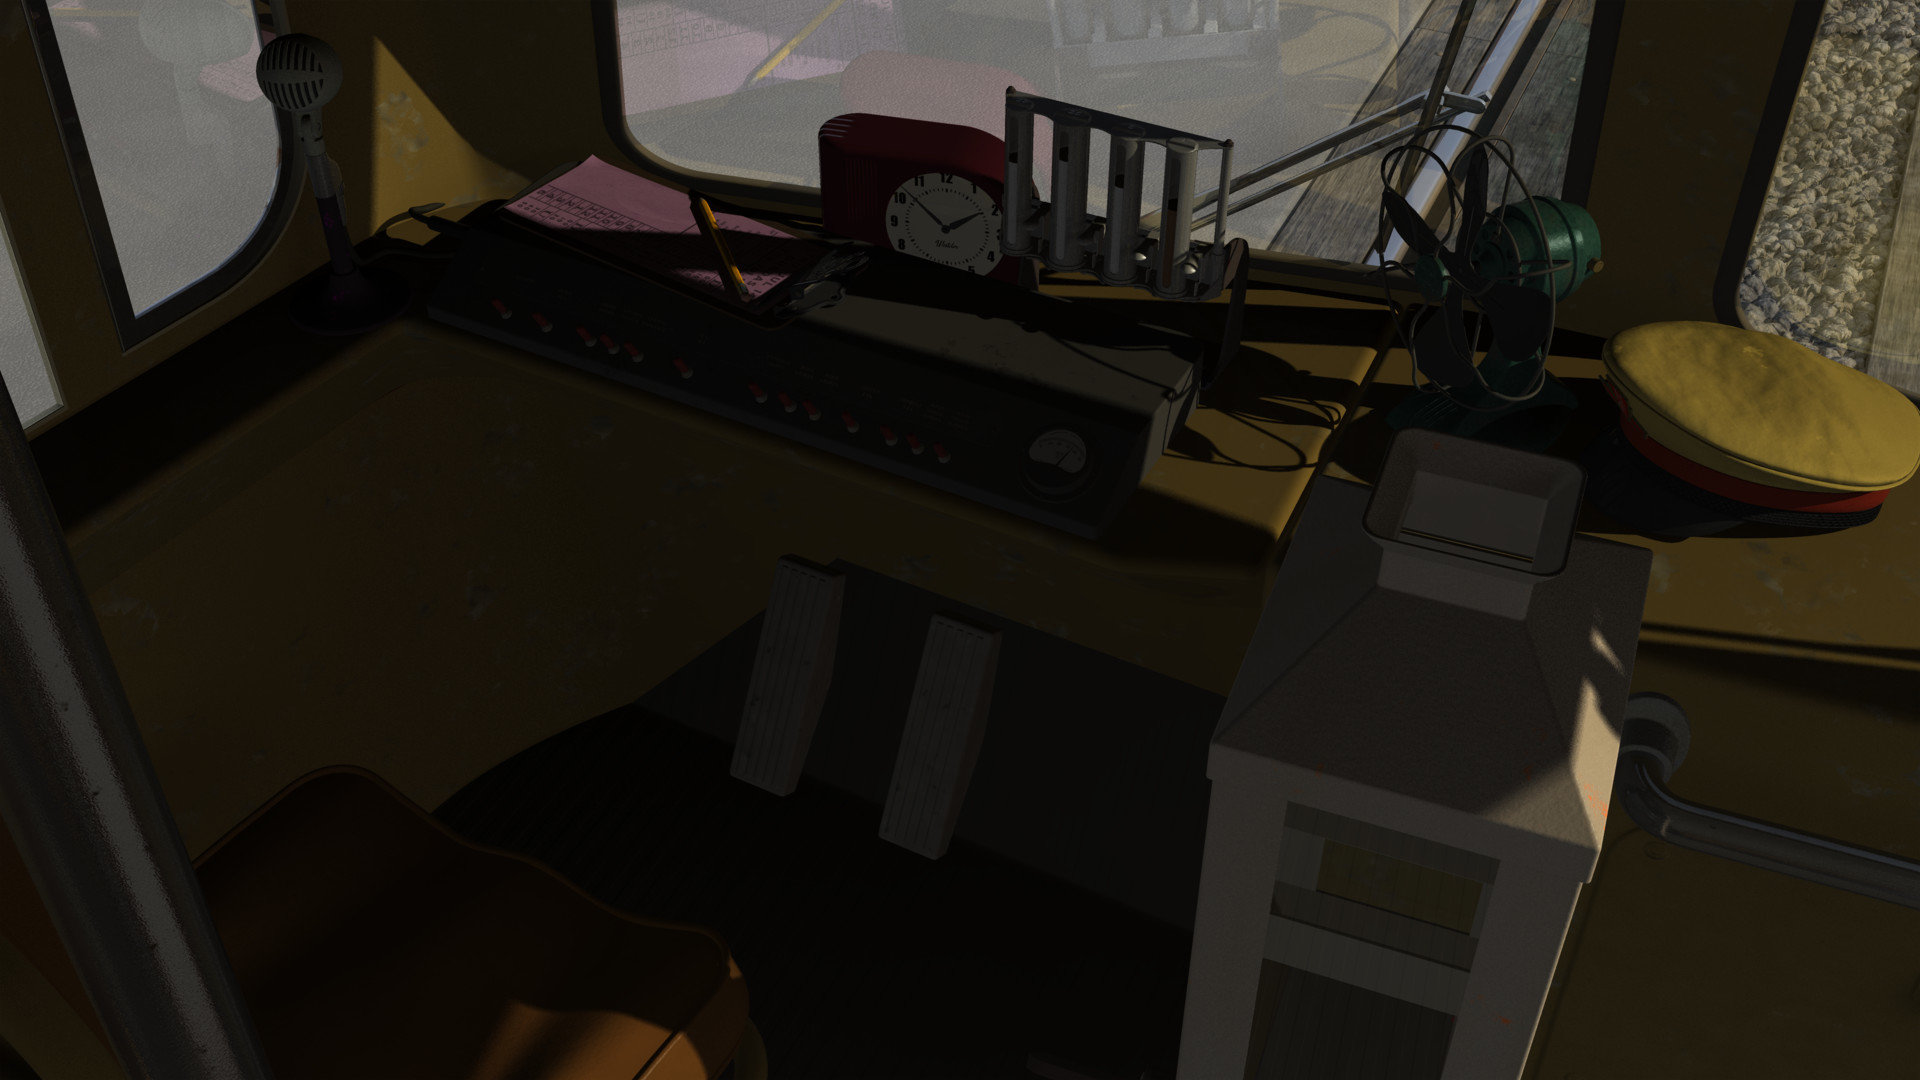
Typically most of my renders are exteriors shot under direct sunlight. Since I have this factory in the background I thought I'd take a crack at an interior with sun and sky light streaming through the windows. Ultimately the desk will be pushed against a nearby wall so I don't have to ask any awkward questions about where the lamp and phone cords go. The ceiling has a few hanging incandescent lamps, the hand car under repair is under one of them.
-
That's unexpected since it's the latest H.265 HEVC codec. It even runs on my Android 7.1.1 phone. But then the Alphabet overlords have won.😉 Let's try the older H.264 AVC codec; see attached. You and I have been down this road before, Rob. We've even tried using the same monitor calibration images without success. For reasons unknown, monitor images that are acceptable to me are too dark for you. I'm beginning to believe our problem isn't technical, it's aesthetic. And to reinforce that idea, I offer this. To me, the video looks equally acceptable on my desktop monitor (which I've calibrated a number of times) and on my phone (which I've never calibrated). I think we're going to have to agree to disagree. Be that as it may, in my standard outdoor sunlight chor I always have AO on and there are eight, inward aimed, no-shadow sunlights (4% intensity) pointing up to simulate bounce light from the ground. But that still didn't cut it, the interior was too dark, even for me. 😄 So there's a diffuse klieg at every large window (35 total, see attached) with intensities set at 3.5%. If I had to appeal to a focus group of robcats, I could easily make the interior brighter than full sunlight. I toyed with the idea of gradually changing the histograms of the original frames as you walk through the door to simulate the camera's AGC adjusting to the interior light but then the exterior would be lost in over-exposure, a sacrifice I'm not yet willing to make. street_car_walkthru_720x480_H264_AVC.mp4
-
I wanted to get the effect of a "climbing aboard" video using a phone. I probably could have sold it better if I had rendered it in portrait mode but I simply refuse that particular form of insanity. street_car_walkthru.mp4
-
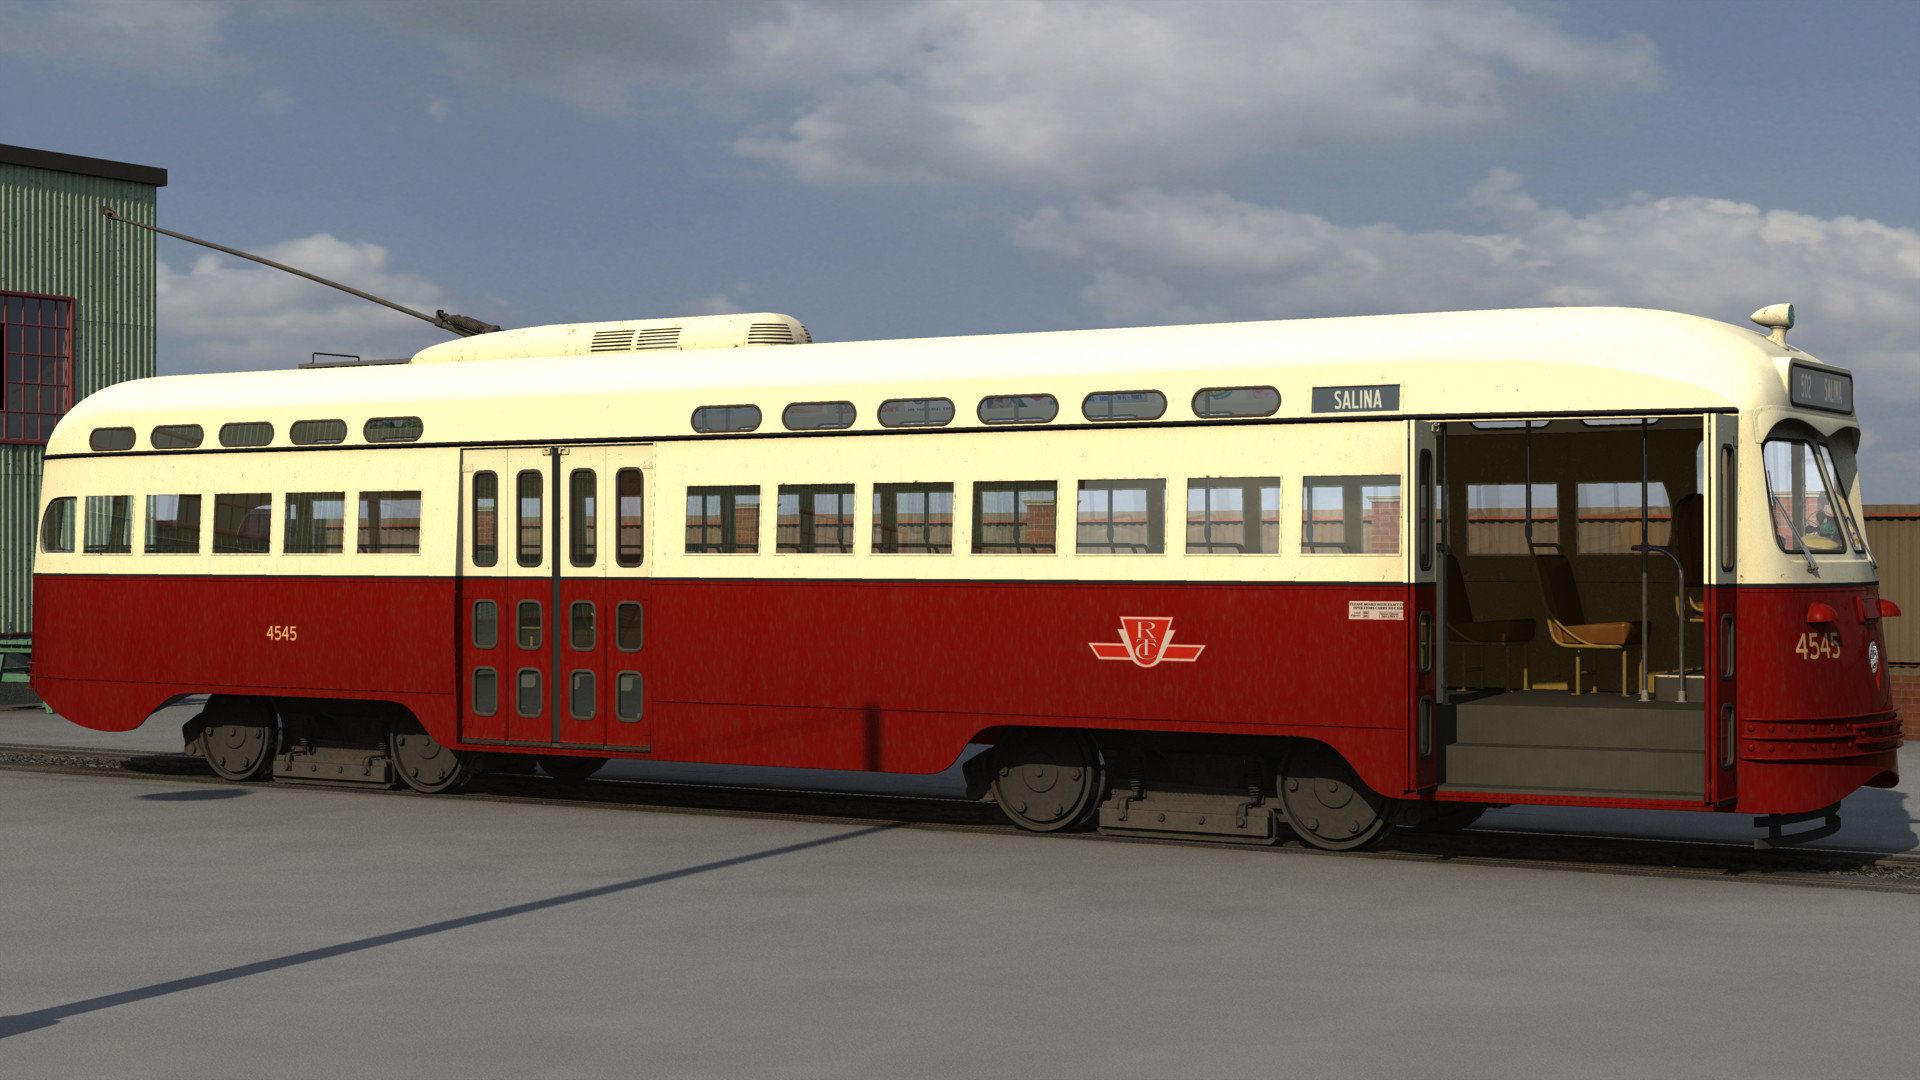
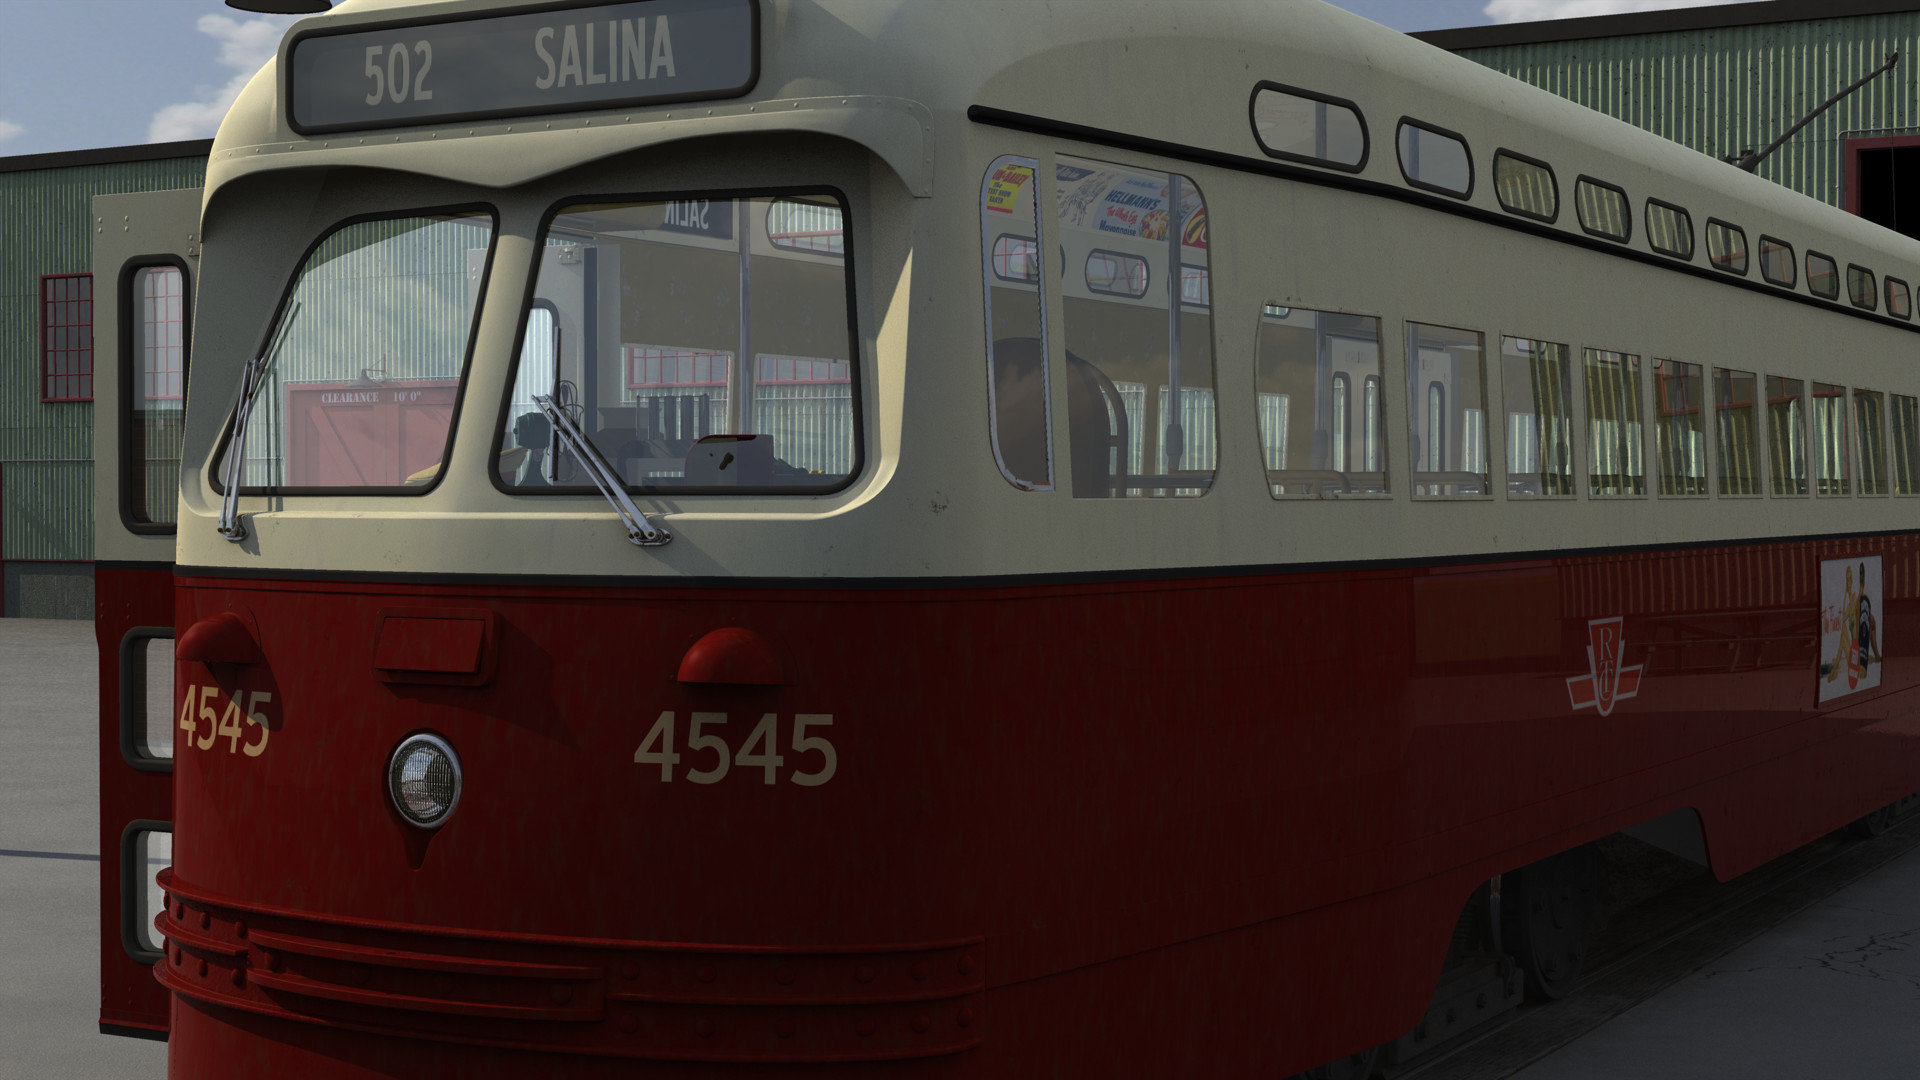
It may not exactly be "rolling stock" but it runs on rails so I'm rolling it out of the factory. The PCC (President's Conference Committee) style of street car was the type used all over North America during the 1940's, 50's and 60's, This was an attempt to design a standard, modern street car that would keep cities from paving over their street car rails. And we all know how that turned out. I remember travelling as a kid to Toronto where these types of street cars were kept running long past their design lifetimes. I liked their shape then and I still do.
-
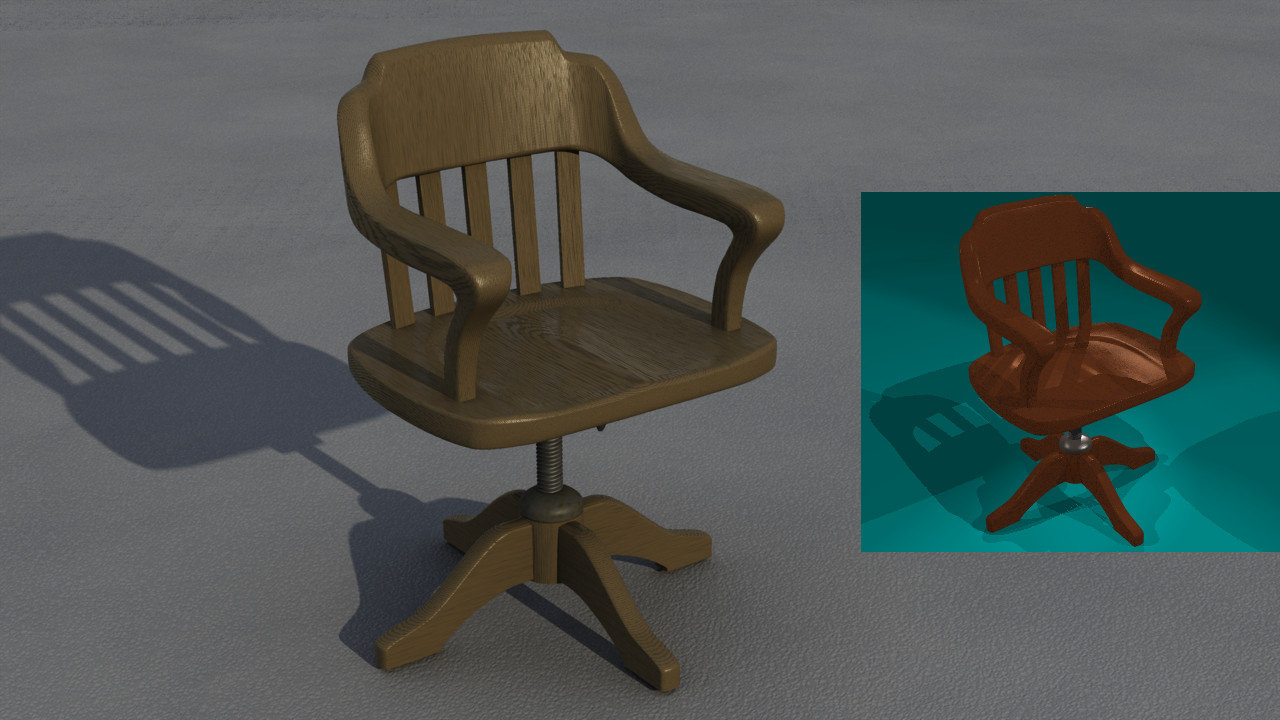
I've been updating some of my old models including this wooden desk chair. The large image is from today, the small inset image was rendered on Dec. 20, 1997. If nothing else my colour sense seems to have improved.
-
uncompressed AVI strangeness (v19.e and l) [solved]
R Reynolds replied to R Reynolds's topic in Animation:Master
Of course...It was the player not the file! After running the avi through other players the source of the problem was clear. My VLC video effects switch was not turned on, so I'll have to do some more investigating. Thanks Robert. Now how do I erase Issue 7027 in Mantis? -
I was experimenting with saving an image series as an uncompressed AVI and I noticed that the brightness and contrast in the avi was different than the original frames. So I cooked up a grayscale test pattern, gray scale frame.tga. I made 30 sequentially numbered copies and saved them as an uncompressed avi (gray_scale_01.avi attached). Then I did a screen grab of the video on VLC. That screen grab is shown in the lower half of the attached comparison image...obviously something has changed. This is consistent with what I've been seeing in other, more typical images. After submitting a bug report to Steffen, I started looking around for other programs to stitch image sequences and found VirtualDub from 2013. So I unpack its zip, fire up the program and after some time with the help files I produce an avi from the same 30 copies of my test pattern. Much to my surprise it has exactly the same problem! Not a similar problem mind you, it modifies the 21 gray levels by the identical values. Now I'm beginning to think that I'm missing something...any suggestions? gray_scale_01.avi test_pattern_compare.tga gray scale frame.tga
-
Afraid not...the outbound route will have to be carefully chosen.
-
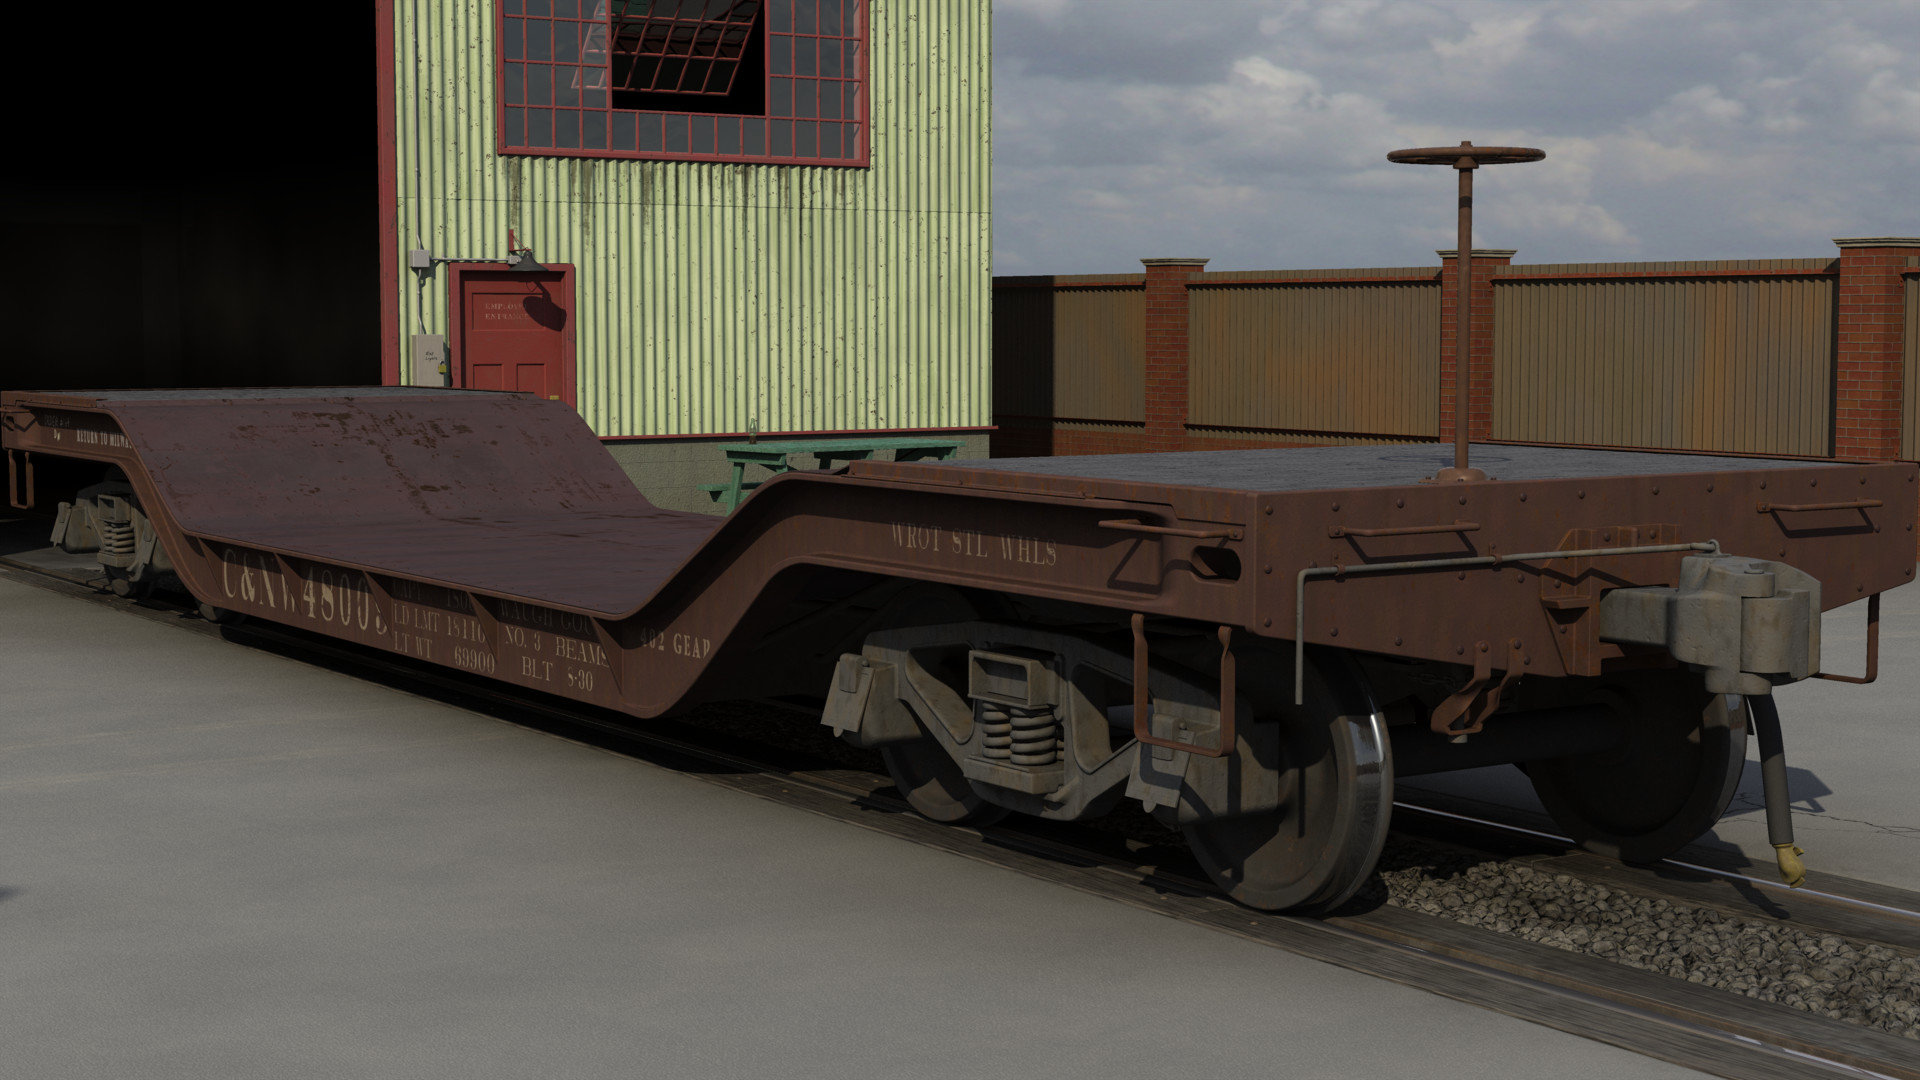
Although I've said one's interest in any flat car is proportional to the loads it's carrying, even an empty drop-centre flat car with its curved side beams is inherently more striking. Since such a flat car is designed to haul over-sized cargo it's important to load it with something more than just a very large crate. Something like this steam hammer that may still be functional but has seen better days.
-
Thanks for your efforts Robert. I tried your idea but the render bug you mentioned was more severe in my case in that I could only get the desired results in a final render if I was rendering from an isometric view (v19e). I had similar render problems with my own attempts at both pose and action based solutions. Camera view progressive and final renders yielded inconsistent results. I'll revisit this technique if and when Steffen can fix it but for now I'll simply have four versions of the same model with different decal sets...brute force but guaranteed results.
-
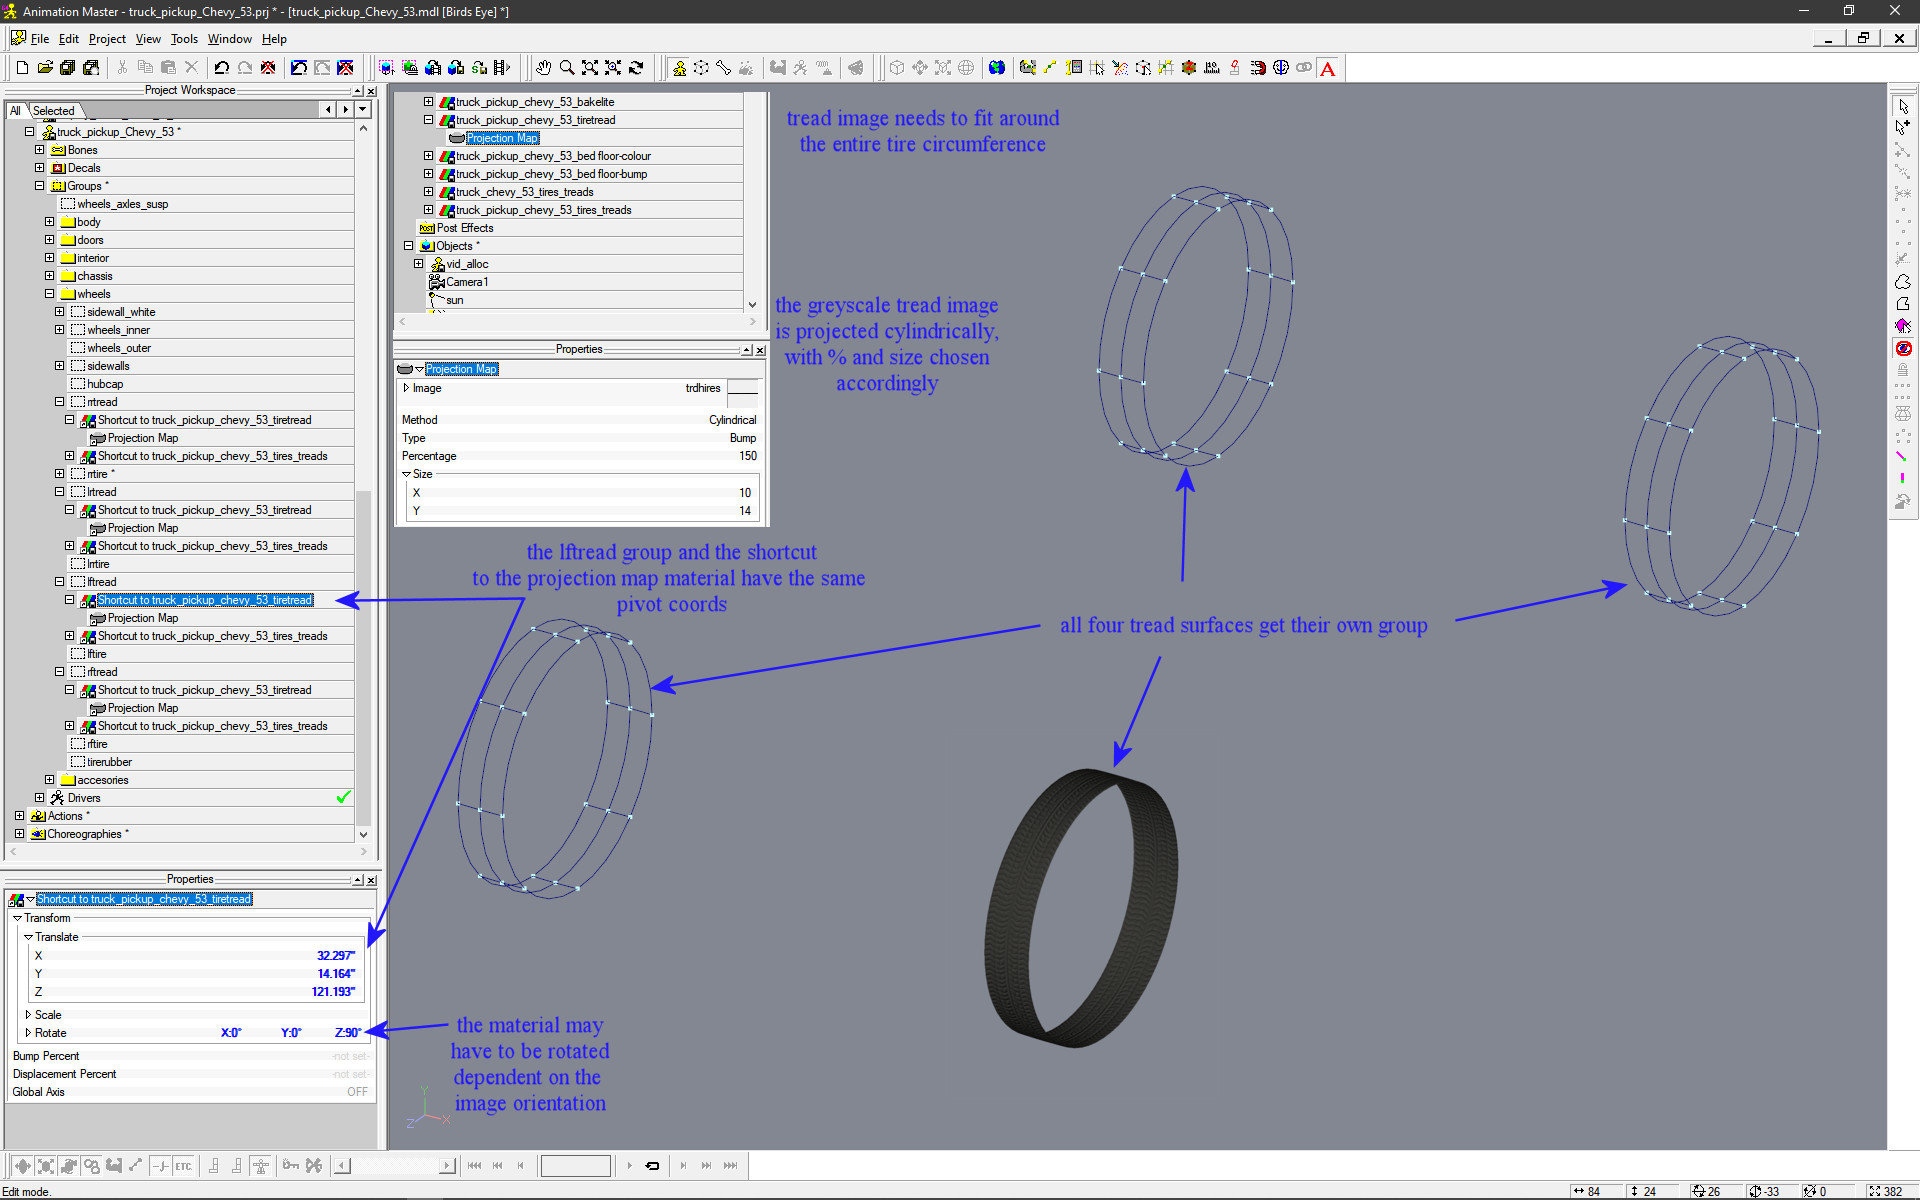
Nicely done! That layered gradient finish really catches the eye. Any reason it's only 12 inches long? Using poses to add segmented tread maps obviously works but you might want to consider a Projection Map material.
-
This was a really tantalizing idea but I couldn't make it work. I went with applying all the required decals to the model and only the desired ones are selected using an ON/OFF pose; four sets of decals with four poses. It worked like a charm while editing the poses and with only one instance of the model in a chor. But within the chor, a model's decals are not appended with a number that gives them a unique name for that instance. So the second model's decals are affected by the pose of the first model. I tried renaming the decals in the second model instance but that isn't allowed. Too bad.
-
I just tried v19l Netrender and it doesn't seem to find the paths to all the various components; forcing me to lead it to every model in the chor. I tried consolidating the project into a new folder but it stopped after loading the project, not asking to select a chor. Would someone please confirm this in case I'm doing something wrong? Thanks.
-
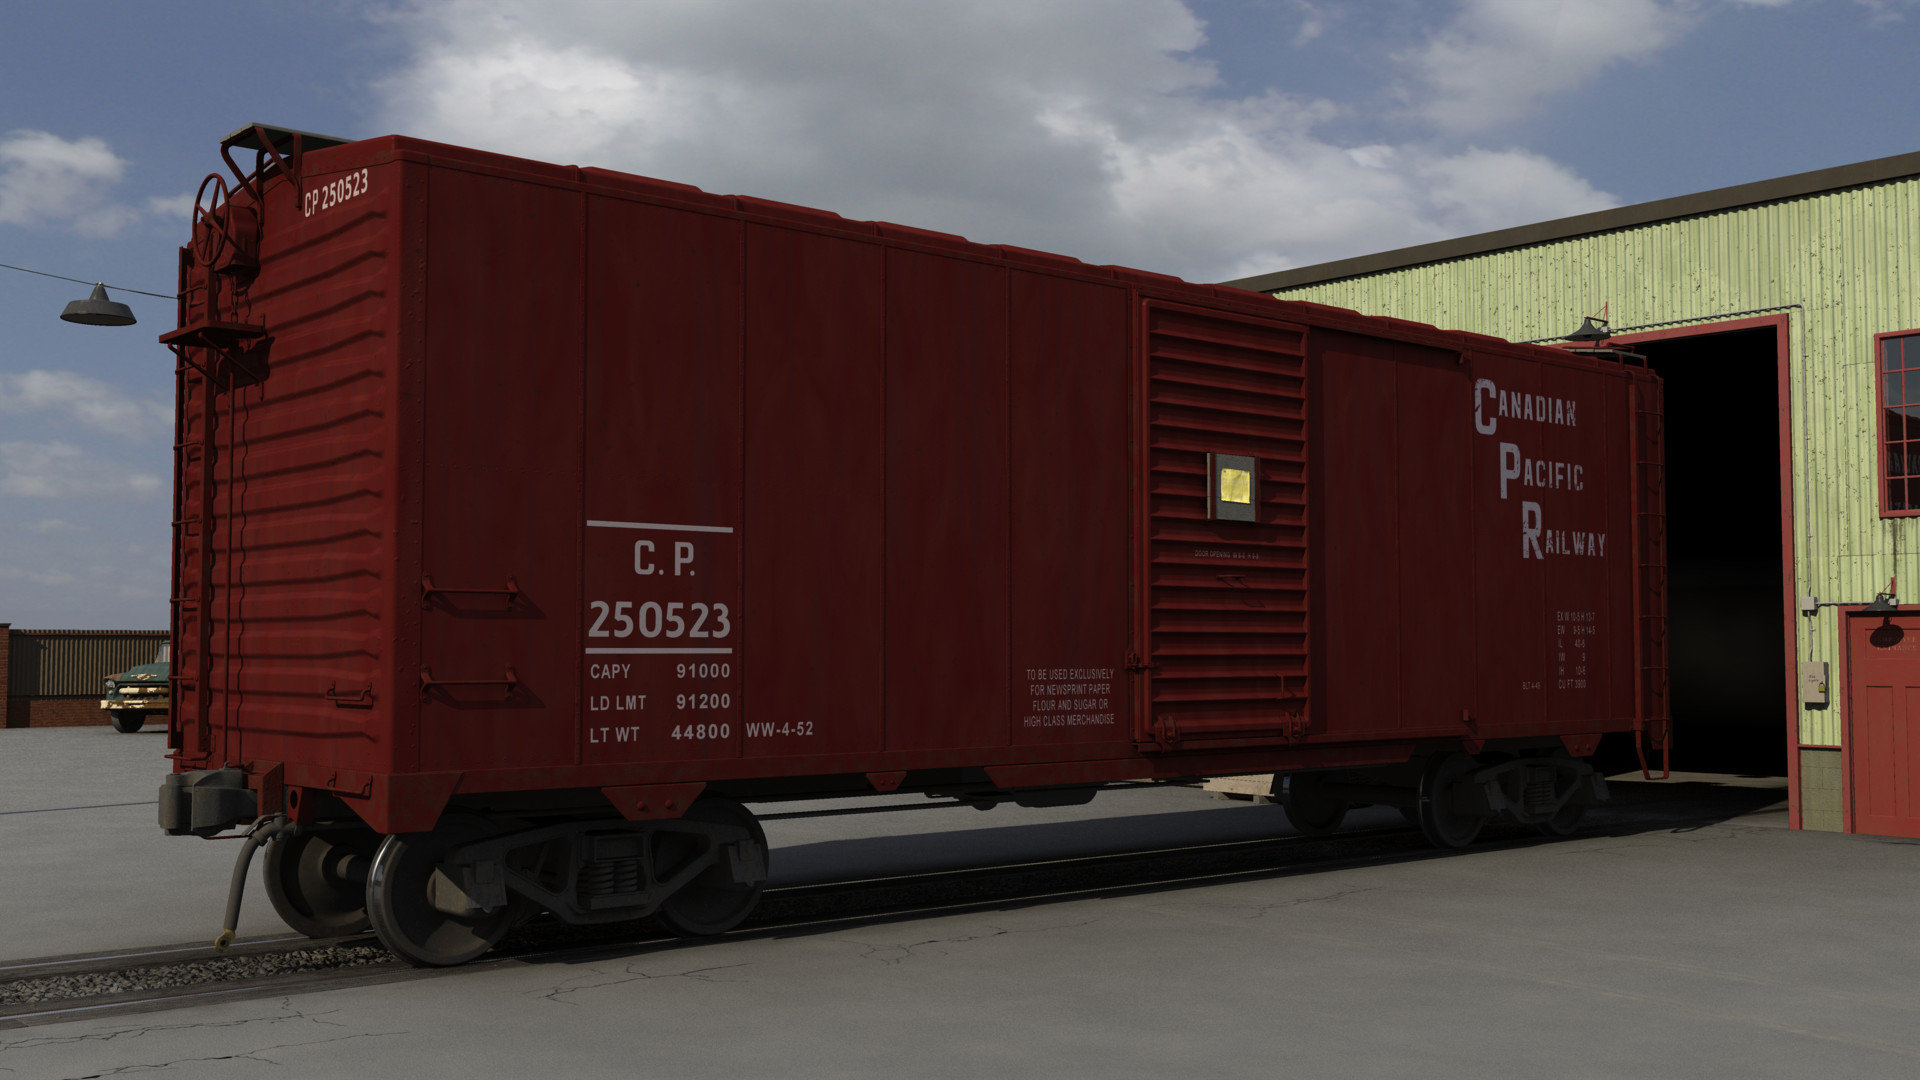
The next boxcar is the more modern style with the brake wheel mounted vertically to the end wall. Once again I used the same model but put different signage on other side. CPR with NYC, N&W with PRR. I got carried away with detailing when I found a good reference image of a vintage NYC waybill. I reproduced it in PSPro and filled in the blanks with Lorem Ipsum words.
-
This was an intriguing idea Robert. It was also a bit daunting since I've never used poses before so I had to do some forum research. Your "Basics of making a new pose" from '09 was quite helpful. After spending a day of trial, error and documentation, I think I have a good handle on it and will use it on the tank car I'm currently building. Thanks!
-
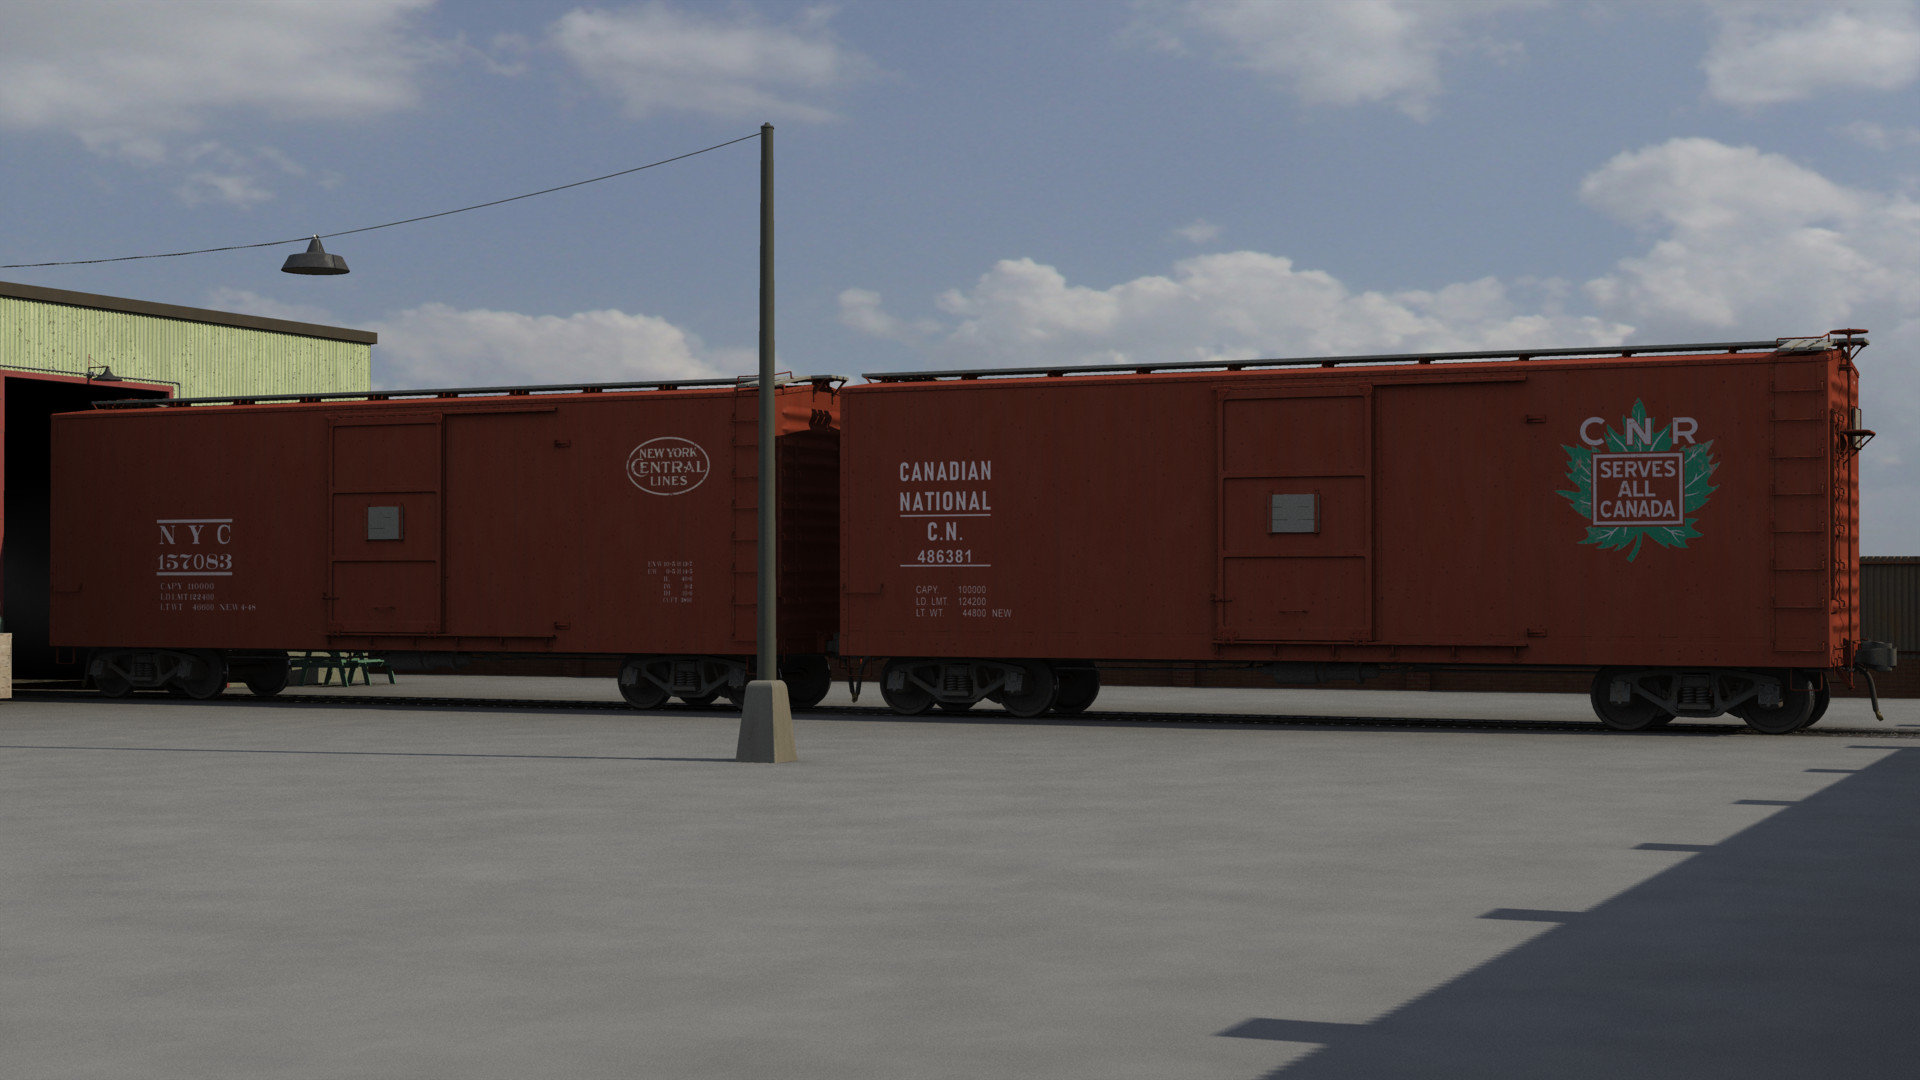
The first type of boxcar I built was the older style where the handbrake wheel is mounted horizontally above the roof line. In order to maximize the number of boxcars, I decided to cheat and put a different railroad line and specs on each side of a single car. This scheme only breaks down when looking at the end of a single car where you see the two different numbers. However once the two cars are connected together and their ends are somewhat obscured I now have two boxcars for the price of one model.
-
LT WT (light weight) is the weight of the empty car. As you've guessed, LD LMT (load limit) is the builder's recommendation for a maximum safe load while CAPY (capacity) is the absolute maximum load the wheel bearings can withstand.
-
Next up, a flat car. I've always felt one's interest in passing flat cars is proportional to the loads they're carrying, making an endless line of container cars extremely boring. Having said that, large steel pipes are pretty plain as well (but low in patch count). So I went a bit overboard on the material textures for the rusty steel and woven tie down straps.
-
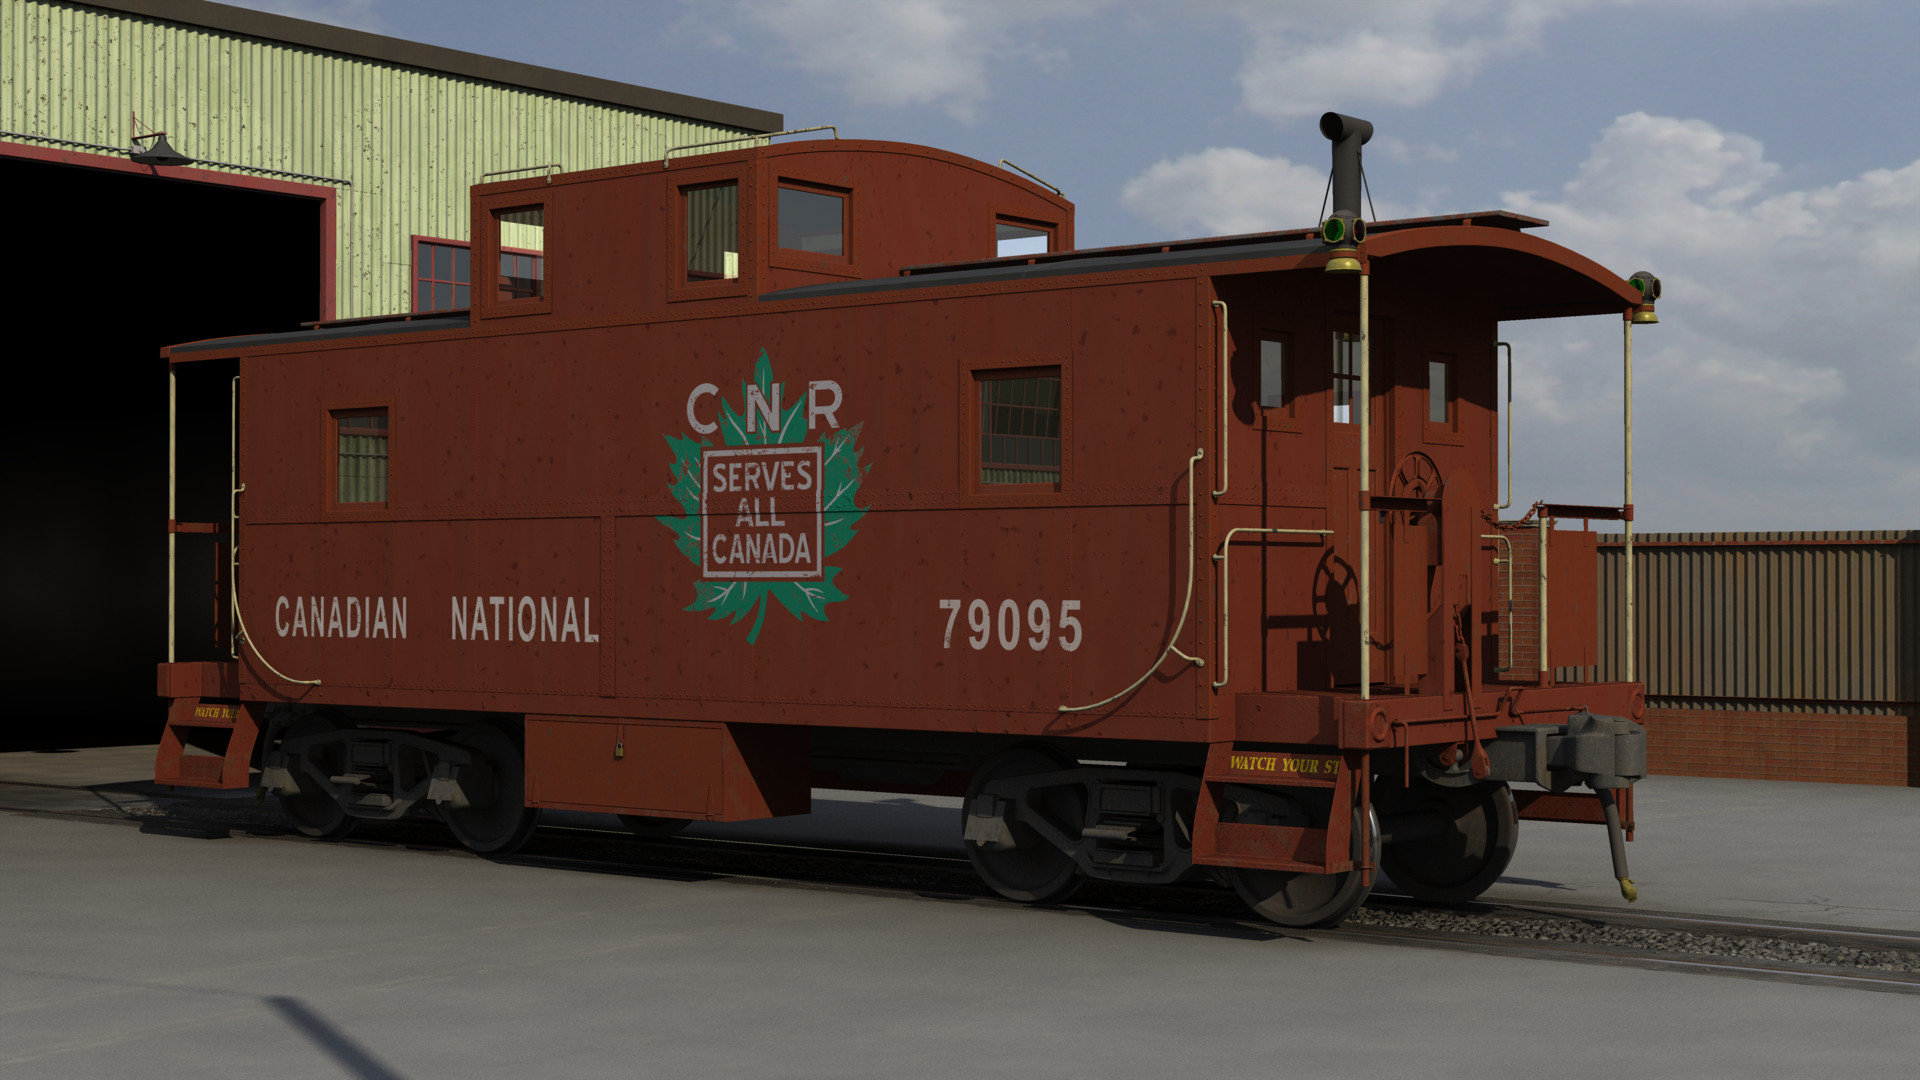
Before I move on to the next railcar I beg your indulgence while I brag about getting a believable "look" to the rear running lights. The rear facing lenses are tinted red with the other three are tinted green. The light from the internal bulb is quasi collimated i.e. the lamps appear illuminated only if viewed close to on-axis with the lenses. I wheeled the caboose back into the dark factory to get a better view.
-
Let's start at the end of the train with the caboose. They went out of style in the 1980's but I still think they're the "right" away to finish off a line of railroad cars.
-
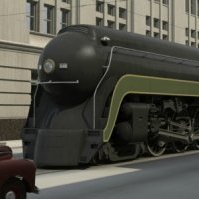
I've been spending my lock-down time giving my steam locomotive something to pull. I'll use this topic to display all of my railroad cars as they're rolled out of the factory. Since showcasing my renders on a personal web site is so 20th century I've decided to make the plunge to Instagram. But the phone-size 1080x608 limit is a bit small for my taste so I'll be putting up the hi-res versions here.
-
Thanks, Robert.
-
I've discovered a render glitch in v19j1 and I need to send the entire project to Mantis. Is Consolidate sufficient or do I need to Embed All as well?