R Reynolds
-
Posts
176 -
Joined
-
Last visited
-
Days Won
47
Content Type
Profiles
Forums
Events
Everything posted by R Reynolds
-
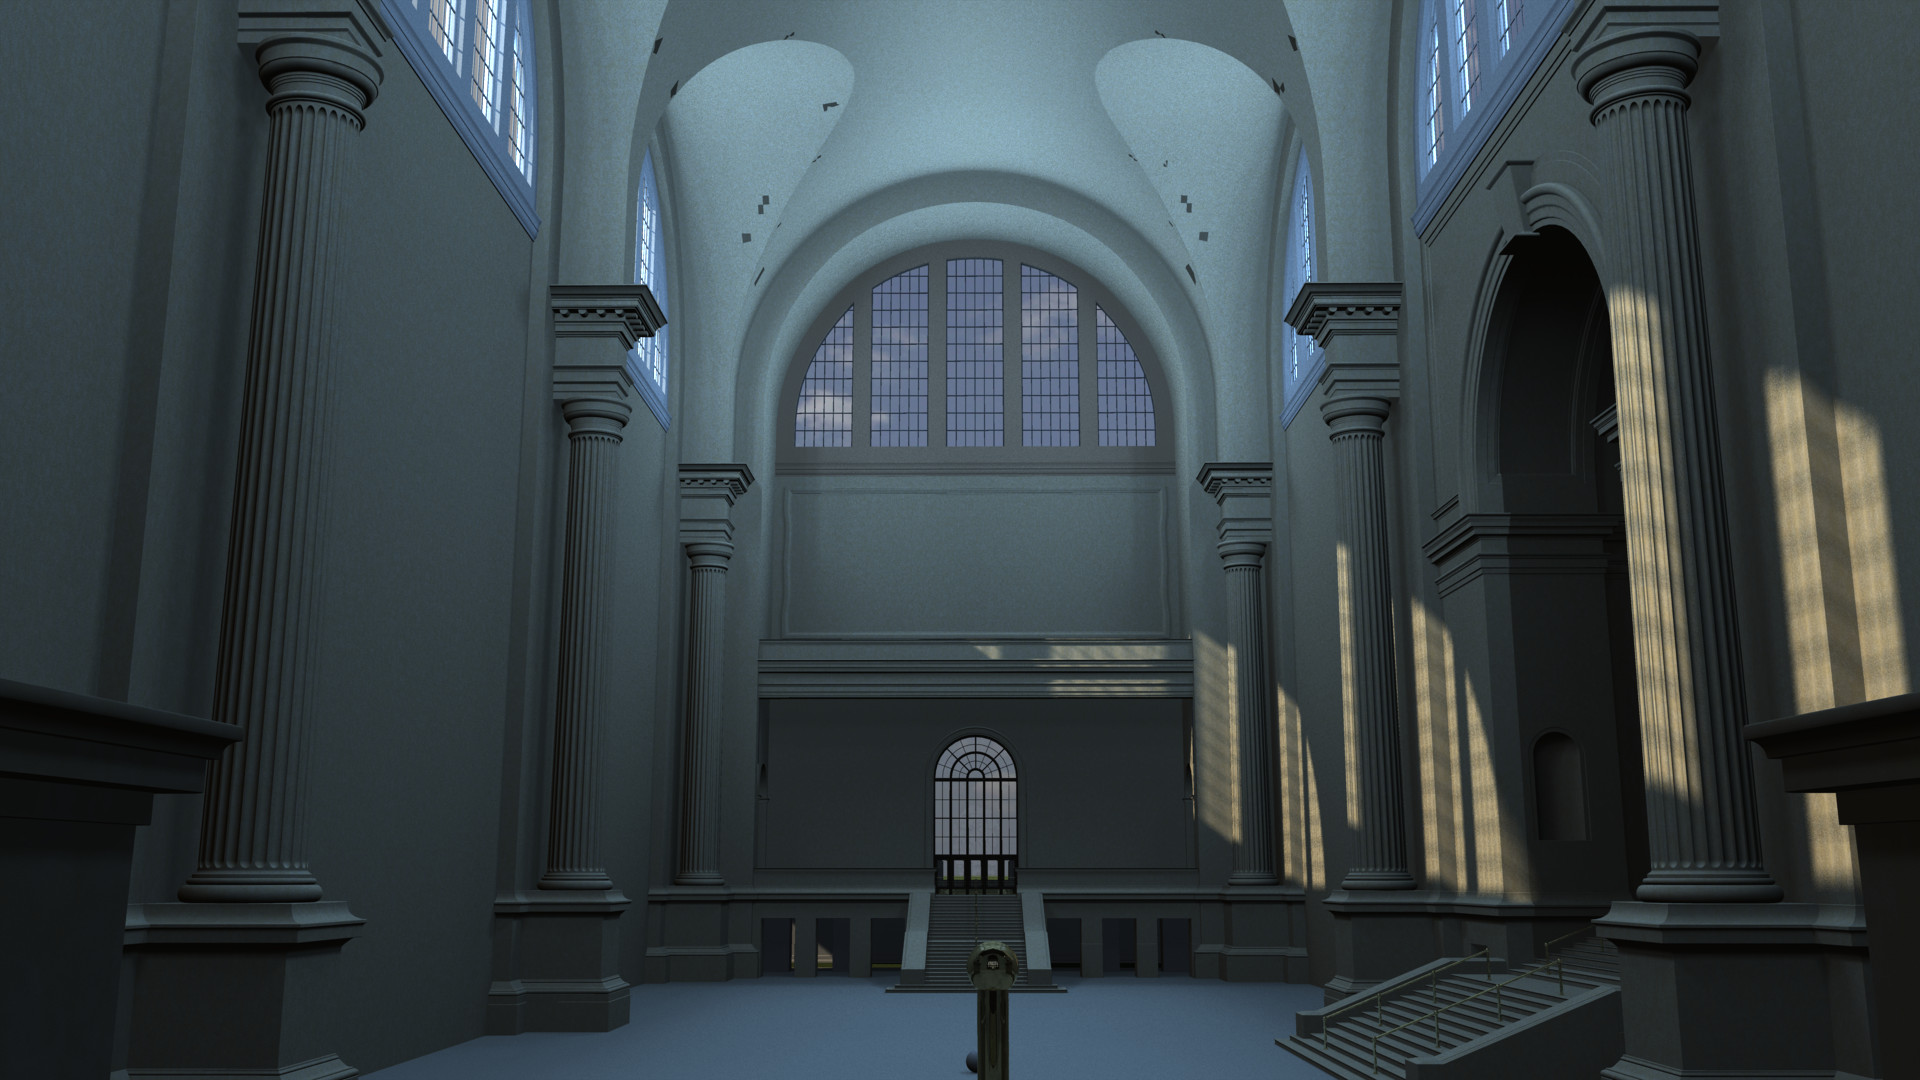
WIP - Pennsylvania Station (sort of)
R Reynolds replied to R Reynolds's topic in Work In Progress / Sweatbox
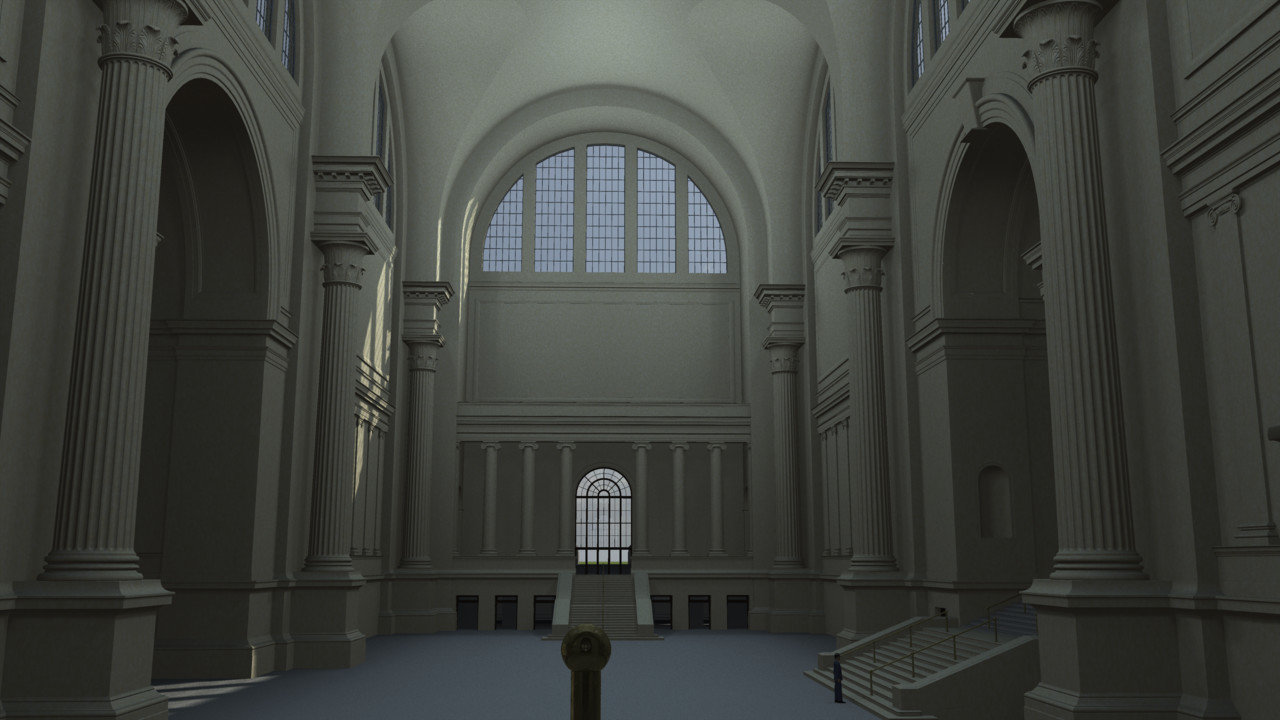
The main waiting room.
-
WIP - Pennsylvania Station (sort of)
R Reynolds replied to R Reynolds's topic in Work In Progress / Sweatbox
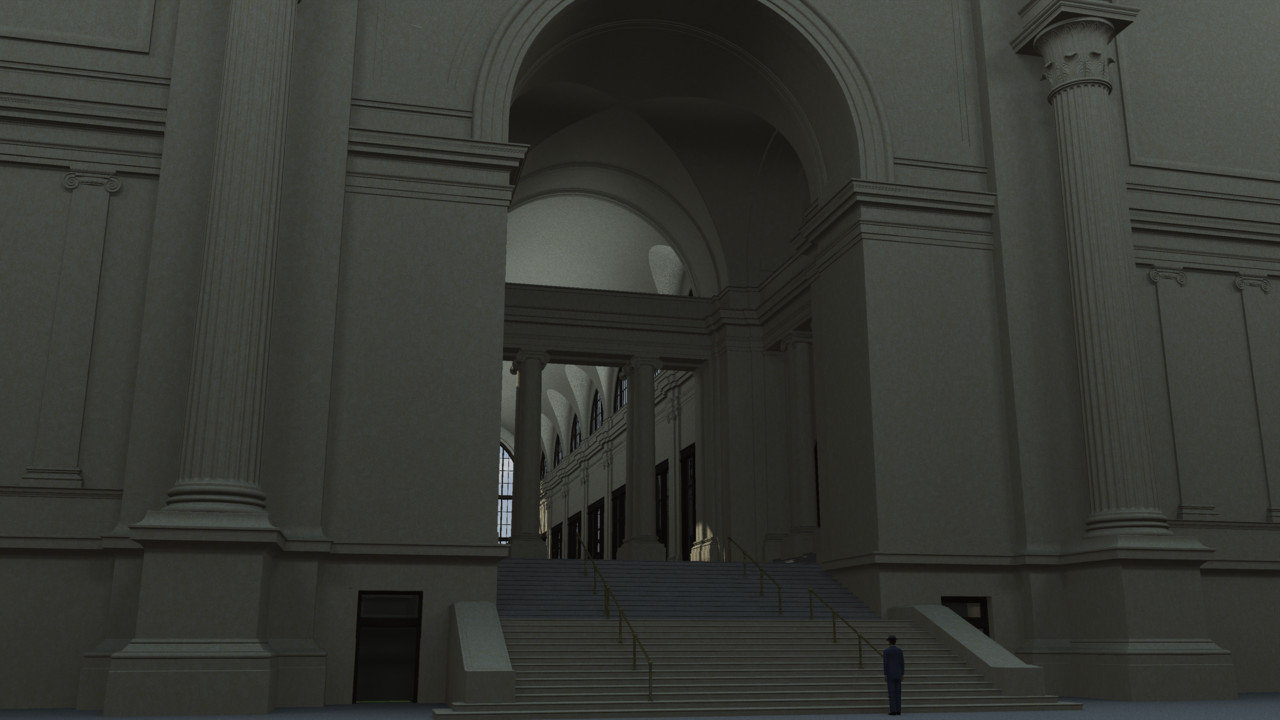
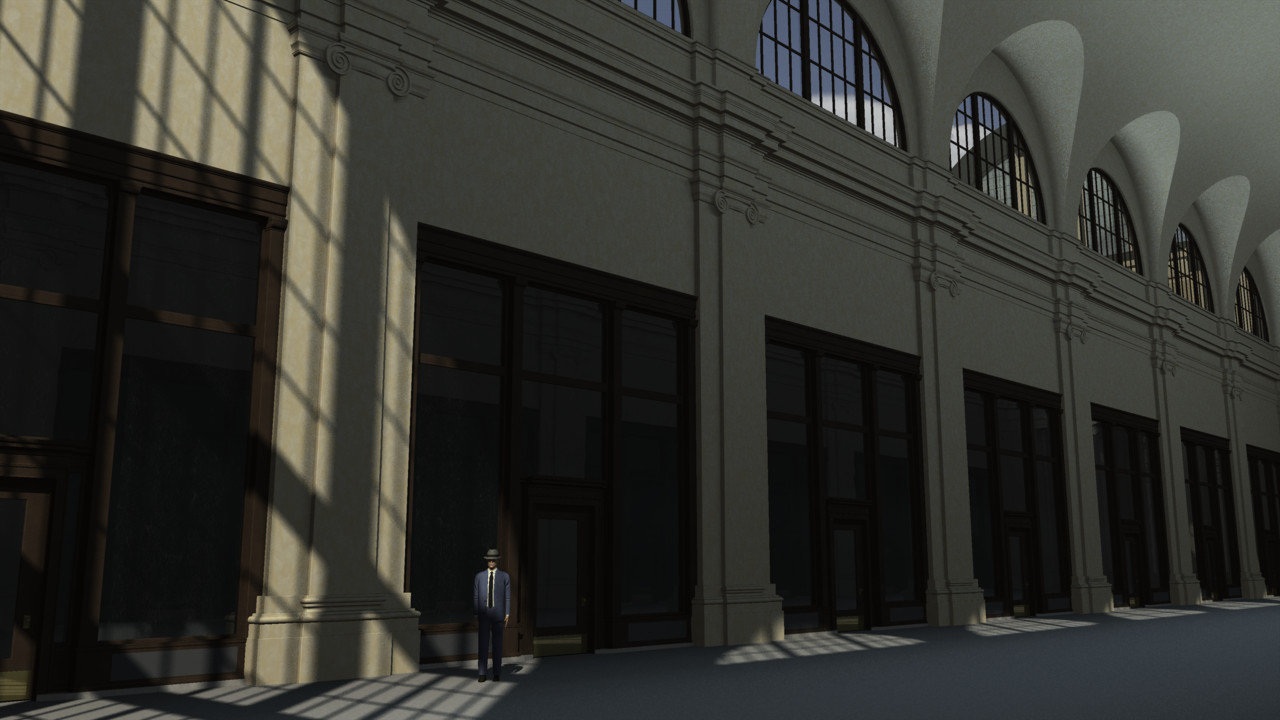
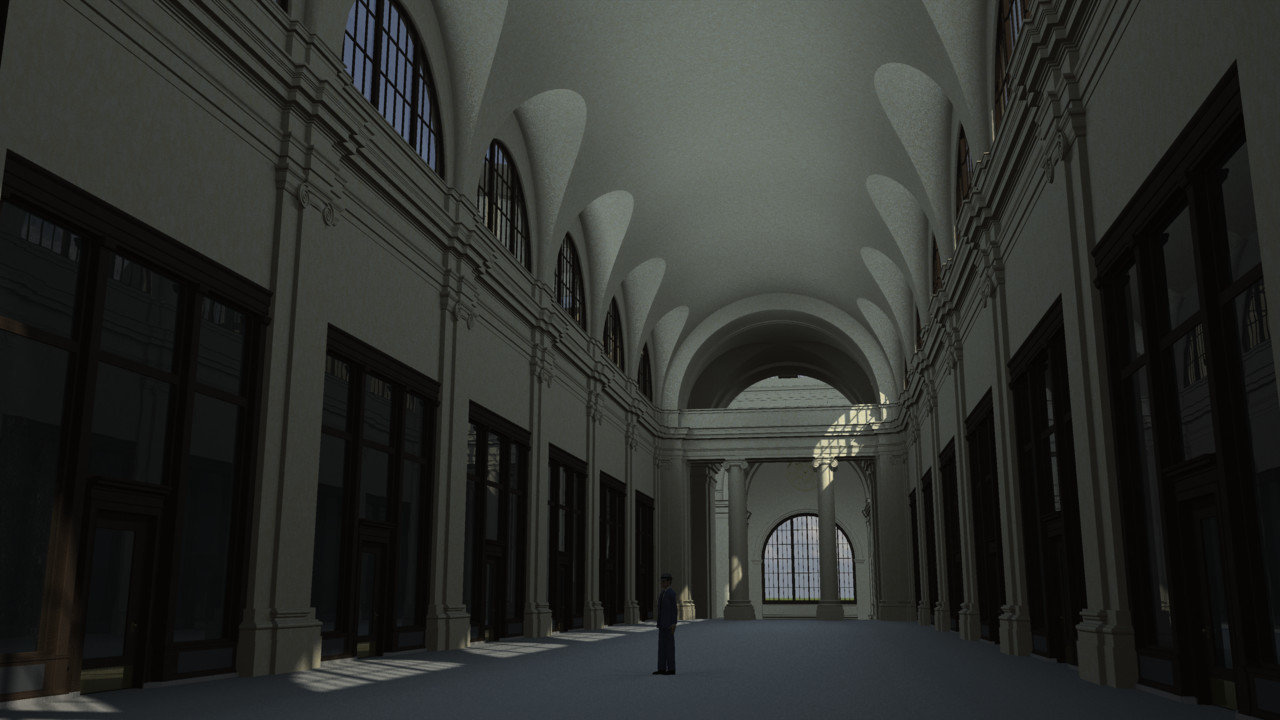
A view of the arcade from the floor of the waiting room.
-
WIP - Pennsylvania Station (sort of)
R Reynolds replied to R Reynolds's topic in Work In Progress / Sweatbox
Keep in mind that this is a WIP and I have a long way to go (including getting the lighting right but I'm still pleased with the result. Here's two views of my arcade taken from the street entrance end and showing the concourse archway in the distance.
-
The ALT snap bias aim feature is such a pleasure to use, I've regained my enthusiasm for an architectural model I set aside in 2009. It's my version of a Hollywood set of the grand old Pennsylvania Station built in New York in 1910 and demolished in 1963. I'm calling it a Hollywood version for three reasons. 1. Since my reference images from books and the Net only have a few readable dimensions I have to make a lot of "looks good to me" guesses. 2. The amount of detailing required for a 100% accurate copy is too staggering so I've simplified it while trying maintain a similar look. 3. The section of the building where people board a train is called the Concourse. While it was a spectacular work of architecture, it was essentially a large room where passengers would congregate before descending down stairs to tunnels in the lowest level to board coaches pulled by electric locomotives. To me that's a subway station not a rail station. So my Concourse will be a complete fiction but it will have steam locomotives. Here's four views of the real thing.
-
Here's a re-rendering with better behaved sheet metal seams. Not only is the seam now a bump map but it's been reduced from 100% "intensity" to 23%. Being produced at the Instagram worthy ratio of 720 X 480 also makes the noisiness in the reflections more tolerable. piggyback_walkthru_insta_h264.mp4
-
Excellent suggestion! Attached are three sets of four images with descriptive names for clarity. 9x9_noblur are the originals; 9x9 oversampling with no motion blur 9x9_blur are the same oversampling but with 100% motion blur 16x16_blur are sampled at 16x16 with 100% motion blur It certainly helps the chaos in the reflections but ultimately these grazing angled reflections of closely spaced vertical lines in a very wavy surface will be pretty noisy. That chaos is a good simulation of reality. If I really want less noise, I need to reduce the bumps in the sheet metal material. As for replacing the normal map with a bump map, also a great suggestion since it's trivial to generate and replace with no re-modeling required. I'll just have to get over my obsession with the improved (IMO) look of a normal map. Thanks, Robert. piggyback_walkaround_9x9_noblur_00.tga piggyback_walkaround_9x9_noblur_01.tga piggyback_walkaround_9x9_noblur_02.tga piggyback_walkaround_9x9_noblur_03.tga piggyback_walkaround_9x9_blur_00.tga piggyback_walkaround_9x9_blur_01.tga piggyback_walkaround_9x9_blur_02.tga piggyback_walkaround_9x9_blur_03.tga piggyback_walkaround_16x16_blur_00.tga piggyback_walkaround_16x16_blur_01.tga piggyback_walkaround_16x16_blur_02.tga piggyback_walkaround_16x16_blur_03.tga
-
I see two issues. First look at the following four frames and note the vertical sheet metal seam that runs between the last two letters of Canadian. To me it flashes like a fine, straight geometric detail that hasn't been sampled enough. piggyback_walkaround_a077.tga piggyback_walkaround_a078.tga piggyback_walkaround_a079.tga piggyback_walkaround_a080.tga What I find more puzzling can be seen in four later frames. piggyback_walkaround_a803.tga piggyback_walkaround_a804.tga piggyback_walkaround_a805.tga piggyback_walkaround_a806.tga I think the noise in the reflection of the factory's vertical siding in the wavy sheet metal would be improved by higher oversampling. But the sheet metal seam (actually created by the normal decal below) that comes in from the right seems way too reflective with no underlying green colour. This is why it's so obvious in the previous four frames. Getting the camera this close was an experiment on my part. After all you can see the pixels in the decal of the word SERVICE as it passes. I figured a decal for the seams would be an adequate way to reduce patch count but I may have to bite that bullet with these chromed seams. But for generating Instagram content for the phones of friends and family, it'll do.
-
They're not compression artifacts. They're just as obvious in the rendered TGAs and the uncompressed AVI. I suspect it's an anti-aliasing issue so going to 4x4 or 5x5 oversampling would be the first test I'd run.
-
Try it again Robert, I replaced the video with one that uses the H264 format.
-
Usually I do a walk around of my models but the piggy-back setup allowed me to do a climb over and between. piggyback_walkthru_h264.mp4
-
Mathematically predicting mag & bias values?
R Reynolds replied to R Reynolds's topic in Animation:Master
Dang! I've used that technique before and I still didn't think of it for this case. Thanks for the reminder. -
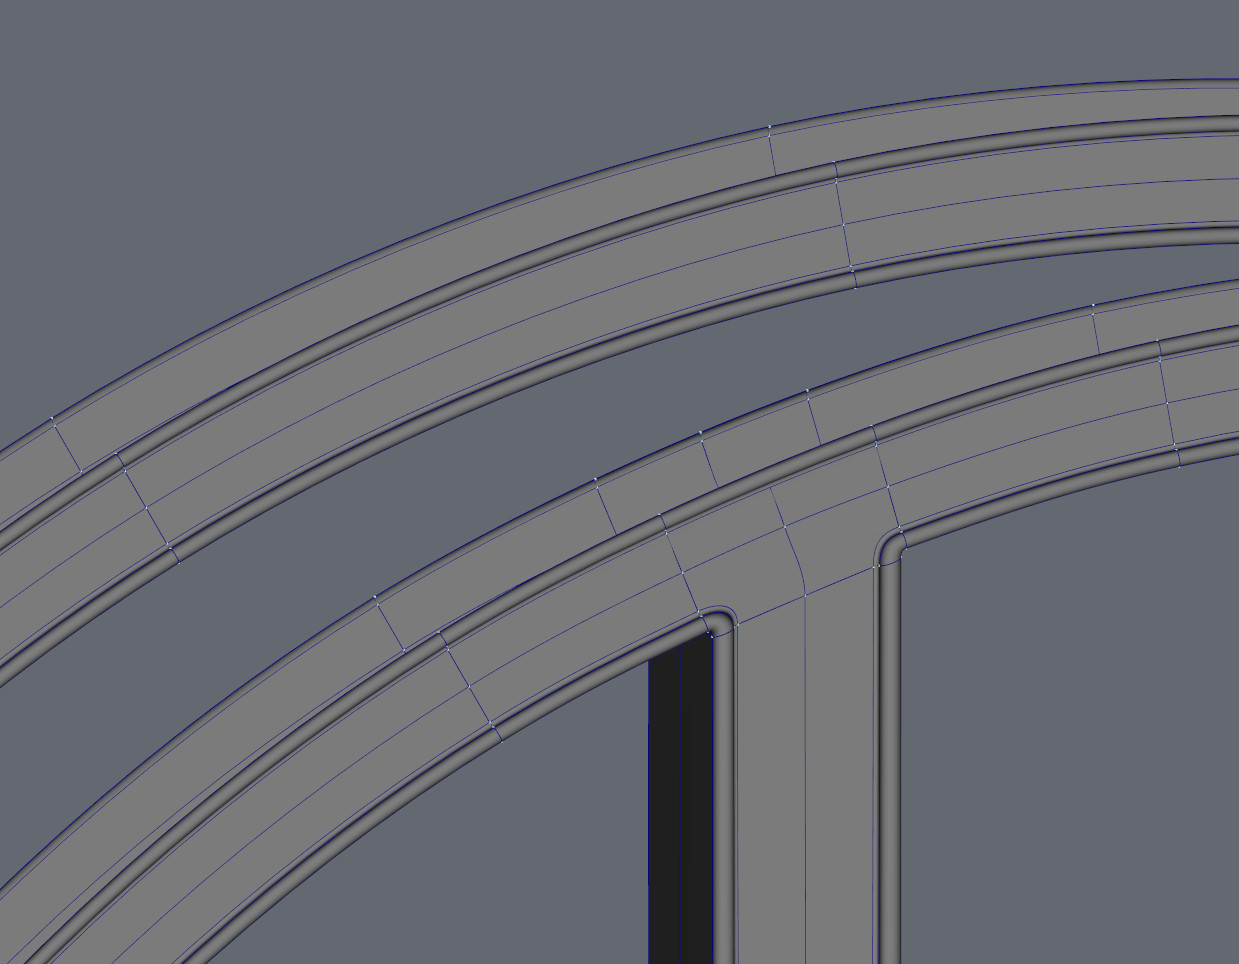
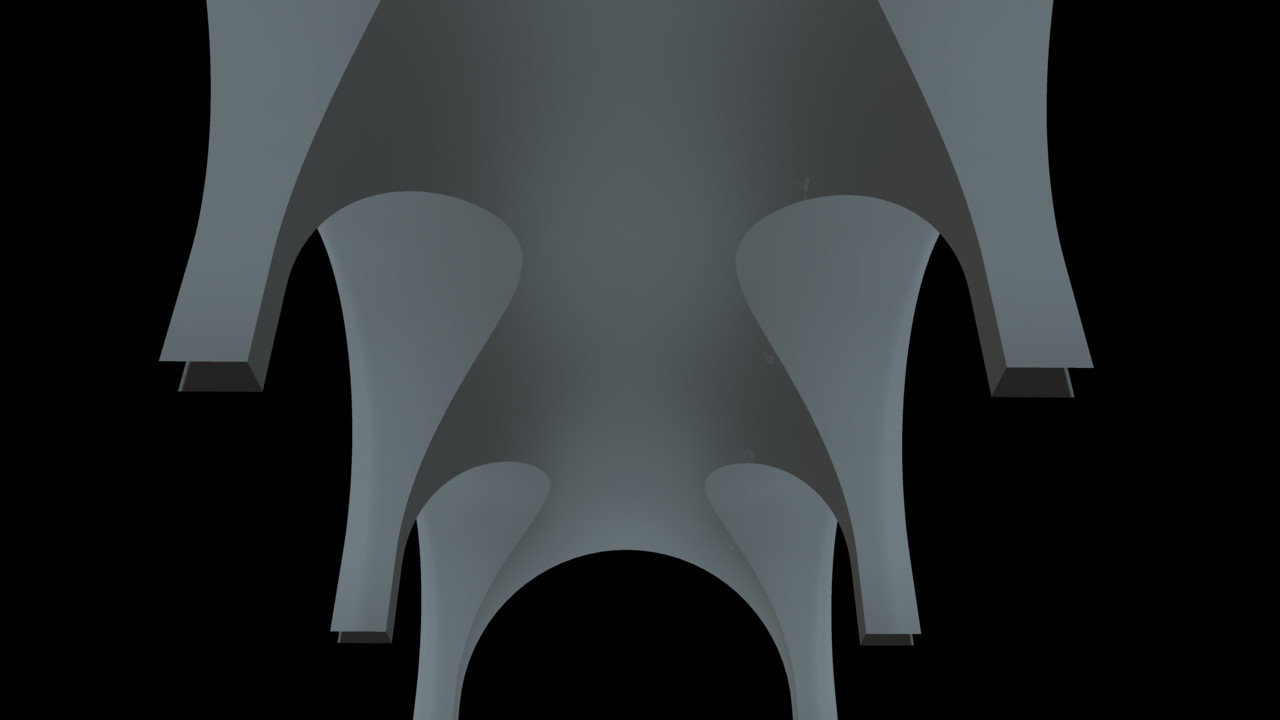
I'm building a formed steel frame, a part of which is shown below, to fit inside an archway . I wanted the vertical column to intersect nicely with the curved section, so I built the curved beam first and made a copy of it as a background template. After completing the orthogonal Tee section with all the corners and five pointers, the final step was splicing the Tee section into the curve and massaging it's cp's, mags and bias values so it's shape matches that of the original curve. My question is based on the fact that when you lathe a circle in A:M, no matter how many points make up the circle, the correct mag is always calculated to get the splines to lie on a circle. A four point circle gets mags of 167.39 while a twelve point circle uses mags of 105.78. So does a mathematical formula exist (at least on paper) that says if you want a spline that matches a mathematically defined shape, an ellipse for instance, input the coords. of a CP anywhere on the line and the output is the correct mag and bias to get the best match? I'm guessing the answer is no but I thought it worth asking.
-
I can't say how long these options have been around but I noticed that Netrender has two checkboxes. Enable OpenMP for slaves Enable GPU processing for slaves Currently my CPU has four physical cores so I typically run three of them in Netrender and leave the fourth to run A:M. What would enabling OpenMP bring to the party? Windows 11's Trusted Platform Module spec. is giving me an excuse to replace my 11 year old hardware. What GPU specs. should I shop for to take advantage of GPU processing? Thanks.
-
That's an integral part of the outdoor sunshine light model invented by Yves Poissant. The yellow and -blue suns are both kliegs with identical properties other than their colours. The -blue is "translate to" and "orient like" constrained to the yellow with zero offsets. It's an easy way to give shadows a bluish tinge to simulate fill light from the surrounding sky. But as I'm describing it to you I realize that it's probably unnecessary in this case since I'm supplying the sky light with at least 40 kliegs.
-
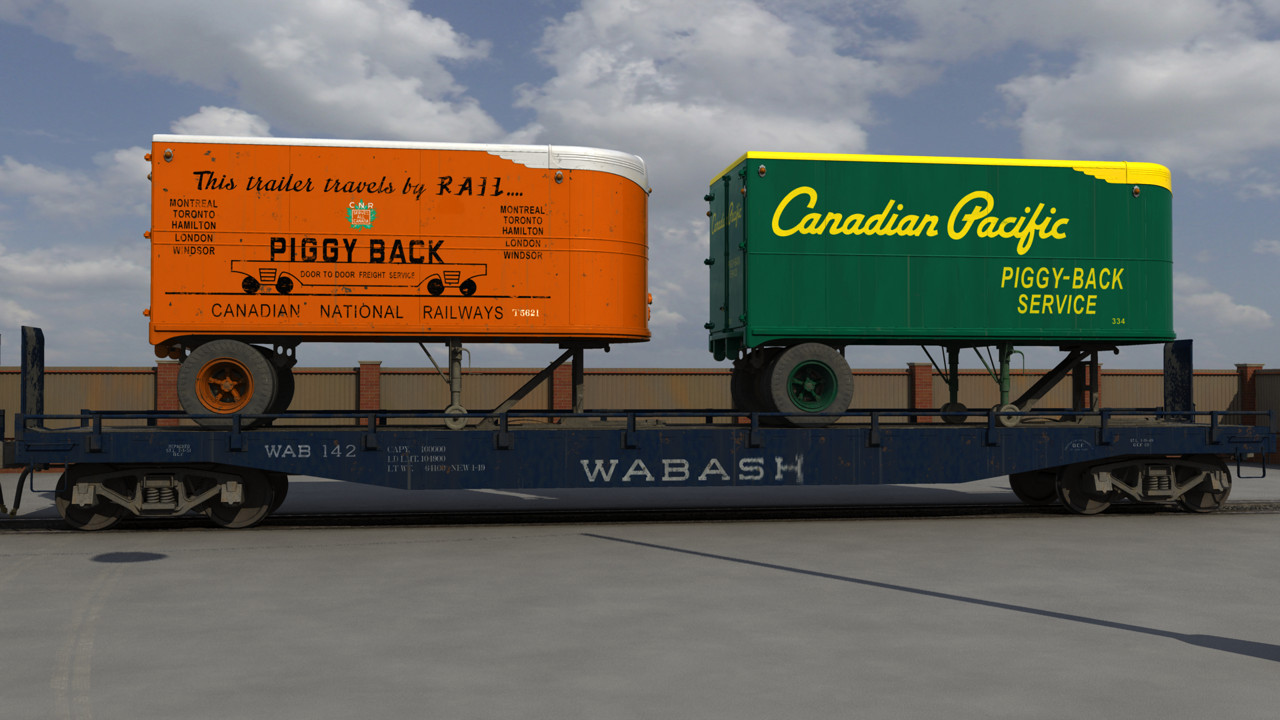
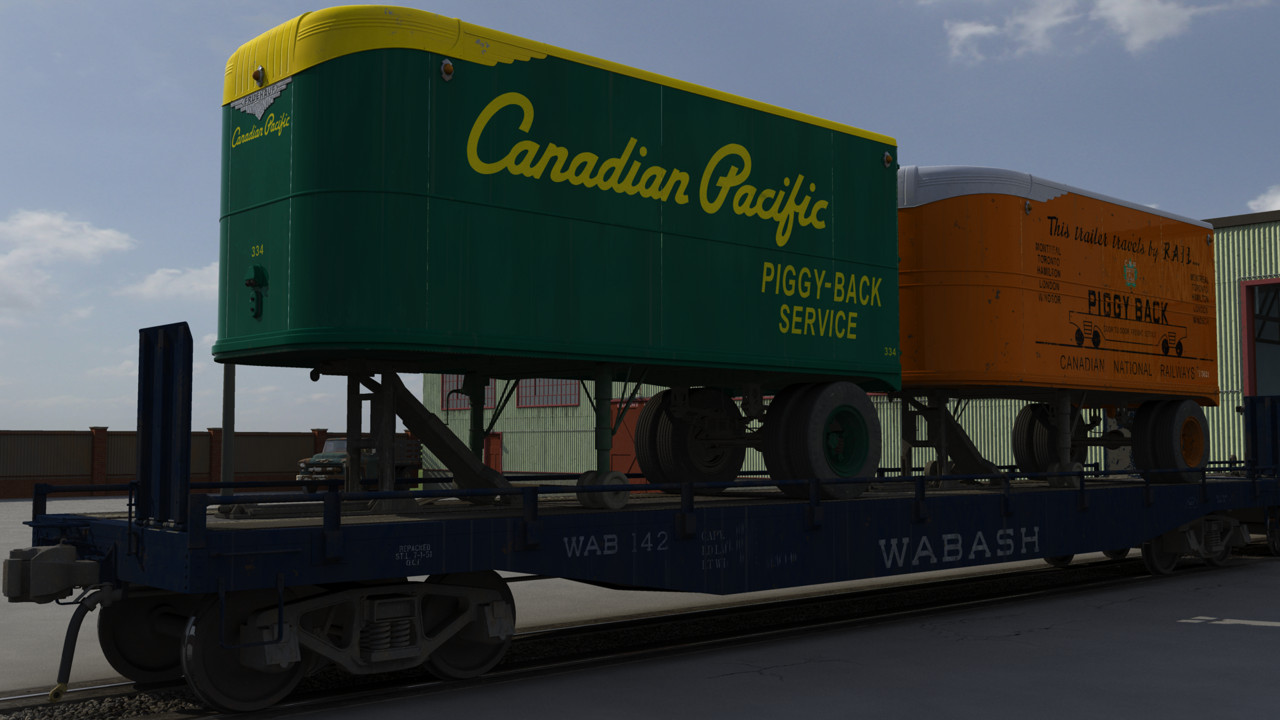
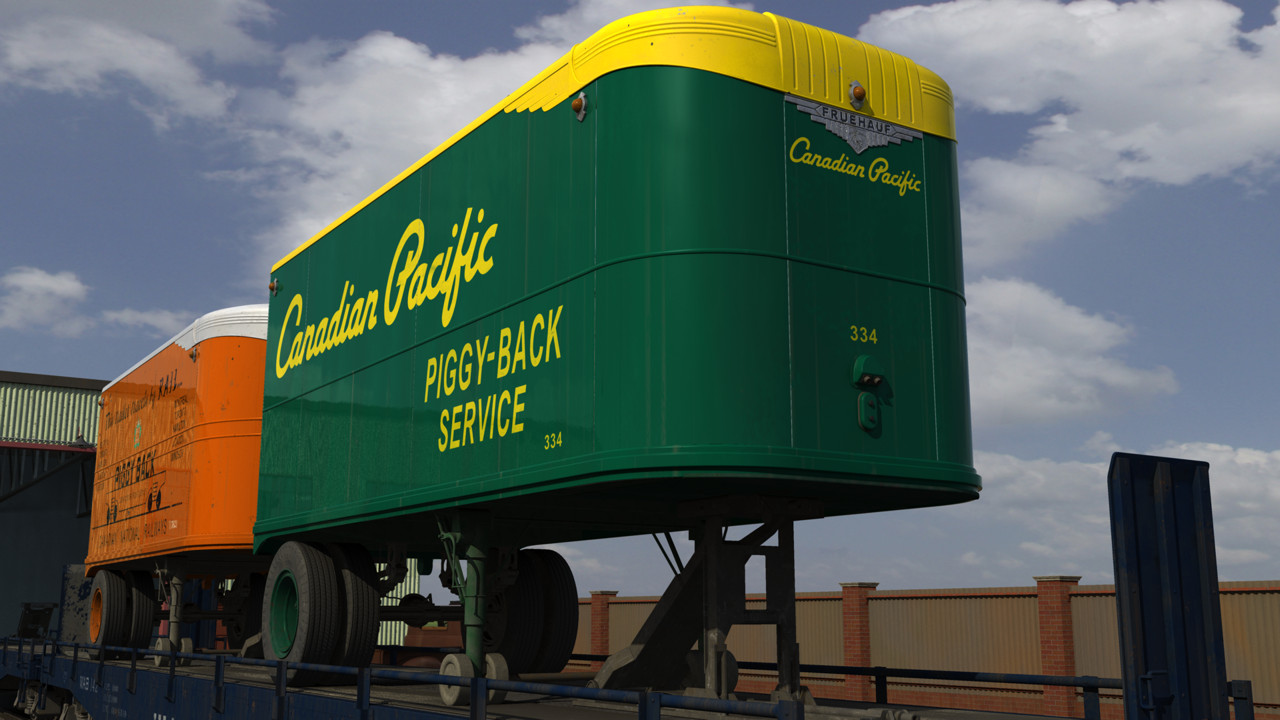
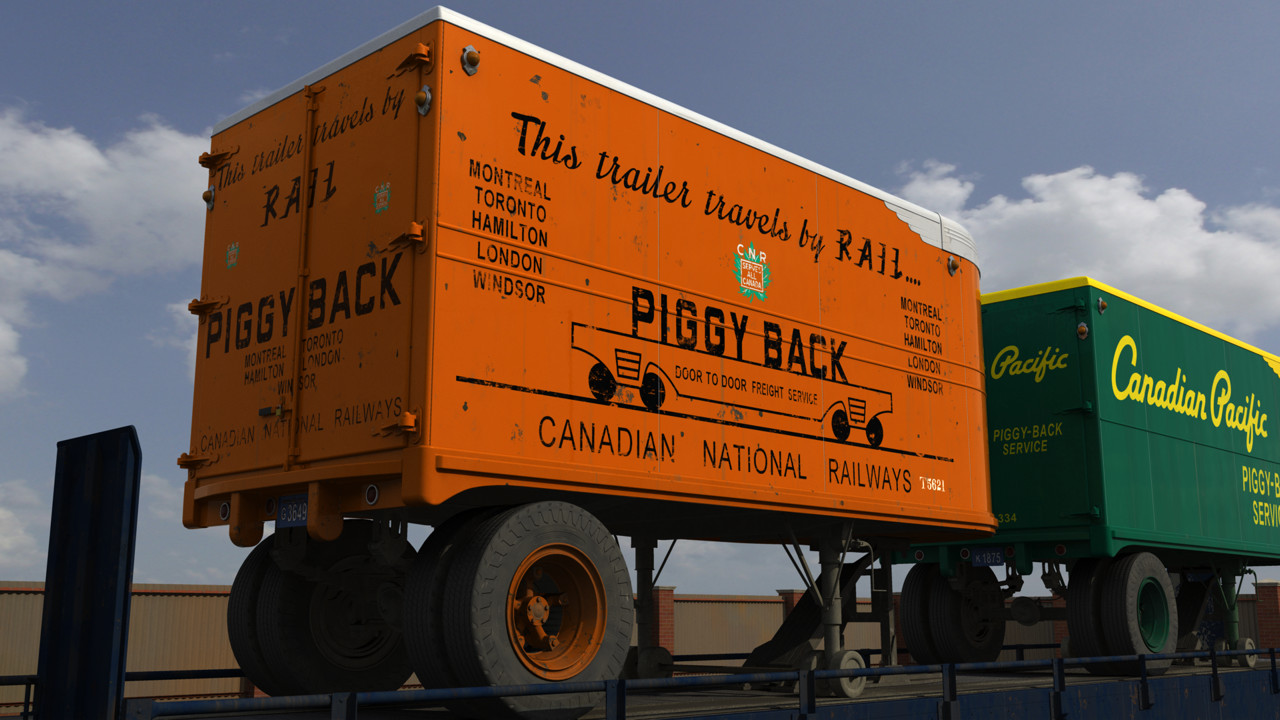
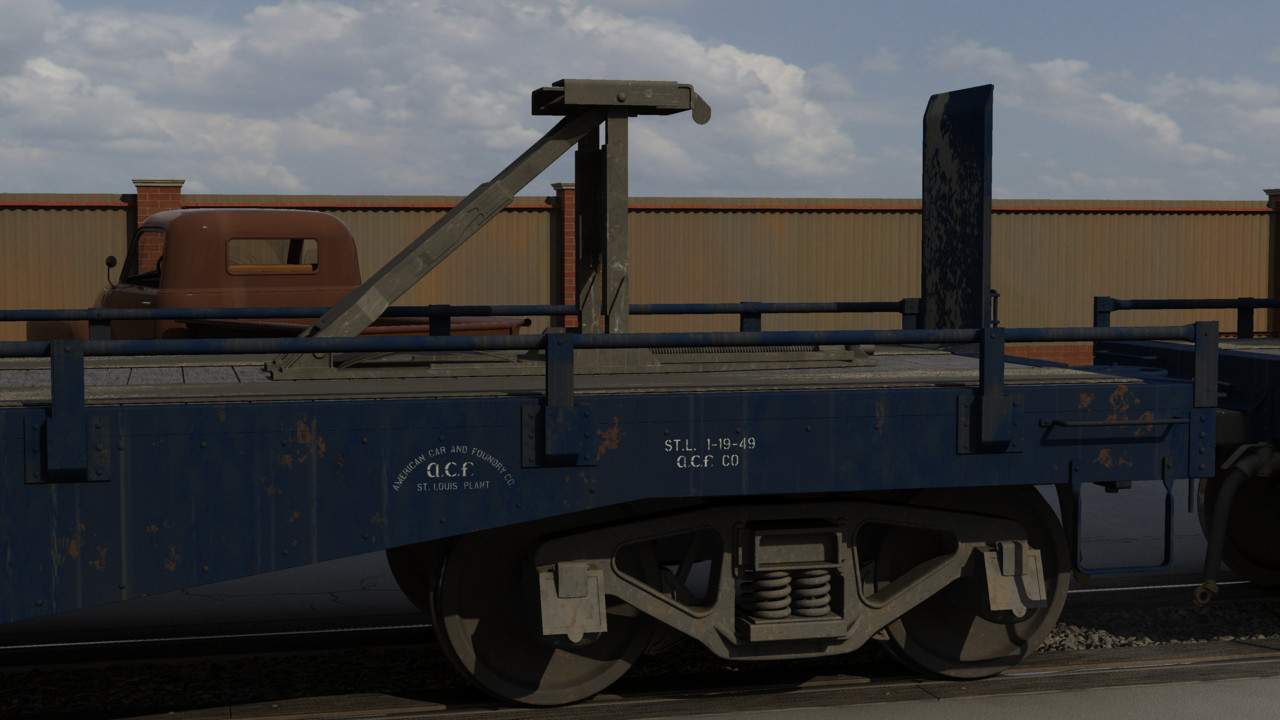
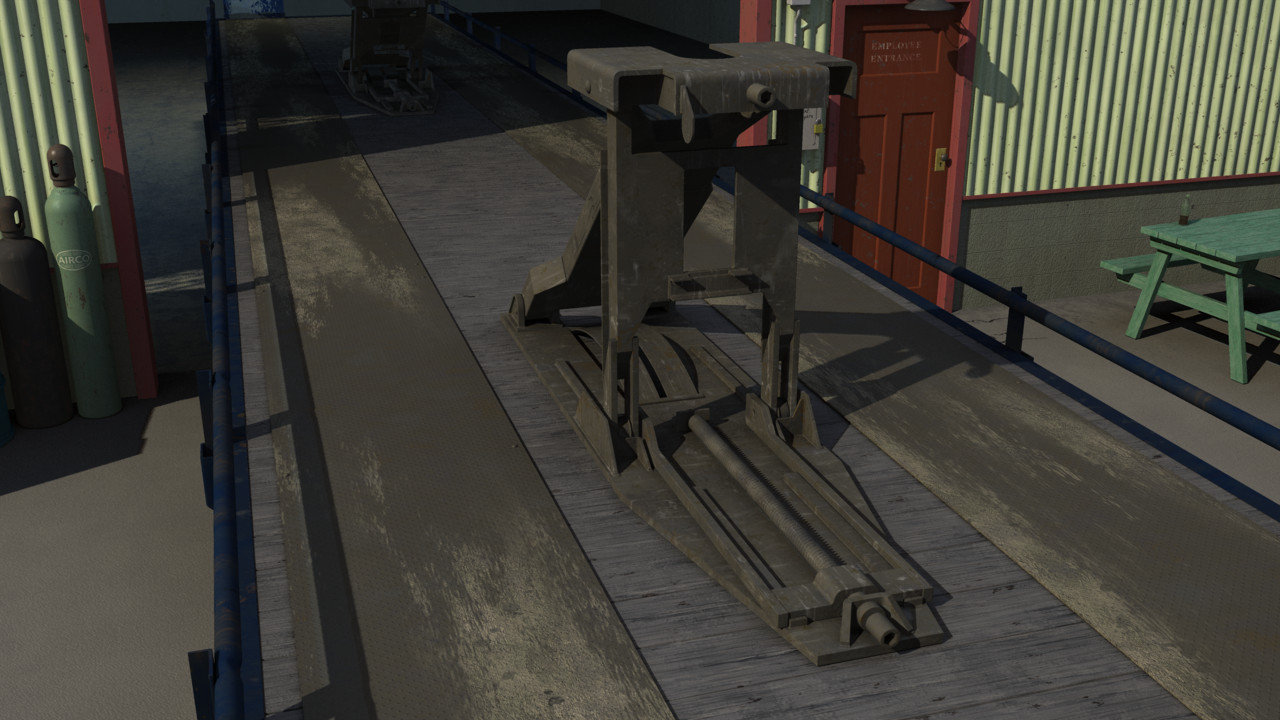
Well my latest rolling stock release has taken more time than usual since the cargo required way more work than the railroad car. Before interstate highways and stackable containers, rail "intermodal" transportation was defined as driving transport trailers onto railroad flatcars to "piggy-back" their loads from city to city. Railroads started by towing the trailers up long ramps onto a slightly modified standard flatcar and anchoring the trailers with chains. Soon modified flatcars were given integral fold down ramps so multiple trailers could be driven onto a long series of coupled cars. Before trailers started to grow in length, they could fit one standard or two shorter trailers per typical flatcar. I justified the creation of two trailers since they could also be used to tow around my backlot once I get around to building the tractor truck. Since trucks didn't have as much horsepower as today, trailers were much shorter. Fortunately short trailers are easier to model because they don't need side doors. But all that painted on signage meant that creating the decals took almost as long as the modeling. To make the anchoring process faster and more secure, one flatcar manufacturer invented a retractable trailer hitch. One man with a pneumatic wrench could lower or raise the hitch and lock the trailer in place. This was one of the more difficult models I've tackled as there were very few reference photographs of them available on the net. And what was available were lo-res, isometric views. I basically had one good hi-res image that had a human close-by for dimensional reference but only showed about 75% of the hitch. So some of it is guess work. I may have over-compensated with the beat-up materials and dirt decals. However, I think the old, dirty diamond pattern steel plating that I showed off a few weeks ago looks even better installed.
-
Its almost entirely kliegs. The sunshine is my typical sun klieg plus negative blue sun klieg combo about four miles away to give the window frame shadows the right blur. Each semi-circular window gets "filled" with five overlapping kliegs that are just outside of the window frames, so forty in all. They're all greyish blue but I highlighted one set in white for illustration. Each klieg is about 360 in. in diameter and has a cone angle of 179.9 deg. I still have to play with number of rays and how they're distributed because you can see grey banding in each arch close to the windows. I may need to go with more lights per window but this is a reasonable place to start. Maybe the banding will become less noticeable once I start adding materials? The upper right inset is a more distant shot showing the circular array of eight, tilted up, inward pointing, low intensity, no shadow suns that I trying to use as reflected floor fill light. This trick works quite well to fill in shadows under full sun outside. But inside, the floor and similar horizontal surfaces are unacceptably darker than the floors and ceiling. I should give radiosity a try but I have yet to look for any tutorials.
-
I never think of that! Thanks again Robert you've been extremely helpful.
-
OK Robert while I have the tech ref open I can't find any reference to "Distribute in Passes". I assume it has something to do with how rays are cast from the area of the klieg? i.e. For every render pass, the rays come from different locations within the klieg area.
-
Check that! It's an advanced properties and I had neglected to throw that switch. Thanks Robert.
-
NIce catch! Under BIAS the tech ref says "scenes using very large sizes may experience math precision errors during rendering". So your observation sounds right. It also says "Visible: Sometimes" and in my case I can't see it. I assumed it would be under Cast Shadows but all I get are Type, Rays Cast, Distribute in Passes and Darkness. I'm not sure where else to look.
-
Sure! Now you tell me. 😄 I'll keep that in mind. Thanks.
-
I may have done something wrong but I couldn't get this to do what you expected. Oh I'm well familiar with Action Objects. When I first started building Pennsylvania Station in 2009 I ended up with a model that had 74 of them. I returned to that model recently and the first few screen renders were frustratingly slow in v19o & p. On a hunch/whim I decided to rebuild it as a single model importing all the parts that used to be action objects. As of today the model is 18Mb but renders are back to being typical. However finding patches and aligning normals during a save is more than a minute so I'll probably start a new interior detailing model with the double doors and many other additional components and add & constrain it in the chor. Thanks for your suggestions, Robert.
-
I have a model of double swinging doors with bones and poses that I want to import multiple times into a new model. After the import, I can select all the CP's and translate and rotate them into my desired positions but the bones stay anchored at their imported positions. Is there a way to move the entire model, bones and all, within a model? I'm fairly certain the answer is "No" but I thought I'd ask before doing the grunt work or installing them in the chor.
-
I'm curious as to what problem this new feature solves. This is well timed as I had just generated a render that had this very problem in v19o. v19p eliminates the really black patches. Thank you Steffen. But still remaining are the subtle light grey patches on either side of the arches on the right that were there in v19o. Both images were rendered using the attached project. Penn_station_black_patches_embed.prj
-
As you can see, it's all based on my favorite Enhance_AM combiner; AM_Dirt. My only problem with it is the way the blend percentages work. I had assumed that if you wanted an equal distribution of six evenly distributed grey levels (0, 51, 102, 153, 204, 255) then the blends should be five bands with the same limiting percentages. A look at a histogram of the resulting material showed this wasn't true. So after some trial and error I found the blends shown that produced a reasonably even histogram and I use these consistently with colour choices that are subtly different so they combine well to my eye. Using AM_dirt, I make the basic surfaces, steel and dirt (light and dark). CellTurb is used to combine a layer of light dirt with distinct dark spots scattered throughout. I also let the dark dirt slightly bleed through the light for even more variation. AM_Bozo is the combiner used to make regions of steel and dirt. The key variable here is the Gain of 99.99% which makes the dirt have hard edges. The AM_Dirt Bump variable is cranked up for both dirts but set to 0 for steel as I preferred the look of a separate texture material not based on colour variation. Both the steel and dirt texture are variations of the Dented plugin from Alibi with the steel texture being small craters and the dirt texture being larger bumps. These are combined using AM_Bozo again with its variables the same as the colours so they match regions.