-
Posts
569 -
Joined
-
Last visited
Content Type
Profiles
Forums
Events
Everything posted by Ganthofer
-
I think Ken's approach might work, but the surface would have to have some curvature to it or at the angle that the specularity shows up, it would be across the entire helmet since it is a flat surface.
-
If they are both Flat objects, then there is really no reason to put the head behind the helmet. put it in front and the color of the helmet will not affect it. Is there a reason to make the helmet 50% transparent?
-
In A:M >Tools>Options>Folders>ShowFolders-Libraries -- what entries are listed? for the CD, it should be the Drive letter and path (example E:\Data\Libraries) Also, on the Drop Down for Libraries, try "All Libraries"
-

Trouble with Exercise 16 (smoke, wind, & fire) V.12
Ganthofer replied to Joe Gamblin's topic in New Users
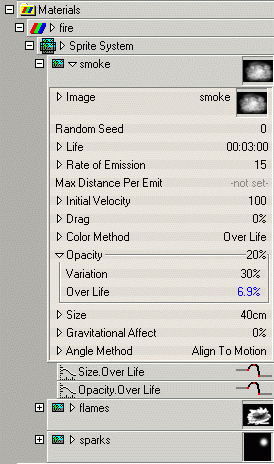
The setting you are looking for is in the material. see attached pic. There are three locations you could set it. In the Materials, under Models or in the Chor. You must expand the tree to get to the Sprite system and then below that will be each sprite and there you will find "Opacity Over Life". Hope this helps -
Interesting design. insect based. What's the story on the wings? The bottom one is flat the top one is arched up.
-
I have found this to be true in both V12 and V13a9. If I click off the point or press ESC and then select again, the graphic of the sphere is back. It seems to be the same for Bias Handles and Manipulator Properties Box.
-
Welcome to the A:M Forum Here is a link to basic Splines Basic Splinesmanship I There are 2 basic way to get sharp corners (and a couple of complex ways). -to make a spline that goes through a CP angular instead of curving, there is a Button called Peak. It's ussually above the Lasso tool on the right. If you select the CP and Press the P key (to Peak) and the O key (to Smooth). -the other way is to make 2 splines cross and join at the intersection, then delete the tails. Useful Links
-
Welcome To the AM Forum next, let me suggest that you "do try" and find the answers in the manual or by using the Forum search feature. I realize that in the beginning, its hard to even know what words to search for. Now to your question : - Patch color - named groups made up of CP's (Control Points). Similar to Exercise 9: Flower Power. You can model all as one mesh (providing the model lends itself to this method) and then select the Patches and give the group a name, then in the PWS under Groups> named group properties Surface, you can set (among other things) the Diffuse color. This works well if the Splines follow where you want the color changes. You can also use Materials instead of (or in conjunction with) Surface attributes and apply them to the Patches, Named Groups or the entire model. - Decals - This is covered in Exercise 10: FW-190 Fighter and mentioned in Exercise 11: Giraffe. There are a couple of tutorials on making and applying Decals. This requires some type of paint program. Hope this points you in the right direction. Here is a link to the Useful Links Forum page.
-
I believe you need to open an Action window with you model. then under the Models User Properties you can turn off the rigs poses.
-
Here is a trick that may be helpful (maybe not !). I used it on book covers. For all the keys that are the same (Identical) size and shape: - make a model of a key ( cut it out of your full model ). - make a set of images (same aspect ratio, over all size can be different ) - position and apply one image, then add all the other images to this key model. - make a model of the rest of the keyboard. - in an Action for the keyboard, add the key model as an Action Object for as many copies you need. - set each key to display the proper letter (I set the % to 0 for all the unwanted letters ). might be able to use a Images sequence, but I don't know how you control which frame is displayed. there is only a frame number selection and obviously you don't want the letters changing every frame . Just a thought.
-
-

Oz Map -- Another v13 Displacement Fun Thread
Ganthofer replied to Zaryin's topic in Work In Progress / Sweatbox
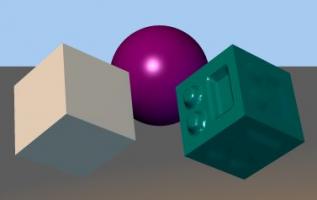
It looks like adding a Fractal or a Normal Map makes the Specular show. (example with same image added a second time but set as Fractal) -
In the bones view, the bottom ring of the body looks like it's the only one attached to a RED (Pelvis) bone. If that is true, I would add the next ring up to it also. Maybe use CP weights and split 50/50 with the LightBlue (Back) bone. The CP's in the crotch would also attach to the Red (Pelvis) bone. I would use CP weighting with each hip where it joins the Red (Pelvis) area. I'm working on a slight re-splining of the hip and reducing the body rings to 8. Unless you have a lot of detail in the crotch/hip area, the less splines you use to get the basic shape the less CP's you have to try to deal with when CP weighting or Smart skinning IMHO. The model float when dropped into the Action/Chor window. I think it's your foot targets. In your modeling window, they need to be lined up on the ankle joint. The rig is setup to make the ankle joint follow the null. (edited) I've got a little free time, as I'm a bit under the weather and they sent me home to do some mandatory online training. That's obviously not the only thing I'm doing online
-
Some thoughts on your problems: 1- in the modeling window in bones mode, where are the feet relative to the Model Bone? I believe the model bone is what decides at what level from the ground the model starts at by default. 3- I can't really tell from the pic, but if you would post a side shot in wires it might clear things up (for me ; ) I would probably change the layout of the spline running up the back of the leg (or is that the front? ). I think that reducing the number of splines in the body would also help, unless the body has a lot of distortion to do, 16 splines seems a little heavy and joining to 4 spline legs leaves a lot of splines that don't appear to really contribute to the shape. Just my 2 cents
-
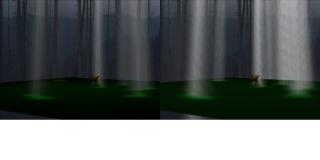
I realy like the landscape !! A couple of thoughts on the volumetric Light: -make sure that the cone of the light does not extend past the outer edges of your clouds (or what ever you are using as a mask). Especially in line of sight with the camera. see attached image - right has light coneextended past edges of mask (clouds). -the Quality setting. -I prefer the look I get with the Width Softness set to 100%, and then play with volumetric contrast, brightness and Light intensity.
-
It depends a little bit on how you work in A"M (Modles embedded or seperate mdl files) Disclaimer - there may be an easier or quicker way!! (This is on a Windows PC) Model Files Not Embeded (floppy icon in bottom right corner of Thom Icon to right of Model/object Name) -Make sure you SAVE so everything is updated, you might actually want to close the project and re-open. 1-Import the Model again from the location that the original Model is saved at. -You may want to then "SAVE AS" the second instance of this model so that you can make individual changes to each with out having them conflict. Model Embedded 1-right click on the model name under Objects in the PWS. 2- Select "SAVE AS" and then using it's current name, save it. (remember where you saved it!!!) -The Thom Icon will now have a Floppy icon in the lower right corner, indicating that the model being used is externally saved from the project. 3- Embed the model back into the project by clicking on the triangle (between the Thom Icon and the Model/Object name). Inthe properties click on the triangle in front of "File Info" and change "Embedded" from OFF to ON. -Now you are basically back to where you started, but you have an external copy of the modelthat you can ow Import into the Objects in the PWS. Don't forget to Toggle "Embedded" to ON after you import!
-
Are you wanting to do this in a Chor or just under Objects in the PWS?
-
Steffen Gross has this one: http://www.sgross.com/plugins/plugin18/index_e.html It was for v11.1i, haven't tried it with v12 (v13)
-
OK, the arms still seem a little stiff. This is for the "construction guy" model, right? Does that poxy really match the skeleton of the "construction guy"? Could just be my perception. His shoulders look too small. I think the visual clues would be better if the proxy were expanded to match the overall size and shape of the model. I think it's possible to make a stickman walk like a heavy individual, but without the visual mass, the connection is thin (pun intended).
-
Ah... for that I'll leave you to better qualified people. I won't be much help in that area, but I'll be interested in what may be suggested. Best wishes.
-
Paul - didn't even know what a sporan was (had to google it). Worn around the waist and hangs in the front of the kilt, right? Can we see it from another angle? Maybe a side view and a straight frontal shot? Most of the one I found pictures of had 3 tassles (or something) hanging from the front. They either had what looked like a metal "cantle" to open an close? Or a flap that only whent about 1/4 to 1/3 of the way down the front. It looks like you are going for the flap closure, made of leather? with a embossed design? If so, I think the flap is too large (top to bottm wise). Just observations. May or may not help, but there it is.
-
Maybe this will be of help. Some one posted this a while back. BML Walker I think the arms are to stiff and so they distract from the overall effect. Still giving it some thought.
-
a couple of suggestions- -his belly should sag with each foot fall. maybe a little bounce like. -more hip movement, twist, right hip forward as right foot moves forward. -his whole body should drop a little with each foot fall and rise to lead his next step. -exageration ... lifting his foot is slooow, putting it down is faster. -a little slower or maybe a bit of a pause before he lifts his foot for the next step. It's a lot of work moving that body around.
-
Don't want to add a ME TOO post, actually I do want to add a ME TOO post. Love the format!
-
John, The view from the loft needs to have some reflection (and/or shadow) on the floor, similar to what you can see beneath the table to the right of T-rex. I think this will make his feet less floaty. Also it looks like most of the light is coming from behind him, so I'd darken the side away from the large glass area. Probably render T-rex with the light source from the perspective of the Glass wall. The edges might need to be a little less sharp and/or the the rest of him a little less blurred (could be my eyesight on that one though ) I think he fits much better here than in the Front office.


