Ganthofer
-
Posts
569 -
Joined
-
Last visited
Content Type
Profiles
Forums
Events
Everything posted by Ganthofer
-
I have not heard of any dictionaries for other languages, but perhaps some individuals out there have added to the Dictionary.dic file. If you have a look in the Dictionary.dic file, there are some German words in there already, of course not the words you are probably looking for. In the mean time, you may find this useful. Dictionary.dic - Hash Forum Thread Glenn
-
Very nice. Are you planning on expanding it to the whole body? Paul - It looks like he's using Sorenson V3 for video compression (uncompressed PCM audio - no sound recorded as far as I can hear though). Glenn
-

Having Problems with Copy/Flip/Attach
Ganthofer replied to Noganite's topic in Work In Progress / Sweatbox
Make sure you do not have Mirror Mode on. You can get really strange results, especially along the zero axis. -
many things have changed here in the Forum, but I believe it still depends on what forum you are trying to post in. For instance: I can not upload an AVI in this message, but I can upload a MOV (quicktime). Most, but not all video clips you find here are MOV or mpeg because they are more (or seem to be more ) universally viewible. Many A:M'ers use MACs and many avi codecs seem to be problematic without extra software and added codecs.
-
Sorry for not reponding sooner, been away from the forum for a while. I posted while you were posting, so I didn't see the question. I have a large number of incomplete models, mostly experiments to learn a specific feature. So I'd have to say, I'm not really good at modeling.
-
Don't know if there is a physical limit, but many large decals may become a problem in realtime review, as I believe they have to be loaded into memory. Just my observation.
-
Glad to help.
-
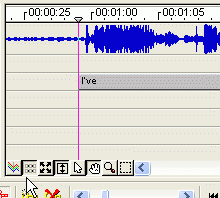
Take a look at the lower left corner of the time line. I believe you may have the graph Icon selected instead of the other (don't know what it's called). Select the one to the right of the graph icon (see pic) If that's not it, we'll try again.

-
Give me a few minutes to try it (v13.0o that's the letter "o")
-
What version A:M are you using? I'll give it a try and see if it's working? Haven't used the Dope sheet in a loooong time
-
I'm not quite sure I understand what it is you are trying to do. Can you clarify? Holding down the shift key when adding CP's to an existing spline preserves the current shape of the spline. If you are creating a new spline, holding down the Shift Key doesn't do anything (as far as I know).
-
As a general rule, most clothing is built into the model. If you take a look at some of the models provided on the CD or else where, you can see this in wire frame mode in the Modeling window. You will see that beneath the mesh that makes up the clothing, there is no body surface mesh. Only the exposed areas of the body are actually modeled. This is not to say that you can not model a complete body and add a mesh for clothing over it. the Difficulty level just increases, because now you have to either constrain the clothing to the underlying body mesh or use the Cloth Material (Cloth and Deflector) to prevent the body mesh from poking through. The Cloth feature has changed a lot (in it implementation) over the past few years and is generally thought of as an Advanced feature. Skin Tight spandex clothing is ussually just a Decal or texture applied directly to the Models mesh, the same as skin colouration, bump maps etc.
-
I just downloaded and unzipped without errors. Don't have anything I can open the psd file with on the computer I'm currently on.
-
Try this link Libraries - By Heath If your still having problems, provide the OS you are running, what you copied to your hard drive and the folder location you copied it to. Glenn
-
My time on the Forum is sporadic at best, but the Forum has a great group of members and some one is bound to answer any specific questions you have. Be sure to try the search feature for topics you have questions about. Rodney's signiture has some good links to resources. Glenn
-
Very interesting characters and statues! did you find how to extrude yet? Glenn
-
I was playing with toon setting, just out of curiousity and (Rodney) I can't set a negative Bias. Only goes down to .01 and that turns everything Black. Could be I misadjusted another setting, haven't really playedwith Toon much.
-
Do you remember what version A:M you were using (2006, 2005, .....)?
-
Answer to question 1: -In the PWS under the Chor, you change the resolution of the camera. You only have control of this in a Chor window. Then the camera frame you see will show the bounds of what an actual render would give you. You can of course render from the Model or Action Window and set the resolution of the out put to File or AVI/Mov, but no in those windows them selves. Hope this helps. Haven't got a clue on 2.
-
I remember have problems similar to this, ussually when deleting and adding a lot of slines. I don't remember if I ever found a solution that always worked, but here are some things you might try: -close and re-open project. -select the cp behind the offending end cp and press the Y twice to insert 2 cp's between. break the spline between the 2 new cp's. -select all but the offending cp, copy the mesh, paste into new model. What version A:M are you using?
-
I think this is the tutorial Robcat2075 is thinking of. http://www.hash.com/users/ed/tutorials/fpm/fpm.htm It's by Mediaho (Ed Lynch) Blunt Force Trauma
-
The 100% vs. 50% in the Task manager Performance Tab is a bit misleading. If Hyper threading is enabled and you run one instance of A:M you will see around 50% (that's 100% of one virtual CPU). Split the graph (View>CPU History>One graph Per CPU) and you should see that one (virtual) CPU is pegged to the top and the other is not doing much of anything. The little bit that shows on the second (virtual) CPU are processes taking advantage of the Hyper Threading. So when Hyper Threading is enable and one graph is pegged at the top, 50% really is the same as 100% with Hyper Threading disabled. When the second (virtual) CPU graph starts trending up is where you can see performance gains (or losses!!) depending on the application and contention for the same resources.
-
Here are some Forum links that may be of interest OMG! Lightning fast renders!, Zippidy do da! AM and Multiple Core CPUs, Want to get the rendering to be as fast is it can be on this system. P4 Hyperthreading, some lessons learned One thing that I have found to decrease render time (Increase speed) is specific only to Intel CPU's with Hyper threading with Dual channel memory, Oh yeh and XP Pro (I haven't tested it with anything else!). Meeting all of the above requirements( I have a P4 HT 2.8 ghz with 2gb of dual channel DDR2 memory - Oh and a motherboard that supports Dual Channel memory!), and if you are rendering more than one image (a series of TGA's for example.....), You can open 2 instances of A:M and render both at the same time (I ussually render odd even frames, but first half - last half would work also). I use 2 copies of the project and associated files to reduce the chance of file access problems/contention. you must have enough physical memory to prevent Page file(swap) use. I don't have any added software on this PC so setting the Priority (from Normal to Realtime) of Master.exe in the Taskmanagers Processes list doesn't gain me anything. The render time for an individual image (in either instance of A:M) is slightly longer than if you only had one instance of A:M running, but the fact that you are getting 2 frames (2 instances A:M running) in slightly more time than 1 frame (1 instance A:M running). I have seen as much as a 40% time saving. I have also seen frames that have nearly no time saving what so ever, these have been very few in my case though. There are other hardware and software considerations that could probably be optimised (haven't tried these yet to see): -multiple hard drives - each instance writing to it's own physical drive. -video card that doesn't use shared memory -disabling the realtime virus scanning of the A:M files. -removing from startup or disable any applications/services not needed. (this list could be huge and will vary greatly depending on your machine)
-
Maybe this will help
-
Yes, Flexible tripod legs like you linked to can be created and animated in A:M. A:M is very (and I mean VERY) good at organic model animation. You don't have to be limited to cylinders and spheres for limbs and joints.