-
Posts
21,633 -
Joined
-
Last visited
-
Days Won
114
Content Type
Profiles
Forums
Events
Everything posted by Rodney
-
Boolean cutters can be very useful tools. Animated Boolean cutters... even more so. But you need to plan ahead and close your objects. Note that we can get away with boolean cutters cutting into geometry that isn't fully enclosed but when we do we are risking rendering abnormalities when objects are seen at certain angles. The only way to ensure optimum results is to use enclosed shapes/volumes in both the cutter and the target object. For this we need to plan ahead as we model and close both cutter and target. If the operation is really simple and the image static you might be surprised with what you can get away with using unenclosed shapes. Just be aware of the risk in rendering as you do. I haven't tested booleans enough to know when and where we can break their rules. Hopefully someone else has and will share what they've learned.
-
If those .mov files are referenced in every chair that'd certainly slow things down. If unnecessary I'd remove them. If necessary I'd consider substituting smaller proxy images for them, turning them off or temporarily removing them or using sequential images instead. (I'm sure I've missed other options)
-
I want to add this link to the mix. Here is the official write up on Specified Booleans. ...and here is pretty much the same thing without images:
-
We've got to find a good way to suggest that everyone Right Click often. So many options and solutions are revealed via a simple Right Click. Every new user should set aside a day to do nothing but Right Click and explore whats there! Roberts suggestion to Save first cannot be stressed enough either. If you save first you can always abandon any effort... throw it away... gone forever... with the confidence that you can return again to your last Save and press forward again. A good workflow in A:M will always include Right Clicking and Saving. Doing both often... makes even better sense. Maybe we should request a Save function via every Right Click menu. That'd help us emphasize both of these essentials.
-
I'm drooling already. Way to build up the anticipation! The banner looks nice. My suggestion would be to bring Squetchy Sam down and to the right so that he isn't on top of the lettering. This would let you increase the size of the fonts considerably and make the smaller words underneath more legible. I figure you are wanting to have Sam be on top of the 'I' but perhaps the ball could be there instead? Perhaps with the other 'i' over there above Rig it won't work as well. Anyway... the pose looks great to me.
-
I don't think A:M is pausing here. Its working. If you have any textures or bones or groups A:M has to rename those as it gets them out of the paste buffer to avoid conflicts. Its also possible A:M can hang if it encounters an event where its not sure what process to perform. I don't know whats going on deep inside of A:M but lets say it gets to 'Chairseat999' as a group... does A:M know what to do to create Chair seat 1000? (only an example here) You should investigate creating your more complex models in a Choreography. You can start by doing something simple and work to the more complex. Save out of the Chor as a Model every once in awhile and then reimport those models in. Try this... Drop 4 empty models into a Chor. Offset each of the models Xaxis Translation by 100cm from each other in their properties (i.e. -100, 0, 100, 200). Now copy and paste a chair or some other model into the that original model. Go back into your Chor. You'll see four models. Switch to Modeling Mode - Shortcut Key F5 (still in the Chor) adjust some splines and see your changes effect all the models Switch to Muscle Mode - Shortcut Key F7 (still in the Chor) adjust more splines and see your changes only change that model You can build up very complex models individually and as groups in this way. If you save often and reimport those models you should be able to continue to work quickly with less lag time. Save decaling and rigging for later if possible. If the models don't change in the Chor they'll automatically get updated when you update the original model. If you plan ahead your can optimize your effort by dropping multiple models in between other models to fill in the spaces. The next thing you know you've got one giant model. Note: I'd have to test with huge models to determine the true difference in realtime responsiveness on that scale. I'm not sure I have the patience for that yet. I know I've not explained this well enough. Bottom line: This is one way you can create large complex models without the lag time.
-

Render Problem- Strange artifacts showing up on final render
Rodney replied to cindylyoung's topic in New Users
Cindy, First things first... other than the artifacting... that is one very nice render (the modeling, the animation/camera work etc)! It'd be nice to see a wireframe or shaded wireframe rendering as that'd show us where the patches are. I think we can guess by the artificating however. Its it possible that you've got the older porcelain material on the model? (any materials applied to that area for that matter?) If yes, if you take the material off will the artifacting go away? I ask as several years ago A:M changed how porcelain materials work. Also... don't hit me here... silly question that has to be asked: Did you check your normals? -
Hey Tim!
I got your comment today. I just commented on your Pitch. I've been a little busy of late and haven't had the proper time to comment. Sometimes its better if I don't comment as it allows others the opportunity to comment. If all you see is commentary from me... you'll get bored really fast.

I'm glad to see you working your way through
-
Come on Kyle. You know how to import/open and apply actions. You are going to have to convince us you don't.
-
Thought I should add this to the mix as most people don't know about this tutorial. The classic tutorial on modeling a soccer ball surely must be the video by Alain Desrochers (Alweb here in the forum). The video itself (one from Hash Inc's SIGGRAPH videos) is hard to find as its out of circulation but the tutorial is still online. Modeling a Soccer Ball - by Alain Desrochers It makes for a pretty good modeling exercise.
-
Not at all. Its important to be fully grounded in reality before launching off toward distant stars. I'm must admit I'm a sucker for those bouncing balls. I've bought books just because they contained a snippet of something I thought worthwhile or representative of one artists take on this rather simple(?) exercise. I haven't pursued the math of it all because I know in that way for me lies madness. I'm not chasing after reality here or I'd just go out and bounce a lot of balls. One of the reasons the bouncing ball exercise is so important is that it teaches us how to move shapes, forms and masses in time and space in a believable way. If objects in a scene move consistently enough they create their own reality. Thanks for that Excel spreadsheet. Thats rather clever. I'm trying to think of how I'd implement it differently... or adapt it to other purposes... and failing miserably. I need to consider spreadsheets more in my daily wanderings. If nothing else they make really great dope sheets. Regarding Channels... woo boy... welcome to A:M! (Sorry... can't help you on a Mac. I thought it'd be up there on the menu.)
-
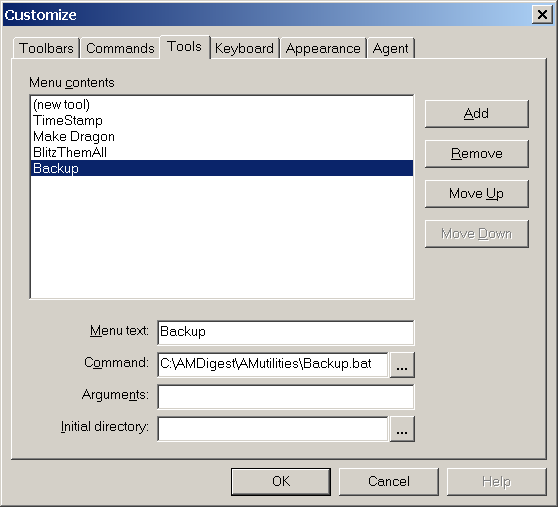
Great tips. Keep 'em coming! Here's one that's only been available in the past few versions: Sometimes people like to add their own programs and utilities into A:M's Menu. This is accomplished via |TOOLS|Customize and adding the programs in via Tools tab. This is nothing new... that functionality has been there for dozens of years. But now we can assign shortcut keys to those Custom Tools. I happen to find this very cool. This is quite handy for launching pre and post processing and other automated tasks with the click of a key or two on the keyboard. ...and of course you can minimize those programs and continue on working in A:M. For instance you could run Rusty/Glenn Anthofer's Library Manager via shortcut key. The next time you open that Library it'll contain the updated resources. It might be handy to set repetitive tasks up via a 'Begin Session' script (batch file with PC or action script with Mac) then close out the day with a whack of another shortcut key to launch an 'End of Day' script. I haven't used this functionality a lot lately but I really should. Guess I haven't had that much need for automation of late. At a minimum it can save a few minutes during the course of a day.
-
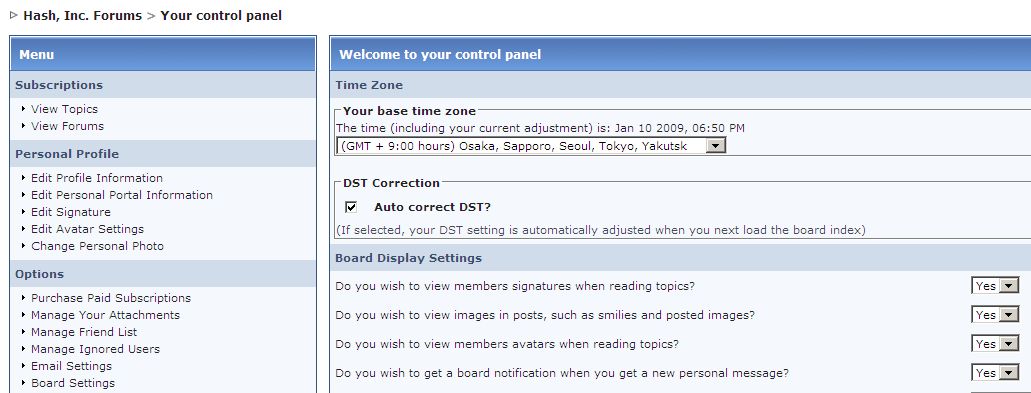
Steve, It looks like somewhere along the way you turned off viewing signatures in your Forum Settings. Not that you want to turn it back on but you can do that via 'My Controls' at the top of the forum. Look for 'Board Settings' under the main menu. Viewing Signatures should be the first option on the Board Display Settings menu. What were you thinking. Didn't you know... all the great links are in the sigs!
-
I've never seen a shortcut key for that. I don't think any of the icons in the timeline windows are exposed to keyshorting. The closest functionality to that is probably having both views open at the same time. To increase productivity I suppose one could open several windows to animate in with optimum views and Alt Tab between them. This doesn't toggle back and forth between spline and keyframe views though.
-
Of course there are some Shortcut Keys that aren't listed. These undocumented shortcuts can be great timesavers too. Take the Shift Key for example. Draw a spline. Hit the Comma key to select it. Now before you hit the Lathe Icon hold down the Shift key. Note that the Tools menu for Modeling pops up. Here you can easily enter the number of Cross Sections you need. Try the Shift key with the Lock Icon as well. Model something. Select it all. Press the Lock key. Note that because everything was selected... nothing gets locked. Thats not what we want so lets try that again with the Shift key. Model Select Shift + Lock (Note that you get the same results at this point) Click the Lock Icon again Everything is locked The Shift key is also the only way you can access some functions. Older hair methodologies for instance.
-
(Updating old links) Here is a PDF file generated from the HTML Shortcut key list. If you are up to the task, learn a few of these in your area of immediate interest. It'll add speed to your workflow. KeyboardShortcutListing.pdf
-
Another excellent video tutorial Robert. The insight into rigging, both from a general standpoint as well as TSM2 specific, is appreciated. Thanks!
-
Chris, Welcome to the forum! I'm trying to figure out a good way to say 'thanks for having that problem'. The solution you've arrived at is something I wish could be added to the original tutorial video. It covers the basic setup of the two actions but doesn't attempt to go beyond that or get into troubleshooting. (Its great we've got the forum for that!) Great use of Jing to capture your screen. In the image intensive world of computer animation we really need to leverage that technology. One thing I've learned from visiting the forum today is that we need to make more mistakes! Then at least we'll know what we are learning. Nicely resolved Mr Bill!
-
Another discussion referenced this topic and I see an opportunity to close a loop and continue the discussion on transitioning from one action to another. The video mentioned here is what I want to link: The "Path Ease (walk, then wave)" video can be found at the very bottom of Hash Inc's Video Manual page. There are three additional videos at the bottom of that page. Don't miss them! The Video Manual (TaoA:M) page: http://www.hash.com/2007web/vm.htm Direct link to the zip file containing the Walk then Wave tutorial accessible at the bottom of that page: http://www.hash.com/ftp/VM/pathease/pathease.zip Get up to date on this discussion and learn more by reading through Chris's question on Actions in a Choreography. Note how the use of screencaptured images in his discussion refine the issues in question and help others see what you are seeing. Note to self here animation:masters; use a little screencapture in your workflow every day. Record yourself at work. There is a lot of good information, links and videos to be found in these discussion so... don't miss it!
-

help me!!!??? I'm having problems installing A:M
Rodney replied to matt_stanford's topic in New Users
Glad to see you've got it going again Matt. As Gerry suggests, any insight you can give into steps you took or installations you made will be of benefit to others as well. If we have a number one goal here in the newbies forum surely that must be it. Namely, to get everyone up and running with A:M quickly. -

help me!!!??? I'm having problems installing A:M
Rodney replied to matt_stanford's topic in New Users
No. No. No. No. You don't have to purchase the websubscription. You've already got a good thing going with the CD. We just have to get the program installed because your system has gotten finicky. Download that installer I linked to and you won't have to be concerned with the installer on the CD. Most likely the one on the CD is several releases earlier v15a or v15b... or something earlier than v15e. You'd want to install the v15e update even if you had A:M up and running. There is a very good chance that updating to v15e will solve your problems. I give it a solid 85-90 percent chance. ...and the update is free! -
This book is more expensive than the other best known book on A:M (by Jeff Paries) but its definitely worth every penny. Is it better than Jeff Paries book? I'd have to say yes, but for the price of Jeff's these days its easy to buy both books. Jeff's in my opinion is a bit more accessible to the layman. David's book: Very practical. Very technical. Very thoroughly covers most features up to about v13. If I had to do it all over... I'd buy it again. (and hopefully read through it more thoroughly!)
-

help me!!!??? I'm having problems installing A:M
Rodney replied to matt_stanford's topic in New Users
Matt, Its been awhile since I used A:M with a CD. I've grown accustomed to the websubscription. There are several things this could be but (guessing here) if your PC has more than one CD/DVD drive is it possible that you installed while having the A:M CD in the other drive? My guess is that the installer on the CD isn't the latest and greatest so I'd install that before you wander too much farther. The latest version is v15e: http://www.hash.com/ftp/pub/updates/windows/AMCD.exe For those a bit shy of directly downloading exe files or in need of other installers go to the Latest Info forum area: http://www.hash.com/forums/index.php?showtopic=33836 -
This what you are looking for? Feature Focus Forum
-
Congrats on making that a reality. I understand that element has stumped more than a few people. Gerry is going to want to get your insights into that. So... now we'll have volume control while watching Subject 99? Too cool!


