Rodney
-
Posts
21,630 -
Joined
-
Last visited
-
Days Won
114
Content Type
Profiles
Forums
Events
Everything posted by Rodney
-
Looking very good. You make this stuff look easy.
-
One useful construct for proportioning is to sketch out (or modify meshes in A:M) several versions of the character that show a progression of the character's ages. I'd say optimally there are three stages: child (baby), young adult (teenage) and aged (adult). Inbetween those ages as necessary to target the age of your character and their storyline. These don't have to be detailed models/drawing but might also be useful later if the story ever dictates a look into the past or future of the character. Even if never used it gives the creator a better idea of who they are, were or will be in the character's story arc. The progression I have yet to do is to take a character from three heads high (a child) to 5, 6 or 7 (an adult). I did a set of drawings once that I thought I might pursue some day where a youthfully enthusiastic teenager is transformed into a overly cynical and frightened old guy. As stories are suppose to being already in progress and don't usually contain the death of a character in old age, the infant and the octogenarian usually won't fit into most onscreen storylines. The use of highly advanced age often conveys wisdom, experience but also degenerative frailty. That'd be quite a challenge but I know it'll be educational so it's on my list of things to do. Usually in 3D each stage of the character is a separate model but I can see some characters being one model morphed and remodeled. Also, some adaptation can be made almost exclusively with textures or animated personality traits (youthful exuberance or a slow methodical painfully unstable gait). Change... animation is all about change. The more change/contrast between otherwise similar thing we can direct at the viewer the better. But there does generally have to a rationale for that change... a grounding in reality. That's were relationships (and proportions) come into play.
-

new model with some rigging running test
Rodney replied to johnl3d's topic in Tinkering Gnome's Workshop
Cute. Very cute. If you could create one those fluffy guys to ride in for the real world... and not kill the passengers inside the bouncy character in the process... you'd be rich. It'd be kind of bungy jumping without the rope... -
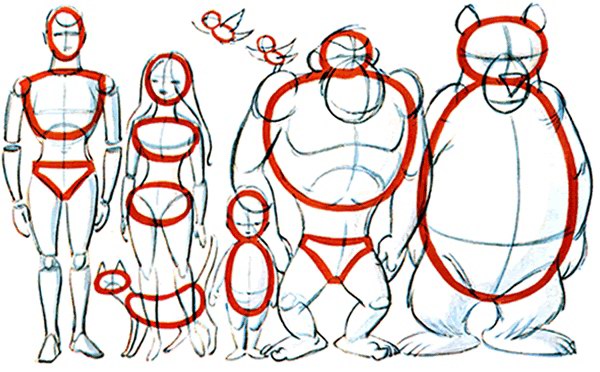
Looking good! I can already tell that these are going to be great characters and (if you accept the concept of 'Character First!' great characters tend to lead to great storytelling. You are well on your way! The texturing is really starting to look great as well. Feedback Mode: I'm not smart enough to accurately convey what I want to say about proportions here so I will type toward it and hope others can narrow my focus. Ultimately this is your story to tell and I am not trying to sway you from pursuing your vision in any way. I do want to offer feedback for consideration. I hope you will do the same for me someday. Here's a site I found while trying to find the right words to say: http://www.zebtoonz.com/proportions.htm There's nothing there you don't already know already right? The area that comes closest to what I'm rambling on is somewhat hidden in the webpage: Obviously this is that artist's attempt to formulate his own understanding on the relative proportion of characters. Your mileage may vary. I've certainly seen adults that towered a lot farther than one head above ten year olds. While much rarer, I've seen shorter ones as well. What I'm after here is a sense that the characters belong in the same set... in the same universe... in the same story. Can they can safely and effectively interact (this will make them easier to animate!). When they are in a close up shot, establishing shot or looking eye to eye does everything work... in frame? Are their silhouettes immediately recognizable and compatible. If they were seen only in black against white how might their interaction 'read'. So, this is the underlying area of focus I think... I think... I am narrowing this down to: Why are the head proportions so dissimilar between the two characters? Should they be more similar? If not, why not? Will it have impact on your storytelling one way or the other? (i.e. There may be very good reason for this or even a greater dissimilarity) You don't have to answer these questions here. The important thing is just to ask yourself these design and composition related questions. I'm certain you are already. If you are happy with the relative proportions between the characters as they are then that is an answer in and of itself. It's your thing... "Please yourself." My long winded way of saying... I'm enjoying your updates! Added: Here is an old classic from Preston Blair:

-
Sweet! Thanks for the tip Rodger. Such a simple and elegant solution. Over the years there have been several times where this underlying idea of creating sacrificial templates has worked really well with splines (I recall sacrificial templates being useful in layering materials as well ala Anzovin). Another example is where we might lathe a sphere but by first lathing a cylinder to get the ideal curvature for the half circle we need to lathe the final spherical splines. It's a lot more easy to do than describe... To achieve better/smoother surfaces with more evenly spaced four point patches I can easily see the benefit of using your methodology.
-
Hey! You should throw out your models more often. That guy is really looking great! Outstanding even. I like him. Color me jealous. Everyone is surpassing me in tech these days.
-
With .MOV files you have to consider the amount of RAM the whole process is going to take. When using sequential images programs will usually only require the image currently being referenced to be loaded into memory. Once that processing is complete the image is moved out of memory space, the next image is loaded and any free memory released. If I understand correctly when working with .MOV files all or at least a majority of the files size must be maintained in memory during the whole process. Now, note that this referencing of the input imagery isn't necessarily the whole deal. Are you also rendering out to .MOV? If you are then you are exacting the same/similar price in memory usage for the output in addition to the input. This is one of many reasons why people recommend using sequential imagery formats over movies. How do you eat an elephant? One piece at at time. When we use .MOV as our source *and* render out to .MOV we are passing that whole elephant through our entire digestive system. Depending on that system... that could be... painful. When testing something using movies where ever you can I recommend using a proxy movie. This is a smaller version of the movie you will ultimately use. Once the system is determined to work with the proxy then replace the proxy with the original. If it doesn't work you'll at least know where to focus your troubleshooting effort.
-
I was looking for movies to put into the cue for playing at the top of the forum and had to search this one out. I'm not sure it'll work in the size/format it's in currently but I wanted to say... This test in particular really captivated me. 'Mesmerized' may be the more appropriate word. I say this rather carefully and cautiously... it may very well be my favorite animation test ever presented in the forum... and I'm not exactly sure why that is. When I saw it I had to keep watching it over and over again. So... not yet playing at the top of the forum... but still great animation anyway... these two kids with stars in their eyes dancing their hearts out to a lively beat: Lothario the Lover Boy and Ida - Dancing with the Stars - On Checkerboard Squares* ...and of course there are the latter versions with alternate music and enhanced environment like this one. Nancy, you've done something great with these characters. *Not Nancy's title. I just didn't know what to type there.
-
I do. That's why I prefer Coreldraw. Actually, it's probably more of a 'first learned, best remembered' thing. Once you learn something its hard to unlearn that and learn again. Persistence does pay of however and even old dogs can learn new tricks. Not everyone is going to be good at everything and certainly not everyone is going to be great at A:M. That's why you want to get to know some of these talented people... one never knows when the right ship will sail in. PIXAR is much the same way. Their primary program for animation, Marionette, is propriety and exclusive to them as well. We are in the in on that... our proprietary means to animation being the one and the only... Animation:Master. Okay, that's enough slogans and catch phrases from me for today. For what it's worth 'Remedy' would make a fine live action series. But, you'd probably have to CG that crazy cat. I don't see any other way.
-
I'm headed out the door at the moment but wanted to say 'Hey!'. Every once in a while I drop in to see what is up with Remedy... you know I'm a fan... glad you are still plugging away! Anyway, great to see you and hear what you've been up to. If someone wants to know how to set things aright... show 'em the remedy. Later...
-
One approach might be to order the shots in some sort of sequence that makes it seem like the time of day is changing. I suppose depending on the story that is being told it could even span the course of days... years... centuries. Odd thought of the day: For the credits the sequences might be sped up replays with the animators names somewhere in frame. In that way everyone gets to relive their favorite experiences all over again.
-
I'm not sure if it's the largest size but the largest I've seen uploaded but not resized successfully is 320 × 180. It's great to see your project is still coming together.
-
This last guy looks like he's wearing glasses too. hehe You've got a nice claymation look going on with the character in the orange shirt. Looking good Gene!
-
If you take a moment to note most of your favorite animated shorts there is a good chance that sound was an important element. This isn't to say the imagery isn't just as important but rather that when more of our senses are engaged we tend to be more fully entertained. This is a secret of the pros but only in that (good) sound is often lacking in amateur presentations. When great imagery and great sound come together... it is hard to resist being entertained. Shaun has all of that coming together here and takes it to the next level by adding compelling performances... character animation.
-
Awesome Stian! Wonderful quality. ...and just in time for fall! Thanks!
-
My take on this is that you want the appearance of thickness even if using SimCloth... so yes... you want to add that. As Fuchur mentions you don'thave to overdo the extrusion, you just want enough to create the illusion of thickness. As a benefit to SimCloth the additional splines at the termination point should help prevent any penetrations into the leg. Too thin a mesh and you risk having penetrations. As an aside: One of the secrets of effective SimCloth is to leave dangling splines in place (but they are invisible/will not be rendered). These dangling splines can then be manipulated to effect the tolerance of the Cloth's interaction with the leg.
-
Using Illustrator wizard (AI files) for modeling
Rodney replied to Vertexspline's topic in Work In Progress / Sweatbox
You are very welcome. I would be remiss if I didn't point out that Illustrator and Coreldraw have one very useful tool that specifically can help with bringing drawings into A:M via the AI (Adobe Illustrator) vector format. In Corel it is called CorelTrace and it takes a bitmap (Raster) image and converts the image lines into vectors (which are then in turn turned into splines). Here is a quick conversion of a random image that hasn't been tweaked or optimized in any way. Original version>CorelTraced outline>Image Color removed (to better see the outline)>Import of AI into A:M While you should be able to see some of the potential issues with such a conversion (Follow Mark Largento's suggestion to import the paths only and not surface the outlines!) it's not a bad deal for not even laying down a single spline. Note that I just accepted the default settings from CorelTrace and those settings could be further refined to obtain more/better splines. So, the AI wizard can help with precision placement of lines/splines. I took a little while to set up the image for displaying here in the forum but the conversion is almost instantaneous (depending on how fast you can click buttons the whole process here was easily under five minutes). ...and of course you don't have to actually use the splines you've imported in your final mesh. You can just use them as a spline rotoscope/framework from which to build upon.
-
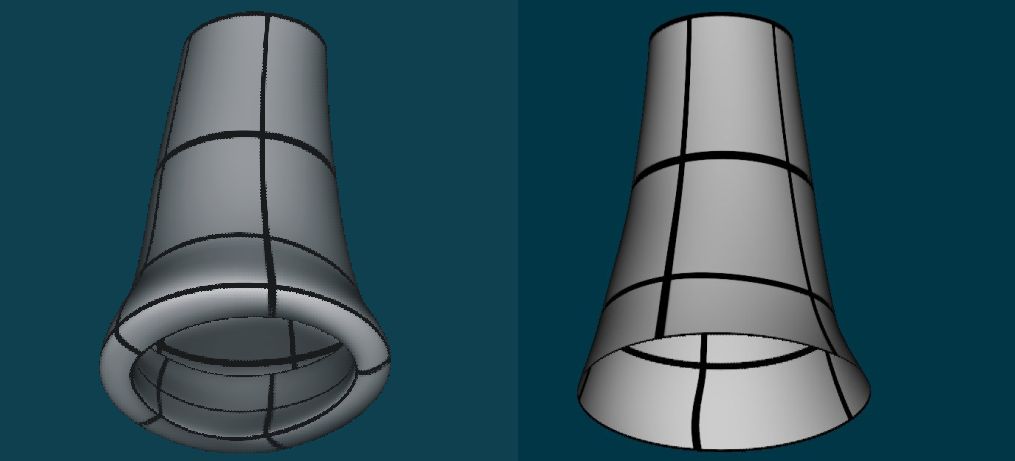
Looking very good. For some reason this character really appeals to me. I want to see her adventuring! Before you get too far down the line I would suggest giving the shirtsleeves and boot tops a slight extrusion and turning back in of the geometry. This will give them a sense of depth. Currently, the ends are razor thin. (I like how Robert Holmen describes it... 'infinitely thin') See attached image for an example of what I mean by adding thickness at the termination points. As far as the texture goes I think you are doing fine there. You might experiment with adding the same/similar image a second time and change the Decal image type to bump/displacement/diffuse or whatever produces the effect you need.
-
Using Illustrator wizard (AI files) for modeling
Rodney replied to Vertexspline's topic in Work In Progress / Sweatbox
Now here is where I think things start getting interesting... Coreldraw has a tool called Contour. With this tool you can specify an outline be created either inside or outside of a shape. Creating a contour inside our star translates quite well into A:M. Note: All of these shapes are imported at the same time into A:M with no other adjustments made.
-
Using Illustrator wizard (AI files) for modeling
Rodney replied to Vertexspline's topic in Work In Progress / Sweatbox
You can see if these two shapes are imported/interpreted separately the star works out fine but the circle...
-
Using Illustrator wizard (AI files) for modeling
Rodney replied to Vertexspline's topic in Work In Progress / Sweatbox
Here is a look at the same shape but this time I converted it from Outline to Object in Coreldraw before saving to AI. The circle shape is now maintained because there are more CPs built but we now have another problem... there are three circles/splines. Also note that if I wanted to (perfectly) surface this shape the number of CPs on the outer circle and the number of CPs on the star don't allow them to align. The AI Wizard is going to have to interpret this and because of these problems its not likely to produce perfect splines. Note: In the below image I have slightly moved the top CPs up/down to allow you to see that there is more than one circular spline.
-
Using Illustrator wizard (AI files) for modeling
Rodney replied to Vertexspline's topic in Work In Progress / Sweatbox
Here's an example of the above shape imported into A:M without any sides or surfaces (only the outlines). Note how the AI Wizard created one CP for each of the star's points and four CPs for the circle. Also note how the Bias at the start/end points of the circle's spline were not correctly interpreted. Complex shapes can be planned for and fixed as necessary but it is often easier just to build in A:M in the first place. Because circular shapes created in Coreldraw often don't produce enough CPs in the translation I consider them complex shapes that may need to be adjusted before and/or after importing.
-
Using Illustrator wizard (AI files) for modeling
Rodney replied to Vertexspline's topic in Work In Progress / Sweatbox
I'm a big fan of the idea of using AI files with A:M but in practice, I must admit, I don't use it a lot. What I found was that the more I planned out my shapes in Coreldraw the better the results in A:M (I know... I know.... entirely too logical!). However, the same thing can be said about planning those same/similar shapes out in A:M itself and often you'll find you would have spent about the same amount of time creating the shape directly in A:M. Still, there is something about having the ability to draw/create splines in another program and easily transfer those to A:M that is... a whole lot of fun! Perhaps the most useful thing about using Coreldraw is using Shaping to build splines via Weld and Trim (and to a lesser extent Intersect, Simplify, Front Minus Back and Back Minus Front). Complex cuts don't always transfer well into A:M though. I've found one of the most useful ways to use AI is to bring the shapes into A:M as only outlines. Delete the unwanted CPs, then fill in the surfaces manually. Whether building in A:M or elsewhere and importing its best to have a target to shoot for. It's also nice to know that in a pinch I could use Coreldraw to create shapes and objects if necessary. My original plan to work back and forth from A:M to Coreldraw was to draw layered drawings in Coreldraw and then incrementally bring each of those layers into A:M. Alas, I'm no programmer and so I'm not up to the task of getting each layer to import into A:M as desired. Steffen Gross did create the Connect plugin to address part of this in that a series of lines created in Coreldraw can be selected and connected in A:M quickly via the use of the Connect plugin. Not particularly useful in most cases but certainly a big step in that direction. One specific pitfall to be avoided is over reliance on circles created in Coreldraw. Circles tend not to translate perfectly into A:M unless you plan for it. For instance, the AI wizard may not know how to interpret the bias of a single circular spline with only two or three Control Points. Similarly if you cut into a shape with no plan for where splines and CPs will connect... the AI wizard has to interpret where to build surfaces and so it will make best guesses that aren't always right.
-
That works for me. I'm probably just being a bit hyper sensitive to the year designation as we approach the end of yet another year.. As each year's end looms larger I have a tendency to look for subject matters from the previous year to organize/archive. Inevitably some will fall into the gray areas or continue from one year to another. Please! It is rare for projects to get done earlier than anticipated and I'd hate for 2012 (or any year) to miss out of having a community project. In theory, if every year's project were to slip by only one month... well... a year will eventually get skipped by default.
-
'Garrett' is now playing at the top of the forum!