Search the Community
Showing results for 'project'.
-
Well, I've been working on this project a bit. Tweaked the mesh for Tauri a bit (mostly in the head, neck, shoulders and hips). Adjusted the gradient edge material and render settings. Here's the latest render of Tauri in a scene. The things in the scene with her are cacti-like plants. This may not surprise the old hands at A:M, but they are all the same model. I added some relationships, actions, muscle-mode poses to it and placed about 8 "instances" of the cacti in the scene. Then I gave each cacti a different setting to the Height, girth and twist poses. They are all percentages and 50% is the "orginal" pose/shape of the cacti. So I can make the cacti shorter or taller, wider or thinner and even twist it clockwise or counterclockwise. I think I "get" relationships now. What I like best about what I've done, is that I can have the cacti look like the same species of plant, but give each one some individuality w/o having to remodel the wheel, so to speak. This is now "offically" a project, I have a storyline figured out. Will storyboard it tomorrow (I'll be going to the N. California coast with the spousal unit, so I can be amonst the ocean and storyboard a desert scene. go figure). There's a song I want to use as a soundtrack. It's by Robyn Hitchock named "Catherdal" from his "I often Think of Trains" album. I'll have to model some rocks, desert ground, bg mountains. Then there's the other characters, a hummingbird (based on the Violet Crowned Hummingbird) and a 6-legged newt/gecko-horse beast of burden. As far as props go, there's a blanket, an amulet, fire, saddle and some camping-type eating utensils. Then there's the Catherdal itself. I want it to be intricate and slightly Gothic/Victorian looking ( thinking of the Palm House at Kew Gardens and the Albert Memorial, both in England) and looking like it's made of Crystal/Prisims. There's going to be lights inside and will provide a distinct glow to the enviroment. I'm hoping to have this in some kinda shape by the end of the year. --- I'm still having massive problems with moving Tauri's arms around and having the frickkin' elbow mind itself. I'm missing something, I fear. Should I leave the Arm IK on or off? Does any one have a rig description that works for them? I may buy the Setup Machine when the refi comes through. Still feel that understanding how the 2001 rig works is important. I really wish there was a complete description of the Hash 2001 rigging that I could look at. The links in the ARM either is for a rig that has all different names for most of the bones (and different constraints, I think) or just not accesible ( 404 or downloads nothing but a directory structure and files my Mac can not read). The biggest help with the video tuts from the Art of Animation Master. But then, it was a more of a move this here, do this, do that without any detailed explaination of why is it done that way. And the elbow bone is a complete mystery to me. It moves all over the place, and when the roll handle is turned just by a degree or two, the forarm and bicep area of the arm just goes spastic on me. I can get the arm to look good in keyframe "a" and then I move forward to keyFrame "b" move the elbow so the arm looks good, repeat for keyframe "c" and "d" and then I go back to keyframe "a" -- and it's all frelled up! I would like to start working on giving Tauri some expressions (I have a eyeblink pose made, but that's just rotating the bone that controls her eyelids), I think I should use poses and muscle but I look at her mesh and just brain-fart, I don't know where to begin. Any help with using the 2001 rig and where to start with making facial poses would be greatly appreciated! I'm hoping that once I get tauri working well, I can then move her skeleton/rig to Kenth and hopefully have a bit easier time of things. Darn this learning curve thanks for reading this far, and thanks very much in advance for any and all suggestions, criticisms and /or help!
-
This is somewhat of a trial and error process. I'm not happy with the density of branches near the trunk. I'm going to reduce the number of main branches and add more of the short secondary branches. This should give me a much better looking tree form. I'm also not happy with the uniformity of the arrangement. Doesn't have the aesthetic appeal I want. I'm going to arrange the branches less uniformly to give it a more natural look. More of a bunching of branches and leaves here and there, with some more space between "bunches". One reason this project is taking so long is the number of "rehearsals" it's taking to optimize the look vs. performance. The number of things to tweak each time is pretty huge. Definitely not an efficient workflow sort of thing at this point. That would take a software utility to build it for you, with some nice features to allow you to tweak it efficiently. I think I'm really pushing AM's limits in terms of the sheer number of constraints and relationships involved. Some of the branches are loosing their texturing during the camera rendering. And this is only one tree... May have to send another sample to Hash to figure out what's happening and fix it. Bill Gaylord
-
I've finished my latest project ('bout time I say). The 160 x 120 version is at AM:Films. http://amfilms.hash.com/search/entry.php?entry=850 For those with more bandwidth, there's a 320 x 240 video at this address: http://gutterbrothersllc.com/video/ I welcome all feedback, however I am finished with this project and will move on. So if you don't see your comments being used to fix the video, it's not that I didn't listen. In fact, I'll likely use everyones suggestions for future videos. Laters . . .
-
thanks for the suggestion I guess I'll have to think about it a bit more... have some ideas and maybe some enhancements to the models. If anyone else wants to play with them I'll post the project file tinkering robots before I throw out the material I added it a second time turned it into a displacement map and animated it like the material ..to speed up render I hid 2 robots and changed animated to 15fps. tuenned out interesting but not right for this project robot3.mov
-
Vernon Zehr's Basic Boolean Tutorial with project file and animation
-
I apologize gents. I should have checked to see if the tutorial/demo was still online. While waiting for the experts to chime in I'll post some additional information. I'll even check to see if the links work! Boolean Globe project description
-
Mike. after looking through the thread again I remembered I had this image of Tony from an old project, like many characters there are a stack of different evolutions to choose from

-
Hey, I'm trying to download the sample project but all I get is a browser window with text in it. What am I doing wrong? I guess I don't know how to use this internet thing...
-
okay tweaked the colors and added a light (volumetric with turbulence) now have to get habitat better action(now action controls turbulence the rest is hand postioning in chor) and maybe some force oh and not sure if the eyes on front and back look okay will post project when finished robot1.mov
-
Anywhere those of us late to the party can check this out? I went to the site and got the 3D Farmington, MI slide show (now where are my 3D glasses when I need them?). Also, can you post the project?
-
Anywhere those of us late to the party can check this out? I went to the site and got the 3D Farmington, MI slide show (now where are my 3D glasses when I need them?). Also, can you post the project?
-
I never did comment on the overall project. This is brilliant. It is one of those short simple concepts that practically "pre-exists" like the laws of physics. It is such a great idea that it seems to have created itself through you. Like the "idea particles" that stick in peoples heads in Terry Pratchett's "Disk World" books. There is no fat in the story. Vernon "Sorry! I'm gushing again" Zehr
-

Adjustable spherical constraint
Ganthofer replied to itsjustme's topic in Work In Progress / Sweatbox
Thought I'd drop a line here. I down loaded the project back when you posted, but hadn't gotten around to looking at it. Saw Rodney's post and thought, "let's just make the time and take a look at it", so I did. I've not worked much with constraints yet, but it seems they can save you a lot of work if done right. Interesting piece of rigging. Not sure what situation it would be used in, but none the less, just seeing how the relationships are setup and being able to follow what's happening (without having dissect a complete rig ) has been very enlightening. For those of us, OK just ME , that have only use simple bone structures ( parent - child ) and very few if any constraints. Aim At, Translate To, Translate Limits ... seem like fairly simple things, but figuring out how to combine them together to achieve a control is at times confusing and at other times beyond comprehension. Enough babbling. As much as I like figuring things out for myself, I don't think life's long enough to do that with everything. Thanks for sharing, and as far as I'm concerned, keep it coming. -
okay this is still rough but closer to a sewing machine http://johnl.inform.net/pages/sewm.htm project file available on page again this is rough but it was just a side project and I don't have time to fine tune it tinkering gnome
-
HEY! Too kewl!! Glad I wandered into this topic...yes, PLEASE...post project! Thanks! dc
-
Sorry this is a bit rough but I spent 20 minutes on it render as line thread and a pose slider..very rough watch the last few stitches I can post the project later sew.mov
-
After talking to Rodney Baker I decided to post a project file that was the result of a discussion on making a spherical constraint with Carl Raillard on CGTalk. Here's a description of what it does: When you open the "spherical.prj" project, it should have "Action1" open and ready to mess with (if not, double-click on "Action1" to open it). What you see is "Bone1" as the bone that defines the sphere, "Bone2" as the bone you would attach any geometry to and "Null2" (at the intersection of "Bone1" and "Bone2") which is the manipulator...there is also a "Null1" that is set so that it isn't seen which helps drive this. When you move "Null2" around ("Bone2" can be moved independently as well, but the constraint only works by manipulating "Null2") you'll see that "Bone2" follows while remaining within the area defined by "Bone1". You can move "Null2" outside of the defined area, but "Bone2" will still remain inside. You can adjust the area within the sphere that "Bone2" can occupy by changing the setting on the "Translate Limits" of "Null1" in the "Pose1" relationships folder. To make "Bone2" able to operate in a larger sphere, you'll need to increase the maximum translate limit for "X" to something above zero, to keep "Bone2" from reaching the center of the sphere, you have to change the the minimum translate limit for "X" to something higher (-14, -13, etc) than "-15cm".
-
Just had the opportunity to whip up another prop for my animation project. Comments? Questions? Observations about life?
-
Looks an interesting project! I can't get to see the animation as it's too large and I'd say others find that too. Maybe you can edit it or put it in a compressed format? Good luck with it anyway!
-
actually the stream is confined to an invisile tube so a force or even a small invisile object could proof intreresting busy right now but here's the project file and tga I used bubs.zip
-
simple sprites I can post the project and tga for bubbles if requested bubs.mov
-
Very imaginative. I'm not really sure as to what you need to hear, but it looks a surreal dream. I do think the water could stand to be adjusted on it's ripple scale and contrast. Currently instead of a water appearance it has a feel of a paste. Will Sutton posted a link to a simple and clever water material he created that might better suit your project. I'll see if I can dig up the link. http://www.hash.com/forums/index.php?showtopic=2476&st=0 Hmm.. Couldn't find the Ark thread with the search. had to resort to the brute method to extract the thing. <sigh>
-
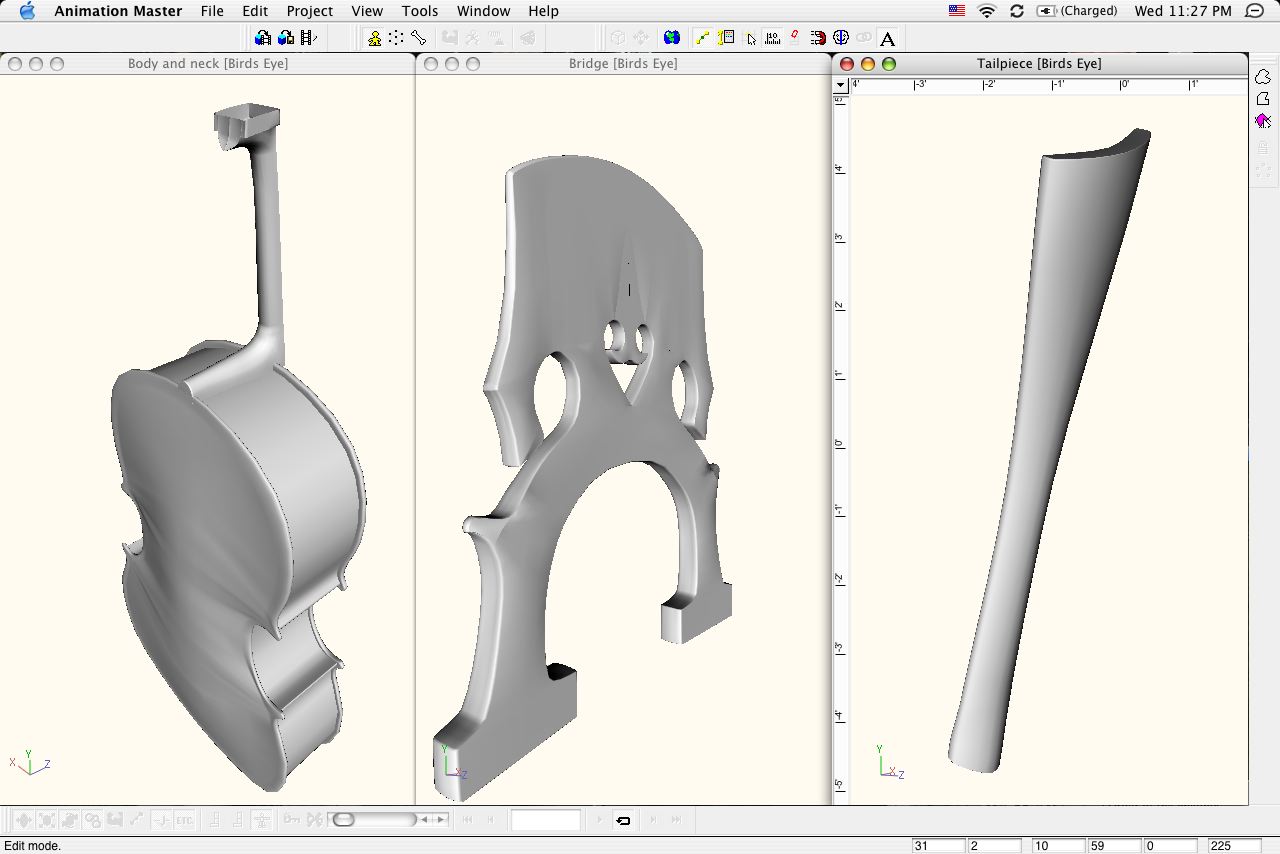
Wow, amazing violin! It really looks real. How'd you do the scroll and f-holes? If you download my project you'll see that it's slightly awkward, the way I'm going about it. Also you'll see that I have about 8 rotoscopes for various views, but I also have my own cello as a reference. that's what I'm kind of modeling after. That's why this one is slightly wider than some of the 'scopes- my real cello is. -Zev
-
Finally, an update. I've made some more progress. I finished the bridge (darn 5-pointers!) and have begun work on the neck and scroll. The scroll is easily the hardest part. I also completed the tailpiece, the part to which the bottoms of the strings attach. Here's an image of what I've done so far. You can also go to http://homepage.mac.com/igeek1/FileSharing11.html and download cello.zip, which is the complete project, if you want to see it in more detail. My method for starting the scroll is pretty crude. I may start over. I leave for camp for a week on the 11th, and I may or may not be able to see the forum until I get back. 2 days later I'm going to music camp, where I'll get to spend more time with the real thing. Thank you all for your comments and quick responses. Boy, this is fun! -Zev
-
Wooooo, thanks for all the replys! Glad some of you folks out there liked it, as for questions: It was a kind of an organised jam. For instance, the directors knew what they wanted and then got the rest of us monkeys to do some of the bits. The two girls in the one photo at the end (Rebecca and Charlene) stiched 50 frames of the girl flinging her hair back, which didn't need to be timed, the same with the bird and other bits. So these were used to pad out / make the bits that needed to be on time (such as ticking) be on time. So it all came out on time in the end (but it was mainly due to luck!). As for a storyboard...heh...it was a uni project (the type where you think of a cool reason after you made it ). As for the factory bit, I have to agree with you, but I don't think there will be any smoothing as it was for a deadline so it could be entered into submerge 2004. Glad ya enjoyed it! P.