Search the Community
Showing results for 'project'.
-
I would just like to clarify a small point so there is no confusion: First off I am not jealous of the "hair ball" created this weekend. I came to terms many years ago with my lack of hair and it is no longer an issue with me... at all... not a problem whatsoever... nada... no probs. The fact that my lack of hair is even mentioned, by anyone but myself, is irrelevant to any type of important discussions regarding A:M, and is only an attempt by excessivly "hairy" people to keep us hair challenged individuals "in their place". As for missing my presentation when you left early John... no worries, I didn't really have one... I just showed the animatic of my Incompetent Secret Agent project which is available online here: Incompetent Secret Agent Animatic I did show earlier, the only thing I used AM for in months... a door that opens and closes. Took 36 hours to render. I wanted to know why it took so long: Apparently having 3 or 4 raytraced lights with volumetrics will really extend the render time... good to know for future reference. Earlier in the afternoon I also discussed the fact that the theory of black holes is incorrect! Things can escape from a black hole... I did... somehow I managed to escape for a short time on saturday, although I was horribly frightened by that bright ball of light in the sky. Rich made me give a try at making the "hairy ball" work properly even after I insisted that "I don't know anything about hair!". Apparently my skills with trial and error are still very powerful. Not having a number pad slowed us down somewhat. Once again I am not sensitive about my hair and no one should mention it anymore because I am not sensitive about it so there is no need to call attention to it. That's not why I wear a hat. Vernon "baldy, clean-head, cue ball" Zehr
-
MAAMUG Meeting #2 - By John Hubickey Can also be viewed at: http://www.hubukai.com/animationmaster.asp The second Mid Atlantic Animation Master User Group meeting went extremely well and was hosted by Don Davis. We started the meeting between 1 p.m. and 2 p.m.. Chris and I arrived at Don's house at approximately two o'clock. There was an abundance of food Don had prepared for the meeting and I think the best part was Don's special chili! After having two or three bowls of chili we went in the living room where Rich was projecting some of his work up on the wall. Rich started off the meeting by showing us some of the detail of the male human character he has been working on. The level of detail in Rich's model was amazing. I would have to say that Rich's modeling and texturing skills are approaching the level of the characters in the final fantasy movie. Some of the textures Rich is using on his character are extremely large which gives him the incredible detail that he is shooting for on his models. I will try to get an image of the character Rich is working on to post on the web site. Pause, go get a beer... After Rich's demonstration we proceeded on to hair and the dynamics of hair. One of the questions that I had was how do you get hair to react to forces and gravity. Rich and Vern both answered that question by using a simple primitive and showing us all how to adjust the hair settings. It got a little confusing because hair has so many possibilities but we worked it out and rendered a short 4 second ball of flopping hair that Vern was extremely jealous of! ;-) During the whole discussion we also watched some of the Jeff Lew animating characters DVD. This DVD looks extremely helpful and I personally am planning on picking up a copy in the near future. Pause, go get a beer and in another bowl of chili....(Yum) I showed some of the stuff that I was working on since the first meeting. I was extremely happy because the first meeting encouraged me to begin working on one of my projects. Now I had some animation master fans that I can show my initial renderings and animations to. We also got a Skyrig demonstration from Rich. I love the effect of the Skyrig because it gives you a very realistic looking render. Thanks to Rich, I am now using the Skyrig lights. Here is the link to the Skyrig setup and instructions on how to use it. http://www.shipbrook.com/jeff/animas/skylight/ http://www.shipbrook.com/jeff/animas/skyli...structions.html Unfortunately I missed Vern's demonstration as Chris and I had to leave a little bit early. Maybe it for lucky Vern will post is project so we can all take a look at. The second Mid-Atlantic Animation Master User Group meeting was another success thanks to Don Davis and his spectacular chili and cooking skills! We are planning on having our third meeting in approximately three months.(November-ish) The details of the time and location have not been worked out yet but we will post them as soon as we have it figured out. OK, now everybody get to work on that hairball and we will hope to see you and hopefully some new people at the third Mid-Atlantic Animation Master User Group meeting. Sincerely, John Hubickey.
-
Well, here's the lowdown: -I am doing this as a solo project -I am putting together the elements I need to recreate some Clone War battles -I'm going to send my finished film into TheForce.net Fanfilms -The story is called Clone Commander and it follows a Commander through the war and you see what's going on from his point of view Please post any questions. I am still writing the script, but I am concentrating on the models right now. If any of you out there like Star Wars, I will be releasing all of my models on the internet for free after I release my film. By the way, I had ALOT of spare time and I've about finished the Dwarf Spider. Here it is:

-
Thanks for the comments, I find them all very helpful. As we all know, after looking at our own work day after day, it really helps to have some outside input. Yes it is a bit soppy. It was orriginally going to be about a school aged girl who draws to cheer herself up. That's why the room is kid's colours. Also I wanted to express the power that, kids have to enter there imaginary worlds. I changed it after I found the music. I liked the song, and it has a good beat to animate to, so I wanted the story to fit the song. I didn't spend a lot of time on modelling, texturing, lighting, etc, because I wanted the project to flow quickly, so I'd get it done, and my goal was to tell the story and not spend a lot of time up front. I would like to polish it, and add some to the end. The rider is the girl, she is drawing herself on a horse. I planned to have the horse and rider shift to colour, opposite the her and her boyfreind fading to black and white, but I liked the look of the line horse walking away I left it that way. In the expanded version the horse and rider will disolve into a colour scene, but that will come later. I am quite happy how the transition from drawing to animation worked. This part was the main theme of the project, showing how we can use our imagination to create our world. It was also the part I was least sure how to do when I started. it turned out to be quite easy, after a great suggestion from Iham Wrong.
-
Please tell us more about your project. (I'm forgetful. If you've told us I need reminding) Are you doing this as a solo project or collaborating with others? Nice Dwarf Spider thus far by the way!
-
Pretty darn good! I'm glad to hear that you never gave up on your project. I tend to start projects and have tons of ideas, but some how always get side tracked. Good job! My only crits are: I would like to see your lighting changed. It makes the feel of the animation flat. I would also like to see more improvement on the textures. Get away from the computer generated stale look. The animation timing seems a bit too slow or off. Maybe rework it a bit. Just my 2 cents worth. Great effort! Have a great day
-
Hi gang. I finally have a showable version of my first music video for crit. This is the project that led me to A:M 3 years ago. After 2 starts, 1: in Strata and Poser, 2: in A:M 9.5 (enough said about that), and now in A:M 10.5. Even though it is quite rough, I am quite happy how it turned out. I would love to hear what you like and don't like, and don't worry, I'm not easily offended. I made it as small as possible 5.4 megs for 1.5 minutes using the On2 codec. If you have trouble veiwing it, please let me know. I can post a Sorrenson 3 version, but for similar quality it comes in at 8.8 meg. Here it is Just My Imagination
-
You may be doing it right. Sometimes AM has a problem with refreshing the changes and showing it in the view. So, when you expect a change press spacebar or else try saving the project and re-opening it. Hopefully it should be sorted soon.
-
This discussion is designed to serve two purposes. First, to highlight some excellent resources, and second to point everyone to related 'breathing spaces'. Breathing Space is the term I use for when you have been working at a project for a long time without taking a good break. Ideally, that breathing space should be as far as possible from the task that you are trying to take a break away from. However, it isn't so far away that you stop working on the project. If you wander too far away... that's a vacation! For more than a few people that means the end of the show. Move just far enough away to get a refreshed perspective on the task at hand. Take a breather... then head on back to work. Note: This discussion is designed to add to New Users storehouse of knowledge and prepare them for success. Additions to this discussion should have at least some connection to the subject of animation however far that connection might be. When posting, if the connection doesn't seem obvious please state how it applies. Thanks! http://www.sambuntrock.com/guy_like_me7_web.mov
-
Thank you all for your comments. To tell you a little more about the project, this was comissioned for a book cover illustration. Because it was for a Mathematics first grade textbook, the publishers wanted something that was about making math fun for kids. The art director was crazy about, yep you guessed it, "Finding Nemo", and so he along with the editor, decided they wanted an underwater scene with playful characters. After a few character sketches and a couple of Adobe Illustrator color layouts, this little character came about. Gotta tell ya the truth though, one thing is to do a character in 2D and another is to bring to life in 3D. So really, I should be thanking you guys for the help, because in all honesty, I've learned almost everything about AM here in the forums studying and learning from all of you. For all interested in how I got the job, it was really a matter of being in the right place at the right time combined with a little persistance. I say this, because a few years ago, I decided to pursue a little more aggresively my illustration career. Being a full time graphic designer, I thought something was missing, after all illustrating was, and still is, my first love. So I put a mini HTML slide show together showing off some of the work I had done previously using "Ray Dream Studio". Among the piesces was an underwater scene I had done. I sent it to every email I could find, targeting specially book publishers (since this is where I had the most experience with). Out of dozens of emails, only one called me up, but it was the right one, and I've been busy ever since. I hope this answers your questions. By the way, thank you William for the compliment. Cute is good (I think).
-
Count me as a fan too! I like the look. Sure wish they had fun 3D characters like that to guide me through math when I was kneehigh to a grasshopper. Like others, I'd like to hear more about your project! Best, Rodney
-
Nicely done. I'm curious, what sort of project is this for?
-
Keep it up Doug. Looking very nice thus far! Glad to see you've picked your project back up too.
-
Christina, I'm a little behind in answering the mail (email and here in the forum) Glad to hear San Diego went so well! While I'd like to say that upgrading won't effect your project it almost always will. The question becomes whether or not the changes are significant enough to hold you back. Personally, I think you will want to upgrade to v12 the day it becomes available... from what I understand it will be THAT good! I also think that you'll want to start a new project/sequence at that time. You can always use the older version right along with the newer! It takes more time to isolate any differences but can be done. Concerning v11, the main reason it would appear for you to upgrade would be to get familiar with the newer tools that have come on line. When in doubt an email to support@hash.com might be in order. They would be able to give specifics on render changes (if any). If there are specific areas of concern perhaps posting them to the main forum with a link to any pics here in your WIP. Just a few words from the peanut gallery! Rodney
-
The black areas with porcelain are most probably flipped patches. Sometimes it's hard to see. I like to set the option to render only one side of patches. Also there is a way to unify the direction of patches in the "right click" menu. Finally, sometimes you have to save the project and re-open to see the black patches are gone. To your questions: 1. Not sure. Maybe the render to file option would fix this. 2. Are you sure you're rendering the right frame range? And there is a light right? 3. Could be Opengl/Directx related. Update any drivers and/or switch between the two. 4. Can't find the thread, but basically you turn on the "floating menu" then select a piece of the spline and press /(or is it ,) then in the floating menu you input 0 to the x fields. This is from memory, so it's probably flawed...
-
Vortex Force On Hair Test
SHADOWMASTER replied to John Bigboote's topic in Work In Progress / Sweatbox
LOL! You do anything special to get that? Cuz I'm needing exactly that same effect for a project I'm doing. -
don't have any time to play right now so here is the project. just remember with gradients you have to adjust them for the model and in this case scale the turbulence too as well as "animating" then in the chor or by an action or even a pose would work if anyone gets a better effect with this please share johnl3d...the tinkering gnome newcloud.zip
-
Nice effect, Jim. I just might use your technique in my current project. Whare do I send the royalty checks? Brian
-
whoa... thanks Yves... Yeah, car tutorials are pretty scarce, guess i have to do a car tut now Well, it's between a 1979 VW Rabbit or a Ford Focus... I'm thinking of doing the Ford because those cars are pretty simple in design and a lot newer. Besides, I can't find those rabbit blueprints anywhere on my hard drive... it would have been nice to give it a few dings and then add rust decals to the rear quarter panel to give it a bit of authenticity but we'll make do with the ford I guess. We'll begin as soon as I finish this project I'm working on.
-
The ocean generator would be a great addition to A:M. I've downloaded your project file (thanks) and have a few questions. How did you create the movement of the waves? Is it part of the ocean generator? Different perimeter setting? If not..... Did you use a distortion box, magnet mode or change the displacement and bump percentage of the decals? Or none of the above. Thanks again. P.S. I'm sure there is alot more people interested in your efforts to produce such a tool than there seems to be. And I hope you decide to continue your efforts. Looking forward to your finished product.
-
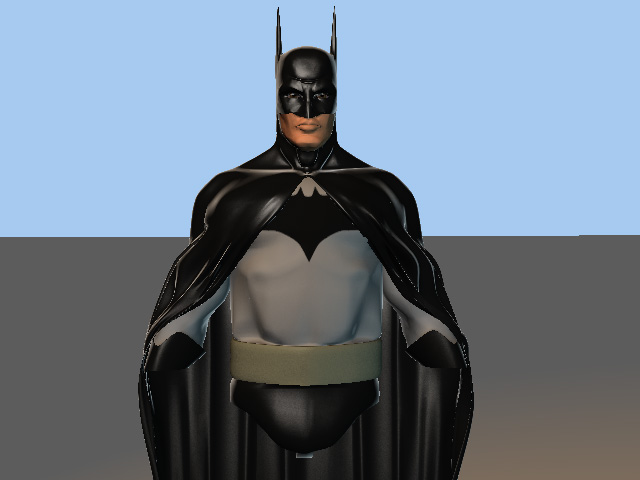
Looking really good from that first view! I'd like to see and know more about your project. There are a lot of comic fans in the A:M Community I'm sure they'll pop in to comment as well. While waiting if you can post from a few angles and maybe add a spline shot that will help them give you better feedback. I sure am interested in seeing what you have planned for him! Rodney
-
Hello, all! Just wanted to get some feedback on my latest project. Tell me what you think. I'll update as soon as a can. Thanks!
-
Not for a method, but for the 'Ocean Generator' when (if) its ready If you like to play with this you may download an A:M project file for the first frame. The whole movie project is to large though. You'll have to wait for the 'Ocean Generator'...
-
Man that's good! I hope you didn't shave your head for this project! If that's the inner mouth, it looks a little patch heavy to me. Especially as it's rarely seen in detail. Keep it up!