-
Posts
28,191 -
Joined
-
Last visited
-
Days Won
390
Content Type
Profiles
Forums
Events
Everything posted by robcat2075
-
For what it is worth...FakeAOGPU works for me in 64-bit v17 both as a render time post effect and as a post effect in a Composite However, both FakeAOGPU and FakeAOCPU crash my 32-bit v17 One other work-around for people who want to use 32-bit v17 but also want to have FakeAO.... Render without FakeAO in V17 to OpenEXR with a depth buffer, then use that OpenEXR file in a Composite in v16 to add the FakeAO as a Post effect. Of course this is more efficient for image sequences than single images, but if you tend to use FakeAO in Post anyway, like me, it's a minor commute.
-
Does this computer have a touch screen? I'd be curious to know if any of the touch interface gestures work with A:M.
-
For what it is worth...FakeAOGPU works for me in 64-bit v17 both as a render time post effect and as a post effect in a Composite However, both FakeAOGPU and FakeAOCPU crash my 32-bit v17
-

How to cut a circular opening on a tube
robcat2075 replied to detbear's topic in Work In Progress / Sweatbox
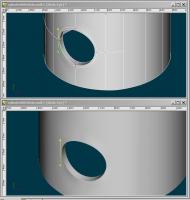
I'll note that you may have more success with modeled holes if the 5-pointers are from fairly squarish patches and if they come up to a ring around the hole rather than try to be the edge of the hole itself. -
So make the object not-green?
-
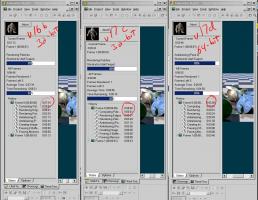
OK, you made me install 32-bit v17 again. In a three way race I got v16b 32-bit 7:34 v16b 64-bit 5:57 v17c 32-bit 8:06 v17d 64-bit 5:05 So perhaps 32-bit v17 is a bit slower than v16 edit: I ran another test with 64-bit v16 in the mix and added the result above. So 64-bit v17 is faster than 64-bit v16 but 32-bit v17 is slower than 32-bit v16 In all cases the 64-bits are faster than the 32-bits. It's POSSIBLE that my and Nancy's results for the 32-bit versions are handicapped because we are running them on 64-bit CPUs.
-
Something is weird happening around the corner of the mouth. It looks like your smile line is connecting to the bottom edge of the lip. I'd have run it down to something below the lip.
-
The Frequency% is how much of the top clock speed the CPU is running at regardless of whether it is churning through any code. I have a 2.4MHx CPU but right now it is idling at only 1.6MHz. The usage% is how much of the available processing time is spent doing real stuff, regardless of what speed it is doing it at. If you are running One A:M on a two core machine 50% would be an expected number (100% use of 1 core out of two). your results sound reliable. I'd have to install 32-bit v17 to investigate more.
-
First, I'd find the Resource Monitor (I have no idea what it is called in Win XP) that tells what percentage of maximum frequency your PC is running at . Maybe yours is always at 100%. If it is, it is. But mine throttles quite a bit from 66% to 100%. I have to get 2 A:Ms rendering simultaneously to get it up to 100% (This is not the same as "CPU Usage") I'm not convinced yet that v17 is what has caused the momentary display freezing in my PC If you need your OS for your peripherals then that's a reason to stick with it or start scoping out ebay for a replacement. Used cintiqs can go for not much.
-
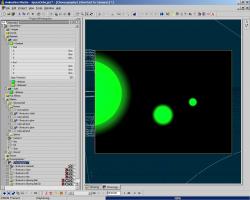
Nested, semi-transparent spheres can make a glow around another sphere that will scale with distance. In this case the spheres have a gradient material on them that makes the edge completely transparent and the center nearly transparent. SpaceOrbs.prj
-
Try moving the porcelain material to higher in the groups folder than the color material are.
-

How to cut a circular opening on a tube
robcat2075 replied to detbear's topic in Work In Progress / Sweatbox
Basically what Gerry did! The 5-pointers are not closing because the center spline at the top has two CPs in the same location. Select it, press teh detach button and you will be able to drag it away and delete it. -

How to cut a circular opening on a tube
robcat2075 replied to detbear's topic in Work In Progress / Sweatbox
You will need the cylinder to be splined so that point where you want to punch a hole presents 2x2 arrangement of fairly squarish patches. Then you can splice in a four-point loop around the center point, break the splines in the middle of the new circle, adjust the biases so it's appropriately round and extrude it through to the inide where you have done the same thing on that surface. A boolean is easier. -
I don't know Nancy's exact parameters but I'll note that I've gotten unexpected results when benchmarking with just "one" A:M running. Apparently just running A:M by itself isn't perceived as enough of a panic situation (on my 4 core machine) for the OS to always run the CPU at full speed. Once I did get a result that o newer version was slower than an older version If I run two A:Ms at once that will force the CPUs to run at 100% speed and i will get better apples to apples time comparisons.
-
First, I would fix the splining so that there are no dead end splines, In the middle of the pic there s a CP that appears to have five splines coming out of it. At best, that is two splines crossing (good) plus one spline ending on that same CP. That will always be bad, porcelain or not. I suspect I see something like that where the leg joins the hip, also. Then we could figure the porcelain out.
-
Here's a post from the Benchmarks thread with a speed comparison of v15, v16 and v17 http://www.hash.com/forums/index.php?s=&am...st&p=365392 A:M comes with NetRender now so if you have a multi-core PC you can get rendered faster with that also.
-
Here are several threads that new features get discussed in; I'm not sure we have a official list. http://www.hash.com/forums/index.php?act=S...ite=%2Bfeatures Faster, faster, faster is my favorite new feature. On editing apps... I've not found a free one that i liked. I'm still putting stuff together in my 13 year-old version of After Effects. Other people may have opinions on editing apps, however.
-
Welcome back to A:M! That one is easy. AM is capable of TV/DVD broadcast quality. For old NTSC (including DVD) you could choose the D1-NTSC preset for Resolution at render time. That renders squashed NTSC -shaped pixel. If you want to work in square pixels choose VGA For Newfangled HD you could choose HDTV-720p or HDTV-1080p
-
This thread will hold links to the new A:M Quickstart Videos and copies of the files used in the demonstrations (It will be "closed" until it is fully populated.) 1 A:M Interface 2 A:M Spline Modeling 3 A:M Spline Techniques 4 A:M Rigging 5 A:M Keyframe Animation 6 A:M Curve Editing 7 A:M Texturing 07_Texturing_PRJs.zip 8 A:M Rendering Options
-
- 1
-

-
That's the first cogent explanation of Hyperthreading I've read. thanks Yves!
-
Somehow the Youtube 3D option got turned on (at least when I'm watching it). It thinks you've upload a left-right pair for stereo but you didn't so it's making a mess of it.
-
Some smile line speculation... ObamaSmileH350.mov
-
I'll also note that just about everyone who is not asian has a substntial lump of flesh hanging from the brow over the eyelid. Spline for that might come down from the brow, bottom out just above the level of the top eyelash, head back towards the top of the eyeball a ways, then head back down to make the actual eyelid.
-
There's a line that most middle-aged people, including Obama, have that runs from just outside the nose down past the corner of the mouth. Sometimes it's called a "smile line". It's the most visible crease on most people's face and it would make sense to stake that out with an actual spline. If you have that there it will make rigging the face easier to have actual CPs at that landmark to move around rather than try to suggest it by folding the middle of patches. Same line now pulled to the sides and up...
-
I think this is a side-effect of the way A:M steps thru "undo" one morsel at a time, but I find that it also works if you select a CP, then SHIFT-select more CPs then hit CTRL-Z interesting find, Gerry!


