sprockets brown shoe Purple Dinosaurs Yellow Duck tangerines Duplicator Wizard Gound Hog Lair metalic mobius shape
sprockets
Recent Posts | Unread Content
Jump to content
Hash, Inc. - Animation:Master

Eric2575

*A:M User*
  • Posts

    2,615
  • Joined

  • Last visited

Everything posted by Eric2575

  1. Nice modeling. Love to see it when it's a movie.
  2. Let me be the first one to say it: If you don't find a side view of her face, your efforts will be futile. Even with a side view it is very difficult to model a face and have it look like the actual person you are modeling. Take this with a grain of salt and please, prove me wrong, but I am usually a bit more in your face all with good intentions. Oh, and by the way, this is just my personal experience -E
  3. Eric2575

    Hi

    Yes, we are your technical support. Just make a donation of $5,000,000 to the United Bank of Nigeria in the name of His Majesty the Royal...wait, that's another email I have to finish...ahem, never mind...Tech support, yeah, tech support...
  4. Nice comparison.
  5. Is the hair around the ears modeled? It's hard to tell from the wireframe.
  6. Keep it up Case, practice makes perfect
  7. Wow, that's nice. How about a wireframe? The bridge of the nose may need some tweaking?
  8. Al, I wondered when you'd peek in. Bein' from the ole country, you ought to know a bit about seefare and pirates, eh? Just kidding Judging from your post, you've been hangin out with Vern for too long...hmmm, me thinks Vern is rubbin off on us all in a good way Now that Caroline has given you the super duper secret of applying decals, you have no reason not to finish your Walker in a spectacular way and animate that puppy. Here's to happy splining, CHEERS! Btw, you gonna enter your monster in this month's contest? Hmmm....??? Eric
  9. Argh! I'll make you walk the plank for that one I'm almost done modeling the ship, now it's on to the ocean waves, then textures. I'm glad y'all like the ship. Eric
  10. I'm glad you brought back the face to the chubbier version. The version above doesn't look as Mayberryish as your avatar. I have not followed the Bertram story, is this a personal project or ...?
  11. My car got broken into several years ago and the thief got my laptop and my AM cd among other things. The insurance company asked for nothing else other than some kind of proof that I had a laptop and AM software. I provided the proof and received the current value of everything that was stolen. Your company should have no problem putting such a small claim in for you and getting you a dollar value equal to what you would pay now to have the cd subscription.
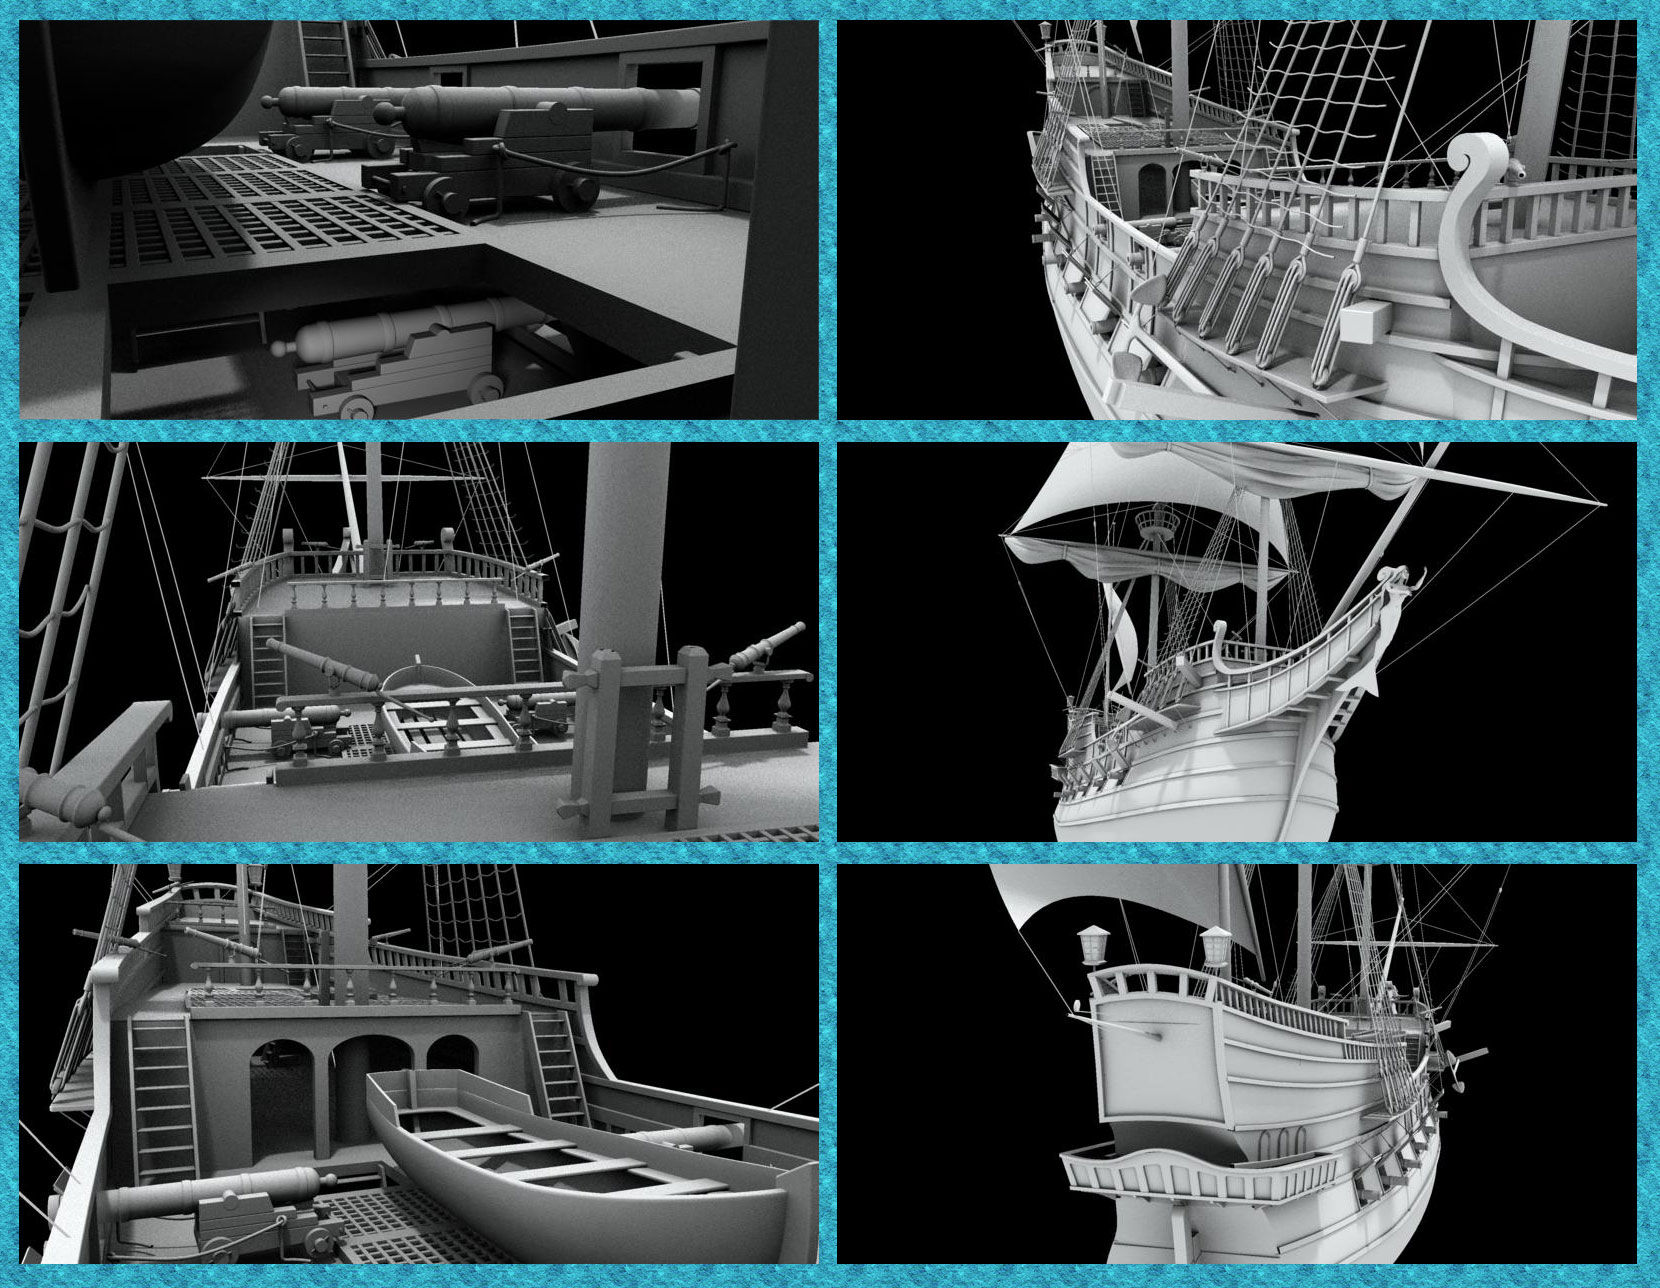
  12. Thank you Bill. I don't have that one and will look it over carefully. And yes, the rat lines are another boo boo. After modeling them, I had to change the angle going to the mast head and haven't gotten to the spider lines yet.
  13. Yup, that's one
  14. Instead of modeling, I rendered the ship from several angles. It's still a work in progress, so if you look hard, you'll see some boo boo's. Enjoy... Eric
  15. What is the best way to approach the decaling of a coiled rope? Up to this point I have only needed to decal rope a couple of time and then only one length at a time. Now that I am modeling the Spanish Galleon: http://www.hash.com/forums/index.php?showtopic=32733&hl= , I have a ton of rope to decal. I used to take the rope model, create a pose, and then straighten the rope in the pose to apply the cylindrical rope decal. This works great for one or two pieces of rope, but now I have so many pieces and coiled rope to boot. I wonder if you could decal a staright piece of rope first and then coil it? Maybe in an action or something?
  16. :blush:jl I feel the love. David, I love that emoticom Whenever I plan to model a subject based in reality, I try to find the best references that I can find. In the case of this ship, I was surprised to find that very little, as far as scaled graphical plans, survived from the time of the Galleons. Mind you, there was plenty of written evidence about the description of Galleons, their stores and such - the Spaniards were very bureaucratical about such matters - but actual visual references were scarce indeed. Many paintings of Galleons exist of the period, but if you've looked at 15th and 16th century art, you'll notice that it's very stylized and completely out of scale. According to Angus Konstam, Spanish Galleon 1530 - 1690, "shipbuilding was usually a matter of good eye and judgment, but after 1580 designs had to follow a set of mathematical principles, and shipwrights had to measure everything." But even after the period of tightening specifications, the old plans did not provide a workable visual reference. So, believe it or not, modern recreations of just about all the ships from those days are based on liberal amounts of artistic interpretation. That's also the reason why depictions of even the most famous ships of the time will vary considerably from one model to the next. My search then took me to plans created for and by Master model shipbuilders of these galleons. Although there were several plans to chose from, I did not want to spend a minimum of $40 for plans that were more detailed than I would ever need for this project. So, I went back to my trusty search engine and found some free plans that would serve nicely for my rotoscopes. Apart from those references, I also picked up a wealth of detailed photos of scale models and actual floating reproductions of Galleons from all over the world. For an historically accurate model - to the best of my current knowledge and ability - these pictorial references are invaluable. On a side note, Hollywood is largely responsible, unjustifiably so, for the way we imagine many of our interpretations of things we take for common knowledge. Well, kinda got a bit long with this one, but it is interesting stuff. Oh, and no, I have no references of Cap'n Jack's ship, since I wanted to stay closer to reality. Although my ship borrows heavily from the Atocha, a Spanish Galleon that sank off the coast of Florida, near Key West, on September 6, 1622 during a strong hurricane, it's basically an amalgamation of different ships of that era. Hope you enjoyed this little dissertation. Eric
  17. Shane, would you make a small tutorial for us real 'Noobs" on a radiosity primer please. I know there are posts on the forum about Rad, but a specific example like your bathroom scene would rock n' roll. Oh god, I feel it coming...I can't seem to stop it....she's gonna blow........ WOW! Whew! Thanks Eric
  18. And here ya go
  19. Thank you for all the support and positive comments. Sebastian, yes I will put it on water and have already done some tests (classified for now). I'm going to do some renders in calm waters close to shore and some in a heaving sea - that will be a challenge. The tests look promising. Rodney, the partitioning of the ship is really pretty straight forward. When I started to run into the usual bogging down of AM after laying down so many splines, I thought, why not take what's finished and export it into a new model. The key is not to move the splines or the bones in the new model or things won't line up. Not too big of a deal if they get moved around though, since I can just realign them in the action. As I complete more sections and export them, I just add the new model sections to the existing action. Pretty soon I have a complete ship in the action. There are some tricks involved when I have to model a part that depends on another part that has already been exported, but like I said, it's pretty straight forward. Since the ships exterior is pretty much done, I'm spending most of my time on the details on deck and the rigging. It's really tedious, but the devil is in the details. I'm cooking a render for my desktop right now but will render more of the details when I feel they are ready. I'll post the desktop render. I do temporary desktop renders of each model I create to keep me motivated even when I'm not using AM. On a side note: Way back in history, about two years ago I imagine, someone (?) did some testing with water in AM. He might have been programming a plugin for the most realistic water that I have ever seen in AM. I followed the post, but it ended without ever revealing what happened to the water plugin. Does anyone remember that post or the guy who was doing that? Even if the plug wasn't completed, I'd still like to know how he got the water to look so real.
  20. Here's a wireframe, I know you guys want one This is a pretty high res model, and the patch count is up there at 39007 patches. The model is made out of 8 components in order to keep the work flow managable. These parts are nicely put together in one action. This actually started out with the creation of a mermaid, which now graces the bow of the ship. The part with the highest patch count is the webbings going up to the masts, because I wanted to model those instead of just using "draw as lines". Modeling the webs will let me decal them later and actually have them look like ropes for subsequent close ups. Your comments and critiques are always welcome. Thank you. Eric
  21. Last year I modeled a toy boat, the Santa Maria. Ever since then I had the itch to create a fairly realistic Pirate Galleon. It's almost finished, but I thought I'd share before heavy texturing starts. This project is for my portfolio. Thanks for looking... Eric
  22. Wow, - that's the catch word for for the time being - no manual? You can find the PDF version right here: http://www.hash.com/2007web/reference.htm Download it and start doing the tutorials. That's what I did and they really help a beginner. I'm a bit beyond the oval now, but I still have lots to learn If you love creating something from your thoughts and ideas, keep at it, cause this program can do some amazing things. Amazing? ...who would have thought that a capsule could do such an amazing thing...??? Oh god, that commercial will never go away!!! Never mind, I'm ok now If you're gonna stick around this forum, you'll run into some off-beat humor along the way...just a fair warning
  23. Unless the grass will be seen pretty close up and plays a major role, simulating grass with a decal and displacement map may be the quicker and simpler way to go. Tell us what the scene will look like and how close the camera will get to the grass.
  24. All right, I'll come clean, I really only modeled the building, but Thom is real. He told me he would pose for the shot, but only if I fessed up later. Yup, Thom is the real deal alright Mark, the building is on Hyw 89 out of Cottonwood just on the outskirts of the old mining town Jerome.
  25. Eric2575

    HELP!

    Warning: The content advisory board has concluded that this post is in bad taste and has no semblance to any real or useful tutorial of any kind. Don't try this at home or anywhere else for that matter. This is a joke, and a bad one at that. Do not take seriously and proceed at your own risk. A Colorful Model To add color, be sure you are in the front view with the shaded model centered. You have to do this in two steps, but let me walk you through the first one, then the second will be very easy, just adjust the view to the rear and repeat the steps I am about to tell you. The first thing you want to do is check to see if all the normals are facing the correct way. Normals are just a feature that shows if all the mesh is facing in or out uniformly. I'm no expert on this, so I can't tell you the technical reasons, but trust be it matters when you apply decals. Btw, just in case you're not familiar with the term "mesh"' that's the term used to describe the vertices and splines used to make up your model. Ok, so now you hit the keys "shift" and 1, with shift first and hold, then hit 1. This will bring out the normals indicators on your model and they will look like yellow toothpicks all over your model. This is a good thing if they are all facing the same way, preferably outwards. Some will shurely be facing in and these you will have to adjust to face out. You can do this by using the patch select tool which is the purple button on your tool bar that kinda looks like a sail. Hit that button and your cursor will change to look like the symbol on the button. With that, you can select the patch that has the backwards facing "normal". Once selected, you have to get out of the patch select mode by hitting the ESC key once. If you don't hit the escape key, you won't be able to do anything other than to select another patch. Actually, to select another patch to the one already selected, just hit the shift button before selecting a new patch. This will add the new patch selected to the old one already selected. So now you have all the bad patches, you hit ESC and are ready to turn the "normals" the right way. Well, just hit the "F" key and all the slected normals should turn 180 degrees to their correct positions. After you've done all that and the mesh is tidy and clean, you have to take a deep breath and prepare yourself for the amazing color you are about to apply to your model. Step 1) Go to you local Wallmart or other suitable supply store and get yourself some high quality permanent markers. Step 2) Make sure your monitor screen is free from any fingerprints and or peanut butter. Step 3) If you do have any residue on the screen, make sure your computer is turned off, make sure you saved your progress up to this point, and get some suitable window cleaner or just plain old soap, water, and vinegar. Now begin to remove all the detrius on your screen with your favorite cleaner, having a blow drier handy for those pesky water droplets that are sure to get into the electronic components of your computer. Once cleaned and thoroughly dried, put on some rubber gloves along with some rubber boots and turn on your computer, preferably from about three or four feet away - to avoid the flames and sparks that might spue out of your computer/monitor. If everything went well and you and or your computer aren't fried to a crisp, start up AM with yur project and mosel in the front view again. Now comes the fun part - take your favorite colored permanent marker and start coloring away on your screen. Since you just got done cleaning your screen, the marker should work well on that shiny clean screen. Keep switching colors to give the whole model some vibrant life, but do remember to chose your colors wisely since this is a one time deal and you'll have to live with these colors on your screen for the rest of your life. Btw, don't move the location of your model, since the process of cleaning the permanent marker off your screen involves heavy duty electrical equipment including but not limited to a high speed orbital grinder, a belt sander, and an acetyline torch. Let me know if you need a tutorial on that process as well. Hope that helps
×
×
  • Create New...