Eric2575
-
Posts
2,615 -
Joined
-
Last visited
Content Type
Profiles
Forums
Events
Everything posted by Eric2575
-
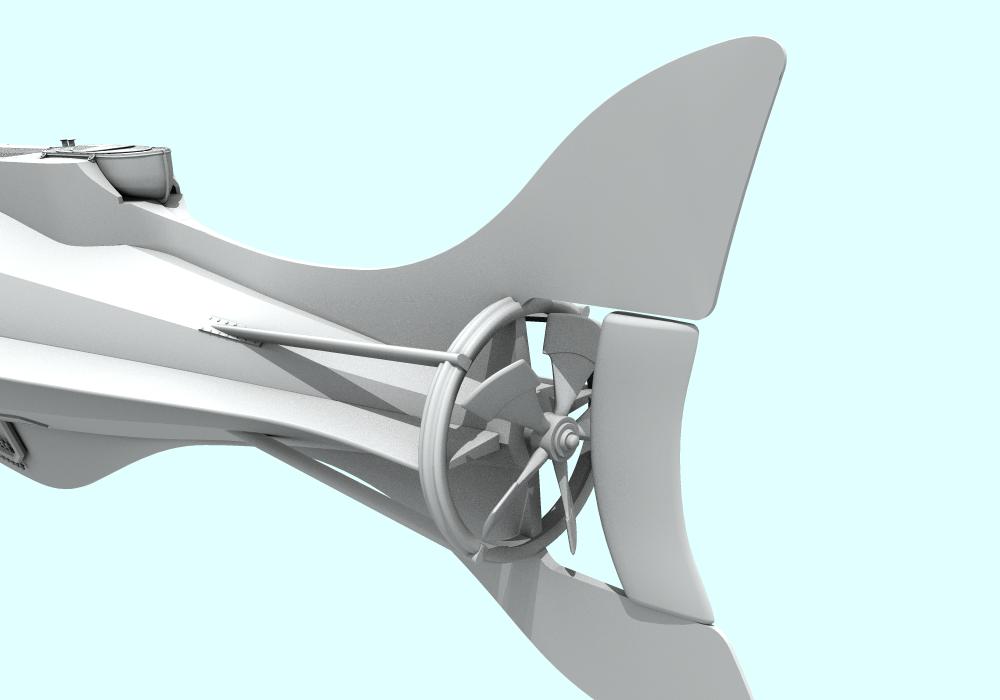
Update: The prop is completely remodeled to be much more accurate, modeled the stairwell leading into the Nautilus, detailed more of the deck and reworked the side fins among many other things.

-
Herzlichen Glueckwunsch zum Geburtstag.
-
Their website still advertises 50 cents. I suppose that is relatively inexpensive in their world, but in mine it's like carving out of gold. This 3D printing business is going to get as cheap as printing on paper, but were not quite there yet. So no ABS 3d model for me yet
-
Just like your avatar Thank you
-
Bill: I have perused both of those sites in my research of this model. But thank you anyway. You never know what I might have missed. I wonder if I could start a build thread under Special topics if I make sure there are plenty of references to my Nautilus model? Here is a render of the Nautilus lifeboat also known as the Skiff.
-
Thank you for posting that and refreshing my memory, William. I'll have to revisit that thread. Those ears look terrific! Let's see what they'll charge for my Nautilus
-
This is great stuff Al. Thank you so much Eric
-
Tralfaz, I would love to get a copy of those. The higher rez the better. Do you Skype? Gerry, us "Contributors" have got to stick together, although I might soon be demoted to waterboy
-
Mark: Beautiful work! I did a water scene a couple of years ago and found that the transition from water to shore is very important. The water will have a slightly lighter appearance the closer it gets to shore, and the shore will have a definite boundary marking the different levels the water has reached. If the water moves a bit with the wind, etc, then you will also have a darker edge around the shore denoting where the water is lapping. In your scene, you may also have some water undercutting parts of the shore creating some ragged edges where the earth broke and fell into the water. Just a thought
-
That piece of pasta is called the speed screw. Sorta like a speed indicator on an airplane, except under water
-
There is a DXF plugin that is used to export. Seems to work ok for the purpose. That's actually one of the reasons I wanted to see some of the finished models. William, where hast thou gone?
-
Hmmm, not very professional in my opinion (not you Al, him), unless you just send them a few days ago?
-
John: The first iteration will not be radio controlled since I will construct it out of metal. To be specific, brass.
-
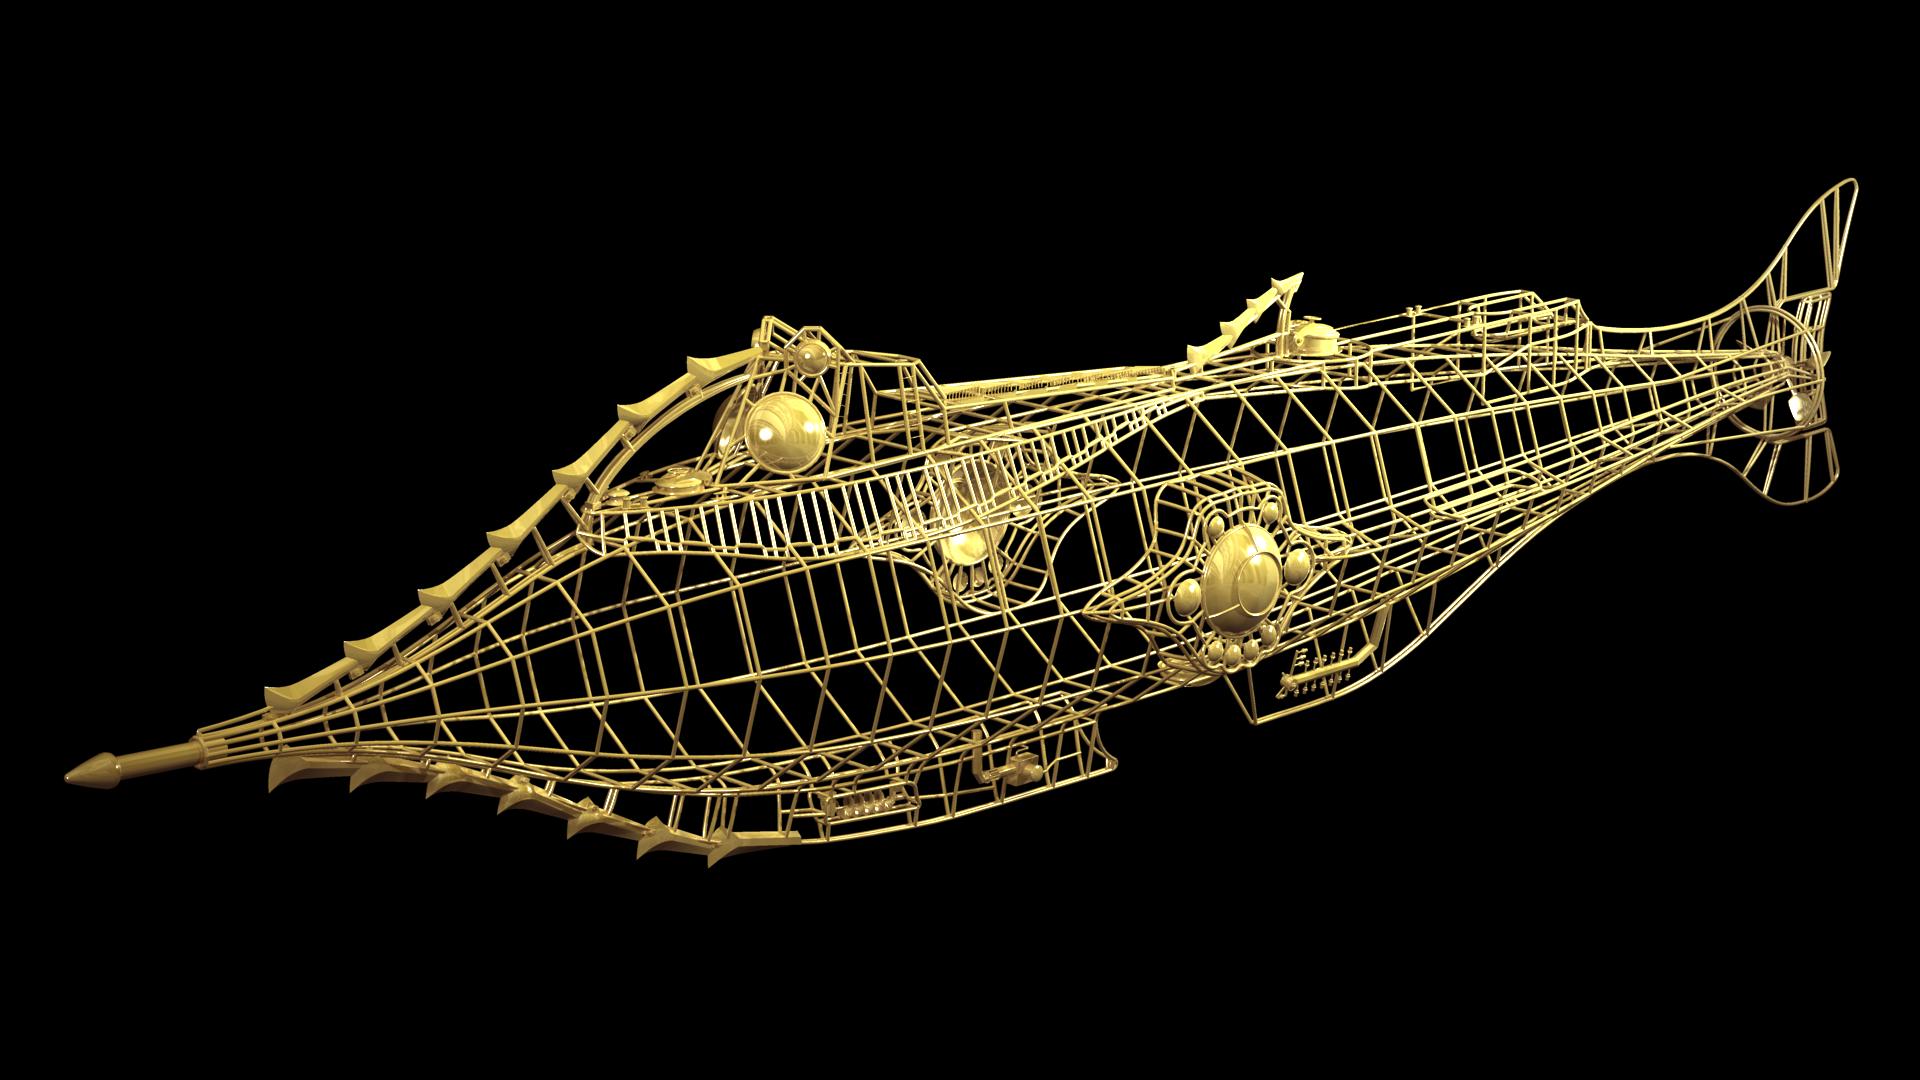
Thanks for the comments. Here is a wireframe with disclaimer: The hull is sectioned into that many patches for a reason - this was modeled after a detailed scale plan I drew, that will be used in the physical construction of the model. Since this will be a real model with real bulkheads, I decided to model them in CG also. There is a separate model of only the bulkheads in all their glory. One more thing, the ram is left over from the old model as can be seen by the great number of splines to make that little thing. It will be changed too. Stian, I feel that this wireframe is a bit large and too general. If you want detail shots of any section, just let me know. Finally, I included a design study of what the sub would look like if constructed out of brass wire - see pic below. Eric
-
Has anyone here had one of their models converted to a physical object using a 3D printer? William posted a while back about doing that: http://www.hash.com/forums/index.php?showt...&hl=printer If he's converted some of your models, let's see the result. I was in talks with him, but he never got back to me after we started discussing details.
-
The original Nautilus I modeled was one of my first models I did in AM. This one is a new version I am working on that will be used to make a 4 foot scale model.
-
Almost.
-
You just earned yourself the Most Improved Modeler in a 24 hour time period award! What a difference! Outstanding!
-
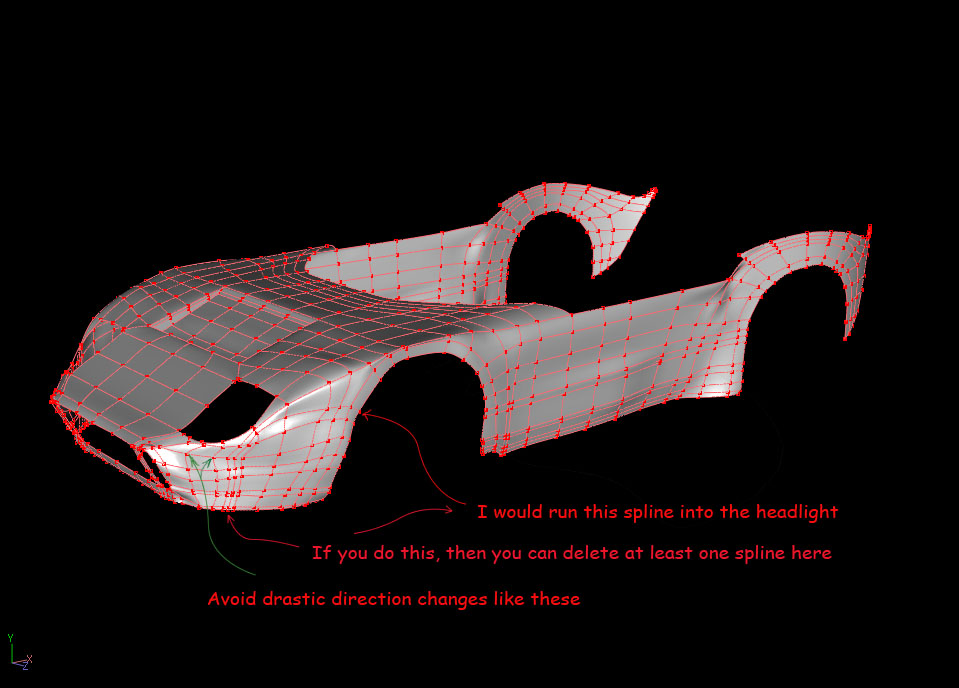
Stian's method is also the one I use when modeling a car, although I usually only model one side first. To check how the whole body is coming along, I will copy and flip on the x axis without using copy/flip/attach. That way I get a sense of how it looks, then I delete the copied side with no fuss and keep working on the primary side. Once I get basic proportions, I will concentrate on really ironing out body panels such as the fender, door skin, quarter panel, etc. Just remember to keep continuous splines flowing and almost never peak splines in a car skin. Btw, don't think twice about Stian's effort of 10 minutes, he's not human edit: To start out, re-work the area below the front headlight, there are way too many splines converging there. Run a couple of the splines coming from the wheel well into the headlight opening, instead of curving down below the headlight. You can also eliminate a couple of the splines running from the wheel well running to the front grille. One more tip: try to keep your splines from making drastic changes in direction -
-
What I especially like about this project is the perception of scale you get from looking at the renders. It is often the case that something that is supposed to represent enormous proportions comes out as looking less than the intended scale. Your Cathedral looks grand from any angle. Well done Stian!
-
It is a great start, and with that said, it is also the most frustrating phase of modeling a car. In the beginning I always think: how will I ever get this to look like the pictures? It takes time and patience, unless you are Stian, then you just do it overnight in your sleep . One thing that has helped me quite a bit is to keep splines down to a minimum and only put them where they are really needed. It helps to get you a mesh which is easier to smooth and you can always add splines later where and when needed. Your model looks a bit heavy in the door and hood areas. I know, there are people that take the exact opposite approach and delete as they progress, but I like to go simple and work toward the complex. I also live and die by the best rotoscopes I can find and make sure they are the same scale, top, side, front, and back. Keep up the good work. -E
-
Not bad for a beginner Could I see a wireframe of the tree? Ok, wire the truck too.
-
Very cute. Start a children's book and make a million - I'll be your agent, haha. -E
-
Damn Nino, I have not been paying attention to the talent that is here on the forum - Fantastic work!!! This is a real treat to follow. Nice concept, nice spline flow, and the curves on the female ain't bad either! Keep it up! -E
-
Rodger: Here is a closeup of the rim. If you need another angle or an even closer shot, let me know. I hope it helps. Eric