zandoriastudios
-
Posts
3,868 -
Joined
-
Last visited
-
Days Won
1
Content Type
Profiles
Forums
Events
Everything posted by zandoriastudios
-
I explained this on page 1 of tthis thread.... A decal can have MANY images in it--not just one. You DON'T make a decal for color and another decal for bump and another decal for specularity, etc! Make ONE decal that contains multiple images. Color,bump,specular intensity,transparency, etc. You load the images into the decal by right-clicking the Images container of the DECAL. then choose add image from the context menu THAT ADDS THE IMAGE INTO THE LIST OF IMAGES IN THE DECAL! Then change the "TYPE" for each image to color, bump, or whatever. please re-read this post until you get it. then when you get it, you will say, "Dope!" (in your best Homer Simpson impersonation) and slap yourself on the head!
-
Under the Decal name in the PWS, there is a container for IMAGES. Right click that>add Image. Then once the bump image is added, set it's Type to BUMP. All of the images in a decal use the same UV coordinates.
-
Doug, with Photoshop elements, I don't think you can work with the channels... When you save as 32bit targa it IS saving an alpha channel--the problem is that it is by default saving a completely white channel. To get the face on the balloon, all you need is the color type image in your decal. If you were able to use an alpha channel, that greyscale channel would act as a "mask" to hide the part of the image you don't want to show. [you may want to download the free program GIMP, that will let you work with the alpha channels] In this case,working with the software you have, you could simply use the "exclude color" to block the part of the image you don't want to see. To avoid creating a "halo" around the shapes that you are mapping, you don't want to paint them with a soft brush. If you do, the softer edges of what you are drawing are not going to be excluded--the exclude color has no tolerance setting, it is an either-or type of thing... So you need to draw the "face" with the Pencil tool rather than the paintbrush, which will give you unaliased, hard edges. This may look like crap when you are looking at the decal, but when you render the model A:M will antialias the edges and it will look smooth. So that is my suggestion: Draw the face in black on a white background, using the "pencil" tool in Photoshop elements. Save the image as a regular 24bit targa. Import the image and set the exclude color to white. now you should be fine to apply it as a decal on your balloon model.
-

Borg-ish City with Crazy Green Background
zandoriastudios replied to JoelS's topic in Work In Progress / Sweatbox
I like it more everytime I look at it! Thanks for the explanation of your technique! -
very nice model! Makes me all jazzed up to see the next movie!
-
Design Critiques Please =^.^=
zandoriastudios replied to nyahkitty's topic in Work In Progress / Sweatbox
#7 seemed the most professional to me. The Sketch on the left is very dynamic and creative, and the 3D version on the right is a good example of what you are selling. You might try one other version: invert the colors of design #7. White background, black sketch, rendering . Black text. That would be a nice version to my tastes. -
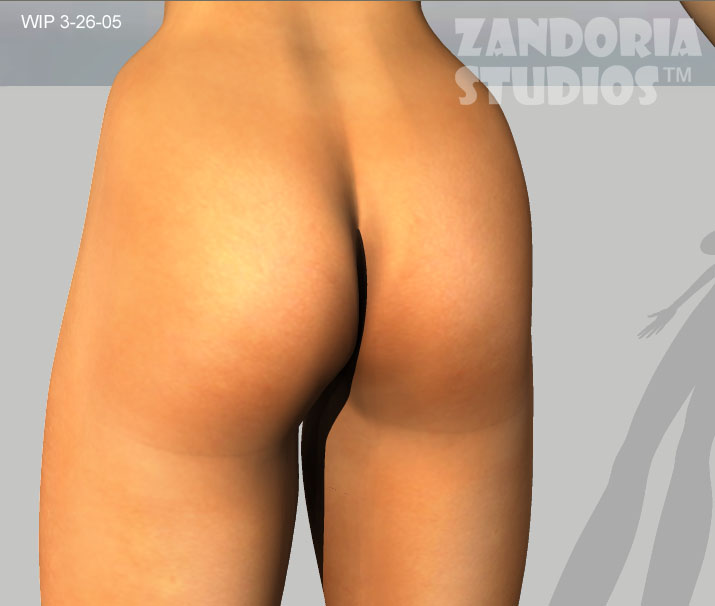
A nice ass is difficult, but I think this one is "perfect"

-
Great stuff!!! You are living the dream, man!
-
The rendering looks very dark.... I think that you need an object to represent the actual bulb where the spotlight is coming from--make it 100% ambient with a glow. Even underwater you are going to get some illumination from the light diffused in the water. try a skylight with a low light intensity to give some shape to the submarine.
-
This is where I eat my hat
zandoriastudios replied to balistic's topic in Work In Progress / Sweatbox
I have to say, I like the radiosity version more. The sunbeams in the original seemed too dominant... Both are great pics. I can't wait to see what kinds of things you do with the higher dynamic range that is coming in V12! It will be Sweeet!! -
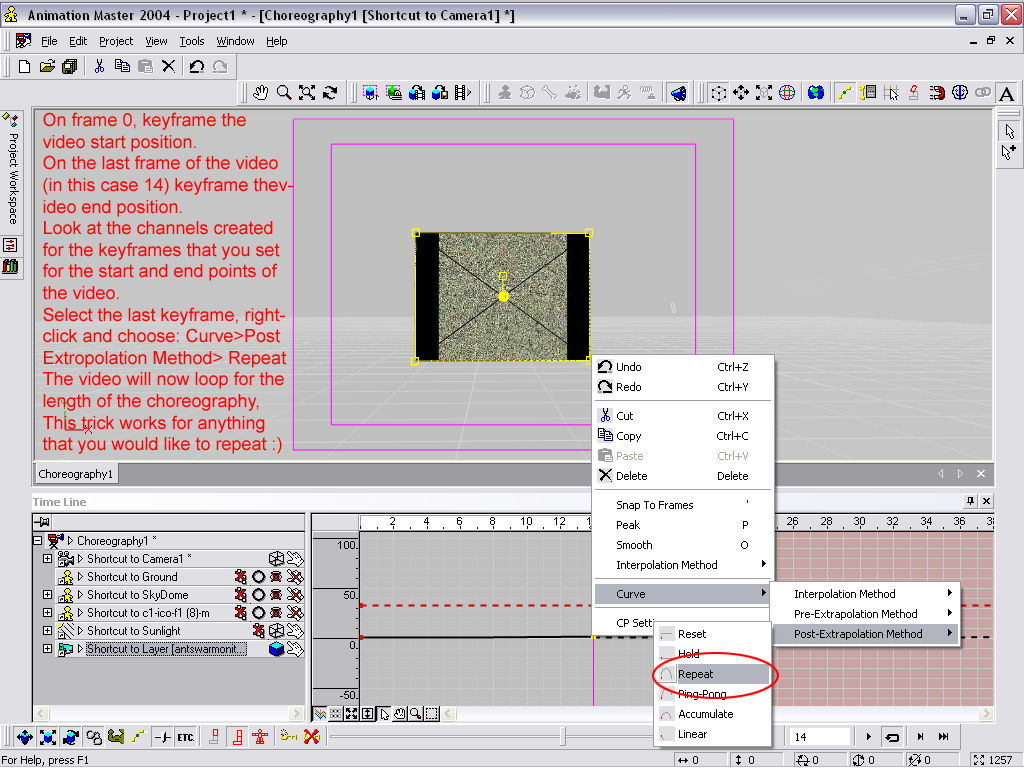
Here is how you set the action or video to repeat
-
The-War-Of-The-Ants-Material
zandoriastudios replied to Mr MM's topic in Work In Progress / Sweatbox
Here is a screencapture showing how to loop an action or video. I set a keyframe for the start frame and for the end frame and set the post extrapolation to Repeat.
-
To join, or not to join, that is....
zandoriastudios replied to Eric2575's topic in Work In Progress / Sweatbox
There is no reason to join them. It isn't cheating either -
stack of cardboardboxes tipping over
zandoriastudios replied to agep's topic in Work In Progress / Sweatbox
you could add some rotation to all 3 rotation channels of the ball before the dynamic constraint occurs, then some of that spin will be transferred on impact, rather than just pushing through. It is looking really good! -
stack of cardboardboxes tipping over
zandoriastudios replied to agep's topic in Work In Progress / Sweatbox
Go to the time in the choreography where you want them to stop sliding and set the ENFORCEMENT of the rigid body contraint to 0% Then resimulate. Try using a beveled cube for the box, that might help those boxes that still want to penetrate the floor. Adjust the MASS property of the different objects to get different interaction. For example, the bowling ball might be really dense and the boxes empty... -
stack of cardboardboxes tipping over
zandoriastudios replied to agep's topic in Work In Progress / Sweatbox
Make sure that your boxes and ball have the normals pointing outwards. Then make sure that your objects aren't starting already penetrating the floor. It appears that rigid bodies are working but the objects are not colliding with the floor, which makes me think that they are intersecting it at the first frame of the simulation. -
Wow! I love that everyone is getting into mocap with their A:M models! This is what I hoped would happen! It is just really cool that you can do that in A:M--all those .bvh files all over the internet are great examples of reusable motion
-
stack of cardboardboxes tipping over
zandoriastudios replied to agep's topic in Work In Progress / Sweatbox
Bring in multiple shortcuts to the box, stack them up in the choreography. Then at the frame where your character is just colliding with the first one, apply the rigid body constraint to each box. Simulate rigid bodies. Check out the Cosmic Bowling tutorial. -
leave his name as Model1.....
-
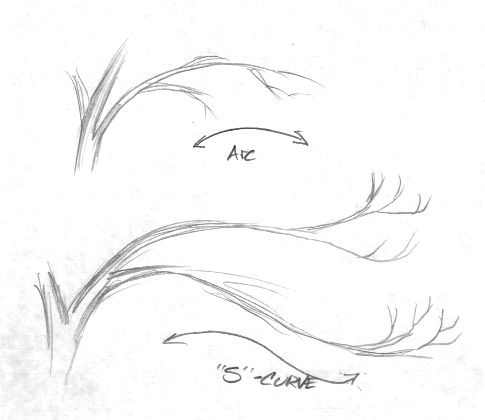
I was walking outside to my car this morning and I was looking at the branches of the trees in the neighborhood. I had skipped my normal method of sketching and studying my subject before I began modeling, so I made a big mistake! I had modeled my branches as essentially forking arcs , with the buds to emit leaves at the last tips. However, this morning I noted that ALL branches seem to follow an "S" curve. They do arc as they extend away from the trunk, but as they reach for the sunlight, they sweep back up. The last twigs that sprout leaves are all pointing skyward, not downward (which is what they are doing in my model, since they are continuing the arc...) So when you get ready to model your tree, go outside and look at some first! There are no leaves right now, so it is a good opportunity to study them trees nekkid! Below is a sketch showing my error and the proper branch morphology.
-
REMINDER! It is this Saturday! Sacman, call me about carpool! 423-899-five four zero eight
-
man--that would have saved me a little time Rodger!
-
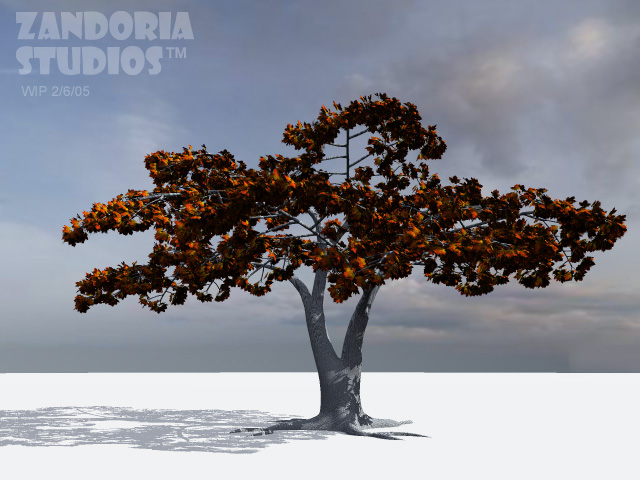
Here it is with some leaves.
-
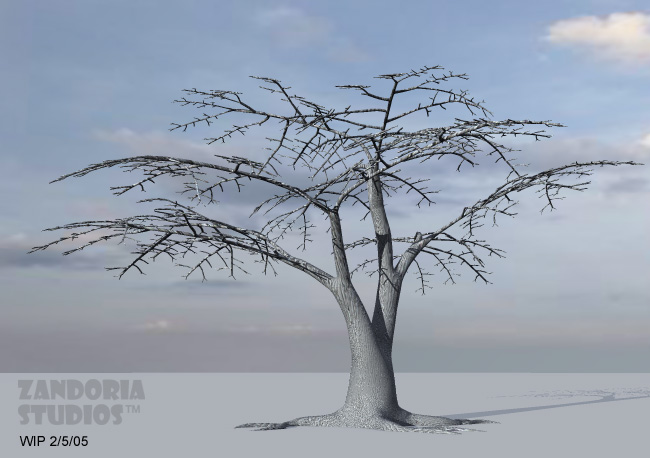
I worked on it all day yesterday. The basic parts were a Y-fork, a T-fork, and a branch made of those. then copied and pasted into the main model. the longest part was waiting for the find patches.align normals when i pasted a branch in. There is a color and bump map for the bark. The leaves are particle hair (image to follow), Great idea--post them here
-
This is a model of a tree I started yesterday, in response to a little challenge amongst the Fellows... It is 31,274 patches! all one mesh . At the tip of each twig is an emitter that I will be adding a leaf material to.