zacktaich
-
Posts
1,056 -
Joined
-
Last visited
Content Type
Profiles
Forums
Events
Everything posted by zacktaich
-
I didn't use AMloft. I don't use it much at all because it's a pain to have to leave the program. But I love lofting features. The screws are sometimes spheres that are partially hidden, and sometimes just half spheres. Thank you. ---- More coming tonight.
-
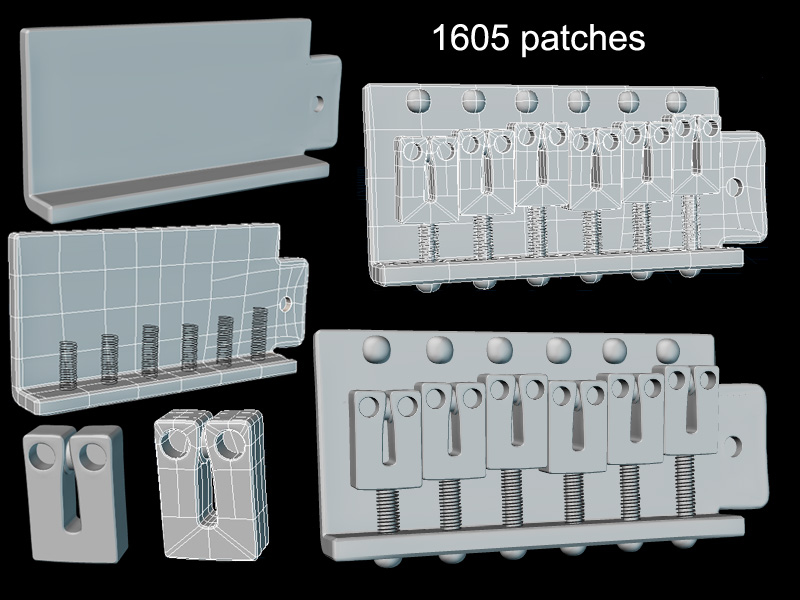
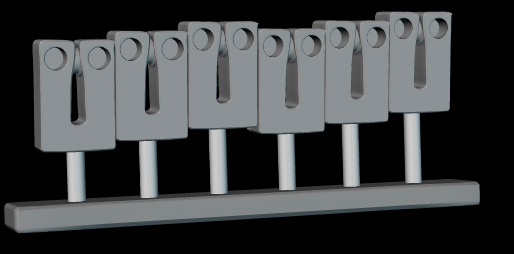
Ok, finished the bridge. I'm really enjoying this. The design is basically that of my own, except I modified it slightly for aesthetic reasons. No materials (other than on the springs) have been applied. Despite the already high patch count I'm starting to really wish I had the grooves in the screw heads. I may use a bump map is I find it works well. I haven't modeled the whammy bar yet, but the hole is there. I hope the pictures are pretty self explanatory, as a lot of the modeling process was similar to (although notably more complicated than) previous pieces, I will not go into extreme detail about the process. Pieces (I don't know their real names): Keys Pretty simple, I used a similar outline technique as before, making sure to bevel every surface. There are two holes that are in every model I have ever seen, although the reason is unkown to me. inside there are little concave wheels for the strings to roll on. Bridge This was a little bit complicated in its construction. I started out wit a pre-beveled, 4 point spline which I extruded all the way around the shape of bridge. Then I made an outline for a hole in which the whammy bar will go. I later filled it in. One difficulty was dealing w/ some peaked/smoothed issues. In some places I had to go with a peaked spline that's bias was tweaked on one side. This is a last case scenario for me, as tweaking biases for perfect bevels is not easy, and can get bad results. There is probably an easier way for all of this, but it worked. From the looks of it, other than possibly the body, this is the most complicated piece, modeling wise. I'm not sure what I'll model next, I may just knock off some of the easy stuff, like tone and volume adjusters, tuning keys, or the neck. Hope you've enjoyed this or learned something. Hopefully I'll get something else done either tonight or tomorrow. Cheers, Zack EDIT: The total number of patches for all the pieces I have modeled so far is 2071.

-
I was definitely planning on using 'render as lines'. Same w/ the springs that will be on the bridge.
-
Just thought I'd leave off w/ a screen shot of what I've done so far on the bridge. I'll work more on this tomorrow. More detail on it then. It already has 1000+ patches (just this part). Zack
-
Dear God, I just had an FF VII flash back... I remember the Wal-Mart, the scary people, plots, and characters.... I hated that game but I was sucked in. I don't know how I thought the graphics in that game rocked. (sorry to hijack this)
-
His face is very expressive, I hope to see a tutorial! Zack
-
Looks pretty cool, and I think it will translate well into 3D. The one question on my mind is how the feather that goes under his eye will look in 3D. But with a perspective shot you may be able to sort out how he looks.
-
Wireframe of pickup. Next I'm going to do the bridge/saddle (where the strings come out of at the bottow). Lot's of little complicated pieces on this part so, I'll show individual shots of each. Hopefully that will explain itself.
-
Smartskin is also great for muscle and skin deformations. If you want his muscles to buldge when he flexes his arm, smartskin is the best way to do it. Nice hair!
-
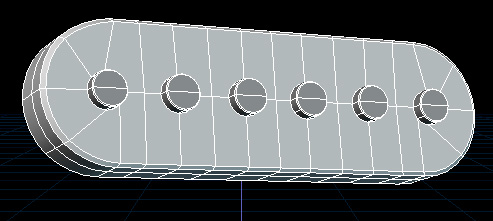
Ok, modeled the pickup(s). Very simple, but I'll explain anyways for those who are getting used to splining. Method: 1) For outer shape I lathe an 8 point circle and delete one half. I pull the half that is left to the side. 2) Copy, then flip, and then attach (note: not one step) so that you have a nice pickup like shape. I did some peaking and played w/ bias to get the sharp top and bottom edges, although there are better and easier ways to do this. 3) Lathe a 4 point circle and put it in the pickup outline. now copy this six times, using any technique you know of to make sure they are at least somewhat equidistant. 4) Now, begin filling in the shape you have, other than the two sides, I found that for the most part I needed to use 5 point patches. 5) extrude the outside edge, make sure to bevel. 6) Now make the little magnetic keys that go in the circle. to do this: I. Select one of the circles, copy it and scale it down to something like 95% in XYZ (I don't know which way you have yours rotated). II. Pull that back in a little bit, and then extrude it out once. Extrude again, this time for beveling, only scaling it down to something like 90-95%. then cap off the end. 7) Copy it five times and put them into the other five holes. You may have noticed that a lot of the modeling I do involves first making outlines, and filling in later, this is the best way to go about almost any situation IMO. Zack
-
Never said I was any good! I need to just work on improvisation and jamming. If I may say so myself, my classical pieces played on electric are pretty good . lol. Zack
-
I have an Ovation, my parents were willing to spend a little bit more at the time for a guitar that would hold up to my beatings (I was something like 10 years old). Next are the pickups. (edit: changed what I want to do next)
-
And here is the wireframe. Note that the only difference is a slight beveling on the inner outline. The topology isn't wonderful, but it serves it's purpose. I'm not going for uber-realistic (I'll take what I can get ) If you find you're getting lost, because you don't know much about guitars, or because my explanations are crap, you can always refer to this image: Strat Front. Zack
-
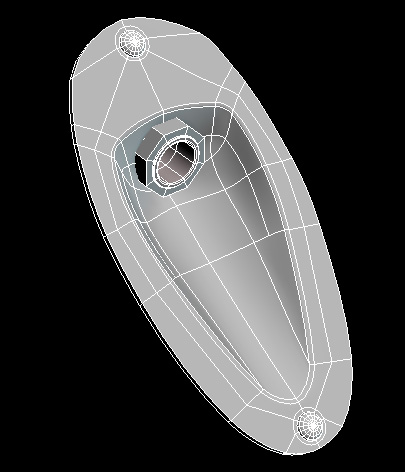
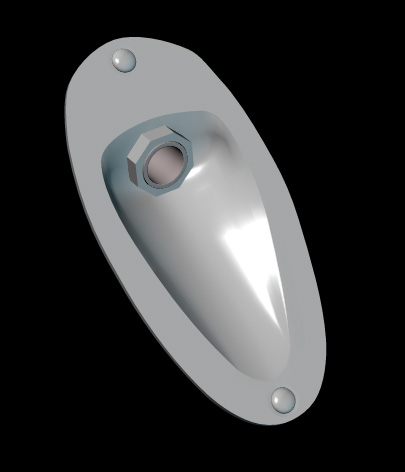
I've decided to model a guitar. At first I wanted to model a car, but after several failed attempts, I decided to build something on a smaller scale to get used to the feel of the mechanical/organic style modeling used in both cars and electric guitars. I decided to model a fender Stratocaster a. Because I have a Strat knock off and b. Because strat's kick @ss I decided that I'd keep everyone informed on my progress and I'll make it into a mini-tute (I don't have the time to do an extremely in depth step by step). At some point I will probably compile it all and give it a permanent spot on my website. Remember that I'm not coming here as an expert, as much as I hope I am helping others, I hope to receive help along the way (especially with surfacing) I started tonight, modeling the place where you plug it on the front (no idea what it's called). I'm ashamed to say that I didn't bevel every edge as I should have (it just takes so darn long!) and I didn't make it as exact as I should have, I kind of eyeballed everything, and tweaked it until it looked OK. I can already see that I will struggle with materials, even though they are quite basic, because of my complete lack of knowledge on that subject. My modeling method was: 1) Make an outline for the outside shape, a surfboard-like ellipse, and a second outline of the inner area. 2) Extruded outer outline down small amount. 3) Made two small circle outlines for underneath the screws, where a small amount of deformation in the reflectivity is visible. 4) Began connecting shapes, keeping almost all lines, except those which are specifically meant to be curved, peaked. 5) from bottom tip of inner outline, extruded inwards and down for indentation. 6) made a circular outline for the cord receptacle area 7) continued to fill in interior w/ splines and declare 5 point patches. I made use of the maintain curve tool a lot until it began crashing A:M. I then switched methods to get around it. 8) modeled screws and put them in place, noticed it would take a lot of geometry to make the indentations, so I decided to put that off till I find a way around it (booleans?) Ta da I still need to do some beveling, but that knocked out the basic shape. My splinage isn't the best, but even without porcelain (which does not react well to sharp edges) it rendered quite well. Zack
-
Very good proportions, and lot's of character. Some suggestions: You have some 5 point patches on her forehead (and possibly in other places) that shouldn't be 5 pointers, they should have a hook The spline count is a bit high, a few splines go along way. Her upper lip seems a bit far out. Looks like she may need braces to change her jaw structure a bit In the back of her ear, there is a crease because a spline from the back of her head intersects a cp that already has two other splines running through it already, just break that spline and make a 5 point patch A few of the angles are a bit sharp. From the front view you can see one of her cheeks is a bit far out, unless you're going for the cruella deville boney look, which is fine as long as that is your intention You might as well take off those shoulder patches, once you've cfa'd (copy/flip/attach, you heard it here first folks) it you'll want to start over, extruding the whole bottom ring. Very good model, hope this helps.
-
I really like the image. Great lighting and materials. Nearly photorealistic. Here are my suggestions, take 'em or leave them, what you've got is nearly perfect anyways. Composition: Something else on the table near the back, maybe show a little 'wall' that marks the back of the bar Move the smoke from the cigarette a bit, it seems runs into a white spot on the table The shotglass looks a bit small to me. May just be the position Materials: Make the edges of the cigarette box frayed a bit (maybe some white edges) Make the paper frayed, and yellow the color a bit. Maybe make the frayed edges black for the burnt look Great job.
-
I'd like to see what this character would look like with black pupils. Could you post a .jpeg? Really cool stuff. Made me laugh.
-
Hair Lock? would someone fill me in? is the same as the new hair we've all come to know in love in v11? Looks really awesome, although at first I couldn't tell if it was supposed to be mail or female. The raytraced picture made it clear.
-
I thought it was hilarious. I hope no one posts to say how offended they were, as toast made more than adequate warning. I also found his stare a bit wierd. I like it.
-
'bout a year now. It was really easy, I was surprised to find out that it wasn't a server or anything, just a direct connection to Zach's laptop. 3D world has been alerted about Duck Sauce, though I have seen no reply to my email yet.
-
Holy shi'ite, that's hilarious.
-
Someone did the calculation for how long it would take us to make a feature film. I don't have the number right here, so I did it myself. It's a pretty simple algabraic proportion. 48 hours = 2880 minutes. It would take us 38,400 minutes to make a 100 minute film, or approx. 640 hours, or a bit less than 4 weeks. The only problem I see is the national coffee shortage that is guaranteed to happen afterwards.
-
Funny, it's no longer on the front page of A:M films... This is such a big thing. I don't get it.
-
that's really incredible. now you have to tell us your secret .
-
Great job! . The best damn film the contest has ever seen. And probably an unprecedented feat when it comes to animation. (no bias whatsoever)