zacktaich
-
Posts
1,056 -
Joined
-
Last visited
Content Type
Profiles
Forums
Events
Everything posted by zacktaich
-
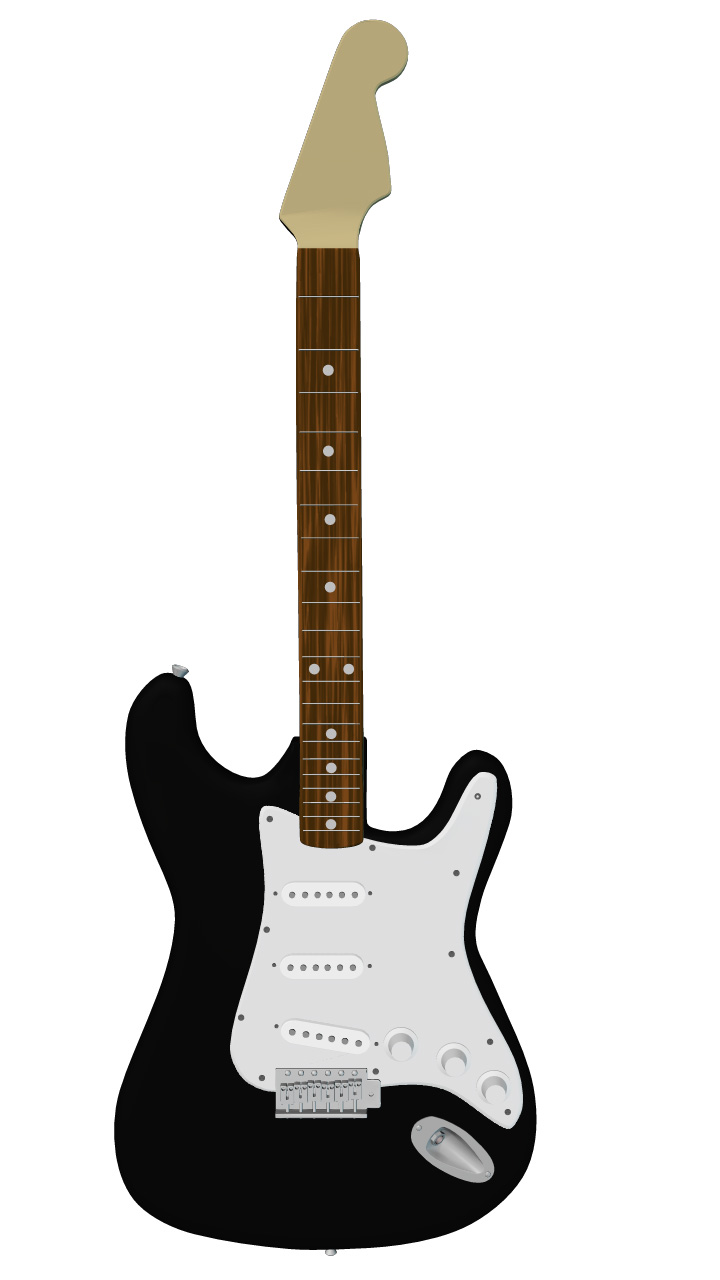
Ok, lots of new stuff today. Check it out. It's almost finished. What I need to do still is add all the tuning keys, strings, and a few final touches. I also noticed that I'll need to move around the pickups and bridge and neck, because they don't quite line up. Any comments about the proportions, look, or anything are much appreciated. There is a minor crease visible in this image, near the top. This no longer exists, I just moved some splines around and spaced it all out. Zack p.s. Sorry if my grammar and writing are bad. It's 1:33 AM and I'm ready for bed...

-
Wow! Nice job on that. What would you say was the hardest part to model on that? I've been looking at the connection to the neck a lot recently, and I have noticed that it's more complincated than I originally thought. This should give you a good idea of what the front and back look like. This may also help. Edit: Bingo, http://www.bravewoodguitars.co.uk/images/b...neck%20wear.jpg The idea is that it goes (basically) from curved to flat, with the flat are being beveled into the curve. If that makes any sense at all. I'll maybe snap some pics of my own to show you. I've got a few ideas of how I'll pull it off, All I know is I'll probably need a lot of hooks. Zack
-
Did you just start with a medium grey template and then use the burn and dodge tools, or did you use a lot of painting tools?
-
Very realistic. I love it.
-
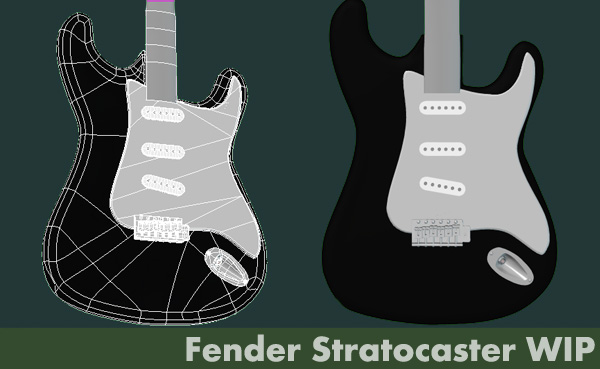
1) I haven't seen any creases, yet. Part of it is just using proper splinage (not beautiful splinage neccesarily, just proper splinage) and the other part is making sure that everything that should be flat, is flat. 2) No, I haven't used porcelain yet. Maybe for some of the more complicated places (such as the neck and it's connection to the frets, coming next!) It's sad not being able to use A:M for a few days... I think I'm gonna cry Zack
-
Thanks for the tip! I can't wait to try it out. I had never heard of this before. This needs to be filed away somewhere... Zack
-
Thanks! It's good to know I merit one regular reader . Questions, anyone? Zack
-
Added knobs for the strap (on the bottow and on the top). Just simple lathed shapes. I'm posting this because it is my last update for a little while. I'll still be able to field questions on my sisters computer, but I won't have access to A:M. Zack
-
Ok, this is my last night before my grandparents come, and my last chance to get some modeling in before I take a 4 day break (my office is in the guest bedroom ). So here are the tweaks and a description of each: 1. Added knobs - just a simple lathe job. 2. Added screws - a little complicated, I will post a wireframe shot of these in a bit. 3. Added material to neck - a spherical combiner with an fbm turbulence, stretched 3000% in Y axis, 50% in X axis. That's about all for now. Questions, comments, critiques, very much appreciated. Zack
-
Here's the thing I'm not proud of, the hierarchy. I can't wait for some form of folders to be implemented. Here are the groups.
-
Hey, thanks! I'm no longer confused with splines. I feel good... (I think I feel a song coming on)
-
I'm having the same great experience. It's a rock solid version, and it's a wee bit faster when it comes to heavy patch counts. I have absolutely no idea why. Maybe it has to do with the fact that I cleaned up this model. I've been playing around with reflections, and my conclusion is that I'm going to need a lot of help from the user base when it comes to texturing . The problem I had was having reflections on at the same time as ambience... But texturing comes later. All I have now is a teensy bit of specularity and flat colors. Ok, I Modeled the neck. Basically, I started out with a spline that looked like this: 0--------------------------------0 0 0 | | | | | | 0 0 0--------------------------------0 I extruded this a few times, then extruded it once more, and I altered this or to look like: _____---_____ _____----0 0----_____ / \ 0 0 0--------------------------------0 Basically, it made a change from a beveled square to a half beveled square/half curve. This second spline was extruded up the body. For the fret dividing bars I will either use a displacement map or some basic little cylinders. Zack
-
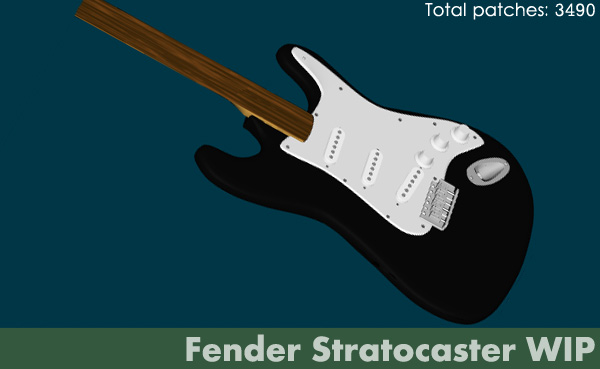
Ok, I got some help from Noel. I won't go into full detail but it involved first upgrading to v11f, then doing some registry editing, then copying and pasting the model into a new .mdl file. Then there was about 30 mins of cleanup, but the nightmare is over now. So here are many of the parts put together. The neck is still just a stand-in. So basically I just copied and pasted all the parts in and used plenty of reference (if you need photos in .TGA format, just ask, and I'll attach them) to scale and put them in place. I think it looks pretty good considering the minimal texturing so far. Zack Oh: 2805 patches, so far.
-

Replacing 5-pointer with 4-pointers
zacktaich replied to OdinsEye2k's topic in Work In Progress / Sweatbox
The problem here is that you have multiple splines going through that middle CP. It's sure to crease. Good Luck! The main thing is not to run into situations where you need one. Doing that isn't all that easy either it seems... -
I put the pickguard in. Just so that you trust me when I say the model is screwed up, I posted a pic . It may or may not have to do with v11e. Just in case, I moved back to v11d, and have had no problems since.
-
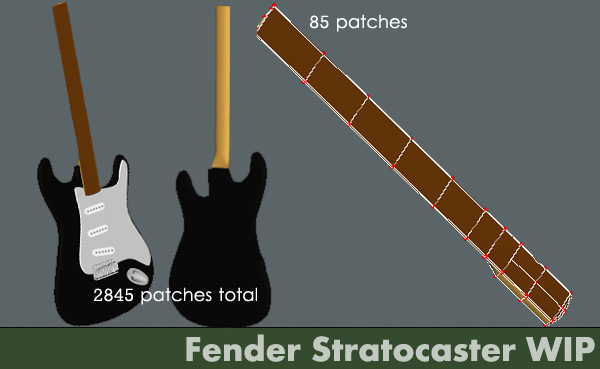
OK, here goes... Life got in the way of this project for a few days, but I'm back. I modeled a basic stand-in neck and I started putting things together a few days ago and it was looking really nice, unfortunately I wasn't sequentially saving at the time and my body model got screwed up. I sent it off to hash, and they're cleaning it up right now, but until then I decided I should still model the pieces I'm missing. Pickguard: super basic stuff, used reference images to draw an outline. Extruded. Closed off. Very complicated, huh? Well here it is anyways. 56 patches. more to come soon. I hope to find a better way to model the neck than the last way I tried. I'll probably end up making it a bit simpler than it is in actuality. Zack
-
Very nice. I still like the black pupils... but I'm not attached . The blue texture is slightly plain at the moment. maybe some variation in color or a bump map would help. I like it.
-
Make a grid, however big or small you want, it doesn't matter, and apply it as a 'decal' now go into the image properties and change it to a 'displacement map'. Hope this helps. Do you want more detail? (I can't believe they're making you do this just before summer break! )
-
Is that nest made with v11 hair? Looks really great!
-
Wow, that was great. Very different style than I think I've ever seen. Bravo!
-
I like the black! The light blue is a bit too hard to read. Makes the facial animation hard to read.
-
mmm... Les Paul... A bit out of my price range Maybe someday. Or have someone else tune for you . Thanks... I'm starting to feel like it's all coming together, although I'm not sure how everything will fall into place. I should have time to model tonight, and I'll post an update, although it will probably be pretty late. Zack
-
Brand: I don't really care, I'm currently using Fenders, but I don't care if they're Fenders, Ernie Ball, or some off-brand-made-in-china-el-cheapo strings, as long as they play well. Weight: I'm currently playing regular lights, because my last set of ultra lights snapped two strings in the first two weeks. It depends on what I have with me. If I have an electric tuner I'll use that, because it always gives me the most exact results. The one method I can't stand is using a pitch pipe. Hate those things. I think I'll work on the neck next. Or maybe the pick guard. I can't decide. Zack
-
OK, finished the body. It's not the best topology, but it does it's job. Basic idea was that I extruded a 6 point, curved spline all the way along the outline except near the very top where the two ends meet and the neck is attached. Here, the sides are much different. Here, I used basically a modified, beveled cube. I connected everything and that's that. If you want further explanation of any part, go 'head and ask. Thanks! Remind me not to touch those (I'll probably end up screwing it up, no pun intended). Thanks, A few parts may not have the same level of detail, but I hope to keep this as realistic and as detailed as I can (I'm afraid I may have slacked off a bit with the body, there should be more bevels near the top). Zack p.s. You may notice a gaping hole and uneven cutoffs, these areas are not as important because they will be covered later on.
-
Thanks for the support. Sorry I haven't been here for the last two days, I've been backpacking with my dad. Before I left I got a good start on the body outline, I'll probably finish up the basic body shape tonight.