John Bigboote
-
Posts
6,560 -
Joined
-
Last visited
-
Days Won
55
Content Type
Profiles
Forums
Events
Everything posted by John Bigboote
-
I like to balance a little good news with a little bad news... THE BAD: Here is an example of the 'render anomoly' where my shadows 'pop' and I am wondering if anyone gets this upon rendering animations. THE GOOD: BEER! I recently modeled and animated a nice glass of beer! TO SEE the GOOD and BAD: Roll over my avatar and you will see a button to play the avatar full quicktime. THE BEER: The cool stuff with the beer (still dinking with it) is the bubbles and the auto gravity pose and the empty pose. For the bubbles, I made two :15 animations in AdobeAfterEffects of rising bubbles with an alpha. I then applied those cookie-cut style to geometry cut and paste inside of the glass. For the auto-gravity...I made the top layer (foam) of the beer have its own bone, and gave that bone an 'aim-at' to a null that is above the glass, so now no matter how the glass gets tipped, the beer on top stays level! For the 'EMPTY' pose slider, I just adjusted the geometry every 10% to 100% until it is gone at 100%...I also made it (the Beer and Foam) disappear from 90% to 100%. The two poses don't work so good together, so I will need further adjustment...perhaps SmartSkin but that will limit the direction in which the glass can be tipped. The glass has some refractive density which I just used 'ice' from a free set of materials I forget where I downloaded from (darktree?) A MAJOR render slower-downer but glass just doesn't look right without it. What else...oh yeah...the GIRL! The cool thing about her is that I used the 'Sphereize' plug-in to model her 'thingies' and then gave each a 'dynamic' bone...whoo-hoo! I will be fixxing the glitches in this so if you come -in late and don't see the render-anomolies...sorry. TO SEE the animation: Roll over my avatar and you will see a button to play the avatar full quicktime.
-
There's a good Maya tutorial at Digital Tutors.com regarding the above mentioned deformer technique...I'll look for a link and edit it in.
-
iGeek's advice is true. QTPro is the way to go... there are plenty of OTHER advantages too... anyone who uses QT and needs more features should shell out the 30buxx. You can't do it from within Hash because hash uses QT as a third-party playback device...
-
Great idea! As I see it, the 'meta' balls would not only be hand-controlled (who would want to hand animate 1000's of units?) but mainly DYNAMICLY controlled as in rigid bodies...thus allowing them to 'flow' amongst themselves. They would have adjustable properties for...gravity....repel/viscosity...bounce... etc This WOULD be a major addition along the lines of hair, cloth... so unless a highly talented programmer steps forward, I imagine we won't see anything like this until V13,14,15....
-
Yup- Thats a work in progress alrighty. A great start. Put it 'thru the mill' once or twice more and maybe show us a little more what your thinking and what you are capable of... but better hurry- deadline is approaching and 'mime is money'...(chuckles to himself)
-

Ain't they the cutest Shaggies y'ever saw?
John Bigboote replied to ZachBG's topic in Work In Progress / Sweatbox
Thats great Zach! I bet she LOVES it! Uhm...cute kids!! -
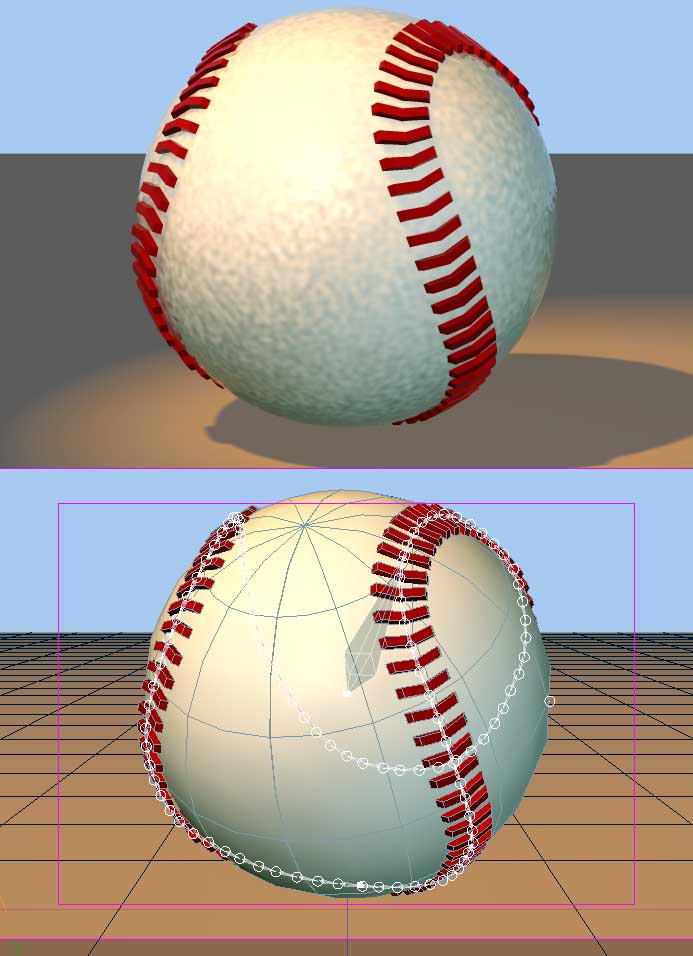
No sir. Ever modelled a baseball? Tis a mathematical quandry, least it is for THIS hasher. The bones serve to spread-out the stitches along the path (explaned further in original post) the reason there is 100 of them is because 100 divides nicely into 100, so each stitch is 1% further along the path than the previous, and so on. Now I'm sure on a real baseball there is more or less than 100...but who counts? The 2nd constraint, the 'aim roll at' serves to conform the stitch to the surface of the ball perfectly...as opposed to trying to 'hand place' them, which would be quite difficult and the results would never be perfect. I'm sure there are other, better ways to do a baseball. Perhaps something using surface constraints or a material, like the hash basketball. This was just a quick solution I came-up with. And once finished, I 'baked' the pose...removing all the bones and constraints and leaving only the affected geometry.
-
Hey- I needed a baseball for a 'Pass the Ball' movie, and had an idea of how to make a quick-cool ball, it turned-out really cool and I thought I'd run it past you guys for hoots- 1st- the ball part is obviously just a lathed sphere, with a little bump added. 2nd I made a 'stitch' and copied and-pasted it 100 times so I had 100 stitches in a straight line. 3rd I made the 'path' which winds around the ball tightly, kinda tricky but not too hard. Then in bones mode I made 1 bone for the ball and 1 bone (each) for the 100 stitches. Auto assign points helped big in assigning the points to the 100 bones. Then came the constraints. In a new pose (ON/OFF) I gave each of the 100 stitch bones 2 constraints...(1) a 'path' constraint with ease graduating from 0% to 99% (2) A 'aim roll at' with the bone 1 as target (made sure it's base was at 0,0,0...) The result is a nice Hash-baseball and it looked great in the animation, I even gave it a nice close-up. Here's a picture.

-
I, too, am tardy in obtaining my V12. I DID-however---go thru all the motions of trying to get cloth collision detection working in previous versions and came to this conclude: IT DOES NOT WORK. See you in 12!
-
A frame from my 'PASS THE BALL' animation
John Bigboote replied to John Bigboote's topic in Work In Progress / Sweatbox
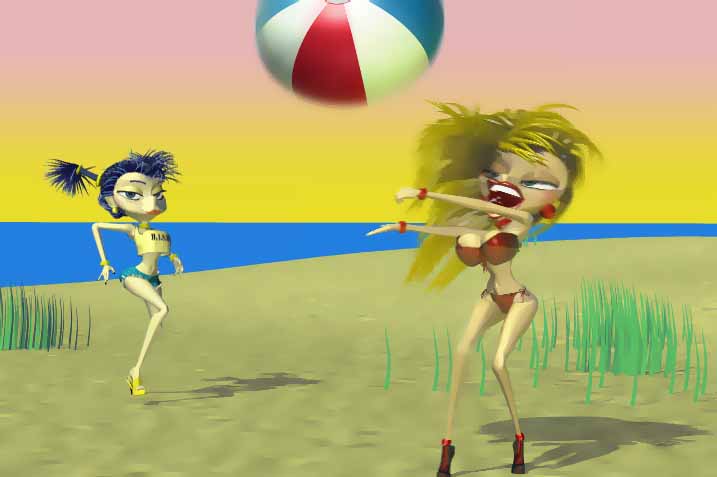
Yes...she's skinny all right---but if I want to look at 'large' women all I have to do is walk out of my office! Not...that there's anything WRONG with that... ACTUALLY I want to use the new 'sphereize' plug-in to make a 'fat' pose of these girls... The grass? Last minute quick addition... make 2 connecting CPs and peak (P) them... extrude, extrude, extrude... scale them to a point... rotate a little here and there...bend... copy/paste/copy/pastecopy/paste/copy/paste... occasional, rotate, scale and reposition... select group/copy/paste/copy/paste/copy/paste/copy/paste/copy/paste/copy/paste select all...make color green import model into chor 2-3 times repositioning here and there... I was going to use the V11 hair...but I already have a lot of hair and dynamics going on in there... and you get exactly what you want by modelling.... Take care Tom! -
Hey! Havent showed anything here in a while and I thought I would stir things up a bit. Here is a fun frame from the middle of my 'Pass the Ball' animation for Will Sutton's group movie Turned out nice...methinks!
-
Quite nice! A very clean style. I diggit!
-
My first animation project
John Bigboote replied to pixelmech's topic in Work In Progress / Sweatbox
Hey thats looking good Tom! Why I oughta...! (3 Stooges-esque) -
I was having a similar problem but it was caused by my smartskinning from an action, with the character in the default FK setup, so later if I turned on IK in another action, my smartskins were not working. The solution was to create the smartskins from the models main window, not an action.
-
NICE! The cockpit looks like a BIG TOE! CRITIQUE: Some of the edges look a little 'play-doh-ey' perhaps a hard edge here or there would help. LOVE the coil springs! Nice work!
-
AWESOME! The trailer gets a little slow at parts, but my favorite part was the drop-down ladder...fantastic! Can't wait to see more of this!
-
The Mach 5 (Speed Racer's Car)
John Bigboote replied to pixelmech's topic in Work In Progress / Sweatbox
Love it Tom, good work! HEY! Maybe you should do-up a nice render of it and enter it into the image contest!!? Why not...? Better yet- (brainstorming) Lets do a combined effort! You supply the car, I'LL put on of my V11 ultra-bimbo's posing on it...kinda like a motorcycle magazine or something! Your part will be the SCI-FI, mine will be the fantasy... JUST an idea... see avatar for example -
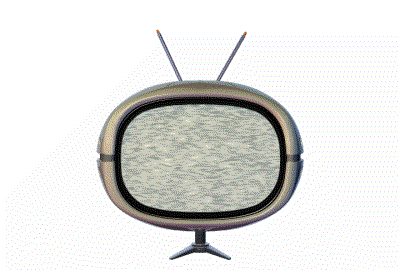
Silly TV I made recently...with static.
-
v12 cloth primitive car wash
John Bigboote replied to johnl3d's topic in Work In Progress / Sweatbox
That was me! The car-warsh idear... 'cept I tried it with V11 Hair...which failed the test. YOURS LOOKS LIKE A HIT! Thanks for doing that! -
I like it...the way you 'exploit' the cartoon page format...SILLY! note: If thats meant for video output you may want to honor video's 'action-safe' area...
-
Space Marine Run Cycle Test
John Bigboote replied to higginsdj's topic in Work In Progress / Sweatbox
Looks to me like a typical 'first-pass' animation...a good base. Something to build upon. From here, spread the keyframes out to make the run cycle a little longer and then add the poses Dagoos mentioned...more of this and that...then sit back...anylise...and commence a third pass...fourth pass...etc. Its almost like sculpture...add what needs be added, take away what shouldn't be there...in your mind. Speaking of which...you should have a clear 'minds eye view' of your space marine run... -
A motion decal---meaning just like a regular decal, but instead of one image you apply a sequence or a quicktime. The decal is applied just like a regular decal ( hide everything but the screen area...under images...import... find and import your jpeg, tga, or QTmovie... drag and drop it onto the model...A:M will ask if it is to be a decal or a rotoscope-choose decal... from the front view (2) position and apply by right-clicking and select APPLY. Unhide other geometry's.) Now, if you applied QTmovie or image sequence you can see it in action by rendering a movie of your TV... I usually like to program a little camera move to my tests so I can get the full 3D effect. Another trick I like to do when adding video to a TV screen...if you have After-effects or another compositor...is to add televised artifacts (static, vertical-hold scrolling, color shifting, dropouts...some of the younger hasher's may not know what any of these things are having-had cable all their lives...) The screen area should have hi- specularity with low spec size and a little (5-20%) reflectivity too... YOU ASKED!
-
WAIT! Before you runoff! Don't leave the screeen blank, put a motion decal in it!
-
Yeah- it was that upper eagle, but now I can see there is some inner detail there. I use the AI wizard a lot too, and know that sometimes it can only get you 80% of the way there...still highly usefull tho-... I just thought I saw some 'dancing' pixels at the end of the QT up high on his right wing...most likely due to compression.
-
TO INFINITY AND BEYOND! Just kidding, great stuff! Can't wait to see it finished. I agree with Ken....something wierd is going-on in that eagle, I would do a normal check.