UNGLAUBLICHUSA
-
Posts
637 -
Joined
-
Last visited
Content Type
Profiles
Forums
Events
Everything posted by UNGLAUBLICHUSA
-

Dark Skull Productions - Sentinel
UNGLAUBLICHUSA replied to Hubukai's topic in Work In Progress / Sweatbox
I didn't get my robot done in time for the mechanical project...maybe you can enter this in the anything goes contest and I can enter mine. Then we can trash talk, "my robot can beat up your robot", etc.... -
DSP (Dark Skull Productions): More tests to show
UNGLAUBLICHUSA replied to entity's topic in Work In Progress / Sweatbox
This is very inspiring!!! -
Depending on what mode you are working in things will appear different. Also, what directions are the patches facing. use the options box to select show normals (temporarily) to show their direction. backwards facing Normals can be flipped. Also, for hair you must have that render option turned on to see it. YES, this is a software security measure to mitigate piracy. If desired, for an additional fee a Dongle is available to free up the drive. Also the disk only needs to be in while the software loads. Once it's running, the disk can be removed. There is a web style interface that can be used (HTML) or use Windows Explorere to browse the disk. Or from the Animation Master open project or open model option you may browse the disk. Help is on the way.....
-
I'm a big fan of Rush, that is a good characature.
-
I will atempt to catch the ball from Rodney and toss it to someone else: ".Snap to Rulers: In the modelling window you can snap to grid, is it possible to snap to a ruler instead"? I do not believe this is currently a tool in Animation master. What do you wish to achieve with snap to ruler? There may be an existing tool or workflow process that adresses that need. "12. SVN Version Control: In the options dialog box there is a tab for SVN Version control, what is this used for"? If you aren't doing programming I would not worry about that option. "13.Undo: While using AM I have noticed some odd behaviour when using undo, occasionally if I have just stitched two or more splines together and then change my mind, when I undo, the splines split but not to how they were originally, the points are now connected differently, why is this?" This MAY have to do with your 'splinage' ( things are different than the polygon world in A.M.). If you used HOOKS and change your mind, the hook MAY jump to another nearby control point. If you post some screen captures that would help some.
-
First off, have you worked through the tutorials? Second, if only part of the model indicates it is selected - are you in "Mirror Mode"? Third, although (like me) you may be wary to upload your project due to intellectual property issues, that would help a great deal to understand exactly what the issue is. I have never heard of someone plagerizing or swiping files posted with a request for help. Fourth, good luck in your endeavors.
-
1. Are you in wireframe mode? 2. If no, go to your options and check the size & color settings for control points, if they are small and the same color as the splines it could be an issue. 3. If none of the above, call 911.
-
Having Problems with Copy/Flip/Attach
UNGLAUBLICHUSA replied to Noganite's topic in Work In Progress / Sweatbox
Sometimes during modelling you may accidentally move 1 or more points (or the whole model) slightly off of "0". Select your middle spline, go to wireframe mode and zoom in till your eyes bleed. This way you can see if you need to tweak points on the center spline. Go point by point to ensure all are lined up and I also reccomend at this point to check the bias on your center splines. -
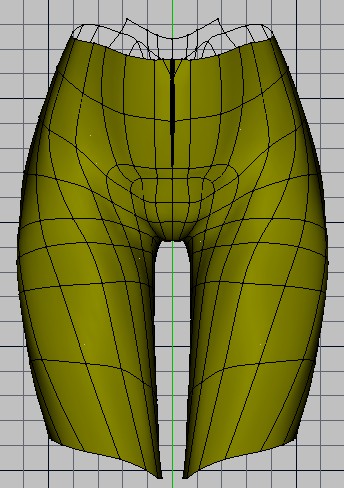
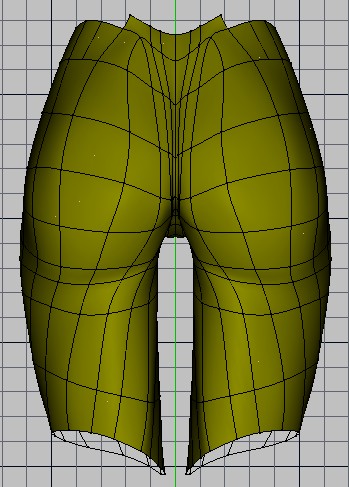
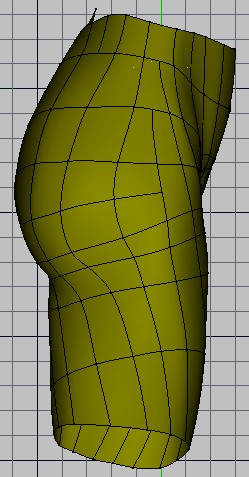
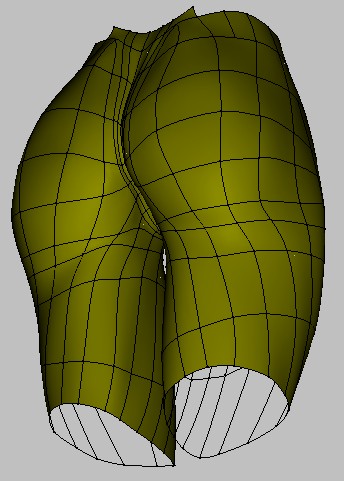
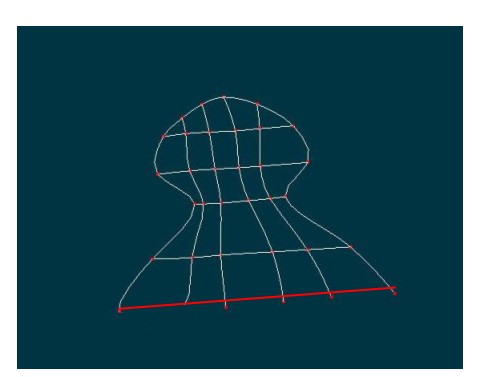
Thanks for the comment, I am always trying to optimize to find the 'perfect solution' to anatomy issues. Not that this is perfect at all, 'perfect' continues to elude me..it's just nice to hear someone liked it. Enjoy the view.
-
If this helps you can use it: butt.mdl Pics attached

-
I'm not jason but we are all here to help each other. Do you have a specific issue that someone else can address?
-
Any John carter of Mars inspiration there? Looks like the description of a Thoat. They are the martian equivalent of a horse used in the Edgar Rice Burroughs series. Looks cool so far.
-
Just one thing to say. DAMN!
-
Are the veins bump mapped? They look very nicely done.
-
AAAAAARRRRRRRGGGGGGHHHHHH!!!!!!!!!!!!!!!!1 What could I be doing wrong. Got my flat pass fine. My dome pass is all black. Can't enter the Mascot Contest if I can't render an image. HELP!!!!!!!!!!!!!
-
Revisiting this thread, I wonder what format these guys render out to???????? EXR, TGA?????
-
Glad to see that the problem was easily fixed. This kind of thread is great for others to follow along with to see where simple mistakes can frustrate the heck out of you! Very nice hoverboard.
-
Welcome aboard, tell us a little about yourself.
-
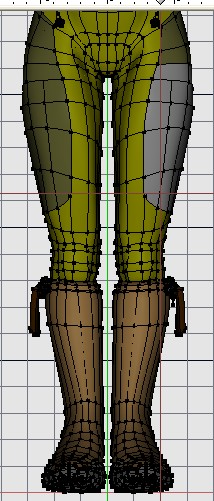
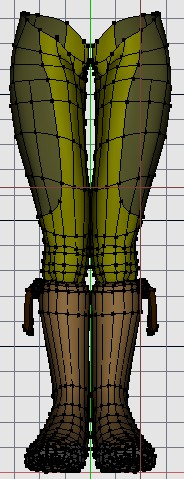
The patch count is partially to define different material boundries and also decal locations for clothing seams. The density around the knees is for extreme bends (heel to butt).
-
Fand-damn-tastic! It woiks!!!
-
I actually started trying the pose out on myself AFTER I posted. You are correct, it is a "knock kneed" pose which is from a photo reference. I am going to have to move the legs around some and try to get the sculpt to look right. I didn't screen capture the really horrific issue after the constraints, I only posted a modified 'pose' of straighter legs. I will post again soon on my progress. You da man!
-
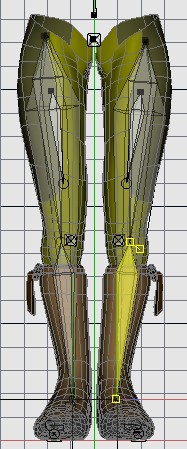
Hopefully Mike Fitz will see this soon, I have used his basic setup from his free section on my arms - everything went to plan. When I set up my legs - aaaaaaiiiiiiiiiieeeeeeeeeeee!!!!!!!!!!!!!!! I have my model in what is a natural closed leg knees together pose. However, once I assign my constraints it bowed my models knees out in an inhumanly painful position. I tried seeing what my model would look like if the (anatomic bones) ran paralell to the rig the pose looks unnatural. see attached images. Do I have to have my model splined out with the legs going straight down for this set-up to work? Or is there some kind of work around? Thanks-
-
Bravo Mike, is there a chance you could post a couple screen caps of the bone set up. I think I get the drift but Images would help. This might help me with rigging a character I am working on that needs a VERY flexible spine.
-
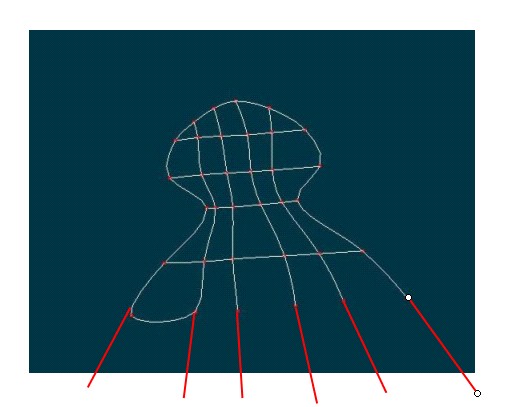
For this particular one I would add the points to each spline as I go across - dot, dot, dot, connecting all the splines together and leaving the trailing edges. Then deleting the trailing edges. I would not try to hook this, although I think you can hook up to four (or is it 3?), I would not do it in this case, especially if there will be any further modelling 'out" from the flat edge.
-
This is a common new user error and I still do it myself when I hurry. The software doesnt know you want a straight edge, the normal condition of a HASH spline is to curve and be organic. Try the following, extend the splines for what looks like a finger area out slightly past where you want to go. (see UN-argh 01.jpg). Next where you want your straight line add a spline (see UN-argh 02.jpg) making sure you attach it to each extended spline as you go across. Next delete the ends of the extended splines (UN-argh 03.jpg). Is this what you wanted?