UNGLAUBLICHUSA
-
Posts
637 -
Joined
-
Last visited
Content Type
Profiles
Forums
Events
Everything posted by UNGLAUBLICHUSA
-

AM Compatable Wrinkled Cloth Map Tutorial?
UNGLAUBLICHUSA replied to UNGLAUBLICHUSA's topic in A:M Tutorials & Demos
I modeled the major folds and need to add seam wrinkles and general warping of the fabric plus enhance the major folds (deepen).
-
Does anyone have a link to a Photoshop Tut for making wrinkled Cloth Decals/Maps?
-
Need Help Exporting for Plastic Injection Molds
UNGLAUBLICHUSA replied to UNGLAUBLICHUSA's topic in New Users
I am reducing the files in size in AM then exporting to DXF and using "Other" software for my usable files. That said, I think there is an inherent problem if the convert to DXF OR OBJ plug-In's on their own, increase the 'real size' of the model. The Translation is taking 37.5 CM and making it 37.5 Inches - that is just not right and should be addressed. -
Need Help Exporting for Plastic Injection Molds
UNGLAUBLICHUSA replied to UNGLAUBLICHUSA's topic in New Users
1 of them is the native Autocad Format. I would have to look up what software my possible sources use that may take other formats. EDIT: Also - Solidworks, ProE, STEP, ParaSolid, ACIS, IGES. -
Need Help Exporting for Plastic Injection Molds
UNGLAUBLICHUSA replied to UNGLAUBLICHUSA's topic in New Users
I need data for a CNC Machine to cut Plastic Injection Die Molds out of metal. What comes out of the mold - needs to be sharp edged in some areas and smooth in others. Curves need to be smooooooooooooooth. STL - even in ABS wouldn't be a strong enough demonstration piece. -
Need Help Exporting for Plastic Injection Molds
UNGLAUBLICHUSA replied to UNGLAUBLICHUSA's topic in New Users
It's GOT to have rounded edges in some places - some parts must be smooth and not faceted. I can probably import the DXF into Autocad if I buy it...... -
Need Help Exporting for Plastic Injection Molds
UNGLAUBLICHUSA replied to UNGLAUBLICHUSA's topic in New Users
So it looks like I will have to remodel everything in another program....after I buy it? -
Hello and here is my scenario: I have developed MANY detailed models in A.M., V15 - that I want to have plastic Injection Molds made from. The Models are to Exact Scale because threaded Inserts will be needed and holes will need to be lined up and they need to interact with other components in the "Industry Standard" size. I am trying to convert one of the many files with little success. My Problems: 1. AM's MDL files are not supported except in Wings 3d (Old version). 2. When I export the model into a *.OBJ or *.DXF File - I lose my curved surfaces. I must have curved surfaces (I thought DXF supported that? No? How do Autocad users get their smooth models?). 3. I got help from someone very nice on the Forum with V16 to do an *.STL conversion....it has all hard edges as well. 4. No matter what way the file is exported, the model increases in virtual size from ~14" to 37 1/2" wide - Dude W.T.F. is A.M. doing that for? I need it to be exactly the same size I modeled it in. Anyone want to touch this with a 10 foot pole? Thanks in advance,
-
4-6-4 Steam Locomotive & Tender
UNGLAUBLICHUSA replied to R Reynolds's topic in Work In Progress / Sweatbox
Is this rigged yet? -
See the Sculpture work of Aris Kolokontes - ggogle him. You should find plenty of good clay examples you can incorporate into your computer generated character.
-
Techical Help with Decaling Needed
UNGLAUBLICHUSA replied to UNGLAUBLICHUSA's topic in Work In Progress / Sweatbox
I think I meant to say "Delete Stamp" for the overlaid images.....my bad. -
Techical Help with Decaling Needed
UNGLAUBLICHUSA replied to UNGLAUBLICHUSA's topic in Work In Progress / Sweatbox
I did a PDF explaining my process and concerns. Hopefully it answers the questions. I do appreciate everyones patient input: EDIT: I reduced the size of the PDF File. Decaling_maus.pdf -
Techical Help with Decaling Needed
UNGLAUBLICHUSA replied to UNGLAUBLICHUSA's topic in Work In Progress / Sweatbox
....and then, Silence - covered the sky. (Enigma) -
Techical Help with Decaling Needed
UNGLAUBLICHUSA replied to UNGLAUBLICHUSA's topic in Work In Progress / Sweatbox
As for why I want it so precise; I have certain patches the extrude out. Where they extrude, I want to have dirt in the crevace - so lining things up is critical. Also around the holes and on eatch hard edge of the cylinder(s), I want to add wear, dents, scratches & paint chipping, Etc. Nancy: The wavy lines are to make the 5 point patches work (getting the splines in closer to the patch. Otherwise they would all be horizontal. When I tried that - my 5 pointers didnt like being streched so far. Will: the "clean image" is a super zoom close up and I want to have one decal for the whole cylinder. I use your balrog tutorial as my 'gospel' until there is an export UV Function inside AM. Robcat: I did the make many zoomed images and patch them together, I will see how it works. However - the seperate images distorted some and still cannot line up perfectly one over the other - I broke mine down into 12 pieces to get up close. Detbear: As far as "Exporting" the Decal - other than a screen capture, I could find no tool or (free) plug-in for such an export into Photoshop (et al). Can you clarify this process or is it all using 3D painter that allows the export? Thanks all. -
Techical Help with Decaling Needed
UNGLAUBLICHUSA replied to UNGLAUBLICHUSA's topic in Work In Progress / Sweatbox
Will, thanks - I will try the resolution switch and see how that goes. Cheaper than $99. EDIT: I am already at my Max Resolution....1440 x 900...... Robcat - What I am talking about is to have markings (such as lines) end cleanly where a spline ends. I want to distress along many specific spline edges and have a what you see is what you get from my Painter program into AM. With a jaggy, pixelated image you cant be sure how anything will line up. Examples attached:
-
Right now I'm using the print screen method on my Decals,then painting them in PhotoShop or PaintShop Pro. However, the screen captures are all jaggy and make it impossible to make a clean detailed map at the edges. Does the Painter Program solve this issue? Can you get even edges on a spline?
-
Yep. Perfect_faces.pdf Photoshop_Quick_Photoreal_Face_Texture.doc Perfectskin.pdf Painting_a_Realistic_Eye_Krishnamurti_Martins_Costa.pdf soa_lee_fairy_tutorial.pdf
-
Happy Birthday Stian, although it be gargoyle Free- may it yet be Gnome infested!
-
Looking for help w 5 point patches
UNGLAUBLICHUSA replied to UNGLAUBLICHUSA's topic in Work In Progress / Sweatbox
I needed to add more holes - so I re did the whole thing being VERY CAREFUL not to have 2 control points in the same location, Etc. Got the Outer layer perfect - great. Copied it - great - resized and flipped normal to make cylinder liner - closed up seams around holes - great. then normals started flipping and now I have 2 outer 5 pointers that just wont close up....damn. Is there anything different in Ver 1`5 from Ver 13 about 5 pointers? I never had so many headaches with them. -
Looking for help w 5 point patches
UNGLAUBLICHUSA replied to UNGLAUBLICHUSA's topic in Work In Progress / Sweatbox
Sorry for the delay, thank you Robcat! -
Looking for help w 5 point patches
UNGLAUBLICHUSA replied to UNGLAUBLICHUSA's topic in Work In Progress / Sweatbox
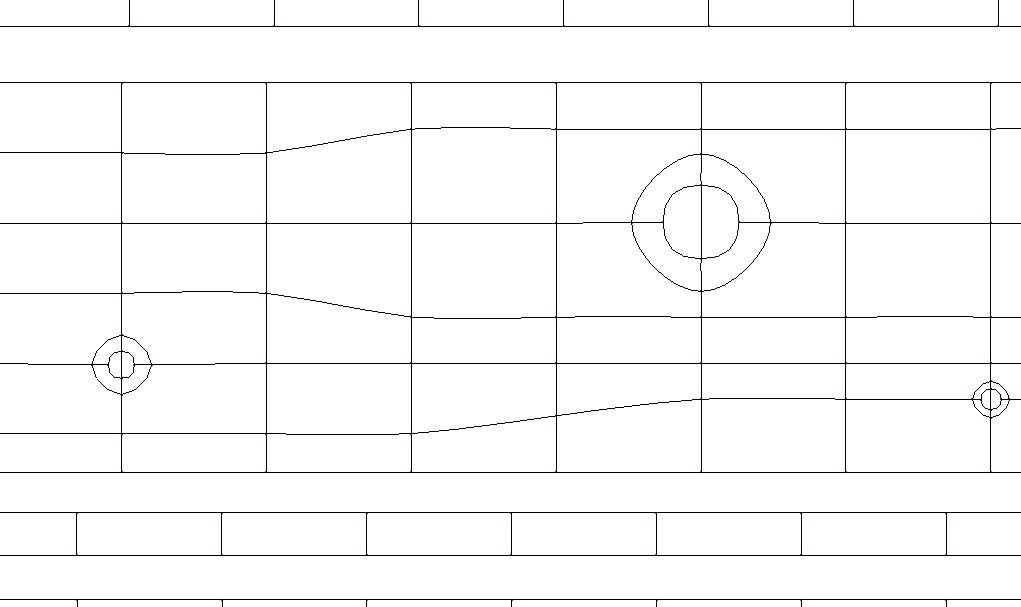
I grouped them and made them yellow calling them Problem 2....maybe squiggly lines isn't the best choice but there are dark wave like lines curving away from the holes. -
I have tried deleting splines & re-adding them. This has solved a couple of the problem spots where I cannot make a 5 point patch. The others are stubborn...could I have some duplicate control points or something - if so how would I find them? Also, on four 5 point patches there are squiggly line artifacts even with porcelain. again - none of my attempts to fix have worked. Any suggestions? Problem_Shell.zip
-
4-6-4 Steam Locomotive & Tender
UNGLAUBLICHUSA replied to R Reynolds's topic in Work In Progress / Sweatbox
This is the kind of inspiring work that keeps my creative juices flowing! All I can say is 3 thumbs up! 10 out of 5 stars! Unglaublich!!! -
Nice alterative version!
-
Maybe they aren't more complicated than my current solution.....I guess it comes down to how my brain works. I want to ensure I have depth so when I cut through a 2 sided object there are inner walls.....and then - booleans and models each need their own bones so thats double the bones.....more complication than when I can just give each part a bone minus the boolean. I'm sure someone else could do a better way out. This is what I came up with - several extendable sections - at each circle (hole/cover). I plan to do this for accesss panels also: P.S. when those circles open up they retract inside and a light comes out to fit the hole.