Meowx
-
Posts
406 -
Joined
-
Last visited
Content Type
Profiles
Forums
Events
Everything posted by Meowx
-
Yeah, undo + delete don't really play well together. You'll get your cps and patches back, but any surface details (properties, materials, decals) are gone for good. You'll typically have to reassign 5 points as well. When I get to a point where I want to delete part of a model that has some decal (or whatever) already assigned to it, I'll make a copy of the model first.
-
Hooks will only appear if you specifically tell them to. To make a point, have the "add point" tool (A) selected and left click. (first example) To make a hook, have the point selected and right click (~ on a Mac) when you drag it to the line you want. (second example) Animation_MasterScreenSnapz001.mov
-
If you select a CP by dragging over it and selecting it, you're selecting two (or more) splines and it won't show both handles. If you select a CP (or spline) by just clicking it, you will always get a handle.
-
A note; by default, bones should attach to their parent as long as you click near the end of the previous one. For example: AnimationMasterScreenSnapz001.mov Here, I have some created some simple mech leg geometry. When I switch to bone mode, I add bones by hitting the "A" key. By clicking and dragging near the end of the previous bone, the new one is automatically attached to its parent. Afterwards, I can switch to a new perspective and align the bones as needed.
-
Seconded!
-
Jason (-at-) hash (.) com Which one? Or is either acceptable.
-
FINALLY got a chance to sit down and watch the whole thing, superb work! The modeling and animation both have a very traditional anime feeling to them, you did a great job with the look and feel of the film. And gotta say I totally agree with Rodney on the mascot bit; the main character in particular is very colorful, original, and well done!
-
hoping to avoid that much work... but it's sort of "all there", you know, the patches, the perfect particles to send whirling. only, the reality of doing so probably won't come with a make-a-dragon -button this time either. and it is fun what happens in imagination when thinking about problems+techniques you know nothing of! If you want an "exploded view" that shows all the parts inside something, you need to model all the stuff and put it inside. There's no way around that. Can't make something out of nothing. If you just want to blow something up - to shatter it - that's what the explode plugin does.
-
Right click -> Refind Normals may do the trick. Shift-1 gives you the little yellow spikes to tell you which way your normals are facing; you can use Patch Select mode (the pink button on the right) to select individual patches and flipping them without trying to futz around selecting each little CP.
-
I had no idea there was a site for AM films!! Learn something new every day. I'll be using this in the future for sure!
-
Neat character!! A tip for editing - sounds come on or after what you see on the screen. When you see a "hit" on the screen, rule of thumb is the sound effect comes one frame later. Most of yours were before. (For example, in "Take 1," the sound effect for his hand hitting the words is about 2 frames before the actual hit. It should be 1 frame after.) This makes the audio track feel out of sync. Keep up the good work!
-
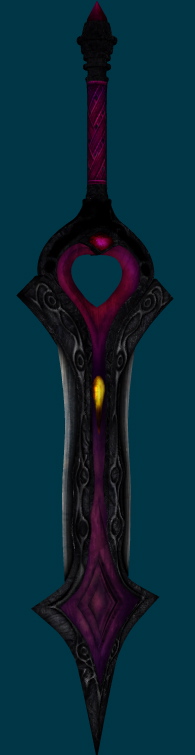
Been putting off the texture work on this one for a while because it's a bit intricate for a prop, but finally got around to finishing it tonight. A ridiculously heavy two-handed sword.

-
The Simcloth will disappear if there's too many collisions. You may have already figured it out, but be sure to change your Chor's default Collision Tolerance setting. By default it's 3, which you probably don't want. Try setting it to 0.3 or 0.1 as a starting point. (Choreography -> Properties -> SimCloth)
-
Those are really nice looking, especially for a first time modeling feet!!
-
 Looking really sharp! Like I said, no love lost for A:M. And make no mistake, I'm well versed in the trail and error process that accompanies stuff like getting everything to look right in cloth simulations. "Staying still" was bad phrasing by me; I meant more the character staying still than the cloth itself. End results like these: are something I'd be very, very impressed by someone pulling off with A:M cloth in anywhere near the amount of time it would take in something like Maya (or at all). Or something like this: There was actually one clip in particular that just about made me cry, like, WOW. I wish I could do that with A:M. Can't find it. It was an arm, flexing at the elbow joint with a very finely meshed silk shirt blowing and rippling around the arm as it pivoted back and forth. Don't get me wrong. I absolutely LOVE everything A:M can do, and appreciate it, its creator, and its community to absolutely no end. A:M cloth is absolutely fantastic considering it doesn't have an entire fully funded development team behind it. But beyond simple uses, it can get a bit ehhhh.
 -
Anybody how says A:M can't play with the big boys simply hasn't seen stuff like this! Truly impressive Ehhhh... on the contrary, that clip kinda highlights how AM cloth isn't anywhere NEAR the cloth tools available to the "big boys" in terms of practical usability. The jittery-ness of cloth-on-cloth trying to figure out how to sit still, for example. Absolutely no love lost for A:M, mind you! Just saying.
-
One thing that Darkwing touched on but didn't really explain: you don't want to have more than four splines connecting at any one CP. This creates the creases you see, and will look horrid when animating. Darkwing's above illustration is one solution to the problem.
-
I've been having that problem for quite some time, actually. The bump map seems to change values from patch to patch. I posted about it and AM Reported it, but haven't heard anything about it since. I've noticed that if you turn up the percent enough on your legacy bump, it will produce this problem there still as well. And no idea HOW it happens... seems random. Sometimes patches are fine, sometimes they do this.
-
The bumps are coming from a material that's applied globally. Would it be better to use cookie-cut maps? I imagine the highlight will still show up, even without the bump.
-
Thanks! Yeah, the wing surface is just a plane. No depth.
-
Been working on various other character and environment models; came back to the dragon this afternoon to do some animating. I'm pretty happy with the result! (5.5MB .mov file) edit: The claws digging into the ledge is intentional; I rotated the hand targets and fingers over time. However, after watching it again, I think I overdid it and they look like they're sinking into it some. edit 2: in the screenshot, you can see the highlight and bump on the parts where the wing is supposed to be transparent (opacity maps). how do I fix that?
-
Haha, so much this. I've been turning off auto-sleep on every one of my Macs since I first started 3D for that exact reason.
-
Fantastic! The subtle differences between the renders really make a huge difference between "obvious bump map" and "or is it?"