-
Posts
588 -
Joined
-
Last visited
Content Type
Profiles
Forums
Events
Everything posted by photoman
-
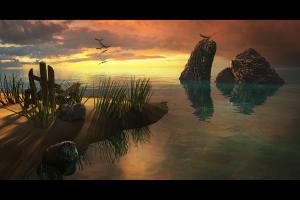
27 hours later..... Render finished! Despite crippling my computer for the past day or so the render has made it through the finish! I have been playing with it in After FX and photoshop. I guess your right Matt I seem to be getting black skys when I load up the buffers and the reflections from the sky are all gone . But in the main RGB buffer everything is fine.... hmmm.... Anyway I brought the straight EXR into photoshop and did some adjusting, dodging, and burning. Converted to a 8-bit rgb jpeg for the web too, though the 32-bit version looks a lot better . Please critic the gamma, tell me if it looks right please! Photoman
-
I am rendering with every buffer on except alpha and shadow. I take the finished render into aftereffects I run a script which separates each buffer into a layer and I then export that frame as a multilayer PSD which I edit in photoshop. Photoman
-
Im not actually having many problems with the sky being black. I have started the final render now. 1600x900px 3x3pass, 100,000 photons (i could have done 1,000,000 or 25,000 but 100k was the middle ground) final gathering at 50. According to A:M it should take about 27 hours since each pass is just shy of 3 hours, also ignore the giant string of random numbers where the time is, its a glitch that happens occasionally. Thanks for the crits! Photoman
-
Its kinda funny actually, I am working on a MacBook right now and according the LCD gamma everything looks fine, but I know it is too dark, what I will do is gamma correct in photoshop on my PC when I am done. Also I am using a skymap/skydome for the sky, also I have alpha channel turned off as well. Photoman
-
That what I usually do, I had the radiosity plugin with v13 but Ive been too lazy to install it with v14. Right now I am using 100,000 photons, photon sample size is 5,000. It works with 1,000,000 photons, size 500 and 25,000 photons size 20,000. The only difference I can see is accuracy, is there a render hit with more photons? Also here are some photonmapped shots: I have renders rendering right now with final gathering on, 1hour passes at 3x3pass 1000x665. Photoman
-
Wow I never knew that, I had always thought blurred reflections was a mass override for all reflections in the scene, interesting. Thanks! I have experimented with photon counts ranging from 25,000 to 1,000,000. Besides render times and lighting accuracy is there any reason to have more photons? Photoman
-
Here is a quick radiosity run: 100,000 photons It was taking an hour a pass at 1000x665 5pass so I canceled it at its 3rd pass to get more work done. I am currently tinkering with other things as well. Photoman
-
Generally I like to save radiosity for indoor scenes, I find it more of a hassle sometimes when using it outdoors (I constantly adjust radiance values everywhere). BUT I may experiment with it later. My render times are about 18minutes a pass at 1200x675 16pass. The IOR on the water with the bump map really adds to the render time. @MattWBradbury How do you set an individual material to have soft reflections? I like the sharp ones on the water. Also I may experiment with the steps being glass. Thanks for the crits! Photoman
-
They are very cliché, also they are 100% reflective, I may experiment with them being glass. Also since there is no handrail it is illegal, does not pass ADA. Photoman
-
Hello! Once again it has been a while since I have posted a new project. This one is more of a sketch. The idea came when I was daydreaming in class . Here is where I am at: I am using a z-buffed kleig as the sun light, AO for the indirect lighting, and a few fill lights here and there. Notice the wavyness in the shadows, thats from low z-buffer map resolution. I marked up what I plan to do now: Photoman
-
I agree with fae_alba, the DOF is so shallow that it looks like it was shot with a macro lens, or a lens with a shifted focal plane. To achieve a more "accurate" DOF I would have less blur, most landscapes are shot with aperatures like f/32 and f/64 so that it minimzes the DOF and everything is in focus. BTW love he foliage! Photoman
-
It is possible with a:m composite... Let me see... I see if I can whip up a tut tonight... Photoman
-
Render to OpenEXR, there is an occlusion buffer that gets put in there. Photoman
-
Use the null shader in camera plugin shaders. It worked for my scenes which had particle leafs (hair system) and particle grass. Photoman
-
Well, Ive been looking back at this project (Its been a year since I finished it) and I now want to further enhance and update it. I am going to rerender it at dusk-late afternoon, and I have a new plan on how to be able to render the displacement, hair, and AO! And before anyone has a (another) rant about resolution, I AM NOT COMPLAINING ABOUT RENDER TIMES. So.... here is a quickie update on the rock up front: AO is used Photoman
-
Yes, it can be created by that. However you have level the resulting Depth-Map, because it is 16 or 32 bit and will show as a black image if you dont do that. *Fuchur* I don't understand, could you make a tutorial? The way I make my depth maps is: 1: Turn on null shader in the camera plugin shader settings (for all of them) 2. Set fog color to white 3. Adjust fog to simulate where infinity focus (pure white) is and where close focus is (no white) 4. Set to 1 pass 5. Render! It can be a pain sometimes to get the fog correct, but it does work for me. As for the EXR I have never gotten a Depth buffer that wasnt pure black. Photoman
-
I used a depth map from this render here: Post 28 There is a quick video with sweeping focus. Photoman
-
The second one is my pick. When I light outdoor scenes or terrains I usually thing about how it works in the physical world. The sun casts its light from an angle depicted by the time of day. Based on that angle only certain wavelengths of light are visible (ie noon is very white harsh light as sunset is only the longer and thus redder wavelenghts). Also shadows depend on the time of day, for midday-noon harsh shadows are ok, but at dawn or late sunset/sunrise the shadows are very soft because of bounce/atmospheric light. But as Robcat mention raytracing can be a render killer. With that said, I dont know if you would want to set up a z-buffered kleig array though Ive been wanting to record a tut on out door lighting with a sun type light for a while now. Maybe I will this weekend, oh well.
-
The IOR of actual glass (Well crown glass (ie lens glass)) is about 1.33, air is 1.000000001 and vacuum is 1. Here is the super awsome best list ever of IOR's : CG Talk IOR Thread Photoman
-
Use the eXtractor plugin here: eXtractor Its for Adobe After Effects, just drop it onto your EXR-sequence and it will seperate it into whatever channel/buffer/pass you want Photoman
-
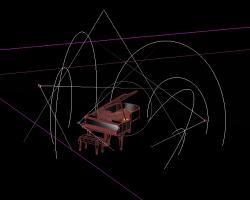
Thanks for the good comments! If anyone is wondering about the lighting setup, it is really simple, and... there is no AO! First thing I wanted was the dark room spotlight look so I placed the first kleig light up top aimed right down at the piano. Then I realized that that looked quite plain and didn't have any "pop" to it, so I placed 3 more kleigs at strategic points around the piano and set each of them to be just specular. Then I wanted the reflection of the "guts" of the piano brighter so I placed a low powered bulb light inside it. After I had all this done I went through each light and tweaked it, I changed the Top kleig to have 25% softness and 100% shadow darkness. Next I set the bulb to have 100% shadows with 3 rays distributed in passes to give more detail inside. SO... that was my setup and for information I had each frame averaging about 1min 20sec over 240 frames @ 1024x435 Also that shiny look is from an environment map material of a studio HDR image, which needs to be upscaled... Photoman
-
Been a while since Ive updated this... The project is on the backburner right now. Ive become quite busy with school and swimming so I get to this whenever I am not tired and have time (which isnt as often as I like). So to keep y'all in the loop here is a quick studio clip: E_Piano_Studioshot_A_.mov Photoman
-
Ok, I know I haven't updated in a while so here is what has happened. I did do a bit more work on it. Just some misc things that needed tweeking nothing much. I needed to render it at 12x8" for the final print. To do that I need a resolution of about 3600x2400 (w/ letterbox so its a little less), anyway, my computer does not have enough memory for a render that large with a scene as complex as this one. So.... I did some back tracking through my previous renders of the scene and I managed to snag one that was large enough to look good upscaled in photoshop. So thats what I did, I used that one (Which was an OpenEXR file). My workflow with OpenEXR files goes like this: 1. Render OpenEXR with all the buffers I can 2. Open it in After Effects 3. Use eXtractor plugin to get each channel as a layer 4. Export composition as a multi layer .psd file 5. Open in photoshop and edit In doing this I can edit things such as the intensity of each light, its shadows, and its specularity. As well as the amount of reflections and intensity of the AO. So I managed to get a pretty flexible workflow going and I got a lot out of that older render than I thought possible. And here it is: I just want to give a big thanks to all that commented, critiqued, and or just browsed by I have entered this in a Art contest at my school as well. Photoman PS mpix.com is GREAT, the print (12"x8") looks incredibly sharp and saturated. It is such a great experiance to be able to handle a rendering
-
All those reflections are from environment maps and hi-specularity (ie Spec Size: 150-300% Spec Intensity: 100-300%). They probably used a studio HDR image for the environment map. Photoman
-

My WIP Mascot entry at the time my computer crashed
photoman replied to Eric2575's topic in Work In Progress / Sweatbox
Im digging the no shaving for a week look, great use of AM hair! Are you using A:M Paint? Photoman


