Rodney
-
Posts
21,633 -
Joined
-
Last visited
-
Days Won
114
Content Type
Profiles
Forums
Events
Everything posted by Rodney
-
Oooo... I like! Interestingly that image (the lines at least) looks a lot better at low resolution than it does larger. The toon lines in the larger full images don't appear as crisp which might be preferred in a mechanical model. My thoughts usually run the opposite as I'm always looking for more variation in toon lines. In this case though the crisp lines would be ideal. Something I've never had confirmed by others but seems to work well for me is to increase the line width a little and render to a larger format (VistaVision or whatever that one is called). Then resample to a lower resolution. For some reason that keeps nice crisp lines where the smaller render doesn't. Only a few years ago producers of the animated Star Trek series would have been giving you a call on the phone to borrow your model. Very nice economy of splines too!
-
Nice John. The judicious usage of both approaches would really make a scene look great. With all your various projects and tests I assume you have amassed a pretty large collection of foliage by now.
-
Wall E? Looking good thus far Stian!
-
There are a lot of little things like those that make working in A:M even more enjoyable. What scares me most is the realization that I've only begun to scratch the surface of what is there for us to use. Together we are gonna learn this stuff though!
-
Once you you've created your Constraint to Path and assigned your model to the path look in the Propertes for the Ease. You can set this from 0 to 100 percent which can help tailor you animaton to just about any speed you need. Sorry, no screenshots. I don't have A:M installed on this computer. The video tutorial Walk Then Wave at the bottom of the Video Manual page should demonstrate usage of Ease. Its the very last tutorial.
-
From your Project Workspace (under the Images container)... - Right Click - Save As Animation - Change to the desired format (in this particular case .MOV) All of this assuming you have the AVI file in A:M to Right Cick on of course.
-
Thanks for the thanks. A good nights sleep is the best way for the brain to fully absorb the lessons of the day. See you tomorrow!
-
This tutorial won't specifically teach you how to lathe a wheel but it should loosen you up and demonstrate what the capabilities of Lathing, a little imagination and a little planning can do for you. It does show you how to move and manipulate the pivot. As creating a wheel is basically lathing a Torus if you can lathe you'll soon be creating wheels with little effort. Advanced Lathing Methodologies (Note: This is a SWF online tutorial. You can download the tutorial here.)
-
I try to steer clear of telling people what to move at the CP and spline level wherever I can. If we did that it might be just easier just to have someone else model it. If someone wants to go CP by CP with you though thats fine by me. Occassionally we'll all draw on top of your pictures and give suggestions of course. But don't be afraid to try it yourself. Stitch in those splines! Then post more images! Yes, when rotating you will have to use the Rotate button. This will take some time to get use to but experiment... save often too. That way you can go back to an earlier version if you adjust something too much. When rotating you can change the pivot point (which will determine where the points rotate from). When in doubt start a new simple model and experiment with that until you feel comfortable. Then apply what you've learned to your more complex model.
-
I would suggest selecting the area you want to work on... Then whack the period key to invert the selection... Then press the H key to hide the rest of the geometry. This will allow you to see better what you are working on. The splines themselves I would rotate into place in the front and stitch in other areas as needed. If you want to go above and beyond you might copy and paste the cockpit area you have now and adjust it as a separate piece. You'll have to break the splines in the body of the aircraft of course.
-
Hang in there! I was going to quote from your last post but realized I was going to have to quote the whole thing! Very profound words. I think most of us struggle with similar things and have similar aspirations. You certainly have our support. Like you I feel very awkward when commenting on the work of those obviously more talented than me. Unlike you though I haven't the talent to rise to their level. We all do what we can. Take care of the priorities and basics of life first. Getting and keeping a good job is important. Take whatever time time you need to get that done. Then the animating will be all the more rewarding.
-
I'm glad it helped. As you find time post the results from your Darktree related work or point others to this topic if they have questions. That way we can all benefit from use of Darktee Simbiont materials even more. We have a lot of valuable resources available to us. Good luck with your project!
-
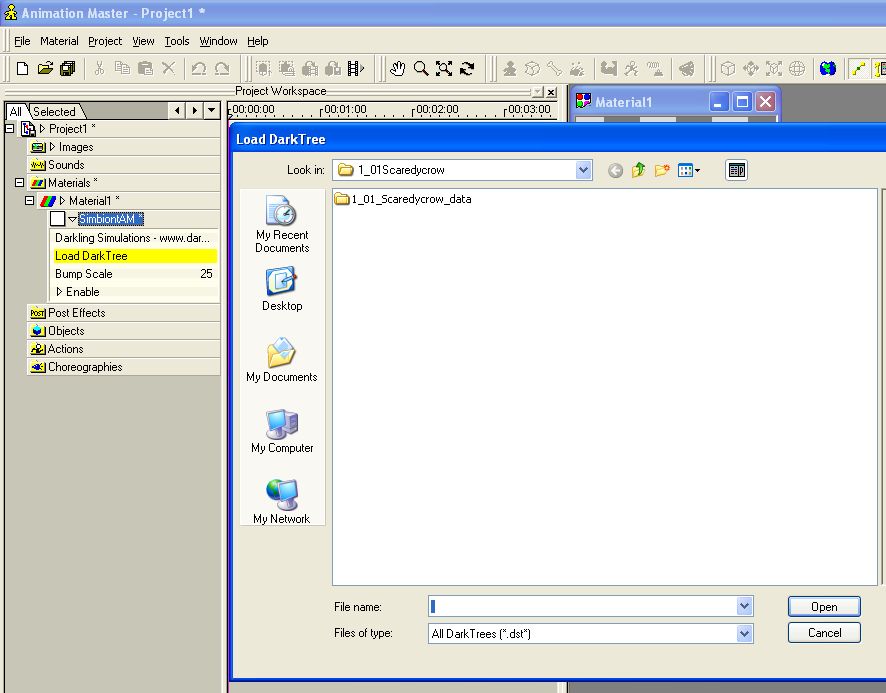
Once you have the DTS material container in A:M look for the option where you click to open your Simbiont material. Browse to your material and... done!

-
A quick way to check to see if your Darktree Simbiont plugin is installed is to look in your v15 folder. If you see a folder named 'Darktree' then you should be good to go. Of course just because you have a folder doesn't mean the plugin will work. So... To access your Darktrees you use the same method as accessing other material plugins. Right Click on a new material's attribute node and drill down to the plugin menu. There you will find your DTSimbiont plugin.
-
I'm curious. Why is the barrel facing north?
-
I know the whole movie hasn't been rendered yet so I'd guess the server just doesn't have anything to send out at the moment or its down for maintenance or its offline or... I'm sure it'll be back up and dishing out new frames to render soon.
-
Yes. Those geniuses at Hash Inc made adding resources to Libraries really easy. I think you may have stumbled onto an enhancement. I'm not sure who is responsible for that particular coding but they done good. Real good. There was a time when people would often report they couldn't copy their resources into their Libraries and a read only CDRom was generally the culprit. I'll credit Noel as he's the one responsible for improving a lot of stuff in the Libraries over the years. Master Chief, Hope you had success in getting your textures into the Library.
-
Matt, My only critique is... TOO SHORT! I wanna see more! Love the sock critters too.
-
Is your marble texture a Material or an Image? If its a material drag and drop it into a folder in the Materials tab of the Library. If its an image drag it into a folder on the Image tab of the Libary. If you don't care to Drag and Drop you can Right Click and Select 'Create Shortcut' then browse for the material and grab it. Warning to the uninitiated: You cannot save things to the Library on the A:M CD as it is 'read only'. You can only save things into Libraries on writeable media. You are welcome to test this theory.
-
No Ma'am, not at this time at least. Having the ability to customize those tabs would be optimum. (If interested I hope you'll submit such a suggestion to A:M Reports) There is already a lot you can do with Libraries and I'm confident that in time (and with more interest) we'll be able to do even more.
-
Matt, There is certainly more powerful stuff there than I can begin to understand. I can't articulate what I know enough for anyone to understand. But... all that for another discussion.
-
Thanks Caroline. You're the best!
-
I'm sure there are a few more ways to get images into A:M but those are the ones I could readily think of. Ah yes... here's another. You can drag and drop from a folder on your harddrive into A:M as well. IMPORTANT NOTE: This is probably the easiest way to get resources into your Libraries too. Especially as you can entire collections of images into your Libarary all at the same time.
-
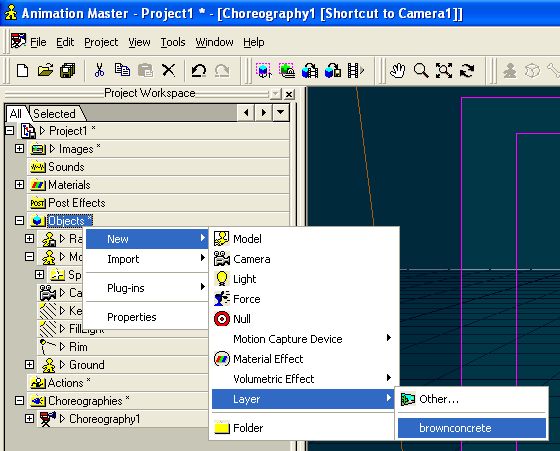
All of these methods focus on images for use with Objects. You can perform similar processes in an Action window or Choreography. If you Drag and Drop an image into a Choreography A:M won't know exactly what to do so... it will ask you: Note: In this case I've dragged a Sky image from my Libary into a Choreography window. The dialog box pops up and I'm going to choose 'Rotoscope'. I could just as easily select 'Layer' but I don't need that much flexibility/rotation etc.
-
A fourth way would be to create a New Layer. When you create the Layer it will ask you for an image: Once again you'll see the option to choose an available image or search for a new one.