Search the Community
Showing results for 'snap to surface'.
-
Installers: Windows 32Bit Windows 64Bit Intel Mac Intel Mac SSE4.2 Change Log New All: (0006593: Wizard: Import Images on Grids) Plugin "Gridimages" , avaible from a choreographie "Add Images"opens a image selection dialog for selecting the decalimage, multiple selection is possible if the checkbox "Import as an animation or a sequence of images" (win) or "Import as sequence" (mac) is checked and the selected image is a imagesequence a animated decal is created can be used multiple times, new selected images are added at the end of the imagelist "Clear List" remove all items from the imagelist Listbox Imagelist you can drag and drop the entries to make a specific order with You get a menu Menu item "Add Images" the same as the Button "Add Images" Menuitem "Remove selected" removes the selected item from the list "Pixel per unit" let You define the gridsize for the create model/layer, can be a float value (as example 6.4) resulting gridsize is shown in the listbox "Subdivision" how many subdivision in the width/height axis should be createt, has only influence if "Create as" "Model" is selected "Create as" "Model" , creating models for the images "Layer" , creating layers for the images[/b][/b] "Create as CookieCut Decal" create the decal as a CokkieCut deacltype instead of the default Color typ decal has only influence if "Create as" "Model" is selected[/b][/b] "Add to chor" add the created models/layers to the choreographie, if more than one image is in the imagelist a general offset between the importet models is computet, so they don't overlap[/b][/b] "First position" the position for the first created model[/b] "Offset" a additonal position offset "Orientation" in which view the grid should be created has only influence if "Create as" "Model" is selected "Modelname" the basename for the created models/layers New All: menu entry bones menu "Bone snap to CP" snap Bone to nearest cp no keyboard modifier -> bone pivot is snapped keyboard modifier Shift -> bone pivot is snapped, bone end is moved to maintain bone length keyboard modifier Ctrl -> bone end is snapped, bone pivot is moved to maintain bone length New All: popup menu entry for imagecontainer "Reload Images" reload all images, if the timestamp for a image is modified , refresh icons in the projectbar and realtime textures related sdk command GetHProject()->ReloadImages(); New All: popup menu entry for single image "Reload Image" reload the image, if the timestamp for the image is modified , refresh icons in the projectbar and realtime textures New All: SDK addition HLayer creation and import into a chor Fixed All: Turn rotates only around the global axis of selected objects , not the local axis Fixed All: [bug]6605[/bug] Group constraint does not obey normal Compensate Mode practices. Fixed All: [bug]6606[/bug] Moving Bone does not "dirty" model Fixed All: "Snap group to grid" for CP's in action or relation Fixed OSX: Imagefile dialog has now the checkbox "Import as sequnce" similar to the windows version Fixed OSX: file open dialog has now the checkbox "Cancel all remaining missing files during this load." similar to the windows version Informational "Bone snap to grid" snap Bone to nearest grid position no keyboard modifier -> bone pivot is snapped keyboard modifier Shift -> bone pivot is snapped, bone end is moved to maintain bone length
-
Is there a way to assure that all cps are in one plane without making them snap to grid in all axes? In other words, if I have a rounded rectangle that I want all cps to be on the same plane without moving the corner points to a different location on the xz plane but I wanted them all to rest on the plane (because one or more cps is slightly offset in the y axis). Is it possible to bring that/those points to the same xz plane as the others without it moving in x or z axis, only the y axis. Man, this is hard to describe... the xz plane is a flat plane... like the ground (but ABOVE AND parallel to it). All the cps are where I want them in each axis EXCEPT y... I want to bring them down to the xz PLANE but not move in x or z axis. Anyway, is there a way to do that?
-
Hi, I'm following the "Flower Power" exercise in the "Art of..." book. I'm unable to correctly place control points near the y-axis because the points are snapping to the points on the grid. How do I toggle the 'snap to grid' feature in the modeling window? Cheers!
-
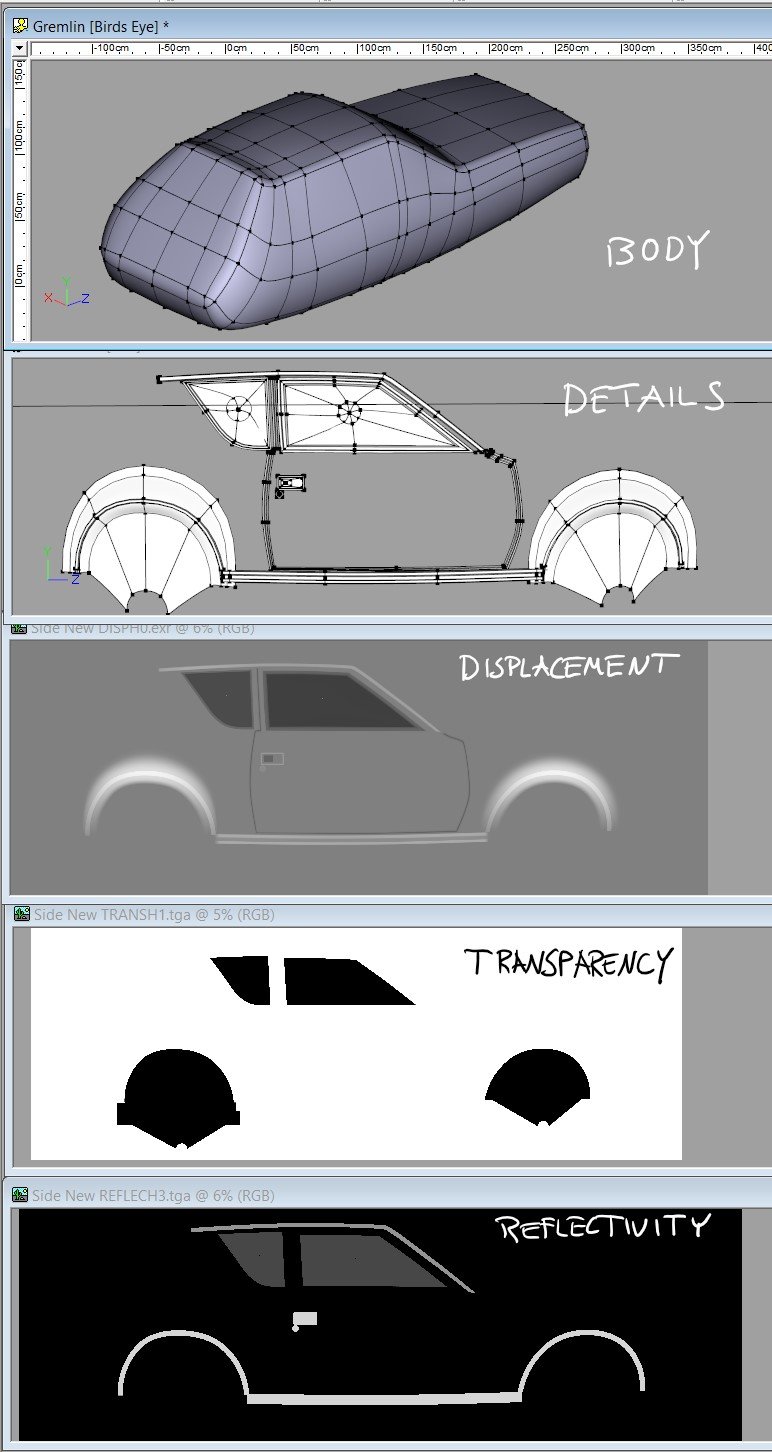
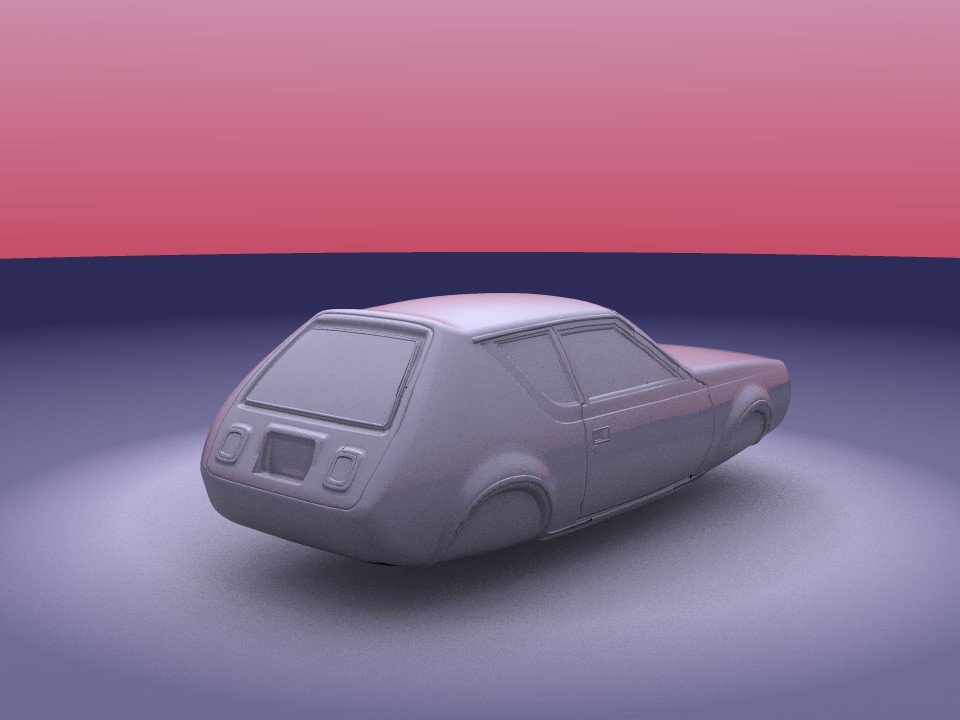
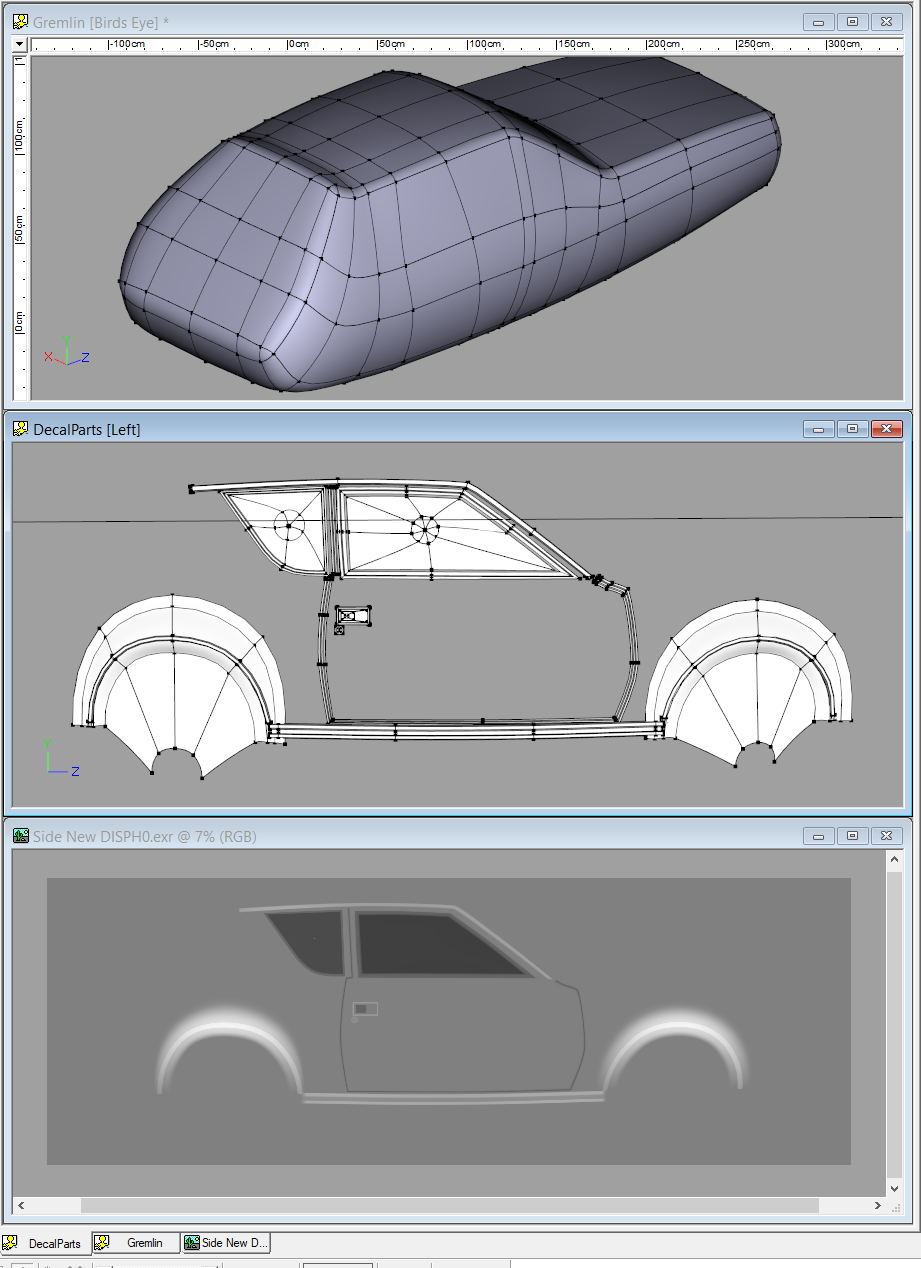
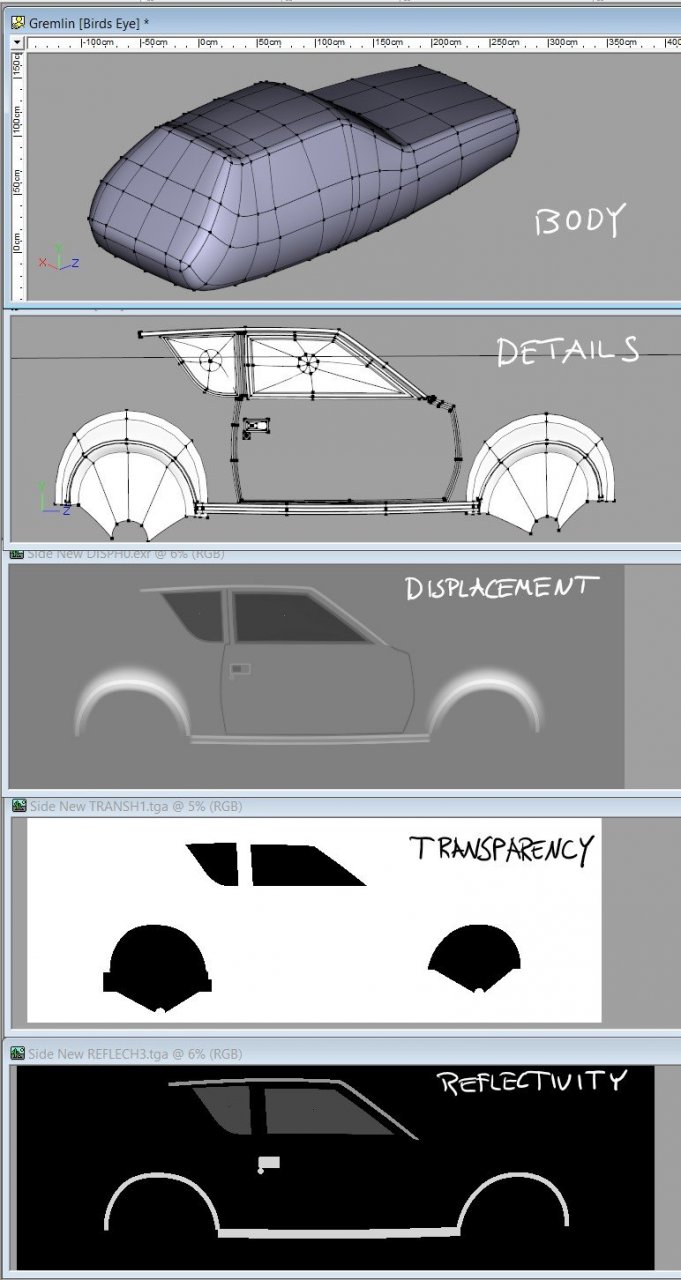
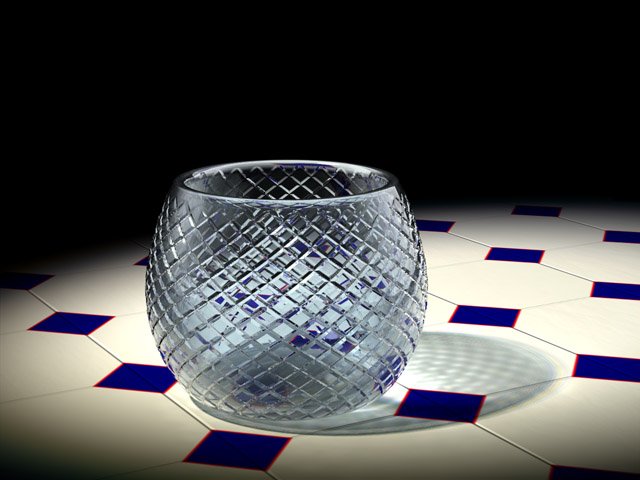
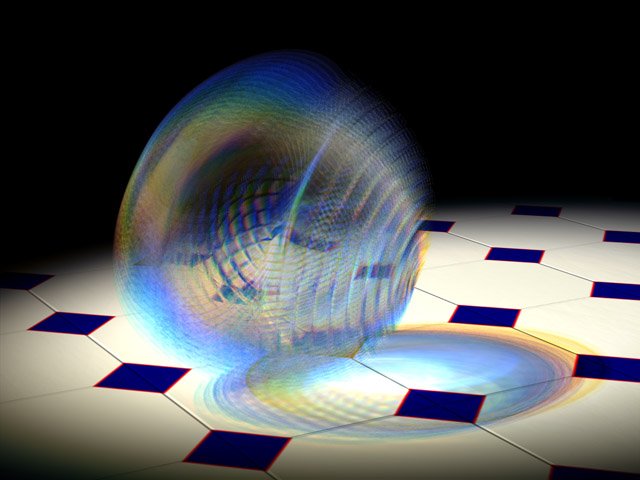
My "Planes Trains Automobiles" Contest entry was an experiment in displacement mapping... The body of the car is just a simple spline form... All the surface details... the doors, the handles, the windows, the rubber and chrome trim... that is all made with displacement maps. There isn't an easy way to manually paint such maps in a paint program but it was easy to model the shapes on a flat plane. I put a white-to-black gradient on them and shot the arrangement with an orthogonal camera. That render to OpenEXR format was applied to the body to be the displacement map. I made maps that way for the front and back details also... I recolored the patches of that details model with white, gray and black to render versions of the map for Transparency and Reflectivity... A turn-around of an earlier WIP version of the car... 155Lefts_3500.mp4
-
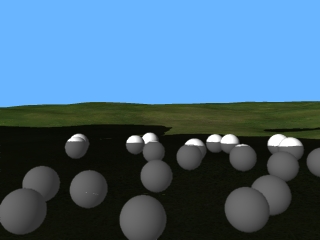
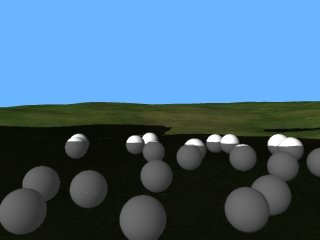
I created a landscape using the terrain wizard and wanted to populate it with flowers. I decided to use the crowd flock and tested it with 16patch spheres 1st from the primitives library. I did a quick test render and sure enough there were the spheres floating just above my landscape. I then used the "flock to surface constraint" to constrain the spheres to the landscape surface. Sure enough, after scrolling through the frames a bit, the spheres moved onto the surface in my choreography window. When I did a test render, much to my confusion, some horrible great big black shadow things had appeared on the landscape, as though some massive thing was casting a shadow. I've only got one light in the cho, just a simple bulb and it does the same thing in all the versions I have (13,14,15). As soon as I remove the flock to surface constaint the rogue shadows vanish. If anyone knows what is causing this and how to fix it then I would be most grateful. I've attached two images, one showing the scene without the constaint and the other with it. Cheers. Also it seems that the objects in the crowd do not cast shadows onto other non flock objects, is there a setting somewhere to make flocks cast shadows?

-
This could well be my own incompetence but every time I try to model a face, when trying to attach the nose I always get this weird crease around where the nose connects (as shown in the pics) no matter whether I make the nose separately or pull it out from the face it seems to happen, I have tried Hooks and 5-point patches to no avail. If someone could point out where I am going wrong I would really appreciate it.

-
What you did wrong was this: In the chor, go to your PWS and click on your empty patch-model. Then click on the "Modeling-Mode" (F5). If you now click on the Add-button, you will create new CPs in the empty patch-model while being in the chor. That is the way that should be used for polygon-models as references. ///////////////////////////////////////////////////////////////////////////////////////////////////////////////////////////////// Snap-To-Surface is also very helpful for creating for example cloth for characters, etc. For that you can use Snap-To-Surface in the modelling-window. First model you character, then use Snap-To-Surfac ein the modelling-window too model cloth fitting the body. Info: Note that you can set a distance-value for the snap-to-surface-tool now (I think from beta 4 or 5 on). The Option for that can be found at "Tools > Options > Modelling > Snap to Surface Offset". Hope that helps a little. See you *Fuchur*
-
I am a newbie here, and i would like to put video on a surface, and "attatch" it to it....what i have been doing is making my video a layer, then frame by frame moving that layer so that it sits right on my 3d surface. I know there has got to be a better way. Plz let me know any and all suggestions. thanx jay
-
Maybe it's a browser issue...it works for me in Comodo Dragon and Firefox, but didn't work in Internet Explorer. OK. Thanks for the pointer. It works in Chrome. What lines? What surfaces? Whatever the technology, you set control points in a 3D space. Then some algorithm computes line representations and surface representations from those points. Those lines and surfaces are only a consequence of how the control points are interpreted to mean, that is the basis functions used to interpolate the lines and surface representations. Different subdivision technologies use different basis functions and thus produce different line and surface representations from the same set of control points. Representing surfaces as triangles is only done for efficiency reasons. It is the lowest common representation for any surface topologies and it is way more efficient to have only one primitive than many on whathever current computing architecture. There are no degradations in splitting a quad into triangles because the shading calculations are based on the normals at each vertices. And the vertices normals are the same wether the surface is represented with quads or with triangles. Jos Stam proved that the 3D position and normal of any position on a Sub-D surface can be directly derived from the control points. In other words. subdivision is not required to display sub-D surfaces. It is a nice theoretical result but nobody does that because this is too expensive. It is still way less expensive to subdivide into micro-triangles and render those triangles. Of course, the solution is not so pure and elegant but who cares. The multiple images are combined into a single image plane where each pixel can represent basically infinitely many luminance variations and amplitude. Depth or Z-space have nothing to do there. Display technology is really just a memory plane where to store color values for the final rendered image and a large array of computing processors. This may be different in a far future but there are no sign that this model is going to change in any relevant time frame for this discussion. So you end up with a bunch of control points in 3D space and an algorithm to interpret those control points into some surface. The display technology uses its computing processors to produce a 3D surface from those control points. Here again, there are no fundamental differences. All surface representation technologies need some algorithms, and thus some computing power, in order to transform a bunch of control points into a surface.
-
hello again unfortunatly due to a Hard drive failure i lost my working copy of AM as well as most of my files ( sigh ) but good news is i still have you guys as i have been trying to rebuild my files i have been working on making shield effects and while i have had good success with making mats that look good i cant seam to remember how to move them along a surface as ever time i try and translate them it moves the solid not the mat . any one remember how to do this???
-
 I am so happy Stephen Implemented this feature for us in V15J. Create_material_from_group.mov
 -
Further development of our live Answer Time discussion Saturday... these use a displacement map to create the surface detail. Whoops!

-
Yes, there has to be a surface to snap to or A:M moves the CP to where it defaults to in 3D space. There are also issues with several surfaces on top of each other (I believe A:M will tend to S2S the CP to the back surface... but this may be related to what you are talking about with regard to the CP being in front of the surface) It doesn't take much for the tool to infer that you want some other surface. For this reason I've taken to hiding parts of a model that aren't needed prior to using Snap to Surface. I then lock down the part of the mesh that the CPs will snap to so the only thing 'active' is the working mesh.
-
Checking things out again - But what happened to moving CPs?
ernesttx replied to ernesttx's topic in Open Forum
I think I found it. Snap to Surface was toggled and forcing CPs to snap to another surface when moving them. -
The Bias to Grid-one is a pretty new feature from a feature request I did ;). It helps a lot if you are using it for mechanical modelling. It really should help making mechnical models. Just have a look at this: https://www.patchwork3d.de/snap-bias-to-grid-195-en Best regards *Fuchur*
-
Does anyone have a small example PRJ that shows a "surface constraint" in operation?
-
I Could use some help. I am trying to change the group surface properties over time (Ambiance percentage and Glow). I've got the latest David Rogers A:M book which states, surface changes can be made over time. The section on surface property relationships is a bit confusing. I've tried it in a relationship using both percentage and On/Off sliders, but I get no results. I'm sure it is some simple but important item that I'm missing. If someone could point me in the right direction I would be most grateful. Thanks Camillo
-
Here is the link to my latest tutorial: As always, your input to make better tutorials is always welcome. Thanks Eric Camden 3DDink Tutorials
-
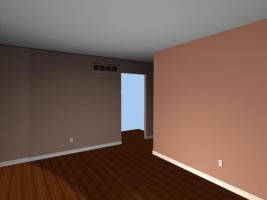
I started building my house in AM so I could see what a wood floor would be like throughout my little place. A friend of mine saw the attached picture and asked if the cold air return was real or a decal. I told him I really modeled it. He suggested that a decal would be better because when rendering, the light will have to be calculated for each fin (There are 68 fins, and a decal or map would be better. (This is based on a 3D program he uses) Does that apply to AM? Am I really going to tank my render times for adding too much detail?
-
That... sounds like "Snap Bias to Grid" is on. 😀
-
That sounds like "Snap to Grid" is on
-
Links Updated Installers: Windows 32Bit Windows 64Bit Intel Mac Intel Mac SSE4.2 Change Log New All: Button "Snap to CP" snap a bone to the nearest cp You must manually add this button from "Tools->Customize->Commands->Manipulator" (Cube with red point and arrow) to add a keyboard shortcut search for "Snap Bone To CP" only active in modelingviews , when the view is in bonesmode Snap the selected bone manipulator (Chain,End,Shaft) to the nearest cp, hidden cp's are excluded from the calculation except of moving the shaft, the bonelength isn't preserved Fixed All: [bug]6609[/bug] Do not select hidden CP function In shaded modes , cp's which are covered by other patches not longer selectable (also not selectable with group or lasso modes), works in all views. It's now configurable , the button must add manually from Tools->Customize->Commands->Manipulator" (filled cube with a red Z) to add a keyboard shortcut search for "Respect Z-Order" at "Tools->Customize->Keyboard" Fixed All: Displaying the correct keyboard shortcuts in the view popup menu Changed All: Export plugins "Generated Modelmapsize" can now be up to 8192x8192 Fixed All: [bug]6610[/bug] Rotoscope not visible in Pose and causes Exception on Delete Fixed All: [bug]6608[/bug] Preview render gamma correction function is incorrect. Desired gamma (== gamma for previewrendering) has now it's own spincontrol for changing the value and also a displayfield Fixed All: [bug]6602[/bug] Input PNG gamma correction function is incorrect. The gamma correction is now done in dependency of the current gamma Fixed All: Flocksystems false icon in chor unusable icons for instanced models removed. Fixed All: Bonemanipulator not refreshed , when the bone length is set in the Length edit field Fixed All: [bug]6612[/bug] Normal indicators display strangely when some geometry is hidden. Fixed All: [bug]6592[/bug] All normals are visible in shaded mode (when display normals is enabled). Fixed All: [bug]6614[/bug] OBJ sequence exporter needs bigger image size options- 1 setting to work for all frames Export plugins extend the resolution for "Generate Model Maps" up to 8192 Fixed All: [bug]6614[/bug] OBJ sequence exporter needs bigger image size options- 1 setting to work for all frames obj export plugin ask only at the first frame , if the filenames for decals should be unique, when a range of frames should be exportet New Windows Only: plugin Imageformat TIF supports save and load , not supported Multiframe Tiff (load only the first frame, save not supported) New Windows Only: Plugin Imageformat PSD (Adobe Photoshop) supports save and load (save only uncompressed) Layer and Masks are not supported (load and save) Greyscale with Alpha not supported (load and save) Fixed OSX: [bug]6575[/bug] Model Geometry Not Visible In Choriography In Shaded Mode (Mac)
-
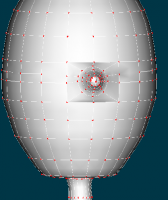
It's fairly simple. In a Choreography, import a prop. Create a new model and place it in the cho. With it selected, go to model mode (the little yellow guy icon) and click the snap-to-surface button. Use the add control point to click somewhere on the prop and you will begin modeling with your CPs sticking to the surface of the prop.
-
Hi all, Must be an easy question for the masters but I am somehow stuck. I want to create an on/off pose, where I can change the surfacecolor or material lets say from white to black or from none to metal and maybe a decal to show / dont show. and cant seem to find a way to achieve this. Any hints, step by step tutorials help?