Caroline
-
Posts
1,248 -
Joined
-
Last visited
Content Type
Profiles
Forums
Events
Everything posted by Caroline
-
Hi, Daniel - welcome to the forums! You could also try resetting all the settings. Click Help Menu > Reset Settings.
-
Thanks, guys. Chrury - "group project" - lol - it's barely more than a twinkle in my mind! Just a li'l project so I can learn more. (And definitely go for TaoA:M - you'll learn heaps.) Update: I lost my rigging - moral (at least, I think that's what happened): don't mess with Copy/Flip/Attach after you've rigged - seems obvious now! Almost got it back again now. I spent the whole weekend doing this: Doesn't seem like much, but, thanks to Will Sutton's definitive decalling tute, and his great video on the Siggraph training CD, I think I'm almost on top of decalling.

-
Your's works for me as well, Rodney, (I bet if you were ever chased by a dragon you'd lose that sword pretty fast, no matter how shiny and new ) and I like the exaggerated rollback eyes. I think the issue with this image, though, is the quality of the render - I think it's the dust that doesn't swirl quite naturally enough, but I'd be interested in your comments on how to make the image a better "quality". I've noticed that the winning images have a kind of soft focus yet still sharp quality, that I don't know how to reproduce, and I don't have the techno-language to describe it either. Is it all in the lighting? Thank you, Riste, for making your image available for this kind of critique.
-
Lol - I did when I first started. I'm learning decalling now, which I thought would be a piece of cake, and I have just realised that it's going to take as much (or more) time to do that as it did to make the model. Much fun, though.
-

Having Problems with Copy/Flip/Attach
Caroline replied to Noganite's topic in Work In Progress / Sweatbox
I'm grateful that you've raised this topic, because my model was no longer C/F/A-ing, and it's prompted me to work out why, and now it is. Javier, of course, is absolutely right. That's why I do steps 6-10 in my list, because if you select the right half and press the delete key, you get those connecting splines, whereas if you select the left side and do a copy of the left side, delete all, then paste, you don't get those connecting splines. Looking at your pictures, before you C/F/A, you need to have all your points on one side of the Y axis. The central spline needs to be on the Y axis. My model had stopped working, because my central spline had got split into two, and while I was lining each of them up separately, I had to line them up together at the same time, and now it works. You will probably have a problem with the pointy bit in the front (you can tell how much I know about aeroplanes) - I had a tail that came to a point, and because it's hard to choose one half in that situation, I removed the pointy end of the tail completely before C/F/A. -
I agree that it it needs to be emerald colour - the sparkle across the letters was good, but needs to be a bit more obvious. What about having emeralds circling a bit of the text? The letters are fine, but a bit close, as Timelord says, but you could have a bit of picture (such as an emerald) to add interest. Maybe an emerald(s) with lightning flashing through it? Was that done with the font wizard? The text looks good.
-
We (I called in the family to do a collective vote) thought your image was great, and made us smile. And, sorry Rodney, I liked the sword in the air with motion blur - scary dragon, ditch sword, run faster. Also, using the sword and the arm to frame the dragon was good. Perhaps it was the dust and smoke that made it look like a bad shop - the initial impression to me was that the image was somehow not quite sharp. I'm not skilled enough to pick out why though. He's a great character - I'd like to see more.
-
Hi, Hybrid - welcome to the forums! If you are using a character that you made, then you have to set up what the character should do when he says, for example, the letter "O". In The Art of Animation Master (TaoA:M) book that came with A:M, Exercise 12 goes through how to set up your own lip poses. Exercise 7 - Can you say that? shows you how to use the dope sheet with KeeKat - he has all his poses already set up. If you have a look at his poses (look at KeeKat in an action window, and View Menu > Pose Sliders), under Face > Lip Sync, you will see all these poses listed. If you make your own character, then you will need to set up those poses yourself. When you have set up your pose, for example the "M" position, you will call the pose slider "M B P" and when the dope sheet uses those sounds, then it will automatically invoke the pose slider. I would suggest that the very first thing you do is go through the exercises in TaoA:M - there's a whole forum dedicated to it, and you can upload and show off your results! It will teach you the basics of the important features in A:M.
-
You could just try it on the end of one of the feet - looking at the furred picture, there's something happening there, and I can't see the splines well. But I haven't had experience of fur and odd patches, so let us know how it turns out!
-
He's very cute. Have you tried using hooks instead of dead-ending the splines? This would mean that you have a few less 5 pointers. I tried making a dog, that had the same nose spline problem - I ended up with a spline running around the end of the muzzle, and 3 point patches at the corners.
-
I don't think my character dresses so nattily on his own - so go for it
-
Having Problems with Copy/Flip/Attach
Caroline replied to Noganite's topic in Work In Progress / Sweatbox
The way I've been doing it: First step - very important - Save the Project and model! 1. Click the central spline. 2. Press the comma , key to select the whole spline. 3. On the top toolbar, click on Show Manipulator Properties. 4. Click the Scale manipulator. 5. Change the X scale to 0% - this aligns along the x axis. I also changed the X pivot to 0 - This step is supposed to be unnecessary, but I did it as part of my ritual. 6. Select the left half of the model up to and including the central spline. 7. Press Ctrl C to copy. 8. Press Ctrl A to select all 9. Press Delete to delete all. 10. Press Ctrl V to paste. 11. Shift click the middle spline. 12. Right click and Copy/Flip/Attach. At first, the C/F/A would work easily, and as the model got more complicated, I had to search for more tricks. Eventually I ended up doing all of these things, in sequence - didn't take long. Edit: I should mention that steps 7, 8, 9 and 10 were only to delete the right half of the model - if you only have half a model to start with, you don't need to do that! -
Thanks, Nancy - I did try to work out the axes - but my head hurt - so I was hoping someone else had done the work. I shall rotate it so it looks like a head, and also try cylindrical. I hadn't thought about the single patch method - I shall give that a go. I may decide to just do it in 3d Paint, as I've worked out how to take the view to Twisted Brush and paint there. (Doing the simplest thing in the most complicated way as usual.)
-
I can't emphasize enough how much TaoA:M helped me - it gave a structure to learning and research. One thing I could suggest, Rodney, is having half a dozen extra research links to go to, for each exercise, after doing the exercise straight out of the book. When, for example, doing the Rigging section, I would read everything about rigging on the forum, and print out heaps of tutes. I have a large 3 ring binder that I drink coffee with. That's how I know the wing rigging really needs work. Question: I'm working on decalling, and can, by following Jim Talbot's videos decal anything that faces front. But for the life of me I can't work out which axes to move, when decalling the top of an arm. Also, do other people material with darktree, then render, then use the render as a decal? I haven't found much about that. Also, where should I post this sort of question - should it go in the A:M section, or Newbie, or here? Also, I lament the demise of the separate forums - those really helped when researching a topic.
-
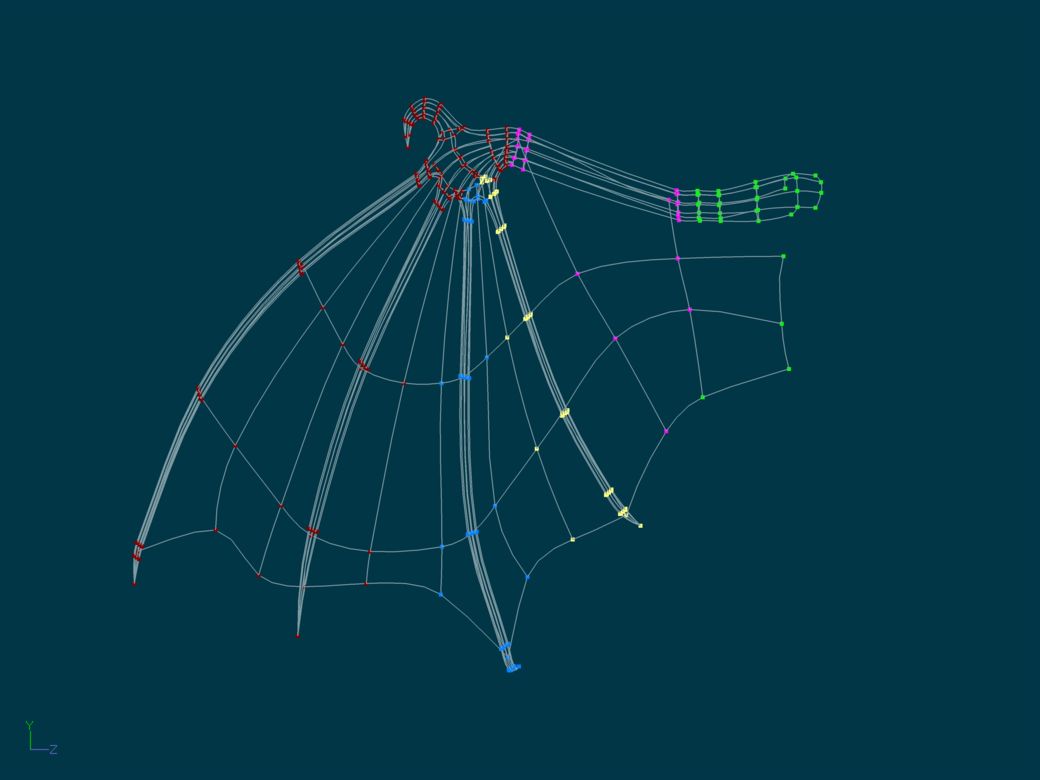
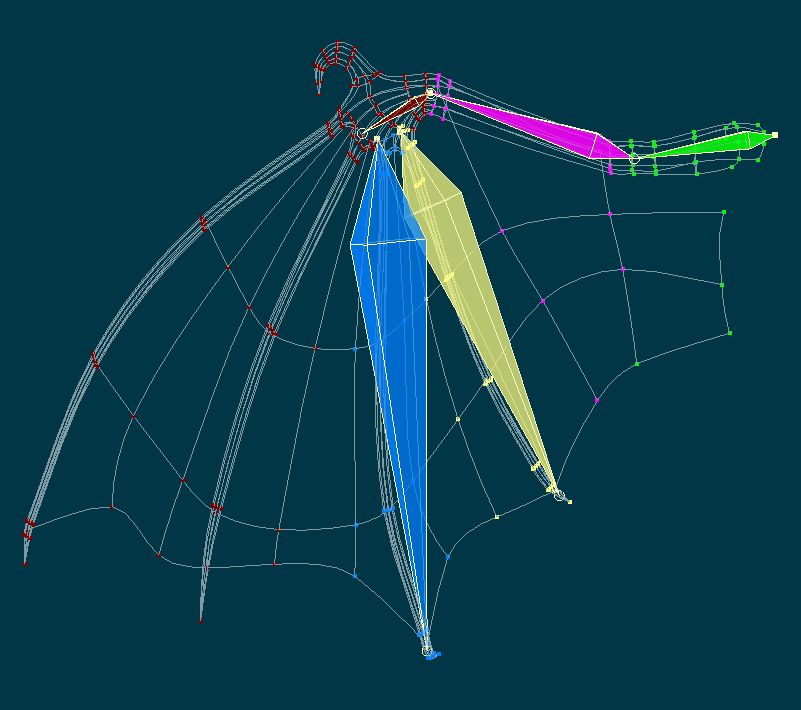
Hi, Mohammad - I'm embarrassed about the rigging on the wings . It's very minimal. I need to think about it more. Here's what there is, for what it's worth. When I was making it, I looked at bats for the structure, so birds will be different. The 'thumb' is the hook, the index and middle fingers in mine only move with the thumb, and should be more flexible, and the other two 'fingers' will move independently.
-
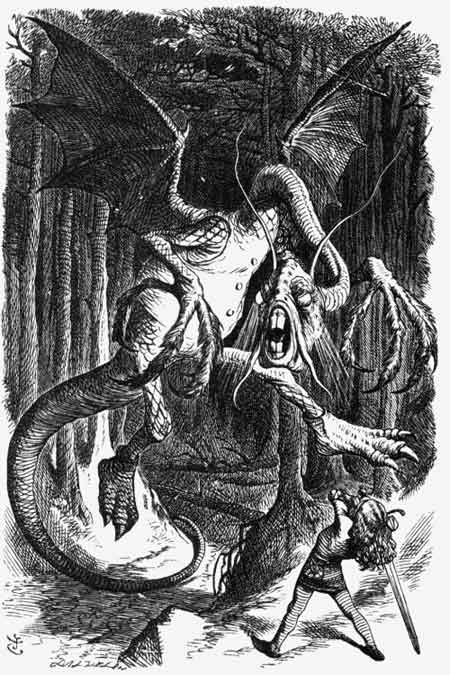
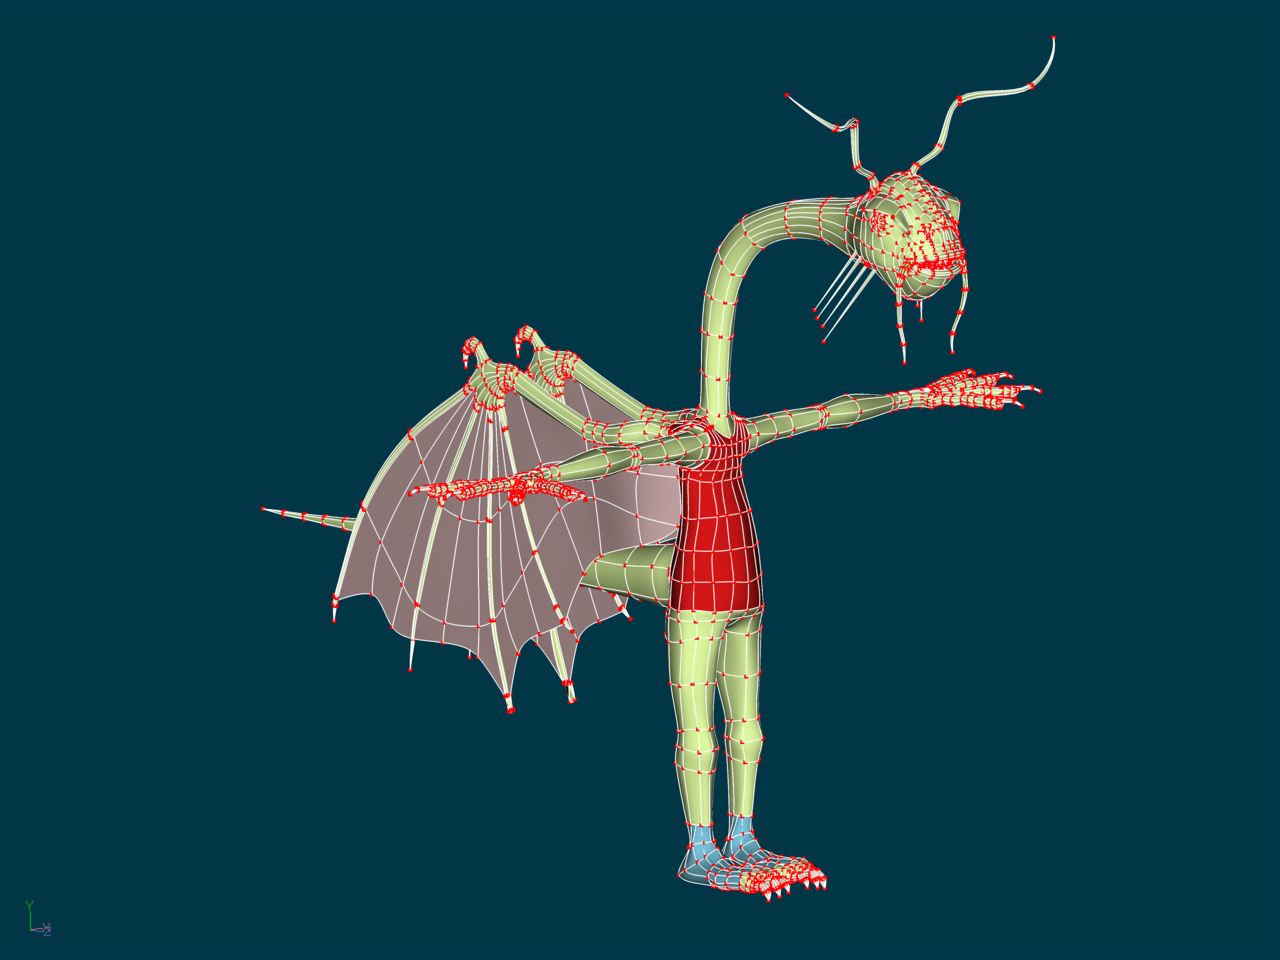
I thought about what I could do as a first project, and thought it would be good to make a movie of Jabberwocky - not too long, and I've always been a fan. Then as I went through TaoA:M I thought, maybe just a verse. As I finished TaoA:M, I thought, just a couple of words. So - "BEWARE THE JABBERWOCK!" He's supposed to be from Tenniel's Jabberwock illustration, and, yes, those are socks: He's only got a basic modified 2001 rig, but as he doesn't appear much in the poem, he doesn't need any more. My next move is to try and bake a Darktree onto his skin and change it in 3d Painter.
-
Nice. You have reflections - how did you do them? On the right hand window, the van's reflection shows for a long time. If it's supposed to be a moving van, not parked, then the reflection shouldn't be there for so long. Cute character - I like his shininess (please change that word to some 3d technical term that I haven't learned to trot out yet ).
-
I think I'm coming to the conclusion that if you're going to use reflections, you must expect a long render time anyway. I put up a greenscreen (red actually) over the building, except for the windows, and turned everything on the redscreen to OFF, and rendered reflections only = ON. That was 5 mins for a 3 second one-pass. For 16 multipass to match the original still tga, it'll take 1 hour 45 mins for 3 secs. My reflections tga looks like: and the resulting movie: untitled.mov Movie has these layers: Reflections (red layer), main street still with alpha channel where windows are (photoshop elements selection - I was hoping not to have to photoshop), shadows, thom. I deliberately left red edges around the windows, where I wasn't very careful, so you could see the idea. So this method of doing reflections separately, would only work where you are willing to compromise the quality of those reflections. Although, I guess, even if you did render for 1 hour 45, we're still only up to 5 hours 15 total render, as opposed to 89 hours of the original estimate. Quiet note: you may realise that I am really bad at lighting and setting up reflections.
-
Thanks, Rodney for the info on green screens. The problem that I'm having with reflections, which may be insurmountable in the example we're using, is that I am unable to isolate only the windows into an alpha. When I delete the materials on the building, to decrease render time, the lighting changes, as you might expect, and the reflections are different. So it may be a question of rendering the whole thing very slowly on 1 multipass, then render the still on 16 multipass, then alpha the still in places, so that you can see through to the 1 multipass. But that seems way too complicated for what should be a simple compositing. Still thinking.
-
My computer's even got a glass side, but as it's under the desk, only the dust bunnies get to see the eerie blue glow. I think reflections here, because aren't we going to alpha channel those as well? Did you catch this post from satyajit? Can't see why it needs to worry about materials on a shadow render, though. Although perhaps shadows would be affected by bump and displacement maps, so perhaps it makes sense. I'll have an hour tomorrow to play with a greenscreen.
-
Does the low-res version make the shadows quicker? Surely, it shouldn't make much/any difference. No, there's no reflection render option. I've been pondering on this, reading This Post, which suggests doing a greenscreen. I'm trying to work out how to do the reflections with an alpha greenscreen, though. I haven't got very far with that. Any ideas? Of course, now we're almost getting into the realms of spending 150 hours rendering to openexr format and tweaking lighting in composite. I still think it's useful to be able to render in parts like we're doing.
-
Great - I remember doing that too, because that's how other programs work. About the shadows, I have a feeling that happened to me the first time, but because I was experimenting, I didn't know what to expect. Try exiting A:M and starting again. I just checked again, and all I did was change those settings - make sure the shadow only for building & street is ON - make sure you've set that on frame zero, because I think it's animatable, so if you set it on frame 30, frames 0 - 29 won't accept shadows (?not tested?). When you put the shadow only to on, deselect the building, and it goes away, and you just see blue sky. Same for street, so Thom looks like he's in the sky. Does that happen for you? When you say nothing showed up in the viewing window, I'm not sure what you mean. My tga was entirely black, and I couldn't tell whether it had worked until I looked at the alpha channel. To compare, because I may have a faster system (mine's dual 2.8Ghz, 1GB Ram), with those settings - multipass = 1, shadows ON, everything else OFF, my shadow took 1:32 Mins. Rendering the whole scene, multipass = 1, shadows ON, everything else OFF, the scene took (bother I just closed it) I think it was 3:30 - 4:00. So from that I guess we can tell that shadow only isn't rendering the materials.
-
Phil, I think I may know what you're doing. I rendered out 180 tgas, then loaded them back into a new project, put them as a rotoscope to a camera, rendered out to mov all 6 seconds no problem at all. When you are importing them, don't import them all. Right click Images in the PWS, then click Import > Animation Or Image Sequence. Then ONLY click the first tga - like Shaggy0000.tga. Then click OK, and the others will all be there. It may only look like one frame, but they are all there. You can then apply this one to the camera rotoscope in the chor, and each frame in the chor will go through the tgas. This is how it looks in my PWS on a blank project having imported 180 tgas. But like Rodney says, the 000 sequence when you render is important, took me ages to work that out, , I really got to know renumbering in Irfanview.
-
Thanks, Phil, it was really fun. Don't know about over 100 photos - I can't 'play' until tomorrow Which tutorial?
-
On the assumption that I'm talking about the same thing as you're talking about, I've been having some fun. 1. Render of main street with 16x multipass, shadows on - 52 mins. Compressed jpgs, so quality is not as good as original. 2. Render of Thom into alpha channels - I made all other objects ACTIVE = OFF, and rendered with Alpha Buffer = ON, no shadows. - Render 28 mins. (jpg here, so no alpha channel, but there is in my tgas) 3. Render of shadows - finally worked out settings. Under Options for warehouse and street, Receive Shadows AND Shadows Only have to be ON. I set Fire Hydrant to Cast Shadows = OFF, but this only saved 2 secs per frame. The render options: Alpha Buffer = ON and Shadow Buffer = ON. I did Multipass = 1, and Shadows =ON. Total rendering time of 91 frames (3 seconds) was 2 hours 10 mins. (I think - I forgot to check). Pretty scary - 2 hours of rendering pure black frames. The alpha channel screen capture from PSP looks like: 4. New project in which I imported the main street tga, the tga sequence of Thom, and the tga sequence of shadows. New choreography. Deleted ground. Set up 3 rotoscopes on the camera - first main street, then shadows then Thom. 44 seconds to render, with all settings off, no multipass. Total rendering time: 3 hours 30 mins, 44 secs. To render original would be approx 89 hours (mostly just due to materials). This is the movie result: ThomSidewalk.mov In retrospect, Thom walks in front of the fire hydrant (doh!), so the firehydrant would need to be rendered at the same time as Thom, and firehydrant shadows with step 3 shadows. And in the original, Thom's walk action sinks into the sidewalk, so it looks a bit odd in the composite where he's a layer on top of it. Rendered a still of frame 1:00 - 58 mins. (Sorry, the lighting sucks ) and the composite render of 1 second I do hope we're talking about the same thing. Next is to work out how to put reflections in - I was thinking of just rendering the windows, but will have to sleep on it.