Gerry
-
Posts
3,775 -
Joined
-
Last visited
-
Days Won
1
Content Type
Profiles
Forums
Events
Everything posted by Gerry
-
Yeah, I'd been an admirer of these images in the gallery for some time now, but I didn't know about this thread until the other day. I'd always assumed he had modeled her in this pose and not rigged. I'd like to know more about this project. Kinda reminds me of Michelle Pfeiffer in "The Fabulous Baker Boys" if ya know what I mean. If you ever wondered what "Makin' Whoopee" means, you won't after you see her sing it!
-
I would definitely say the TSM discs and the Materials discs from Anzovin Studios, mainly because they won't be making any more after the current supply runs out. They're both invaluable and I've been raving about the Materials discs over on the Off Topic forum.
-
Really looking great, Mark! I like this latest character.
-
That's big news! When I do Flash video the vol control is "included" so it wasn't an issue for me. I think the deal was that ernestx wasn't using that work flow, so had to build it from scratch. But if it works it works! EDIT: btw I've just signed up for some advanced ActionScript tutoring later this month, so hopefully I'll be in a position to help folks around here a bit more in that area.
-

help me!!!??? I'm having problems installing A:M
Gerry replied to matt_stanford's topic in New Users
If you tell us what got it working it might help the next person. -
help me!!!??? I'm having problems installing A:M
Gerry replied to matt_stanford's topic in New Users
Hang in there, Matt. This sounds like one of those really simple problems that can nevertheless drive you crazy. And welcome to the forum! EDIT- Can you tell us a little about the specs of your new machine? -
The way it looks to me is that the whole scene is too evenly lit, with the lit fg competing with the lit bg. The way you've got the character stepping into the "pool of light" suggests maybe a spot light in the ceiling, with the light on the floor a little harder-edged (NOT hard-edged, but less soft than it is now). Then the focus will be on the character and his movements. The ceiling light doesn't even need to be very bright, just enough to feature the character. Another impression is that the shadow on the left wall, if it's significant, should have a little more contrast. It looks like the character is heading toward whatever is throwing that shadow, for some kind of showdown or confrontation. If that's the case, the drama could be enhanced with just a few lighting adjustments.
-
that's a great start! Though I don't get what happens at the very start. Where does the ball drop from?
-
Hey Master Funk, I just looked at this last one so I didn't see what lighting you changed. By the way the character is great, I love the detail and movement. But those hot spots on the ceiling and right wall really flatten out the foreground. Where's the light source supposed to be exactly?
-
Can you post a screen shot or something for reference? If you can show the action window along with the PWS that would be best for starters.
-
I would just mention one thing that might help. First, this is a great first try at a walk cycle! If you decal an image, or a grid, on the ground plane, you can check foot slippage a lot more easily because you'll have reference points for how(and if) the feet move while they should be "planted".
-
Does this printer you're talking to specialize in fine art giclee prints? Depending on the kind of paper you're printing on you could easily get away with a lower resolution, as paper with a less glossy or plate finish will compensate very well for a lower resolution. And it's also good to keep in mind that the threshold for visible dots or pixels is 144 dpi. Anything above that will do for art prints. High res is nice but not always necessary or desirable. I've seen fine art prints done on a rough water color paper that were printed from a 72 dpi image and they looked spectacular.
-
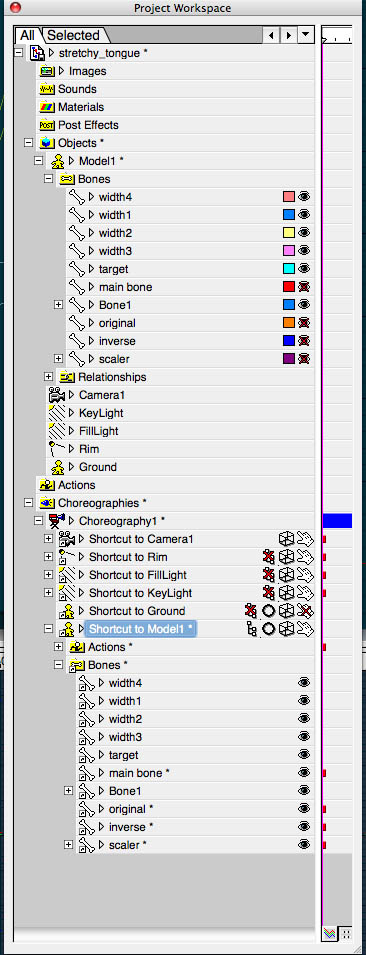
Here's a screen shot of the PWS showing the bones for a model and for the model shortcut in a chor. There's no "Model Bone" in either bones list and when I select the model bone in skeletal mode what is selected in the PWS is "Shortcut to Model 1". EDIT- this is on my mac, I'm on vacation this week so can't check it on the pc side. SECOND EDIT - So Kelley, why not just add a bone where you want the constraint to be? Adjusting the model's position could cause you problems later on, say if you want him holding the gun by the barrel, etc.

-
Do you have front and side drawings of the character to use for rotoscopes?
-
Check out this excellent tute in the Project Bertram forum: http://www.hash.com/forums/index.php?showtopic=32881
-
If you could post some screen shots of your problems it would be easier to help you out!
-
But you can scale just by selecting the model, right? And the model bone isn't in the PWS*, so what's the advantage of selecting the model bone as opposed to the model itself? *at least I think that's right. It's one of those things I never think about!
-
My understanding of the model bone is that it's a default bone for any model that you won't be rigging or creating a skeleton for. But adding bones gives you more control, and once you do you can safely ignore the model bone, it just becomes redundant.
-
Back atcha, Greenie!
-
I was looking for this tute a week or two ago and just happened to stumble across it just today. Thanks David!
-
Okay, I just went through this process quickly so I could explain it better. So here goes...! 1) Import an image sequence that is numbered; 2) Apply the first image of the sequence as a decal to the model; 3) Place the model in a chor; 4) Click "show more than drivers" and you'll see a "decals" item for the model; 5) Create keyframes so you have a time frame for the animated decal to run (not sure if this step is necessary, but the keyframes can always be moved/removed); 6) Now you've got to drill down to find the timing settings: Click on the plus sign next to the decal icon; Click on the plus sign next to "Images"; Click on the triangle arrow next to the image name; Click the triangle arrow next to "Image"; Click on the triangle arrow next to "Timing". 7) There's where you should be able to set the first and last frame of your animation at the appropriate keyframe, and you can set decal frame 1 at timeline frame 1, and decal frame 50 at timeline frame 20, then decal frame 1 AGAIN at frame 21, and decal frame 50 at timeline frame 100, or whatever you want. You have total control over the speed of the decal and how many times it plays. Just so you know, I had to apply the decal three times before it worked properly, and I don't know if it was "user error" or a missed setting. Hang in there. It's tricky to get it to work but it's well worth it.
-
Yeah but the subscription version is only $79! You just can't move it from one computer to another, and it expires after a year. Still a good deal.
-
Off the top of my head I don't think you'll find it in the image's properties. I believe you need to apply the image sequence as a decal, then in the chor you *should* have options for timing and looping. [edit] - You need to check the "Show More Than Drivers" icon. Sorry I never came up with a solution for a volume control. As I think was mentioned earlier, if you were to publish as .flv from within Flash (probably v.8 or better) you can automatically attach controls for playback, vol, etc. but as for manually building a volume control, I know it's possible, but as you may already know about ActionScript, the more you know the less you know! I know just enough AS to get myself into trouble.
-
Looking forward to it as usual!
-
So? Was there a meeting? The suspense is killing me!