robcat2075
-
Posts
28,259 -
Joined
-
Last visited
-
Days Won
403
Content Type
Profiles
Forums
Events
Everything posted by robcat2075
-
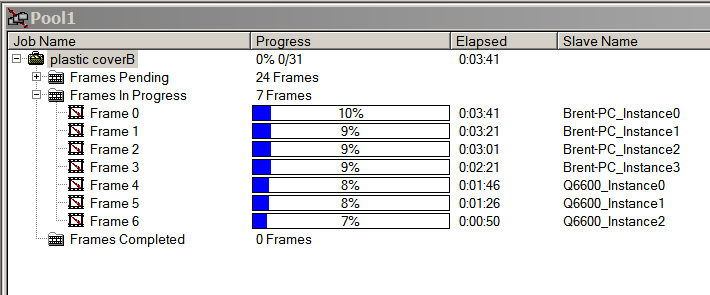
Hold everything... I think it's working! I've got some manually started nodes doing something on both computers. Thank you Gerald, Steve and Jason for your suggestions. I think there were three cascading problems... p2p services not getting started when my computer booted up each computer had it's own "HomeGroup" although Netrender can see nodes on a remote computer that were started from one of the remote computer's folders, those nodes can't seem to understand paths to PRJs. If i navigate from the remote computer to the AM folder on the main computer and start a RenderMessenger, that will load/run on the remote computer AND be able to load PRJs via a network path.

-
I got the p2p services "started" The problem with Homegroups seemed to be that each computer had one established but they were not the same Homegroup. I killed one of them and joined the other and now I can indeed see shared folders remotely. However, my remote Netrender node still is "unable to load Project." I did this and now there is a user named "Remote01" on my main computer but... that doesn't seem to change anything about my remote computer.
-
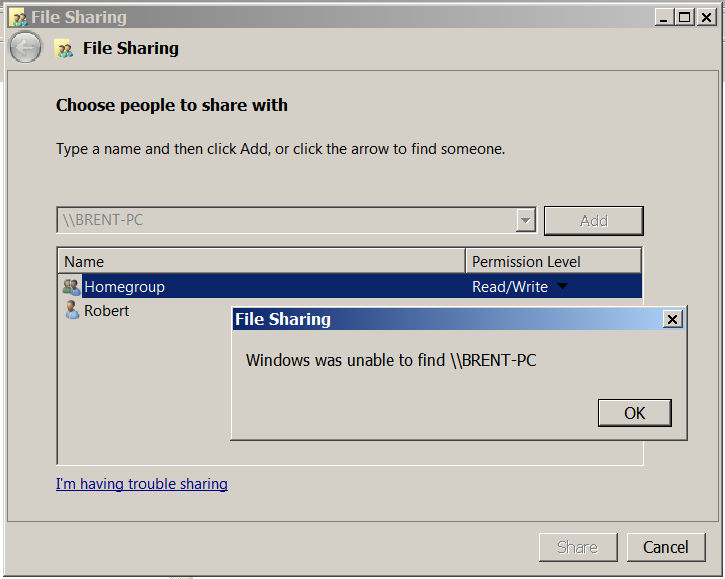
My account name on the remote computer(named "Brent-PC)" is "Remote01". I changed it to that because my account on my main computer was already "Robert" On my main computer , when i try to "Share with" the folder i want to share, I am unable to add anything from the remote computer. It does not appear in a search of the network, even though it does appear in the "network" in Windows explorer.
-
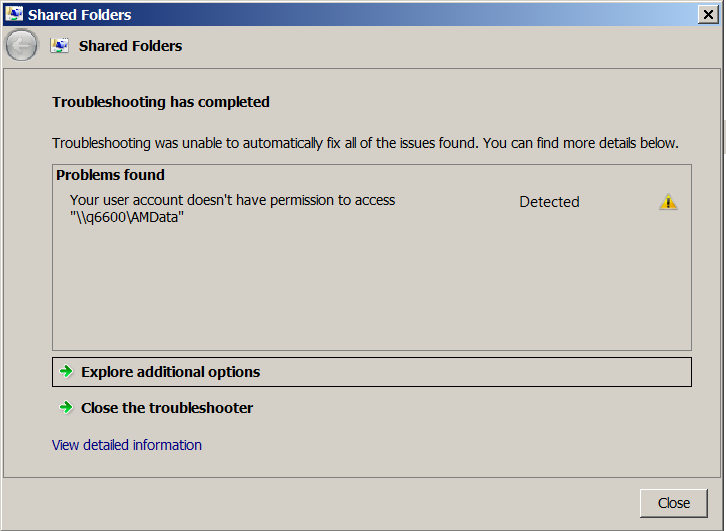
When i run the Windows Networking "troubleshooter" on my remote computer, it says I don't have permissions to access the folder I have shared. What more permissions can i give than the everything and everyone I have already given?
-
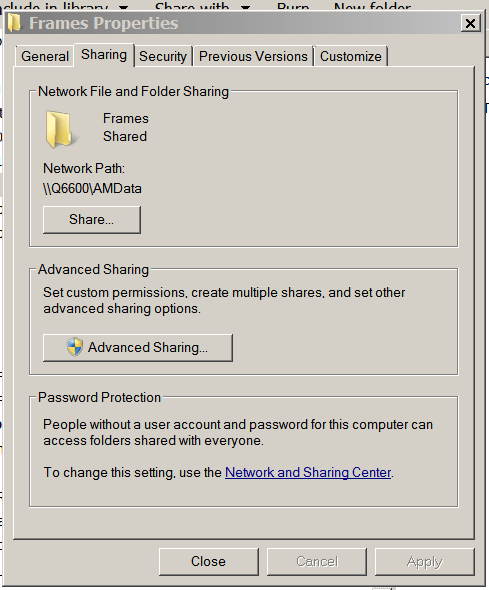
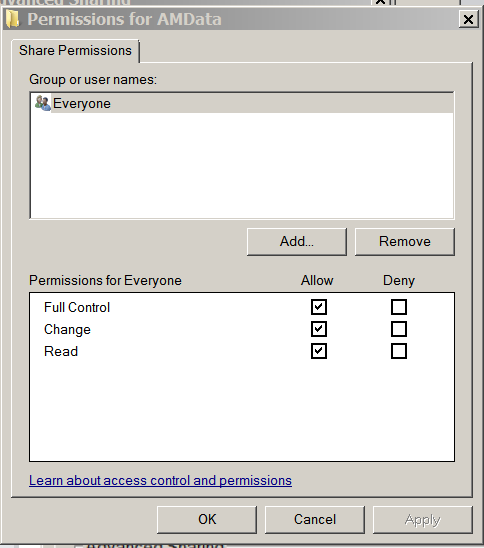
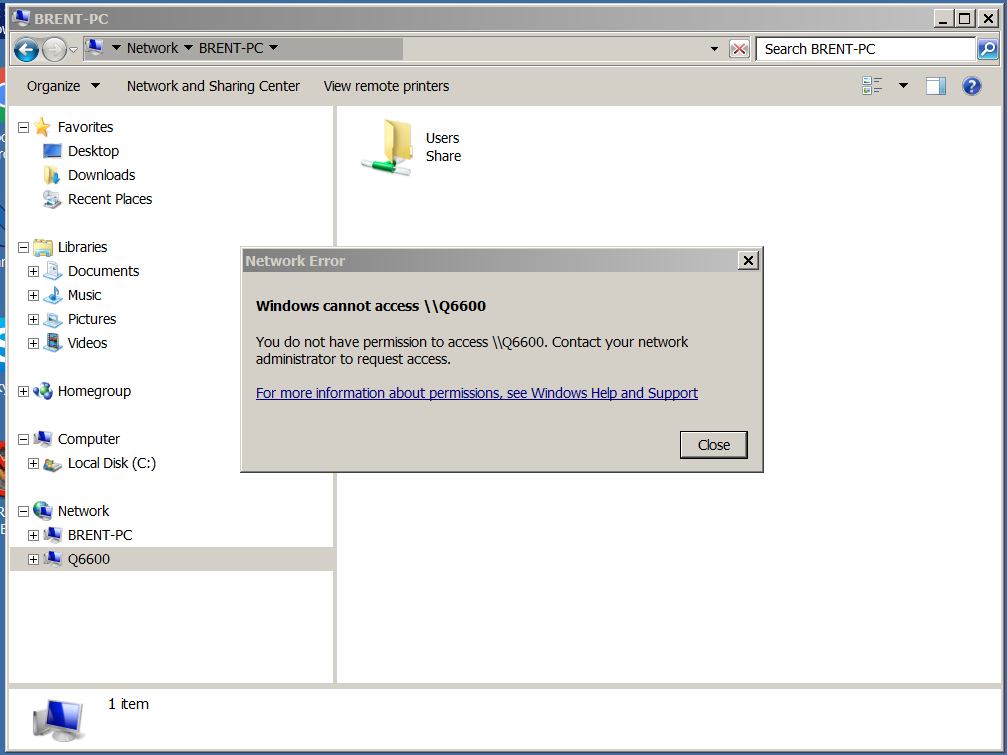
I've made a folder on my main computer (Q6600) on the C drive called "Frames" It is shared with the name "AMData" Its permissions are set so that anyone can do anything to it... NetRender aside... I should now at least be able to see that shared folder on "Q6600" over the network from my remote computer "BRENT-PC" From my remote computer "Brent-PC" the network can see that there is computer named Q6600, but I can't access anything in it, not even the folder that is shared. This is true even if I turn off the Firewall on both computers. What is missing?
-
The core problem seems to be that if i browse the "network" from my remote computer, I can see my server computer on the network but can't see any of the public/shared folders it contains. It's some sort of permissions problem.
-
So far, all of my remote nodes are still "unable to open project"
-
The hair... sort of reminded me of hair on a porcelain figurine. It is like the exterior volume of the hair without being every strand. That is neither good nor bad, I saw it as a style choice.
-
That looks snazzy. I'm wondering how we could make a more effective treatment for the transparent cover.
-
A book that I found to be very helpful in understanding how computer lighting worked and can be used to advantage is Jeremy Birn's Digital Lighting and Rendering I have a thread that translates his terminology (2nd edition) into A:M language... https://forums.hash.com/topic/37134-jeremy-birns-digital-lighting-and-rendering/?tab=comments#comment-320978 Used copies of the Second edition can be had very cheaply now. I have not read the Third edition yet.
-
Simon, When i open the character in a fresh action he appears undistorted. I would have to see more about what you are doing in your action to know more. If you wanted to bring this to Live Answer Time we could probably diagnose this easy.
-
Hey that was impressive! Congratulations on getting a production done! That is what we all dream of doing when we buy A:M. The TV character is scary! It reminds me of the stranger thing in "Stranger Things" 😀 I agree that the lighting would benefit from reworking. It is lit, but with an unnatural flat appearance that pulls out of the story. It is difficult to do one lighting setup that works for multiple shots. Lighting generally needs to be rethought for every shot. There are many promising storytelling touches. I like that it is all done without dialog. Sometimes i think different "staging" of the action would make things clearer. I had to re-watch it to catch the battery scene. Here is a posing thing that stuck out to me as soon as I saw it.... She's pulling the table into view but she is leaning exactly backwards from how she would need to be leaning to do it. I'm still not sure what happened at the end. Should I be? I'm very impressed by the music production, that sounded very pro!
-
The number of passes chosen here applies only to on-screen progressive renders (Shift-Q) Choosing a lower number gives you a shorter wait before the render returns full control of the interface to you. "1 pass" is often all you need to judge light/shadow/AO results.
-

Prehistoric! Image Contest! Deadline December 20!
robcat2075 replied to robcat2075's topic in Animation:Master
Check out official kick-off video in top post with fabulous new prize announcement! -
An hour per frame seems very long for what i saw in your sample video. But 3GB isn't much RAM either. I recommend your next PC be a 64 bit machine so you can get past the 4GB barrier.
-
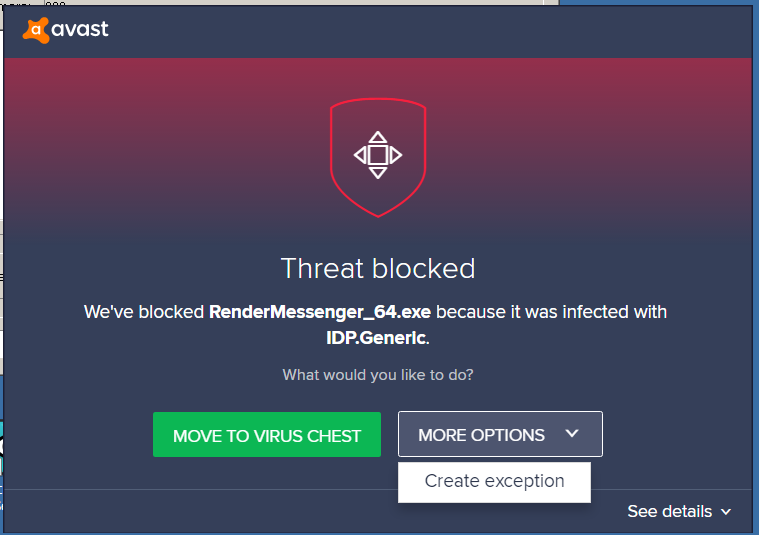
I'm getting this warning on my slave computer... IDP.Generic seems to be a general warning about network activity so I'll create an exception for it.
-
The 64 bit plugin wont' work at all in the 32 bit version. You can get the 32 bit plugin by downloading and installing the 32-bit version of A:M v18 and copying the TIF plugin from it to your v17 install How much ram do you have?
-
I bought some extra nodes. Now... where do i find the instructions on making them work with an additional networked computer?
-
crash when rendering multiple frames at Super35
robcat2075 replied to cribbidaj's topic in A:M Rendering
To be a report-able bug it would have to be some thing observed in v19 -
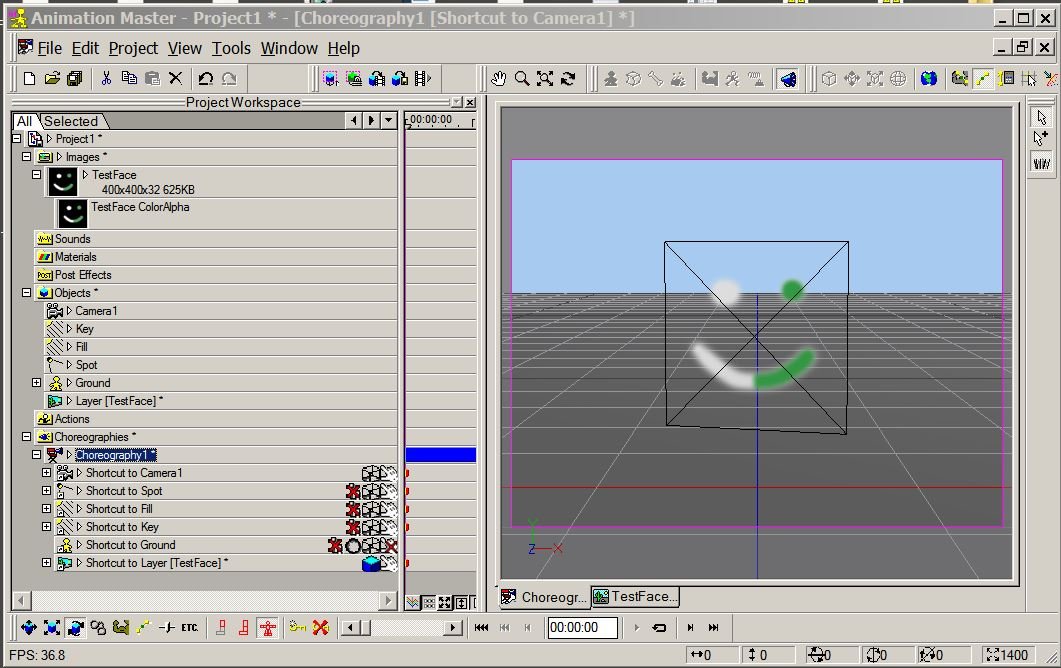
When i look at wolken2.tif in Photoshop I notice that it is a CMYK image not RGBA. It doesn't truly have an alpha channel. But I was still able to import it into A:M. I didn't know A:M could use CMYK. This is resaved from Photoshop... wolken2b.tif
-
The AVI looked very cool!
-
If you rename QuickTime (.mov) files with h.264 compression to .mp4 they will usually play here in the forum. Paradixically, files with MPEG-4 compression seem not to work. I was able to import wolken2.tif Try dragging it into A:M rather than using "Import"
-
The zip file needed to be unzipped before you used it. Are you using 32 bit A:M or 64 bit A:M? If you are on 32 bit you'll need the 32-bit plugin I was able to import the sample image you posted and it seems to have a working alpha channel. It has a halo but that is fixable. I wasn't able to play the video. It must be some sort of mp4 that doesn't play here.
-
crash when rendering multiple frames at Super35
robcat2075 replied to cribbidaj's topic in A:M Rendering
Sounds like a good case for a bug report! Are you permanently on v18? Haven't tried v19? -
Here's where the FTP folder is for windows installers. ftp://ftp.hash.com/pub/updates/windows/ After you run the installer, copy the master0.lic file from your v16 folder to your new v17 folder.