robcat2075
-
Posts
28,258 -
Joined
-
Last visited
-
Days Won
403
Content Type
Profiles
Forums
Events
Everything posted by robcat2075
-

Rendertimes (The Effect of Internal Patches)
robcat2075 replied to jakerupert's topic in A:M Rendering
That's a great insight. -
BTW, I recommend Jeremy Birn's book on "Digital Lighting and Rendering" See my notes on Chapter 11 for some info on Shadow passes in A:M.
-
I guess you guys are doing like Robert Crumb and doing a complete book of Genesis? In song!
-
Well, there's the problem. There's no Steve at Hash anymore. It's Jason.
-
Beautiful shot!
-
Rendertimes (The Effect of Internal Patches)
robcat2075 replied to jakerupert's topic in A:M Rendering
An interesting experiment to try would be to render that at smaller size and see if there is a proportionally similar increase in render time for that same frame. Then you know it's something to do with the models or whatever in that shot. But really, if i had something that took even 5 minutes per frame, I'd render to TGAs. When a program is rendering to Quicktime it has to keep track of all the frames it has rendered not just the one it is working on, so it's possible that there is some sort of accumulating memory problem. -
First you can rotate any bone on one axis by using the rotate manipulator. The R key turns it on and off. That's how you should rotate all bones all the time, whether you're rigging or animating; never drag a bone around by the tip. But for aconstraint I recommend the Euler limits constraint. As Darkwing said, in the model window >New>Pose>On/Off to make a new Pose for your model. Select the bone and >New Constraint>Euler limits. In the properties for the constraint you can set min and max rotation limits for each axis. if you only want a bone to move on the X axis you'd set Y and Z to min 0 and max 0
-
That was wonderful guys! I enjoyed that.
-
The date is set right on your new MB?
-
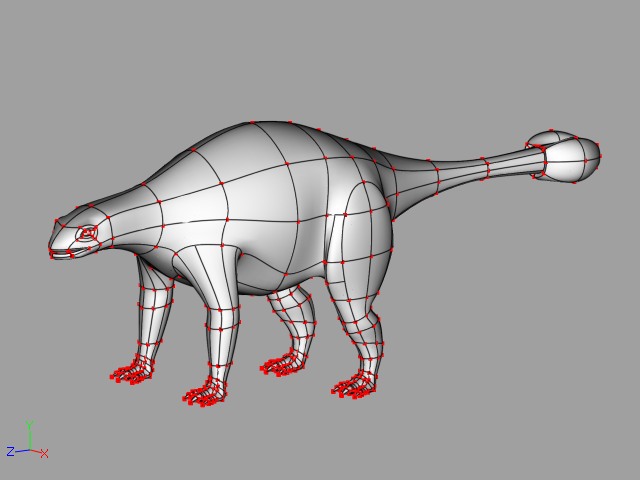
Here's a test with a quick install of TSM2 quadruped. This is all hard attached CPs, no CP weighting yet. AnkyloTakesB_900.mov It turns out it's hard to animate a large, slow-moving beast to not look floaty.
-
Use the "ease" property of the path constraint. Set it to 0 at the beginning of your animation and 100% at the end. In the middle you can key other values to govern how far it is along the path. 40% at 4 seconds and 40% at 5 seconds would make it stay at 40% from sec 4 to sec 5. Of course you have to zero slope those two keys. Yes, but you'll need to key the enforcements of the two path constraints so one is completely off when you want the object to really be on the other path. And vice versa. And of course you'll have to do some keys on the ease of both path constraints so they are not going thru the default 0 to 100% ease simultaneously.
-
Btw, there was a good blog post on the rule of thirds a bit ago...
-
A test with some simple CP weighting AnklyoWalk.mov
-
Thanks. Yes, it's as thin as I can make. I want the difference between the raw state and the textured product will be as dramatic as possible and, of course, to simplify CP weighting. One advantage of material texturing I envision is that you can change your splineage later and it won't seriously break materials like decals would be . It works if you make the five-point patch first. If the hook is already attached, the five-point button will never enable.
-
A small Ankylo-update. Feet finished and tweaks all around. I'll experiment with rigging him next.

-
I've worked with that guy.
-
Hey, I enjoyed that! That turned out real well.
-
Beautiful Work!
-
Welcome back! Good looking Ship!
-
You can't , really. In the screencapture you have a model selected, so the channel view will show you all the channels that model has. If you cursor down to any of the items in that model (such as beam or lid or spinner ) you will get just the channels for that item. After you do that if you hit R you can toggle between seeing just the rotation channels and seeing all of them. Likewise for the N key and translation channels. S key will toggle Scale channels. white, red, green and blue mean W, X, Y and Z axis white is also used for property channels that are just a numerical value like cm or %
-
Cute Character!
-
assign it to a different bone, ie click on the bone you want them to be assigned to, then lasso the cps that were assigned incorrectly And if you click on the model window background you can make the black model bone appear. That is the bone all CPs start out on by default.
-
The Popeye forearms bother me, but I like it none-the-less.
-
Remember the "Ten-minute Man" tutorial? A ten-minute dinosaur would be a cool demo of A:M. I think with practice this could be done in 10 minutes.
-
It *is* a bug in V13 that seemed to appear more on the TSM2 rig, but we weren't using TSM2 on TWO and among the people who were using TSM2 for other things I guess no one got around to reporting it to Hash so it didn't get noticed during V13. CPM is something that only works on the full body, and there are only those four major poses in the walk that are whole body keyed anyway. After that you're tweaking individual bones and you don't want to key the whole body every time you do, mirrored or otherwise. Eyeball those other poses and you'll be a better animator for it.