-
Posts
28,219 -
Joined
-
Last visited
-
Days Won
397
Content Type
Profiles
Forums
Events
Everything posted by robcat2075
-
You want actual shadow? That will need a real light. Daylight is pretty strong. agep had some notes on what you are looking to do here.
-
ya know... maybe something to break up the reflections in the floor so they are not quite so perfect. Maybe slightly wavy or blurry or not all quite so identically aligned?
-
I call this "the Face Contraption" I made a replacement neck.mdl component for TSM2Builder to call What you do is move and scale a few key parent bones into place to fit the clusters to your face mesh. Then TSM rigger uses my new neck script to create all the fanbones and constraints and pose sliders and control bones and hide everything you don't need to see. Of course you still have to attach CPs and weighting the cheeks is still complicated I used it for a bunch of characters I rigged for Kevin Detwiler and it sped up my work but it never got to the point of being simple enough to throw out on the forum and expect that anyone else would "get it" and not get frustrated. When Kevin gets his show done I'll be able to put a clip up and people can see it working.
-
I've found the problem; you can't specify "on/off" in a line that also specifies "in folder" in on/off pose unprefixed "eyebrow middle averaging" in folder "Setups - do not touch" compensated orient like constrain "eyebrowleftMiddleOrigin" to "eyebrowleftOuterGeom" It eluded me because if I just ran the script with the first line the relationship and folder would get created (with no bones, of course) but if I added second line I'd get the crash, making it look like the second line was the problem. But if i take the "on/off" out, both lines will be performed correctly. This only took me a week to chase down.
-
Only new clue so far is that sometimes the bones involved don't display the ring at the tip that bones normally do. Anyone know what causes that?
-
I'm using v15 and also tried v13, but no go so far.
-
By the process of elimination I've found one line in my TSM2 script that is causing a crash. The second line here: in on/off pose unprefixed "eyebrow middle averaging" in folder "Setups - do not touch" compensated orient like constrain "eyebrowleftMiddleOrigin" to "eyebrowleftOuterGeom" My experience is that when a script crashes TSM2 it is because a bone name in quotes is misspelled. (A misspelled script command only causes TSM2 to give up without a crash.) But both those bone names are spelled correctly including capitalization. I can make this constraint manually so it's not an illegal circular constraint.
-
inquire about that. I think when a new version comes out all the variants get updated
-
You really ought to do the free update to v15j+, to make sure you're not dealing with some bug that's been fixed and to get all the other fixes and updates. However... there was a big change with v15f regarding how plugins had to be compiled. It *may* be that your AMxTex plugin really wants to be used in a version before v15f. You might install some prior version on one PC to try. Or that v13 you have a disk for.
-
You did put the model in a chor to see it change over time?
-

Is there a PC file where the initial file paths are stored?
robcat2075 replied to Ralph's topic in New Users
fortunately, the dose of reality thing is part of his goal -
So where do i find it?
-

Is there a PC file where the initial file paths are stored?
robcat2075 replied to Ralph's topic in New Users
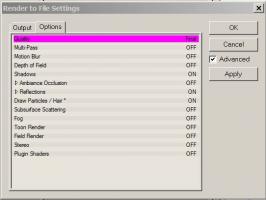
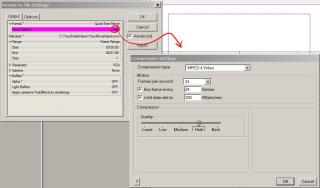
A:M is designed to store its last configuration in the registry so a user can easily pickup where he left off. As a general rule I'd have each student do a "Reset settings" at the start of each exercise and get them used to closing that Library window and other startup rituals. I like Rodney's idea of running a script that copies clean copies of everything you need to the various satellite computers before your class. Absent a script, if you can see the satellite HDs from your station it would be a matter of preparing a master folder you can copy the contents from to the matching folder on the satellite. One drop and drag per machine. The imagery for the presets is actually contained in the .pre file. A preset doesn't appear and yet is present in that station's A:M folder? Being a methodical person I'd compare files between a station that displayed them and a station that didn't. I see six presets in my preset folder If the fault isn't obvious I'd just reinstall A:M on that machine. (I never use the presets. I check the "advanced" button that enables setting individual render parameters.) "Final" Option settings "Final" Output settings and "Save Options" settings (Compression) You just gotta present the change the right way: "Treasured students... that video showed one way... but I'm going to show you the way the real hard-drinkin' CG artists do it..." Dragging also works from the windows interface. You can drag a .mdl or .prj or .cho file from an open folder into A:M and it will be loaded into the PWS then you can drag a model into a chor, or >edit it. -
I'll give it a try!
-
Welcome back! Looks very cool. Don't miss the very fast "FakeAO" plugin elsewhere here that forum member jenpy has created. That ought to be a boon to people doing interior like yourself.
-
I think you can also key the "frame" prop of an image sequence to be controlled by the pose.
-
on the pose's name in the Pose slider window while you are editing it>Settings You can then set min and max values for the pose. Set 0 and 8 and the slider will have 9 steps although you can still enter decimal values in the numeric field.
-
Got it. Thanks!
-
Wow! that was fast turnaround! I like that. Congratulations on the gig! I bet they'll want more spots in the future.
-

Is there a PC file where the initial file paths are stored?
robcat2075 replied to Ralph's topic in New Users
They are stored as .pre files. On my computer they are in C:\Program Files (x86)\Hash Inc\V15.0\Presets Your path may be somewhat different but there must be a presets folder in your install somewhere. well, you've heard my opinion of the library... Get them to use regular file operations. Outside of TAoA:M references to the Library are exceedingly rare. There's always more than one way to do things and that concept would be a good lesson for them. Don't know the answer but that's better than getting that message before you want to quit. -
Trying like hell to get it done..I'll touch base in the morning with a go/no go Wherever you are , you're ahead of me.
-
I also see that those frame names aren't padded with zeros like the like the original chor was set to do. I need that or i can't load them in order.
-
I get a blank dir There's some other way to give me a link that makes it public. But I need them all in a zip too or i'd have to download them all individually.
-
something is not working there. Even after I login to DropBox I still can't see your files.
-
ok...whew, 163 MB! thanks!


