robcat2075
-
Posts
28,280 -
Joined
-
Last visited
-
Days Won
407
Content Type
Profiles
Forums
Events
Everything posted by robcat2075
-
I find gamma explanations often confusing because depending on whether you are discussing an image making device or an image displaying device, the same number can mean opposite results in brightness and I suspect many writers on the topic don't' get that.
-

How long should particle baking take?
robcat2075 replied to robcat2075's topic in Work In Progress / Sweatbox
I've rendered some consecutive frames from the same baked CHOR in v15 and so far none of the momentary hair problems are occurring, so eventually I guess I'll need to boil this down into an AMReport regarding V16 or V17. Why not re-render in V15? Because stereo rendering with multipass (more than 1 pass) doesn't work in v15 and I need to render with multipass to get a saved depth buffer in OpenEXR renders and I need the depth buffer to use FakeAO. -
I think that's a "no". They are "pasted" into the scene from the camera view and will always appear to face it. I once used A:M cloth for a spritelike effect with no sprites that turn in space http://www.hash.com/forums/index.php?showt...;hl=money++drop Stiffer cloth settings would make them more like rigid sprites.
-
is it possible some parameter needs to be animated in the chor to make the waves move? Just for clarity, you might strip that down to one wave material and test settings.
-
I temporarily set the transparency to zero and could see spec reflection of some ripples on the black surface. So at least the waves are there. I rendered one second and saw that they are moving VERY slowly. What parameter in the wave material controls their speed? Try making that about 10x higher and see what you get. Also aim the Keylight nearly perpendicular to the surface. I'm a bit doubtful about his expectation that the single plane would make distortions in the picture below. I think you would need to model a box with thickness like a thick plane of glass (and set Refraction to greater than 1) and put the ripples on the front surface. I got some visible distortion that way. Note that I've added an "all" group to make the whole box transparent. Water_B2.prj

-
It must be something other than network speed since the render server and render slave are on the same machine, right?
-
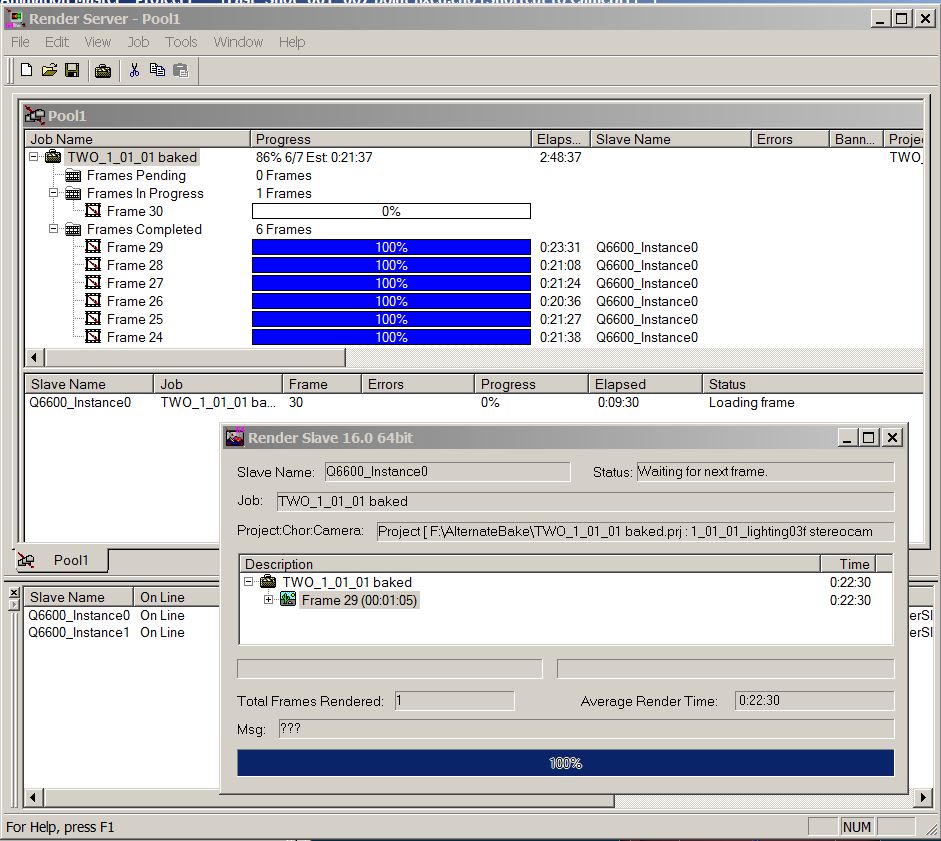
Here's another situation I'm running into. The Render Slave has finished frame 29 and says it is "Waiting for next frame" It doesn't appear to have crashed. There are no errors reported anywhere yet. Meanwhile Render Server was frame 30 ready to go but can't seem to get the Render Slave to take it. Is there a cause/solution for this besides manually closing the render Slave and restarting it?
-
How long should particle baking take?
robcat2075 replied to robcat2075's topic in Work In Progress / Sweatbox
I don't have a 1a in my trove. But I haven't been able to update via SVN for about a year now. -
How long should particle baking take?
robcat2075 replied to robcat2075's topic in Work In Progress / Sweatbox
I'm currently test rendering brief sequences of consecutive frames to look for oddness. One thing I'm noticing is how a shaft of hair will jump out like a stick for one frame then disappear. You can see a couple instances of that in the 3D test I posted. The good news is that when it's odd it's odd in both the left and right views so it's probably not a problem with 3D rendering itself. I'll be back with more questions. -
How long should particle baking take?
robcat2075 replied to robcat2075's topic in Work In Progress / Sweatbox
I'm looking at the shot that I posted in "Oz in 3D" yesterday. That pretty much shows the shot from start to finish. That's what appears in the movie after the title. It's not the very first shot in the movie, but that's what's labeled 1_01_01 in my TWO archive. -
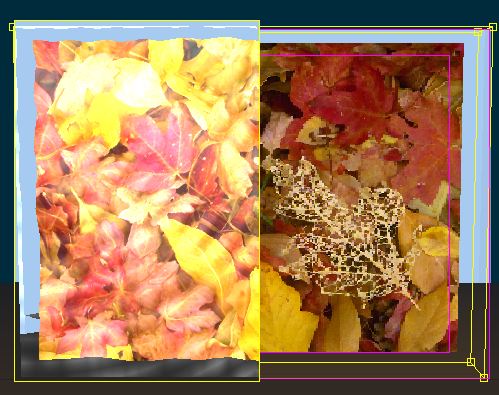
If they aren't red-blue glasses they won't work with that format. That's a "half-color" anaglyph that attempts to present a an impression of full color while reducing the ghosting that a full color. there are several different schemes for creating anaglyphs, all have advantages and drawbacks depending on the images: Gray Color HalfColor DuBois Ghost Reduced The original right left pair in cross-eye format: These were all made with "Stereo Photo Maker"
-
How to do that is a recurring question around here so next time it comes up... you're the explainer guy!
-
He looks good! My one thought is that the splineage around the perimeter of the eyelids (bottom lid mostly) is irregularly spaced and may make eyelid shaping difficult.
-
How long should particle baking take?
robcat2075 replied to robcat2075's topic in Work In Progress / Sweatbox
Nancy, I can't find a particle cloud material in that scene. Are you sure you looked at 1_01_01? And don't Dynamic Options need to be On or the hairs will just stick straight out like there was no gravity? -
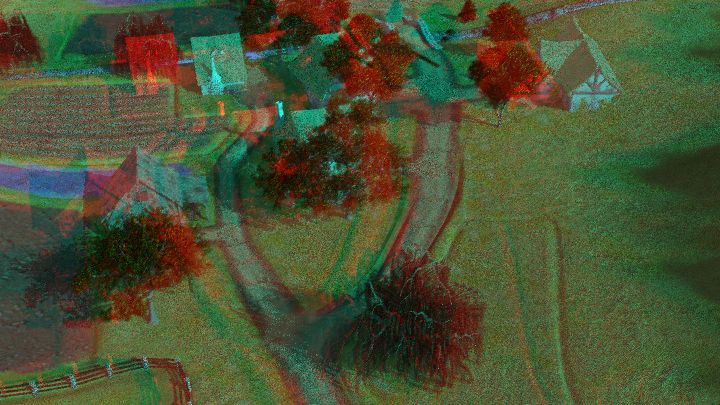
Here is a brief test of rendering the aerial flyover of Winkieville from TWO in 3D. You'll need your red/blue glasses to view this 1_01_01__Stereo.mov I'm not sure who all was involved in creating that set but it's a nice looking opening shot!
-
How long should particle baking take?
robcat2075 replied to robcat2075's topic in Work In Progress / Sweatbox
Clouds... I haven't seen those yet. I'll investigate this some more. Thanks for your tips. -
Very lovely!
-
How long should particle baking take?
robcat2075 replied to robcat2075's topic in Work In Progress / Sweatbox
I don't know a lot about the scene since I didn't make it. My interest in re-rendering it is to do it in 3D and to see how much more res or passes is needed to fix the texture sparkling. It does have the trees made of hair. Whether they are dynamic or not I'm not sure. It's possible that baking isn't necessary, but again, I was advised to bake it. At this moment I'm having success with having baked it in V15 and rendering in V16 Netrender. 3D Frames are getting rendered and much faster than V15 was able to do. But for some reason, baking in 16 was unsuccessful. Fuchur's suggestion to turn off display dynamics seemed to fix that on a baked scene. -
How long should particle baking take?
robcat2075 replied to robcat2075's topic in Work In Progress / Sweatbox
I would have thought there wasn't a need since the hair won't be moving but I was never able to start a render unless it started a frame 0. I was never able to stop, pick up at some middle frame later and continue. Steffen said it would need to be baked to do that. So that's why I'm baking -
rebuild breakable vase with hair flowers
robcat2075 replied to johnl3d's topic in Tinkering Gnome's Workshop
Instead of one emitter for the flower they could be coming from a bundle of small emitters and those could be made to fall and scatter perhaps. EDIT: just watched the clip, you already did that! -
How long should particle baking take?
robcat2075 replied to robcat2075's topic in Work In Progress / Sweatbox
I can render that scene fine in V15 and V16 if it isn't baked So I regard it as functional scene that shouldn't need additional fixes. I'm pretty sure I've restarted A:M at least once in these experiments but I'll try it again when the current bake is done. -
How long should particle baking take?
robcat2075 replied to robcat2075's topic in Work In Progress / Sweatbox
that's a scene from TWO that has been rendered successfully before. So the scene should be correct in itself. But i need to bake the hair to re-render it with NetRender for TWO 2.0 Nancy, have you generally been able to load and render scenes that you have baked hair in in V16? So far this scene from TWO has not survived a baking in V16. -
How do you make a ski lift work?
robcat2075 replied to jnord71's topic in Work In Progress / Sweatbox
You could use an animated material or texture to give the cable the appearance it is moving. I did something similar on my tank treads animation. -
How long should particle baking take?
robcat2075 replied to robcat2075's topic in Work In Progress / Sweatbox
As I sort thru it with a text editor it looks like "unbaking" has left some debris that makes for unsolvable filenames. I've backed up to a version that was never baked and am retracing my steps. -
Fucher is the .x expert around here, perhaps he will catch this thread. There were no 5 pointers and hooks prior to V5 and lots of models got made (the car in TAoA:M is an example) but I wouldn't want to give those things up. It can be done however. Since few other formats supports such things in their topologies, making an exporter to them is tricky. Exporters were relatively low priorities for Hash because they weren't needed to use the program for it's intended purpose, character animation in A:M. But I recognize people will want to use it to make content for other purposes. As Paul mentioned, the SDK is out there, if this is a compelling need for you definitely think of recruiting a programmer to investigate making the plugin you need. OR... convince a programmer of whatever other program you are trying to export to to support the relevant A:M format. It's true, A:M is being programmed by just Steffen right now but he's made huge advances. Between v15 and v16 A:M got twice as fast at rendering!