rossk
-
Posts
332 -
Joined
-
Last visited
Content Type
Profiles
Forums
Events
Everything posted by rossk
-
Hey, I've reverted back to an older version of my project before it started freezing. I decided to try to use Robcat's idea about lowering the plane's density as it recedes towards the horizon. Its working quite well for its intending purpose but I'm having problems with the mesh rupturing due to the wave displacement material stretching it too far. The mesh is having this problem most likely (definately) from my shabby splinning techniques... so if someone could give me a hand that would be most excellent. Thanks, --Ross p.s. is there any way to get rid of the bodies on the smiley faces? the bodies seem to be just taking up space without adding any additional message.

-
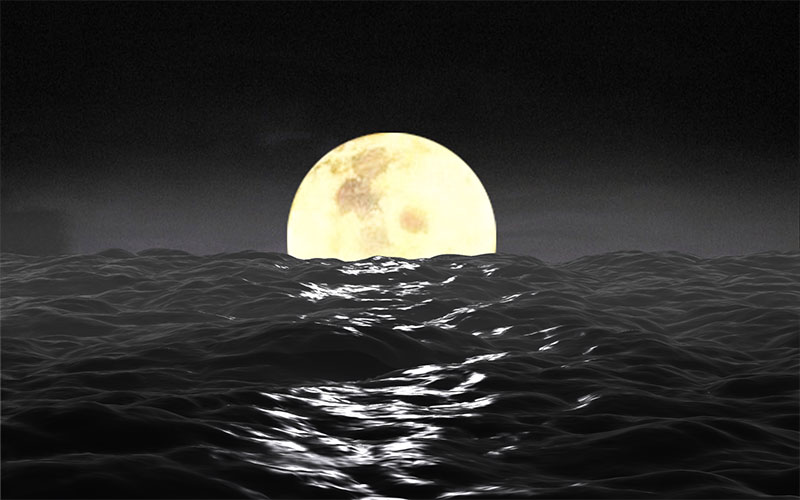
Thanks for the suggestions. Both sound like good ideas and I've been working on implementing both. When I first did the photoshop trick, things looked pretty good, but all of the specular highlighting on the waves disappeared. So I added the displacement material again with a very low displacement percentage which successfully brought back the specularity, but also tiny specks of light appeared all over the waves where they shouldn't be. So I decided to go back to before the photoshopped displacement decal... and my specularity was still gone for some odd reason. I opened up an earlier version of my project before the previous test, then I decided to try reducing the mesh as Robcat suggested. I rendered it a few times, but as I tweaked things and played with the lighting to try to get the specular highlights lined up properly with where the moon would be reflecting, all of a sudden the project freezes everytime that I try rendering it. Thats just the current update as of now. I'm done working on it tonight, but I'm sure I'll make time tommorow to work on it even if I don't have any time
-
Hey again, I've been looking into using an expression to decrease amount that the wave material displaces the water plane as the water plane recedes in the z-axis. I can't quite figure it out... any ideas? or better alternatives to create that flat horizon? Thanks again, --Ross
-
Thanks for the critiques everyone. Yep, I'm using a displacement to create the waves and a bump map to try to give some sparkle or something to the water... I think... I'm actually not sure exactly what that bump map is doing for the image so maybe I'll try rendering one without it too. I've brought down the brightness of the moon now and changed the color of the light to be a little yellowish. I will probably try to extend the wave plane quite a way to try to get a flat horizon. Are there any tricks that would allow me to "create" a flat horizon without actually extending the water plane so far? Like could I possibly use an expression on the scale of the displacement material so that as it goes back in the Z-axis that the X and Y scale will shrink? I think I'll probably lessen the amount of waves some so that I can mess around with fog. Thanks again everyone for the advice, --Ross
-
I've been working on a "waves at night with moon" scene for a bit. I think it needs more work, especially with the fog, but I'm sure there is more to improve. I want it to look as photoreal as possible, but I need to find some reference photos or head out to the lake one of these nights to see how it really looks. Any critiques or comments would be great. I'll try to explain more, especially the problems I'm having with the fog, when I have the time, but I have a busy day ahead so I need to go to sleep. Thanks, --Ross
-
He forgot to mention that along with learning php and mysql for those 6 months that he was also hand-positioning 17,500 invdividual pyramids Those are some neat images though. I, like Nancy, would love to be that rusty.
-
Yeah, I'm trying to find it now too... Even though I haven't seen it yet, I'll put in the obligatory "Wow! That was amazing!" response that I always think when I see Soulcage's work.
-
Haha, that was pretty good. I liked how KeeKat's (or whatever his name is) tail reacts when he yells. One thing that I would change is make Shaggy's arm move faster when he throws the plane. Right now the plane experiences some sort of phantom acceleration after it leaves Shaggy's hand. While looking at that, however, I did notice the rabbit's facial expression in the background. Nice touches of detail throughout. Looking forward to seeing more of your work.
-
EDIT-- nevermind I found another way to do it Jin-- Thanks for the building tutorial, but there's a few things that I'm not clear on. Here's what I currently think I understand... So in Flash (or any other program that can export .ai ) I will just draw the windows. The windows will be a rectangle with a line through it so that I can create the opening in A:M by deleting the center spline. After using the AI plug-in, I will delete the center spline in each window. Then in A:M I will create a box for the actual building and position it so that the windows stick out of it slightly. I would then apply a brick texture to the building. Then going back into Flash I will choose a fill color and fill in the windows, delete the stroke, and export this as a bmp (or other A:M readable image file). I will apply this as a transparency and reflectivity decal onto the building shape so that the "windows" look transparent and slightly reflective. Lastly I could add other details like a door, smoke stack, etc. Is that correct? I got a little confused on how I add the windows to the box (rest of the building)... like whether they are seperate or actual connected to the "box". Also, would I use the bevel features of the AI plug-in at all? Sorry for the bother, and once again thanks for the help. --Ross
-
Sounds like an interesting idea. Is there any way you could post the current project file for the city? I also didn't know that flash mx could export .ai files... good to know though since I'm not comfortable at all with using illustrator.
-
I'm just looking through this post for the first time... and it will definately not be the last time. Your project is coming superbly. Excellent job!
-
My attempt at Babbage water tutorial
rossk replied to Eric2575's topic in Work In Progress / Sweatbox
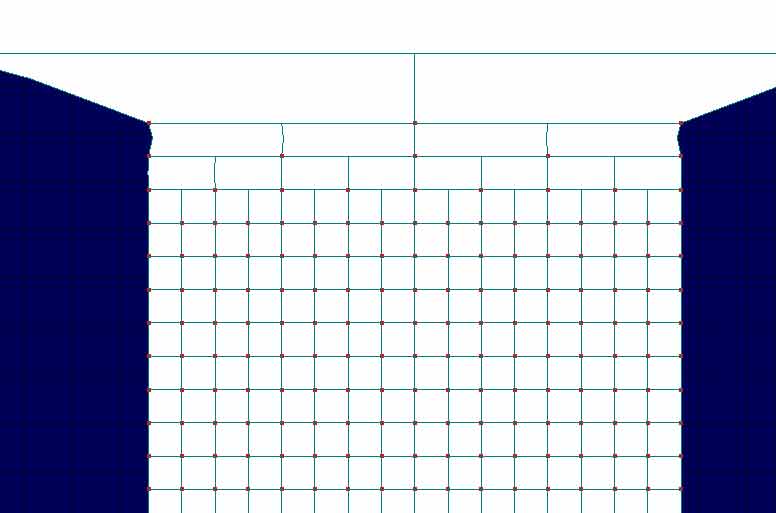
animating the material in the chor-- Click on the "water grid" object and change it so you can see its drivers. Upon expanding out the material, you should see the attributes that you set... I think mine is Perlin. Then go to 5 seconds on the timeline and change Perlin's translate properties to something appropriate. I believe Mr. Babbages used either feet or inches while I used centimeters for my units. Further I set my scale attributes for the material different, so this accounts for why my translation properties are so different. I really don't know a ton of what I'm doing... just experiment until you find something good. The bumpWater material is the bump map for the "water grid" object. The bump map controls how light bounces off the object. I'm relatively new to this, so I'm not really sure how to optimize it for a shorter render time, but I'm sure someone else would have some pointers. As for how the density of the grid affects the "detail" of the waves... just try deleting out large chunks from the edges of the grid object until it is only like 10 x 10 or something. Then scale it up to the original size and check out how it looks. Hopefully that helps some... I really have no clue of what I'm talking about Later, --Ross edit: Oh and to embed the model-- Just go to your project workspace and click on your model. Then go to Properties-->File Options. You should see a "Embed? Yes/No" option. -
My attempt at Babbage water tutorial
rossk replied to Eric2575's topic in Work In Progress / Sweatbox
I'm not sure if you are aware of this, but since Mr. Babbage made the tutorial, A:M has allowed materials to act as displacement maps. This means that there is no need to render out an animated set of images for use as a decal. This was the step that really helped me when I ran into a problem with the tutorial. So basically-- 1. Make material. 2. Apply matterial to grid of cps (decently dense, the more cps you have the more definition is taken from the material) 3. Set the material to act as a displacement map. 4. In choreography, animate the attribute under the material rather than the material itself. So animate "Perlin" or whatever it is rather than the actual material's name.... yeah, I'm not really sure about this last one but it worked for me. For reference, I have attached my project file. Hope that helped and best of luck, --Ross K waterExperiment.prj -
That's looking really good, especially for "still trying to get the hang of animation" as you said earlier. Did you make this character for a story or just practice? Looking forward to seeing more, --Ross
-
wheatfield II image and hair in one proj
rossk replied to johnl3d's topic in Work In Progress / Sweatbox
Awesome stuff. Thanks once again for the great examples. I really hope you make a short someday... I think Rodney said it before, but I agree that it would have the most amazing effects. -
Just a little possible crit... is the key signature ever on the far right like that? key of E or C# minor that is
-
Sorry, I thought "the fat ninja" was one of the cooler character concepts that I'd seen in a while... so I just had to
-
When Shaggy enters the construction zone (and is dialing the voicemail) you show the car bumping up and down as if the car is going over a bad road. In the following scene, which shows the dump truck and Shaggy's approach, the road is perfectly flat and the car is riding completely smoothly. Others have mentioned it, but that shadow partially covering the newspaper headlines at the end needs to be lightened a bit. On my desktop computer I could just makeout "Says", but I didn't even see the ink blotch for "No". Please change this if nothing else. I would really enjoy a making-of video covering how you did the sand (or dirt or something) being dumped from the truck. Anyway, that truly was a great movie. With just a few small changes I could easily see this becoming an internet phenomena. Hopefully this helps with the being harsh thing --
-
A bigger version would be awesome. From what I could see, it looked pretty good though.
-
Sounds like a great idea Tom. I'm definately looking forward to seeing this. I also like the EKG line idea for the robot's mouth. Are we going to see a 2d patch animation like Charlie mentioned? Anyways, Best of luck, --Ross
-
Good idea and execution. I'd really love to see some shorts in a similar style.
-
Excellent work. That character really shows emotions well... amazing especially considering its a robot. Keep up the good work, --Ross
-
So far its looking pretty good. Just a couple crits-- 1. The slant of the forehead points straight into the air on your model while in profile pictures of the roadrunner, the forehead is... well its hard to describe, so here a picture is-- 2. The bottom bill of the roadrunner is also somewhat different than your model shows... I've been trying to think of a way to describe it accurately... but cartoon anatomy is not my specialty so here is a pic again-- Anyways, it looks like with just a few small tweaks you'll have a very nice start to your model. Cheers, --Ross K.
-
One of the direct links to download the tutorial was to a htm file, so just for ease of downloading it-- Cockpit Tutorial
-
Yeah, that would be awesome to the rubik's cube rigged... it would be an interesting project. I wasn't aware of the whole "super-fast-rubik cube solve" hobby until I found out a friend of mine at college "plays" rubik's cube for 2 hours a day. He and a few of his friends have races and everything. Its crazy...