mouseman
-
Posts
1,182 -
Joined
-
Last visited
-
Days Won
1
Content Type
Profiles
Forums
Events
Everything posted by mouseman
-
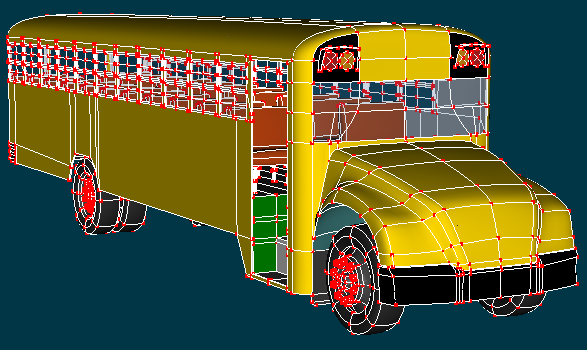
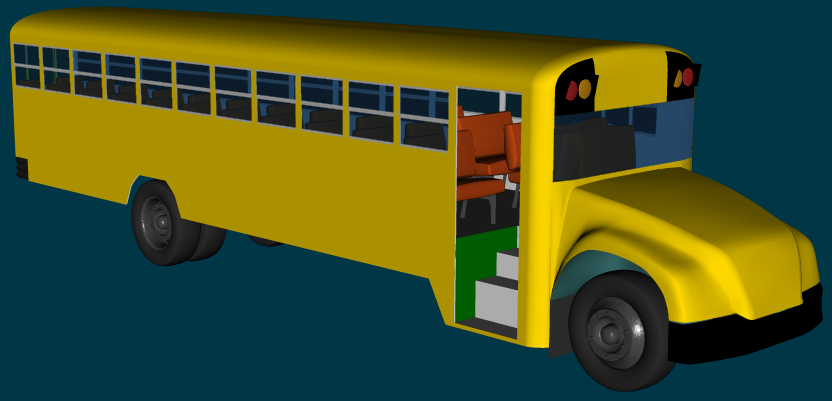
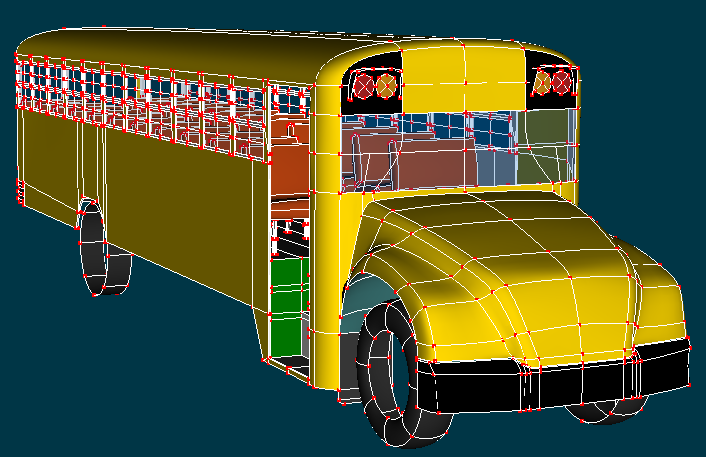
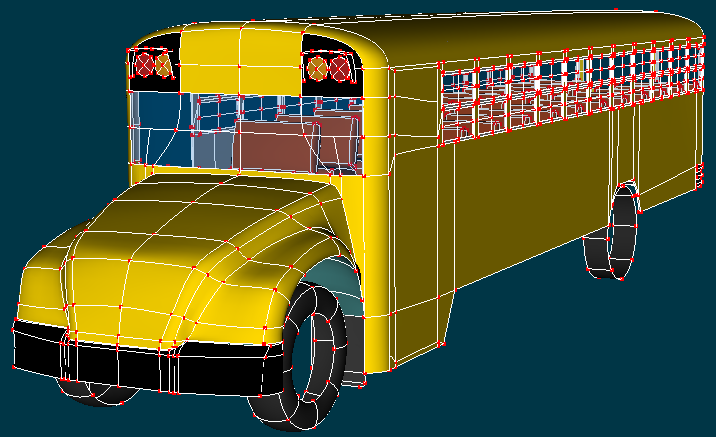
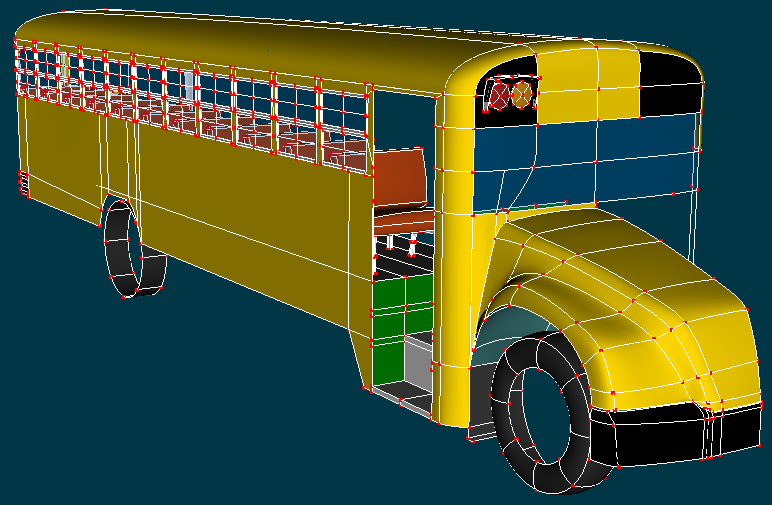
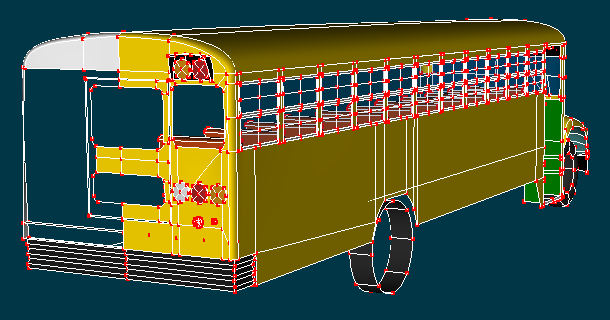
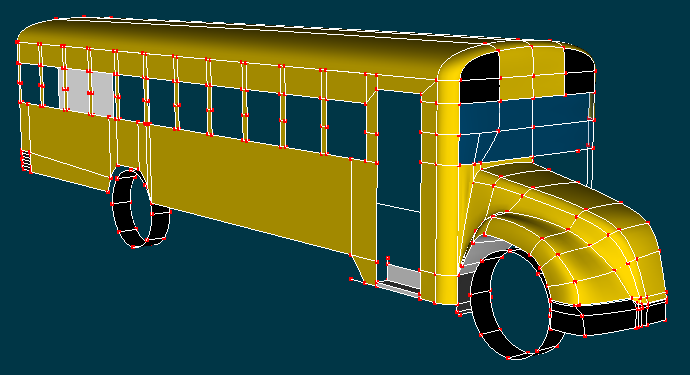
Current Progress: 8188 patches, 16 5-point patches Created wheels. Boy do I wish I didn't have other work to do tonight. TODO: maybe more under-carriage Grille Headlights Entrance doors Driver's seat area and window Emergency door windows, handle Texturing Rigging

-
Nice work! Would have made a great bus stop project entry.
-
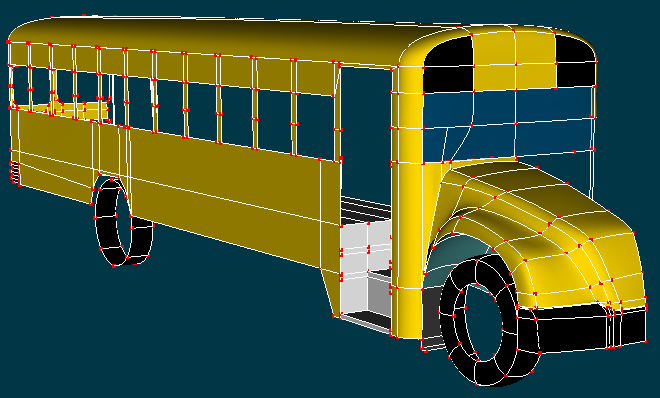
Current Progress: 6869 patches, 16 5-point patches Created interior. Did the copy-flip-attach (probably a little prematurely). TODO: Wheels (and maybe more under-carriage) Grille Headlights Entrance doors Driver's seat area and window Emergency door windows, handle Texturing Rigging
-
Way to go! Lots of fun for the dark-humored among us (such as myself)! Quite an accomplishment, too!
-
I don't have a cgsociety login ... which one is it on the voting page? (I've already voted.)
-
Even with delays, it sounds like you are just beyond the beginning of creating Cupid's Day Off, about to start Act II!
-
That's awesome! I can't wait to see the new forums!
-
Episode 10 - script and storyboards finished - animation begins
mouseman replied to ernesttx's topic in Subject 99
Welcome back! Can't wait to see what you come up with. I loved seeing the first 9 episodes. Your experience in working with television in the past really adds something to your work. -
Wow, it's really coming together. I like the repetition of the visuals, and I don't think it's over done. Pretty decent color model that goes with it; I like how some scenes have the color changing. One area that you might already have covered ... the sequence with holding the photograph and then the closeup of the man sitting (repeated a few times, for example, from 0:08 to 0:13 and 0:13 to 0:21 and 0:26 to 0:37) seem a bit long. It might be good to have some other "business" in there. Another suggestion for something to try (I know, a bit beyond the animatic phase) ... have you done any reference video for the soulful-singing on top of the building parts? Keep it up!
-
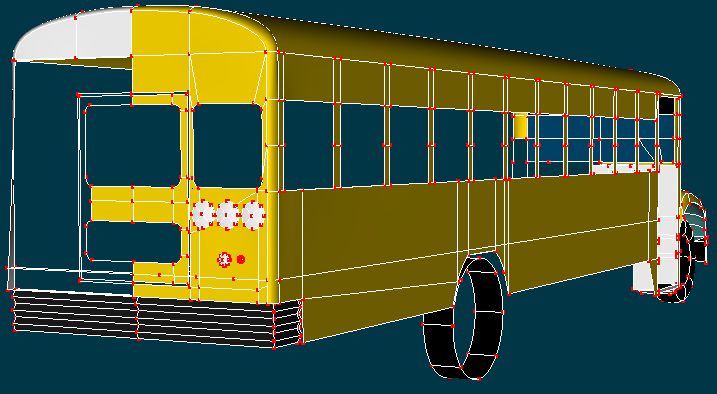
Current Progress: 3382 patches; 8 5-point patches Created windows, seats, and flashers. Expanded width from 7.5' to 8' per spec sheet. TODO: Interior (use PushCPs plugin) Wheels (and maybe more under-carriage) Grille Headlights Copy-flip-attach Entrance doors Driver's seat area and window Emergency door windows, handle Texturing
-
Your contributions and spirit have been greatly appreciated! Rest when you need to, but know we're always glad to see you here when you're up to it.
-
Current progress: 371 patches, 8 5-point patches. I got the floor, stairs, and a lot of the rear section of the bus. Windows and seats are coming up. Probably the wheels after that, then flashers, grille and lights, working towards being able to do a copy-flip-attach. After the CFA, I'll do the entrance doors, driver's seat area and window, emergency door handle. ETA: Oh, yeah, and the inner skin for the bus. Hopefully I'll find the Puzh plugin when I go looking. ETA: Steffen has created the PushCPs plugin which has similar functionality to the Puzh plugin.
-
I've loved watching your progress. I'm just so impressed with your progress. You have had relatively steady progress, your skills have matured over time, your story and vision are great. Seeing what you have accomplished is very inspirational, and inspires me (and I'm sure others think so) to keep at it and dedicate myself to working on my own projects.
-
Quite impressive! And kind of scary!
-
I agree it wouldn't always be of use due to the reason you mention. If you aren't looking edge-on, it probably wouldn't be noticeable. I think in a case like the bus, where for example the windows will all have frames to hide the seams, it wouldn't be noticeable.
-
With the reference links I posted, it seems to be working out pretty well, so I think I'm good.
-
I almost wish groups could have 2 textures; one for the outward-facing normal, and one for the inward-facing normal. For example, I could specify yellow for the outer surface of the bus, and dingy white as the inner surface. This would require separate lighting for each side of the surface; for example, light hitting the outer surface of the bus should not illuminate the inner surface. This would save having to create an outer shell and an inner shell of the same surface. What do you think, crazy idea?
-
Hi, Shelton, I did a bit more digging based on your message. I didn't find any nice diagrams that could be used as rotoscopes, unfortunately. Maybe transit bus companies are better with that kind of information? Most of the school bus pictures were 3/4 views, or close-ups of particular areas. Most photos are not going to be useful for rotoscopes, anyways, since the bus itself is so long; you'd need a far-away shot with telephoto to get a more orthogonal-like view of it. Here's what I'm mainly using for reference: Blue Bird Vision product page. Of particular use is the image that shows "Best In Class Visibility" and "Vision's Angled Hood"; I am using that for a side-view rotoscope of the front section. Of note is that it shows the height of the stairs! That also gave me the floor height within the bus (which happens to be just above the rear tire height). I was amazed at how close I was with eyeballing it previously. Full view of the driver's side. Not useful for a rotoscope, but this shows what the side without the door looks like. Blue Bird Vision data sheet. I really like the view of the driver's area; that will be a tremendous help. The "Tire Size" info (11R22.5 (G)) led me to accurate measurements for the tires. Rear view with emergency door From the Wikipedia School Bus page. This particular picture looks like a bus in the Netherlands. Although not exactly what I'm looking for, it's the closest thing to a rotoscopable image of the rear of the bus. Safety fail view of rear emergency door About 1/2 way down the page. (Notice that the handle is in the down position, so it is probably broken; thus the lock to prevent the door from opening on its own while the bus is in operation instead of getting the door handle fixed.) A 3/4 rear view From AirportShuttleExpress. I modeled the rear bumpers based on this view. A view of the Stairs Not useful for measurements, but good reference for what they look like. Edit additional links: 1950s to 1980s 1990s to today
-
Brilliant! I love the little flashing effect near the end.
-
Hooray! I hope you share some renders or animations when you have something to show.
-
205 patches so far. Making slow but steady progress, thanks to the help from Homeslice and Robcat. I'm working on the steps to figure out what their dimensions should be. That will take a little experimentation and calculation. I've already figured out that the steps were too high to start with. This would all be much simpler if I had an actual bus to take measurements.
-
4-6-4 Steam Locomotive & Tender
mouseman replied to R Reynolds's topic in Work In Progress / Sweatbox
Wow, a very clear example! -
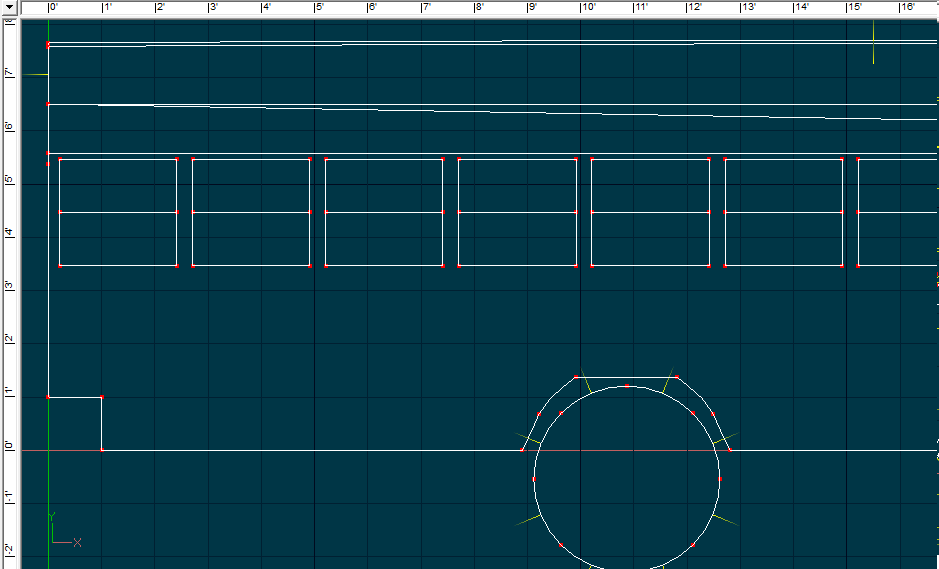
Make one cross-section that's curved right, then you can just extrude that forward as many or as few times as you want to make most of the rest of the roof. Yes, I think that works well when you have a plan for the model, but less well when you have to go back and stitch in new sections. My problem is that I frequently don't know what I don't know, and have to deal with issues when I come across them. I'm sure that will improve in time, though. It's funny, I feel a bit better at modeling people than mechanical things.
-
Separate pieces for the win! Thank you both so much! I'm sorry if it sounded like a dumb question, but I'd rather ask a dumb question than spend a lot of time going down a wrong path. With separate pieces, I can avoid the awkward diagonal lines I had been thinking of and go with e.g. the more appropriate and elegant way shown in HomeSlice's example. This will let me keep clean geometry on the roof (low patch count) but still have the detail needed. Getting the right curvature on the roof requires fiddling with the handles, so I'm just as glad to keep that with a minimal set of patches.
-
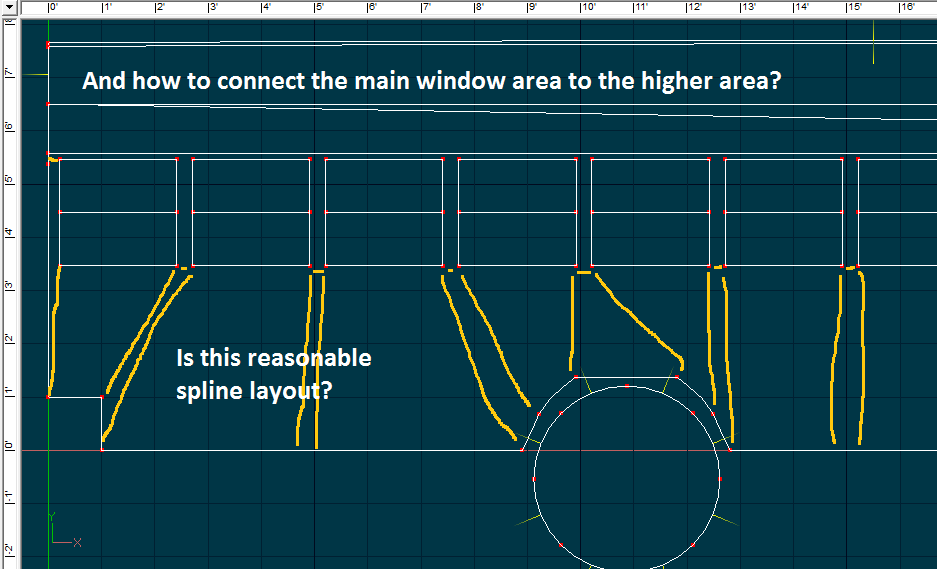
I'm fishing for some advice here. I'm wondering what the best approach is for splining the side of the bus. I have a large area, with somewhat complicated inside pieces (the windows), a complicated bottom due to the wheel well, and then a currently simple top. I have some ideas for dealing with the bottom portion. Are they any good? For the top ... I'm at a loss. I'd rather not add a bunch of geometry on the roof, but I'm not sure there is any other way. Another option might be to have the top of the bus and the bottom of the bus be two physically separate pieces of geometry; however that feels yucky, too. Any suggestions? I'm attaching a template if you want to "draw" on the wireframe as I did above. Thanks in advance. Any ideas would be appreciated.