mouseman
-
Posts
1,182 -
Joined
-
Last visited
-
Days Won
1
Content Type
Profiles
Forums
Events
Everything posted by mouseman
-
It's been a while ... any plans on revisiting this, or using it in production?
-
I just saw this for the first time. Neat stuff! The elbows have a little bit of a problem when bending ... maybe some of the CPs are assigned to the wrong bone?
-
I, too, have had this problem (e.g. when working on my Bus Stop project). I've never used enhanced selection filters, so I don't think that's a factor. I usually have KEY BONE selected, and try to copy and paste by selecting specific bones. I too understood all but one word of what you said. (Native English speaker.) Comment on prior comments: English is a Germanic language.
-
I decided to take my birthday off this year! It was a Sunday. But I ended up working, anyways. Glad yours was so awesome!
-
For the first C: Wow. Unfortunately, I don't have any suggestions for the 2nd C. The only thing that seemed out of place -- the side mirrors really that short height-wise -- checking Google Images revealed that that is accurate. In summary: Incredible!
-
Did a new driver help?
-
The Bird Man Of Alcatraz Robert Stroud
mouseman replied to tbenefi33's topic in Work In Progress / Sweatbox
It looks pretty good so far! You probably won't be able to do a copy/flip/attach since it's so far off center. -
Very exciting stuff. I'll try it out when I get home from vacation.
-
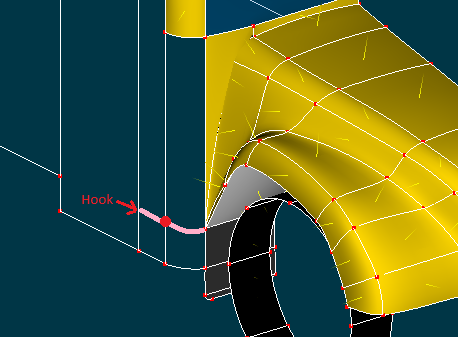
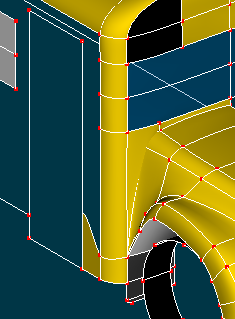
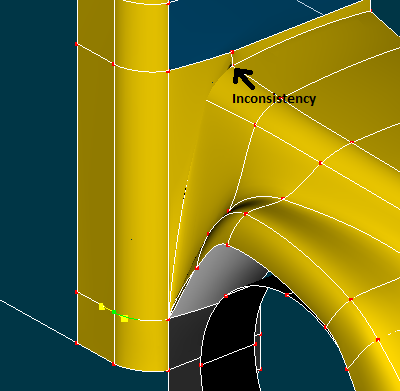
Good pointers! In this case, that didn't do the trick, but that is definitely something I will use! There are places I tried to use hooks, and the geometry went crazy - all over the place. So the next solution (short of creating a three triangles or a triangle and a 4-point patch) was 5-point patch. I think hooks work better where there is a relatively flat or regular area where you are trying to reduce the spline count, i.e. in a cylinder as you get away from the main body and don't need higher spline/patch count for smoother joints (example in TECHREF.pdf pg 54 Hooks). The places that I considered using them on this model were either in a tight area which resulted in the crazy geometry or was on a curve and resulted in too flat a surface where there should have been a curve. Perhaps (or likely) I'm not understanding 100% which places you are meaning. There are 2 5-point patches in the images I posted ... one is the one I mentioned, the other is on the other side of the spline towards the hood area and the windshield. One thing I realized is that the spline that goes from the base of the windshield to down by the mudflap is a single spline. Technically there were not 5 separate splines with those 5 CPs. I broke it, made it a separate spline, then hooked it back together, and I was able to create a 5-point patch (using the hiding trick you mentioned above). The description in the TECHREF "Make Five Point Patch" pg. 266 doesn't specify this limitation, though. That solution works (and maybe will help out in the future), but if you have suggestions for better splineage, I'd love to see/read them. Perhaps I would have been better off with this kind of splineage (see images), that is, if the hook would have attached anywhere near the right place. Or is there something else? I made a 3rd choice that just used more splines. This seems to give a reasonable result after playing with the spline handles a bit, and gets rid of the 5-point patch in question. It's image #3. (I see I have an inconsistency that I will have to fix which is on the other 5-point patch that is in there, but I should be packing now for vacation.) Is this the best solution? I'll probably be skimming the forums while I'm on vacation, but not animating.

-
Thanks! I wonder what is different between you and me that you can do it and I can't. I tried selecting individual points, group selecting, lasso, selecting the same points but on different splines, and so on. Is there some configuration? I have lots of other 5-point patches that worked fine. Why not this one ... for me, at least? Could there be a configuration setting, or is it something I'm doing wrong? It's happened to me a few times in the past. This is a pretty basic and fundamental part of modeling; getting stuck like this really kills productivity, and it's not a reasonable long term solution to send out models to the forum every time I have this issue pop up! Thanks again, and thanks in advance for any ideas anyone has of what is going on.
-
I like the second one (even accounting for the first one being too dark, though can't be 100% sure). I'd suggest you do a little something with the floor texture ... maybe a bump map?
-
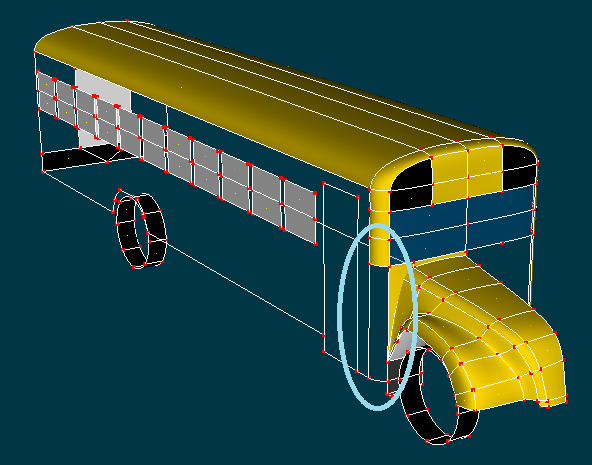
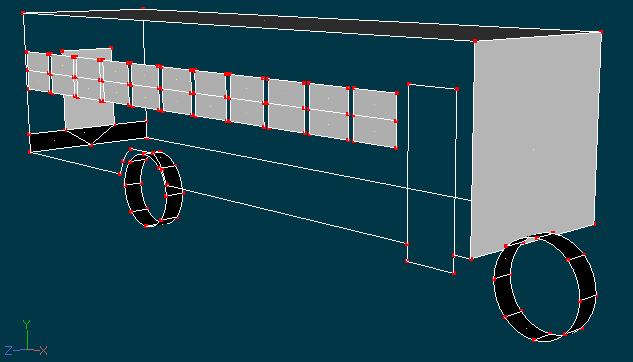
A little more again. There is one 5-point patch that I can't make into a 5-point patch, unfortunately. I've circled it on the screen capture. Any ideas why? I'll also include the model. I'll be away for a week on vacation without my awesome laptop (which is part of the point of getting away), so I won't have further updates for a while. School_Bus_Type_C___problem.zip
-
Out of curiosity, do any forum members use Skype to work together on projects? Or to chat in general with other A:M users? Me: Not yet, but I would be interested.
-
Are you running 64-bit? Is MuHair 32-bit only? P.S. Glad you're back on Cupid's Sick Day after last year's difficulties!
-
I'd love to see him go head-to-head in a match with Will Sutton's latest character!
-
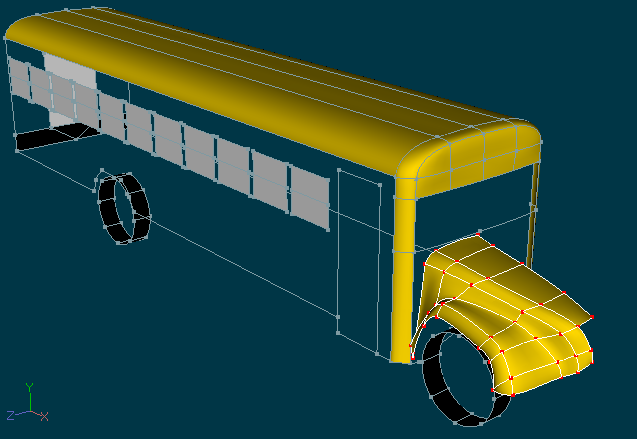
A little more done. I have a little more pixel pushing to do on the hood area to get the right shape before doing a CFA. I'm not sure what the best way to do the grille and the headlights would be. Make room for them in the splineage, or do boolean cutters (which I've never done before)? ETA: Or perhaps use decals.
-
Taking a short break away from the storyboard for a bit. Just getting started on a Type C school bus model. I didn't see any in the contributor's cue, and the bus on the extras DVD was too cartooney. I couldn't find blue-prints or photos suitable for rotoscoping, so I'm just doing it based on specifications and "by eye". Here's some of the research I did: Data Sheet for Blue Bird Vision bus School bus dimensions 11R22.5 tires ~42 inches in diameter, 11 inches wide Apparently Type A and B are smaller buses, typically using the frame of a smaller vehicle such as a van. Type C uses a truck frame (or custom built), usually with the engine in front. Type D is closer to a transit style bus, with a flat front and usually with the engine in the rear. There is even a School Bus Yellow color. Here's what I have so far.
-
I started working on a more detailed storyboard. I'm worried at the same time that I'm going in both too much and too little detail. One thing I've thought of is that I should write down the PURPOSE of each scene. I think this is a great idea, and will help make the story a more concrete and, well, a little more purposeful! For example, the first scene, I've written down "Quickly introduce to the main character. Establish he is a student, pays attention even when he's bored, and looks slightly geeky." The other thing I've been thinking about is writing internal dialogue. While watching some really good movies, I've notice there are many scenes where I could write dialogue for everything the character is thinking, even though they are not saying anything during those times. I don't know whether these choices come from the actor, the director, or script writer. But I'm thinking that maybe some of that should happen up front at script (or storyboard) time. I'm a little worried that I'm over-planning for a short.
-
Here is a ZIP file with the complete set of frames re-rendered.
-
Well timed, Robcat. Thanks for the post!
-
The first one says to me, "I was about to eat this, and now I'm caught in the act ... uh-oh!". The second one says to me, "Oh, this is a very fine cherry! I am so pleased!" I like the first one best for impression, although it may or may not be what you were going for. ETA: But they are both fabulous!
-
I just noticed that I missed out on animating the arms for one of the characters for part of my animation. It took me about 30 minutes to fix. Would you accept an update? (I'm re-rendering now. I think my new laptop might finish by morning, as opposed to my old laptop which took 36 hours, if I recall.)
-
I love seeing your new segments! I was mesmerized the first time I saw the ripples coming out from the hands in the water, that was a really nice touch.
-
Yeah, there's always the "it was great in my head" factor. I saw an interview with Ben Affleck, and he said it was very hard to know whether a movie would be good based on the script. There are so many other factors that contribute to a work being a success. It's hard to come up with a 1-2 minute story that is compelling, so most of it has to be in the acting. And the basic storyboard is not at the acting level of detail. (Maybe it should be? I was thinking the next level of storyboarding would have some of that detail.) I see what you're saying. I was hoping to get a strong sense of "things have changed". Maybe extend scene 6 slightly, with a view of Bill in shock as Rick passes, and nervously (and deferentially) saying "hi"? Or Bill in shock, then laughing uncontrollably, and patting Rick on the back as he passes. Maybe showing that Bill just liked seeing conflicts, and didn't necessarily have a friendship with Dave? What do you think? I think there is some similarity between this story and Warner Brothers' Tree for Two which has a role reversal at the end. (Sorry for the US-centric 6 decade old reference.) Although I'm not doing a pure role reversal, just breaking the role between the antagonist and the protagonist; they are equals. Yes, indeed! Good addition!
-
Thanks for the replies, everyone! The list is actually the outline of my "schedule", a spreadsheet that I keep of time spent. I did that also on Eggs, Potatoes & Bacon (see signature below), and found it very useful. I have a huge list of tasks, but I hope the final product will be short ... 1 to 2 minutes long. I want something that could be done within 1 year. Too late! I created some quick thumbnails for storyboards, which was my first task. And they can't be undone! *laugh* I didn't spend too much time on them ... 2 hours. The drawings are just barely above stick-figure level. I am attaching them. Anyways, if anyone has suggestions, I'd like them. If you have a full critique, I'd especially appreciate that. What do I consider a full critique? Well, going through in detail, first with an overview of the whole thing, and then perhaps a paragraph for each scene. Use the Toastmasters "sandwich" evaluation approach; say what worked well or what you liked; what didn't work well and if possible what you would recommend to do differently; and finally sum up with some additional good points. I'm going to change around the end slightly based on some feedback from a friend. Scene 7 Shot 1 will be split to show 1a and 1b. The new 1b will be a closeup of Rick hearing footsteps behind him, slightly worried. For Shot 2, it should be clear that Dave & Bill leave a wide respectful distance from Rick. I'm a little worried about going over my 1-to-2 minute guideline I mentioned above. Plus there are 3 sets (schoolroom, bus stop, and the area where the repeated actions happen). I guess I won't know for sure until I try to make an animatic with them. (BTW, no, I don't remember where I got the template from.) ETA: I found the template! hitrun_storyboard.zip