-
Posts
1,182 -
Joined
-
Last visited
-
Days Won
1
Content Type
Profiles
Forums
Events
Everything posted by mouseman
-
I had an hour or so on Thursday to do a little more blocking. Here's an update. 1.859KB ChrisDailey_test3.mov
-
I didn't want to wait 20 minutes per frame, so I rendered with quality set to "Shaded". Here's a "Final" mode render, still with the smaller size but with AO and reflections and multi-pass turned off. Did I mention my laptop is 4 years old? ChrisDailey_test2a.mov
-
To start over or not. I guess I'll stick with the original model for this project. Maybe I'll re-rig the 3rd character. Here's a new render test (smaller size) with a little more animation. It's a little more than 1/3 of the action. I started out blocking the animation, which was going okay, with the intent of blocking out the entire animation. Sadly, I'm reverting to straight ahead animating. I'm kind of disappointed that I'm doing that. Maybe it was because of the Great Walk Cycle Fiasco of 2010. Is anyone else going to create a WIP thread? ChrisDailey_test2.mov
-
That sounds tall and skinny! 854x480 I presume.
-
Yep, that's coming. (And then more after that.) It looks like I will need to redo Lucien walking away first.
-
I've mostly animated walks directly in chor actions. It always seems like it's more work than dragging a walk action and setting a few parameters. Then every couple of years (or versions) I'll think "I must have been doing something wrong before" and then try walk cycle actions and eventually give up on them and just go back to doing everything in Chor actions. Thanks for the recommendation! Yes and yes (although it's been a little while for both). Your video and its analysis of the walk cycle is very well done. Too bad the old 2000 rigs don't have the pull up feature on the heel.
-
We have that option... animate the forward moving cycle and jump the model bone forward at the start of every new cycle. Oh, I did not realize. The process is still not clear. Would I have to manually move the bone forward? If so, how could I be guaranteed to get it in the exact right location? Where is this jumping of the model bone done? In a Chor action right below or above the link to the walk cycle? Is there an example or tutorial somewhere that includes both the action and the use of the action in a Choreography? (I have TWO and SO on my HD, if you know of an example there.) This is easy. Set the interpolation of the channel from foot contact to foot lift to be "linear" What do you mean by "wherever you wanted"? There were two aspects to the idea. You might have gotten the first, but I'll just repeat/restate that. I've thought it would be nice instead of copying the first frame of the animation if the system would automatically do a virtual copy-paste. It would be like Conway's game of life, where the borders wrap around. From the user's point of view, it just wraps. This would make incoming interpolations at the beginning match outgoing interpolations at the end. (Of course I have no idea how much work that would be to program.) Now the second part of the idea is that you just animate forward based on a stationary ground, which is more natural. We still need to specify where the ending location is. So for example, if you started off with the left foot forward and the toe of the right foot taking off at 0, the end of the walk cycle should have the left foot forward and the right foot taking off at some position. This position is where the new cycle will have to start, and thus where the model would be moved to. I was basically thinking that this final frame could be "wherever you wanted" - in both space and time. This is important because I never quite know how long the walk cycle will be ... 1:15? 2:02? And I don't know where it will be ... Z = 95cm? 172cm? I hope that is more clear. I'll disagree with that. There's about 10 basic ways ( and a zillion variations ) for a computer to interpolate motion between two keyframes; in a walk (and in all character animation) the "way" that needs to be used is different for each pair of keyframes. There's no way for A:M ( or Maya or Softimage or 3DS or any other app) to know what choice to make. A:M only knows it's moving bones around. YOU are the one who knows those bones represent human body parts and you need to make those interpolation choices for A:M. My statement was too broad -- sorry about that. I was not trying to make a general statement about all interpolation and inbetweens. The interpolation I was talking about was the rate that the ground moves under the character within a treadmill-style walk cycle. Being human, I have a very hard time getting my character's foot to go at a constant rate on the treadmill so the foot appears to be stationary in the choreography. This is the specific movement computation that I was trying to indicate that the computer could compute much better than humans. The problem is that the theoretically simple operation of keeping a foot planted on the ground is tremendously difficult for a human in the treadmill style of walk cycle. It is much easier for a human being to deal with a fixed point of reference than try to get bones to match up with some rate of floor moving beneath the character. What is even harder is that I am always changing the length (thus the rate) when making a walk cycle, so all of the rate-based assumptions I originally made have to be re-computed. I agree with all of the other stuff you mentioned about interpolation.
-
I had some time, so I decided to at least start. Hopefully I will be able to finish! My storyline will pay homage to the prologue of "Infinity Hold" by Barry Longyear. So far I'm using the Lucien and Boris models from the Extras DVD; there will be a third character. I've also created a local copy of the Resolute Walk, which I will need to tweak a little for these models. I'm attaching my first render test with rough (blocking, mostly with holds on keyframes) animation. It is only about 1/3 done. I'm liking the initial timing, but I'll need to improve the timing just after the contact between these two characters. I'm having problems with the transition between the animation in a choreography action to the walk cycle that immediately follows. My model's bones have migrated away from his main model bone, and I can't figure out a way of transitioning to the walk cycle without having him mysteriously move around on the scene during the transition! Is there a tutorial somewhere? (Once I have the initial blocking done, I'll ask for critiques.) ChrisD_BusStop.zip ChrisDailey_test1.mov
-
Are we to post the WIPs for this project in this forum?
-
Kat, I know I've said this before, but I couldn't help say it again. I love following your progress on this project!
-
(Sorry to Paul for getting a little off-topic on his post.) I wish there were an option for walk cycles to be made with motion forward instead of treadmill style. With treadmill style, you have to magically pick a cycle length that matches the speed and getting feet to move at a constant rate on the treadmill is extremely difficult! The trick of using stride length never really works for me. If there were a motion-forward variant, with the last frame of the walk cycle enforced to be the same as the first, and you could move it to wherever you wanted, that would be FABULOUS! Such a time-saver. Plus it would make beginners have a far easier time to get really good results. Animation:Master can compute the movement much better than any human being could. And any flaw (such as a popping knee common with IK) in the animation becomes even more noticeable. I think I noticed a few walk cycles in the first Shrek movie.
-
It looks like frappr.com is no more. Still hoping to find someone in Edmonton!
-
It's traditional to make New Years resolutions around this time of year (or perhaps sooner). So I want to know ... What do you plan on working on with Animation:Master in 2010? What do you want to accomplish with A:M this year? If you specify a big project ("I want to make a 5 minute animation"), break it down into chunks (write a script, design characters, model characters, rig characters, model sets and props, record voices and sound effects, blocking animation, etc.). One problem with New Years resolutions is not dedicating the time. So how much time do you plan on spending on Animation:Master?
-
Bump. Anyone in Edmonton?
-
I tried to summarize this information on http://wiki.hash.com/index.php/Howto_Set. ETA: As is the nature of a wiki, feel free to add to it.
-
Keep it up! Can't wait to see what's next!
-
Very exciting, Kat! I love following your progress!
-
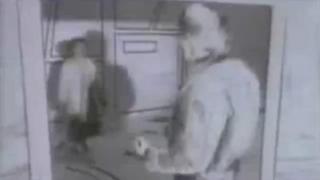
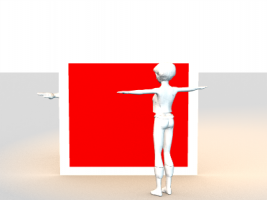
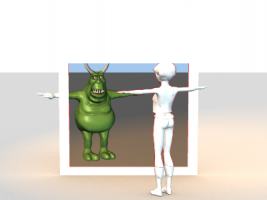
Thanks for trying to make sense of my gibberish! I guess I was describing something more complicated than what was in the video. I think if I describe what was in the video, that would be a lot simpler. (By the way, this is not an official project for anything, just playing around. Don't waste a bunch of time if it's hard.) What I was looking for is close to what you displayed, but is a little different. Basically the "Take On Me" video has a hand-animated world, but there are a few places in the world that have a window that shows the exact same objects and people as live action. If a person walks on the other side of the window, they are viewed as live action; if they stick their head over to look around the window, their head is again animated (and the portion of them still behind the window is live action). A poor quality screen shot is attached. I was thinking that this kind of effect could be achieved with a composite of two layers (or rotoscopes, sorry I'm using the terminology loosely here) displaying effectively the same animation, just rendered differently. The back layer would be the live action (which I would simulate with regular old A:M 3-D). The front layer would be the animated version (I was thinking of using a variation on the front-projected white-out trick earlier in this post). The front layer would in some places have a window in it that would allow the back layer to show through. Here I've specified it in Red. The end result would hopefully look like this image for which I used The GIMP to combine the first two. [ETA: Changed red to transparent, then just let it show through to the BG layer.] Ideally I could do it right in A:M. First render the front with AO and the alpha channel as the front layer. Then use that as a rotoscope over the real rendered piece, which would show through the window. The missing piece for the front layer is modeling this "magic" window so it renders as the alpha channel. I hope that's more clear. I tried thinking of a way of just using an animated texture from a previous render, but I think that wouldn't work because it has to be based on the camera angle, and would be overly distorted. I'll attach the project, too, in case that helps. It uses the white image I posted earlier, plus 2 models from the Extras DVD. It's only one choreography that I changed by hand, unfortunately. TakeOnMeTest.zip
-
Is there a way to make a surface alpha colored? For example, if I want to create an animation with a window that shows something behind it that is composted in, but have objects come through the window that are cut off behind the pane of the window?
-
I just had a thought. Remember that old 80s music video "Take On Me" with the combination live action and hand-drawn animation worlds? It would be kind of neat to do a rendered world (maybe toon rendered?) and white AO world. Maybe you could have the front projection rotoscope be an animation, with random scribbles going through it. It would probably require some heavy video editing.
-
[...] instead of choosing global ambiance tpe = global color = white, choose global ambiance type = image based lighting Aha, beautiful description! Now I understand what you wrote originally! (Sorry to make you re-explain it.) Your image example is worth 1000 words, as well.
-
I think there was nothing called a "Relationship" in V8. Now poses and pose sliders and maybe a few other concepts from V8 are all a type of relationship.
-
Yes, indeed, that did it! Thank you, Nancy! You are fabulous! Here is mine with lights disabled, white rotoscope on the camera, both AI and AO at 80%. I'm done for the night, but next step is to get some shadows on the ground floor. (ETA: And why not, here's the white that I used for the camera rotoscope.) AO_Test.prj
-
Changed the camera background to white. I did not have Ambience set to 100% in the Camera, so I changed that. Not a whole lot of difference. I'm not sure what Nancy meant by IBL in her post. Regardless, the color is still sticking to the model. ETA: Trying Nancy's suggestions now ... AO_Test.prj


