Eric2575
-
Posts
2,615 -
Joined
-
Last visited
Content Type
Profiles
Forums
Events
Everything posted by Eric2575
-
Very nice. I looked at my flashlight and the finish seems a bit more reflective. On that note, why don't you add a reflectivity map to the surface to fake reflections? Is this just a modeling excercise or part of a larger plan?
-
Shouldn't the splash convey something about what's inside or something about the company? I have no idea what that web site is about. Kinda reminds me of something you might find at a match making site, I guess it's the red circle that suggests a heart.
-
Thanks Rodney. I'm not sure that I did anything different that before, but saving the model through the modeling window did the trick this time. Must have been some kind of update issue.
-
AM lets you make a thumbnail out of any image on the screen. I did that for my model, but don't know where AM stores the BMP file so I can follow your steps.
-
I created a simple model and hit the create icon button. Then I saved the model and the project with embedd on. Now I wanted to save the model to the library with the icon as the preview image. I created a shortcut in the library pane and now could see my model in the library, but only with the default Hash guy preview image. How do I substitute the preview image I created in AM with the default image?
-
I hope it will be a bit bigger?
-
See pic. Very nice work, nice progression. I know yo said you are going for a less muscular look, but now he seems somewhat thick? And for God's sake, put some feet on the poor guy. Can't stand to see him hobbeling along on those stumps.

-
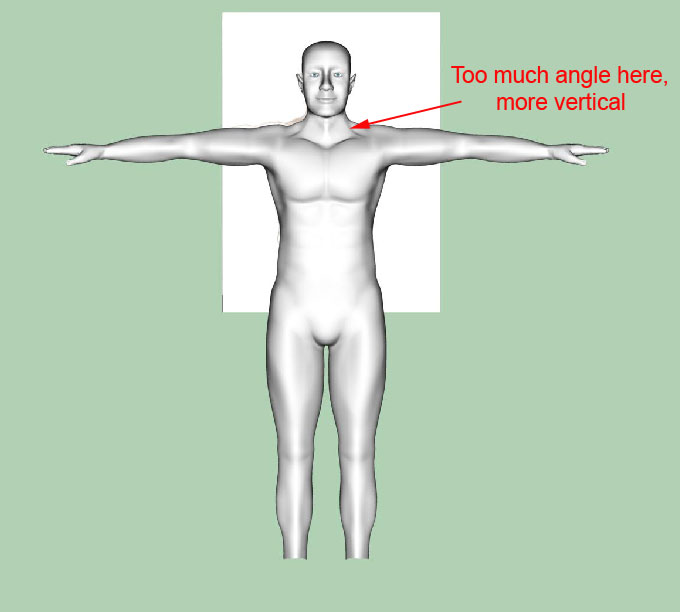
Is the neck long enough?
-
It's ok, I guess... But really, why don't you fess up and stop posting pictures of the real thing here Seriously now, you are my modeling hero
-
Ok, Dan, just calm down and relax I've been really busy with the TWO project, doing some video work for my Uncle and trying to put some high-res images together for Hash. The Saleen is actually one of them. I'm not going to post anymore picks of it until I get it all detailed out and submitted to Hash for the image request. Hope you can wait till then. Burnin the midnight oil... Eric
-
I know what you're talking about with the "feel" issue. When I get to that point, I know that I have been working on the project too much and have lost the inner eye (for lack of better term.) When that happens, I stop on the project, not out of frustration, but to regain my perspective. I stay away from AM altogether for a bit and I will think about the project/model off and on. Usually something forms in my mind as to what I want to accomplish with it and how I would need to go about it. Btw, let's rename this thread AM Psychology 101 Just relax, It'll come to you. Cheers Eric
-
I had already done the excercise a while back but did not like the lack of detail in the excercise. As all of you who have done the excercise know, the rotos supplied do not match in their dimensions. Sure they are decent references, but I wanted something a bit more accurate. So here is my attempt at a little more accuracy. Just to clarify, this is a WIP.
-
Dan, I just started with a new chor and applied the settings you gave. Hurray, it works now! I think my falloff was too low. Not sure and don't care, just glad to have the rig working again. Thanks again... Eric
-
When you say "not good enough", what do you mean? If you've done all the tuts in the book, you've got to have a decent feel for AM, no? Maybe you're being too harsh on yourself? Zaryin is right, you've got to start small, but it has to be something you're interested in. Do you lean toward cartoons, people, mechanical modeling, what? I remember you've posted something similar a while back. What exactly is giving you these misgivings (sorry, couldn't help myself?) You say you start a project, but never finish. So, why don't you set yourself a little challenge? Start a WIP post and tell us what you're going to model. Give a few specifics, so we can get an idea of what to expect. Then post as you progress and don't give up no matter what. No matter how it turns out, don't quit. Don't think of it as having to be something perfect, but rather as a reflection of your effort. You ready to challenge yourself? And by the way, an upgrade of the software is not going to make you finish a project or make a better model. Cheers Eric
-
Dan, are there any other light sources in your chor? Are the default fill, rim and key lights on? The reason I ask is because when I set up my chor with just a skylight rig(25) with an intensity of 8% at the height and scale you have, I get a result that's so dark you can just barely see the outline of the model. I had to crank up the skylights intensity to 200% in order to get a decent render.
-
Nancy, you've just made my day, no wait, my week...no, come to think of it, I've asked about this before last year, early in the year. You've just made my year! If we ever meet at a Hash shindig, the first round's on me . Your method worked great. I had a little bit of trouble getting the top of the decal to be on top of the model, but I eventually got it. It was just a matter of visualizing how everything fit together. This little excercise also showed me that you only need to line the model up on the x and z, not necessarily on the y. If you're on the x and z, you can just as easily move the decal up in the front view. Wow, I'm really stoked. Now I can finally decal my models the way it's supposed to be done. Nancy, if you don't mind, I'm gonna write a wink on this. I've seen many posts that ask about this. Off course, you'll get the credit for clueing me in To get a good understanding, though, I'm still gonna do the excercise Roger recommended. Roger, you are right also, the basics are the foundation and need to be mastered. Thank you all very much. This is great!
-
Ok, I'll try that Nancy. Will get back in a bit.
-
I will certainly do the basic excercise you describe Roger. We'll see what happens. Nancy, I tried that too, but was unable to call a decal from the pose window. I tried right clicking in the window and I tried right clicking in the PWS on the relationship section. It did not give me the option of "new - decal". Before you reply, let me try again and I'll get back to y'all Eric
-
Each decal in the PWS has a translate setting for x and y values. I assume these are to somehow translate the decal position to where you want the decal to be, correct? The conditions for applying a decal in cylindrical fashion are: 1. Have the model on the x-0, y-0 axis. 2. Be in the front view 3. Have the model in the upright position This is great if you are modeling a coke can, but what if you are modeling a plane for example. In this case, none of the conditions for applying a cylindrical decal can be met. The body (tube)of the plane will not be on the x-0, y-0 axis, the body (tube) will be facing the side view, and the body certaily will not be in the upright position. This is what I am doing - I select the body of the plane from the top view (my decal is centered on the top) and use the turn manipulator to orient the fuselage to the vertical (this is easily done by holding down the ctrl key after hitting the turn manipulator.) From this view I then turn the pivot manipulators so the x and y axis line up like they would in a front view. I then apply the decal in cylindrical fashion. In shaded mode(not rendered) I see the decal on the model, but totally skewed. When I do a quick render, the decal doesn't show up at all. When I go into the PWS and change the translate coordinates of the decal to the coordinates of the model, nothing happens. I render and still get nothing. I am beginning to believe this can't be done and the translate coordinates in the PWS under the decals are just there to tease us
-
Dan, thanks for the ligth setup post. What intensity does the light for the rig have? Since the rig is so large compared to the model, the intensity must be pretty high? When I first import the light, the default is 7% for me.
-
Keep it up
-
Sorry guys, but I'm not up to date on this. When did this displacement feature first appear? Sound like something I could use on my T-rex.
-
Dan, would you take a snapshot of your chor lighting setup and post it? I've been having some trouble with the lighting on my attempts. Thanks
-
I followed the method Seven posted and it worked great. Since I haven't applied the decals to the plane yet, I'm going to wait before posting a pic. I'll have it by this weekend. Eric
-
John, could you post the proj file for this? I would like to use it for the FW190 and my Saleen.