Eric2575
-
Posts
2,615 -
Joined
-
Last visited
Content Type
Profiles
Forums
Events
Everything posted by Eric2575
-
Very, very knife...jeez, dont' flame me, I couldn't help myself...ahem, I mean nice, yes, very, very nice. Thanks for the link, Matt. I'll check it out and convert to the power
-
Nice effect, but a tad bit busy. A guy wielding that sword could use it to hypnotize someone if they look at it long enough.
-
Normal mapping...The power of nor....mal mapping??? Tell me more bout normal mapping? I do want to convert. Don't want to be known as using "cheap" methods You're right about the bubbling rust, but you mentioned that it was taken care of through the years. When I've cleaned the rust off of an object that I haven't used in a long time, I find that the areas that I've cleaned the rust off of, are pitted, hehe
-
No problemo, Dan. Pitting - incorporate small nicks and dents into the model via bump maps. A rusty surface eats into the metal, creating small pits. Are you using decals to make the rusty spots? If so, you can add that same decal as a bump map right over the same spot to create a little depth (pits). Also, if you look at almost any knife, you will usually see rust and crud collect where the blade meets the handle. Your knife is spotless right there.
-
Hey Dan: This is off the top of my head as I look at your last render. In that particular render, the blade actually looks like stone. I don't have an old piece of wheathered metal in front of me, but this doesn't look right. If the blade is really old and already has rust on it, I would suggest some pitting, especially where the rust is eating into it. For an old blade, the tip is way too pointy. Use and age should have dulled the tip a bit (I know you said it was well kept, but). I would also suggest a bit more lighting on the interesting handle, it's getting lost in the dim scene. Apply a bump and diffuse on the handle to give it more detail and depth. One last thing: Lay down a similar knife on a surface and you will see that the tip will make contact with the surface unless the handle is made out of lead - balance. In your render, the tip is obviously floating over the surface as evidenced by the shadow. Ok, I've spoken my piece. .....Wait, one last to last thing: The midpoint of the blades cutting edge has some kind of crease. Is that modeled that way on purpose? If so, that's fine. Just wondering. Hope I didn't rant too much...later
-
I'm gonna redo the treads from scratch sometime, and who knows, if they come out better than these, I may do a Wink on the steps. Thanks Stian, thanks Ken...will keep ya updated.
-
You got the one item on the tire that I thought I could let slip The tread in the middle is a bump and diffuse decal that was my first attempt for that purpose. I think the black and white hues aren't optimal and so they didn't convey the depth I was after. Good eyes. But then again, you are the master. Still working hard on the body smoothness. there are some wicked corners and intersections of the body panels that are being stubborn. Some of the mesh is being reworked.
-
When you say anchoring cp's, do you mean hooks?
-
Part of my Saleen S7 model

-
The model looks great, let's see a wireframe.
-
My security settings do not allow ActiveX controls to run. Can you post your movie some other way?
-
Brilliant!
-
Even an old object should have some specular highlights, right?
-
Looks great Dan! More renders, drool, drool!
-
Xtaz, searched through the forum and came back to your great motorcycle guy. I was looking for chrome and headlight info. Your chrome looks awesome, how did you do it?
-
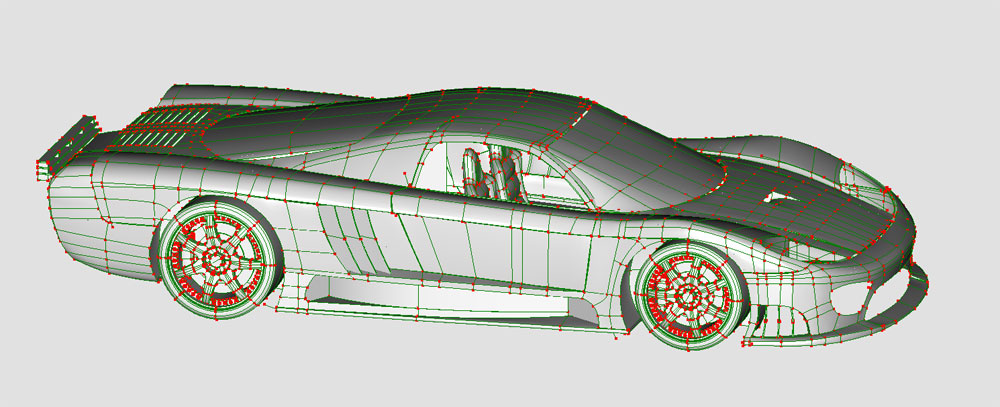
Wireframe so far
-
The frustrating part is: I am using Colin's paint and reflectivity materials. I did a render in a stock chor without skylight rig and the paint and reflectivity showed up real well. I wanted to use a skylight rig because I saw so many cool renders with them. Dan, do you mean to say that I should put a sun into the chor besides the skylight rig? If so, I'll try that. And yes, please give me any insight into applying Colin's paint. Obviously I'm missing something. Matt, are all of the colors we get in the swatch pallette solid colors? If so, will it not be a solid color if I only change the color value by one? Anyways, gonna do some more test renders with your suggestions. Thanks
-
Used Yves skylight (20) for these shots. The white render came out pretty good. The colored render came out like candy and flat. I didn't change any of the settings from the first shot to the second and thought I would get a very nice render, but I'm not very happy with the flat candy color. Is a skylight setup not really the right for photorealistic outside shots, or do I need to change some settings? Btw, the model is still in progress, just some test renders. Uh, sorry, will post a wireframe later today, gotta get to work right now.
-
Tha walls are also way too smooth, they need some cracks or stonework or something to make them look like they belong on the inside of a old musty tower.
-
What the heck? Is that a double spline running down the center of the car??
-
HiYa Dan: I gotta agree with the rest of the comments here, you did a SUPER job on getting the splines to lay flat!! If my car can be half that smooth, I'll be really happy. Great job. Btw, since a paint job for your car is relatively cheap, try a deep pearlescent purple. I saw an AC Cobra with that pain, and it was awesome. Wait, let me check if I have the pic on file....Yeah, but the pic doesn't due the paint job justice. Oh, yeah, WIREFRAME:-)
-
The floor is buggin me. Not sure why.
-
Yup, straight to hell. I was expecting for a burgler to hop over the wall and get sliced in half. What a letdown ps The grass reminds me of Eon Flux
-
Shouldn't the attack come from his fangs? Have the two arms come down, like he/she has trapped it's prey and then give his head/Fangs a quick arcing forward thrust, like he is biting into his/her/its' victim. Great spider. Since it's a mech, have the spider implant a tiny electronic tracking device or whatever else may come to mind.
-
Boy, that Coke bottle shure looks good. Too bad you didn't leave any soda for me That's a great tip too. Anything that reduces render time is worth Brownie points. Now the question is: "Got Milk?"