Eric2575
-
Posts
2,615 -
Joined
-
Last visited
Content Type
Profiles
Forums
Events
Everything posted by Eric2575
-
That's a great start!
-
Using Actions per Nancy blinking light Sorry, I'll get that link working in a sec - fixed! Anyone know of a FREE web space provider that has more than 10 GB of storage?
-
Thank you Luuk, I will also give this a try. What resource did you use to learn about expressions?
-
I'll try that out right now. Thank you Nancy!
-
I thought if I used an expression, I wouldn't have to worry about keying all those frames and manually updating the on/off properties? It doesn't matter if it's an expression or not, just the most economic way to turn properties on/off over a given length of time. Wouldn't the use of an action also require manual updating of all the settings? I wanted to automate that if possible.
-
As it stands, I added 10 key frames to a clip, one every second, and alternated 0 and 100% for the ambiance settings of a model bulb. Setting the interpolation to "hold" gave the quick blink. Clumsy, but it works. Never having used expressions before, could someone give me an idea of how to do this over a 10 second clip? This would be more elegant than keyframing, especially if I wanted to do this for a longer clip. Thanks
-
I'd like a crack at that car too if you don't mind.
-
Economy of splines in every facet...um, wait, I've done the impossible,,,detected a surplus, a waste of splines in Stian's work???? Yes, there it is...the tires....egads, the tires and rims are bursting with superfluous splines.... Seriously, love your work!!!! Awesome!!!! Eric p.s. How did you make the smoke around the Bismark?
-
The jiggle problem had me thinking about this all day, so I examined the tgas' frame by frame, all 280 of them. So what do you know, the jiggles were caused by frames being out of sync. This happened when I tried to import the TGAs back into AM. Selecting all 280 frames was too much for AM, it flat out refused to let me do it and told me so in a short message - too many files at once! So then I grabbed about 50 at a time and this seemd to work. After importing all 280 this way, I thought I was set, only to have the jigglies. Well, after repeating the steps, I found that AM takes the last frame of any given set and jumps it in order to the top. Say you are importing frames 1-37, well in my case, all frames import, but frame #37 gets placed at the top of the heap before frame #1. This happened every time I grabbed a set of 50. So after everything was imported, every 50th frame was pushed to the top of the stack resulting in a missed frame every 50 frames - jiggle. After manually putting them back in order, I had a relatively smooth animation. Now I am working on compositing a scrolling starfield together with Challenger to make it really shine. Glad you like it Mr. C
-
Yup, already ran into that problem and corrected it. Premiere wants to have three digit sequential numbers in the tga's. Photoshop's browser has a nifty batch rename feature that took care of this. I haven't played around with the file today because we have too much to do to prepare for a big party this weekend - lotsa friends and relatives coming over prior to a wedding this weekend. Once all the hoopla is over, I want to get this figured out - a 14 hour render to TGAs should not be wasted.
-
Mike: I don't have quicktime pro, but I do have access to Adobe Premiere. I just don't have any experience with it. Still experimenting. draagn: Booleons worked fine for me in toon render, see attached. ruscular: I rendered the sequence out to TGA at 1280 x 720. Now I am trying to compress it to either an avi or mov file for viewing. The trouble I'm having is that when I import into Adobe Premiere, the movie skips back and forth upon replay. I'm not sure what's going on. The AM movie rendered fine, but the file is too big. 143 MB for about 9 seconds worth of footage is rather large, isn't it? Does anyone know the steps to converting an AM TGA sequence to a movie file that is playable on a DVD so it can be viewed on a big screen TV?

-
Try a search on compositing or bluescreen.m
-
Julian: I forgot all about Ignore Fog - you were right! Thanks for the reminder. Cheers Eric
-
Hi all: I am resurrecting an old model, Disney's Nautilus, and am having a strange thing happen. When I try to render the submarine with fog, the fog does not show up in the final render. To compare, I rendered a whale and it came out fine, fog n' all. The attached pic shows both models, the Nautilus and the whale positioned in the same space in the chor to show you what I mean. As you can see, the whale's back end is shrouded in the fog as intended, but the Nautilus's stern is rendering like there is no fog applied. Mind you, this is not two renders superimposed, this is one render with fog and two models in the same general area. Why and how does the Nautilus model ignore the fog? It must be the model, since the fog renders fine on the whale.
-
I rendered it all default AM AVI. Nothing special. The Ship was actually something I just started a month before the contest. I didn't intend to enter, but since I was pleased with the result, I entered it. Having finished a 14 hour tga sequence for a better flyby, I am somewhat stumped at going any further with it. I have access to After Effects and Premiere, but am unable to get a good looking video out of the sequence. I import the tga's and try to play them back, but the frames seem to skip forward and then back a few frames over and over. The result is less than pleasing. I am not that familiar with both programs, but it seems the approach should work. I wanted DVD quality and size, just to see what it would look like on a HDTV. I did import the frames back into AM and rendered an AVI out, but the size is 143.6 MB. Oh, the AM rendered quicktime movie shows the lensflare at the end, but when I import into After Effects or Premiere, no lens flare.
-
Lance Walker
-
Very impressive skills you've got there. Someone further up in the post asked about the eyes? What are your basic steps (or detailed, if you are so inclined) to get them to look as real as they do? m
-
Thank you for the encouragement John. So far this has been a hair raising experience - geez, I crack myself up. In any case, whatever comes out of this will be my next contest entry!
-
Tanner: I just hear about muhHair from your hair post. Read just a blurb about it - a new shader AM has in V.13. Since it is a shader, I'm gonna set up my hair the way I want and then I'll try and render with the shader. This is my first stab at learning hair. Always something new to learn in AM!
-
Tanner: I got the answer: Go to the hair material and select hair emitter. On the properties pane for the hair emitter select hair direction and enter 0%. Us hair guys gotta stick together, ha ha!
-
Hey Tanner: if we both yell loud enough, maybe someone will hear our cries of grooming agony? What really gets me is the fact that the model imports into a new project nicely groomed in the modeling window, but is a mess once pulled into a new chor. Come on guys, surely this has happened to some of you old pros before? What are we missing here? I can't afford to take my model to Beverly Hills to get her hair done, so how's about an answer here??
-
I understand dynamic options to be used when you want gravity, mass, drag, forces, etc to be part of the mix. I want that, so I have dynamic options set on. It is also my understanding that pre-roll allows one to see the hair the way it would look after all those dynamics have been applied. If you have dynamics turned on but don't have a pre-roll value, then you would not see the effect. In any case, just to eliminate preroll and dynamics from the occasion, I turned them both off/0 and still have no updated groomed model in the chor. I even started a new project file and imported the groomed model only to find that it too does not show the hair to be groomed in the chor window. Any other ideas?
-
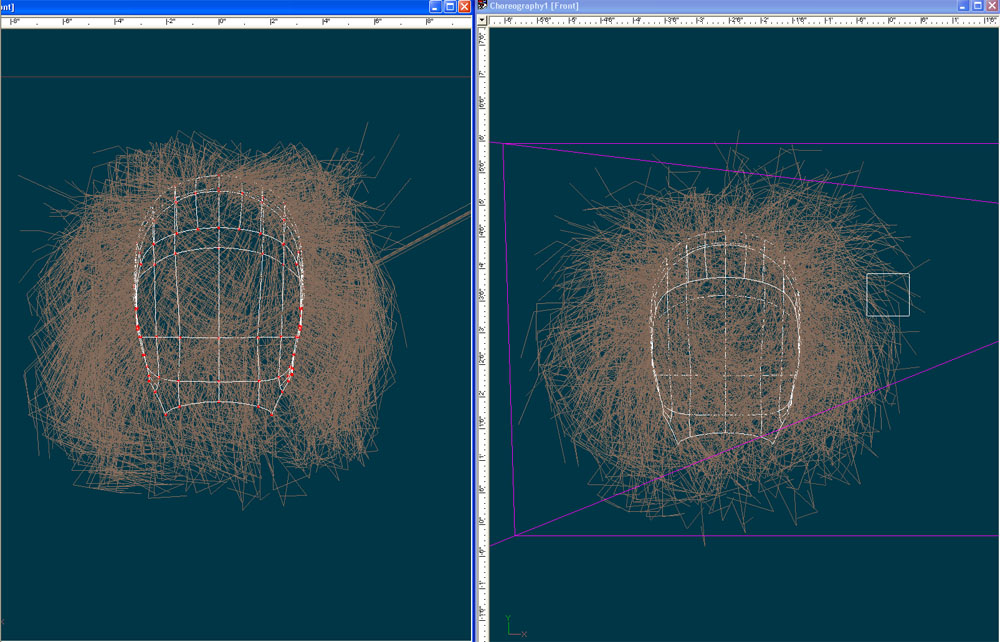
It's not the pre roll, I set that at 3:00. Closing the chor and re-opening it doesn't work either, nor does it update if I close AM completely and re-start. Below is a comparison between the modeling window and the chor. This is after I closed AM and re-opened the project file. I know it's a little hard to tell that I did any grooming, but you can still tell that the hair is not the same in both windows.
-
While working on a new WIP, I started playing around with hair. In the modeling window I groomed the hair just like I wanted only to discover that the grooming does not translate into the chor. In the chor the model looks just like it did before I groomed it. I have to mention that the model was already in the chor before I groomed it in the modeling window. I say this because I just did an experiment where I made a new chor and imported the groomed model into the new chor. This time the grooming transferred into the chor. I would have thought that hitting the spacebar would update the model with the grooming intact, but it doesn't. Is there another way to update grooming done in the model window? Should grooming be done in the model window or the chor? It seems it should be done in the modeling window so the groomed model can be imported into other scenes with hair intact.
-
The answer depends on what you are trying to achieve. In your example, I am going to assume you want the decal to cover the whole patch with just one image of the caterpillar? If so, then you should just hold down the shift key as you are positioning the decal until you resize the decal to fit entirely over the patch. Once positioned, hit apply and you should have just the one decal showing - make sure repeats is set to 1x1. I have always done it this way and have never actually used repeat. If you want a decal to repeat, you must use a seamless decal. AM will not automatically make a seamless decal out of one that isn't seamless to begin with. Your caterpillar image is definitely not seamless. Do a search on the forum or the web on how to make seamless decals. Bitmap plus is a plugin that Marcel made (hope I recalled that right) that does wonders with repeating decals. Hope that helps.