heyvern
-
Posts
5,210 -
Joined
-
Last visited
-
Days Won
4
Content Type
Profiles
Forums
Events
Everything posted by heyvern
-
Yeehaaa! Reminds me of the "Red Green Show". -vern
-
Don't insult the Applesauce. Applesauce can be quite intelligent. I was playing chess with a jar of Applesauce the other night. It did not win of course but it did hold its own for a short while. After I won we discussed the economy and possible solutions. I then sprinkled some cinnamon on it and had a nice snack. -vern
-
I plan to document all my big AM projects from now on. Do a "blog" kind of thing. It's a fantastic way to have the history of it. It isn't that much extra work even if you don't render and upload something and just write down what you did or a new discovery. I've already gone back a few times to my OWN documentation because I wasn't sure how I did something. -vern
-
It may be easier to use the image sequence as a layer in the chor rather than a camera rotoscope. I like this technique because I can see the image layer in any view and not just the camera view. Although this can create issues with perspective distorting the image layer. -vern
-
Me too! I really liked that animation! I tried to do the same thing as I went along with my project. If I forget what I learned it's all there so even I can go back and refresh my memory. I also found that documenting your own work makes your brain see it in a different way. I often think of new things I wouldn't have without writing it down... -vern
-
Sorry for missing anyone in the past. I don't actually hang out on that forum. I like staying "home" and hanging out with people I know. -vern
-
Oh my god! An amazing, mind blowing animated short... winning awards... created using Animation:Master... On the front page of CGTalk... is that... kind of... like a vindication? A "go get stuffed" to the the people who have attacked AM in the past? Or is it just me? It seems to me now that anyone who would say one tiny word in the negative about AM on any other forum won't have much room to talk after this. The proof is in the pudding. There is no argument. There is no more discussion about what AM is capable of. Ah... a sigh of contentment. Put all those naysayers in their place. Dusan you make all of us proud. You elevate the whole AM community through your success. You have not only done what so many of us strive for when we bought AM but you have earned the critical acclaim and awards as well. I finally watched the trailer and would put it on the same level or even beyond any "big budget" studio production. It's breathtaking and if the whole animation is as good (I have no doubts) it is deserving of every award and all the praise it receives. WoooHooo! -vern
-
To be sure open the file in "notepad" or some simple text editor. You will have to right click and choose "open with..." and choose an application. If the file is "blank" there's nothing to save. If however there is something in there... who knows what might be salvageable. -vern
-
I googled "Chicory and Coffee Animation". Anything I could read anywhere about it is positively GLOWING. People are going through the roof over this apparently. I can't WAIT to see this. Is getting one of those "private showing invitations" on youtube going to be like finding the golden ticket in a Willy Wonka chocolate bar? I hope there is an opportunity to see it. I never get to see cool stuff like this in my area... without driving really far and I hate to travel... that is why I watch movies. Ever since seeing the first rendered stills of this, I knew this thing was going to blow peoples socks clean off their feet. -vern
-
Don't forget what Pixar did with the ant legs in "Bugs Life". Those other guys went more realistic with "Ants" which I felt made the characters look more "alien" and less "friendly"... although imagining Stalone and Woody Allen with 6 legs was not much of a stretch. -vern
-

All Rim Lights NOT created equal...
heyvern replied to Kelley's topic in Work In Progress / Sweatbox
Make certain you don't have "stray keys" on one of the shortcuts in the chor. I've done that a bunch of times. Thought two things were identical... there was a keyed value off somewhere or on frame zero. Wild guess. -vern -
I don't know... I thought he might have been covered in ice and stuffed in a big freezer in someone's backyard. Squetch rig on Kong? Yeehaaa! It gives one a whole new perspective on how that famous last scene of him falling off the Empire State building might look... Wiley "Kong" Coyote... -vern
-
This is what I was talking about. I won't speak for anyone else, but I feel that if you could provide more specific details on what you need to know it might help us help you better. The descriptions of the basics of using actions and the choreography, as mentioned previously, are covered in the tutorials, and the tech reference. If you review those topics you are having trouble with it might shed some light on the basic concepts mentioned in some of the answers. Please provide screenshots as well. Or files. A picture is worth a thousand words. -vern
-
I agree... way too little information. As has been true for most of your questions you appear to be more angry and frustrated rather than trying to provide as much info as possible to find the solution. Your questions sound like "Why won't this darn thing work right?". We can't read minds. "why won't this work?" is useless as information to help you. try to explain in agonizing detail what you did, what you expected to happen and the result. The more detailed information you give us upfront without having to ask for it, the faster and more thorough our answers will be. This is just simple advice for a new user to get the most out of the people here who can help. Often if the question or problem is described well in the first post you can get an answer very quickly. Lots of details. Words are cheap. -vern
-
Make sure there isn't some setting to set or button to push FIRST to make the prnt scrn work. Laptops can be strange beasts. Also make sure your keyboard actually HAS a prnt scrn button. I have an XP box with a shared keyboard for the Mac. It's a Mac keyboard so I'm sure that's part of the problem. Even though the "prnt scrn" is theoretically "there" on the keyboard, as in there is an F key that corresponds to it, the stupid PC just doesn't care. The volume key works. All the important keys work... not prnt scrn. In my research it appears that the print screen button is... unique and unusual. It's very difficult to change it to something else, reassign a different key (or fix it when it's broke). In my research the easiest solution was to get a screen capture program... that was actually EASIER than fixing the prnt scrn button which involved some funky system modifications that might not even work. -vern
-
If you check the history of modeling with most long time users of AM you will find the patch count got smaller as time goes by. This is not a rule of course, just a personal observation. I remember my first successful "face" model that had phonemes and poses etc... good grief it had WAY too many patches and was a torturous dog to work with (it was 10 years ago of course). It turned out great but was just too dense if I look at it now. As time goes by you learn to be more sparse and efficient with the number of patches. You would be SHOCKED at how few splines are really needed to define even modestly detailed models. To avoid that "learning curve" try starting now to use as few patches as possible to get what you need. If you are doing "mechanical" style models study the primitives that come with AM (or, I suppose you download them now with the web subscription). Those primitives are a treasure trove of minimalistic mesh construction guidelines for anything mechanical in nature. I still tend to go overboard with patch count sometimes. I remember spending hours upon hours on a metal hinge for a contest image... huge patch count... every edge beveled... each part a separate mesh that moved like a real hinge... and in the final image the hinge WAS NOT IN VIEW. Keep that in mind as well. If it isn't seen much it doesn't have to have a lot of detail in the mesh. Decals, bumps, displacement maps, can all help "hide" low patch counts very effectively. -vern
-
I uploaded a project and models in a zip: http://www.hash.com/forums/index.php?s=&am...st&p=293935 -vern
-
Remember that you don't have to just accept what a simulation produces. Once you have those keys you can do whatever you want with them. I had to make cloth "settle" better after a simulation. It kept jittering at the end even though nothing was moving. The cloth was lying on dozens of cloth deflector objects and just didn't stop twitching for ages and ages. What I did was to delete a bunch of keys at gradual key frames before the "last" key I wanted to keep. I used the existing spline key motion and "softened" it by removing huge bunches of keys. I slid them along the time line till it looked "natural". Then the cloth gradually settled and stopped. Worked like a charm. I used the majority of what the simulation produced and then used it in "big chunks" to tweak it. I didn't have to actually key individual points (I did though on 20 frames. Just 20 frames and about 50 cps. Not hard). I don't animate hair much yet so I don't know how AM puts in keys for the motion. It could mean you would have to bake the action. Cloth is very straight forward and just keys every frame. A warning though, selecting keys for cloth is very slow on my machine. Deleting keys can take some time... that's a ton of stuff. I don't know if the same applies to hair, just thought I would point that out. -vern
-
Here are a few tricks I used to deal with GIGANTIC CHORS: I "duplicated" a BIG chor, did a save as or whatever. I then deleted anything not needed for whatever I was animating or working on. For a specific example in my case, the cloth/physics combo. There was no way in heck to simulate my cloth curtain interacting with all of those objects. Even removing deflectors wasn't giving me joy. There was just too much stuff and my computer couldn't handle it sometimes. In the duplicated "small" chor I deleted EVERYTHING. Every single model except any model that came into contact with the curtain. After simulating cloth I then exported the curtain spline motion as an action for each curtain and imported into my FINAL chor. This was a life saver for me (I prefer cherry life saver's but beggars can't be choosers). I did this as well for some of the physics that needed tweaking rather than a complete resimulation. If there was a portion of physics that didn't work, I could quickly simulate one or two or three objects in a duplicate chor and export the actions. This was so much easier than trying to do the whole thing at one time. I ended up with bunches of saved actions that all "matched up". I load those all into the final chor add them to the models. Then it was just a matter of rendering. For instance the very last stage crash. Some of the objects on the floor are bumped by parts of the falling stage. When I simulated that only those objects "hit" by the stage were in the chor. Other benefits of this was having a "clean" set up for the final choreography. I didn't have to worry about turning things on and off (active) so much because I had one final chor that was "ready to go" so to speak. Faster loading. Some of my chors took a good 5 minutes to open. By having small ones with limited objects they opened really fast. I just saved opening the big ones for the final chor or action import and render. Sometimes I would just save out a chor with no lights or cameras. Just a few models that I was tweaking. I would delete these models in the "final" chor, and import the new chor directly. This allowed me to keep choreography actions intact rather than saving actions, if I needed to make tweaks. It's often easier to tweak stuff when you have the keys right there in the chor rather than a linked action. Anyway, I did lots of crazy stuff at the end to save time and avoid... well.... avoid that thing that happens sometimes we like to avoid. p.s. I only have 1gb of ram. -vern
-
First hand experience of this behavior on my project. This is most likely... user error. It was in my case. I too had HUGE GIGANTIC MONSTROUS chors with so many objects it took several seconds to turn them on and off after selecting all children in a folder. In my case what was happening was selecting and moving "groups" in a chor. Sometimes I was not careful enough about where I was in the time line. This would occasionally cause a group of selected objects to "jump" to the same coordinates and appear to "vanish". For instance I would select a bunch of randomly positioned models in a chor, and move them... they would all jump to the first items position and create a key frame. Other times I would be copying and pasting key frames with out realizing I was copying keys from frame 0 and pasting them later in the time line causing them to "vanish" because they had jumped to their original position. Other times I forgot to click the "A" button off and would use the "active" property and end up with silly models turning on and off all over the time line. This all seemed odd to me until I started paying closer attention to what I was doing. Also I would do a "save as" for like 5 or 6 versions before even NOTICING these problems... then I would be really confused. What really helped were chor folders. I put all models part of one "section", like the stage, in one folder. All falling objects in a folder. I then could easily turn things on and off to see where funny things might happen and to also streamline hiding models in the chor for easier animation. In your sample image I see the "street" sections. You could put all of those in a chor folder. You close that folder and you don't have to scroll as much. Drag selecting multiple objects in a chor creates a "group". This is NOT the same as shift selecting models in the PWS. That "group" doesn't behave the same way. I've found this "group" can have both good and odd results when used to move or rotate things in the chor. Most times it worked great but sometimes it would place keys I didn't want or expect. This is a "new" feature for me so I may not be using it properly. -vern
-
Watch out for really really fast movements or movements over even short distances in one frame. Hard for AM to determine where the hair should be. The hair is penetrating something "between" frames when no collision detection has had time to take place. The same thing happened when I used cloth and physics. The action was happening so fast that collision detection didn't have time to do a check. It was like the speed of light. In an extreme case you could slow it down when simulating, stretch the time of the action and maybe make the hair "heavier" or slower to react. and then compress the the key frames afterwards, I did that and it worked great. Or turn off the hair "movement" for a few frames of fast motion then turn it back on or actually delete keys for the hair. I also did that with cloth and physics. The action happens so fast you don't notice a thing. -vern
-
Not distortiion "map" distortion grid... actually the tool is called "distortion mode". It's a wireframe cube thingy button at the top between mesh mode and bones mode buttons. You set the grid resolution in the modeling tab under tools/options. For example in my model the letters "Change Your Pants!" should be "round" to match a cylinder. With the results from the font wizard the distortion grid makes this a piece of cake. 1. The first thing to do before distorting the shape is to decide how thick the letters or glyphs should be. It's easier to do this now before distorting by grabbing the fronts of the them and just moving them forward or back on the z axis. If you want to do this later it is possible but not straight forward. 2. Go to tools/options/modeling. Set the grid to 2, 2, 2. Now select all your letters, click the distortion mode button and view from the top. 3. From the top view select all the points of the distortion grid on the right and left. Leave the center points of the distortion grid alone. Now using the cursor keys or the "N" key move those points back on the z axis so the mesh "bends" or curves. The distortion grid will "bend" all the points into a sort of round shape. (make sure you curve the letters in the right direction so they "read" properly). 4. Notice the ends aren't right? The right and left side of the distortion grid are still straight on the z axis which isn't creating a good circle shape of the meshes. Select only ONE side group of points of the distortion grid box (still viewing from the top) and rotate those points on the Y axis so they sort of "aim" into the center of the circle shape you are trying to create. Follow me?. Do the this on the other side but rotating in the opposite direction so it points in the center of your imaginary circle. When you get it the way you like it is done. It might be easier to have an actual circle shape as a guide line when distorting the mesh. And maybe depending on the shapes you might find increasing the resolution of the grid in Tools/Options/Modeling will give you more control over the final shape. Keep in mind this is only a GENERALIZED curvature based on the splines and points of the individual shapes in the mesh. It does not curve something that has no points to curve. It won't ADD POINTS to make the curve smoother. For example if you tried to use the distortion grid on a single 4 point patch... not much would happen, it might scale up and down but you won't make it curve because it only has 4 points. However it does a good enough job in most cases that doesn't look too shabby. -vern
-
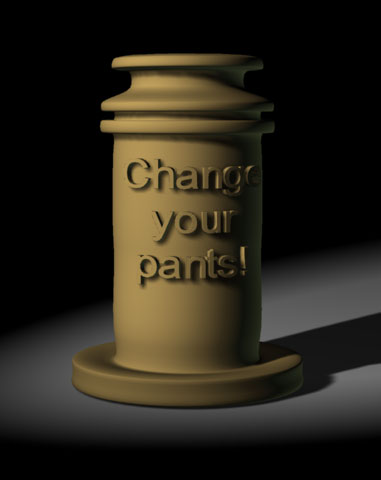
Here's a sample using displacement. I created the displacement map using AM. I used the font wizard to create the text. Made it white with a single neutral gray patch behind the text. Put it in a chor with an orthogonal camera (no perspective) I added a blur post effect to the camera to soften the edges slightly for the displacement (probably too much in this case). After rendering that I imported it as a decal for the cylinder object. Set the decal image to displacement 100%. Worked quite nice for a few minutes work. (if you make the text black it will cut into the surface. The text must have neutral gray around it. Gray will not displace.) project file text_carving_displace.zip -vern

-
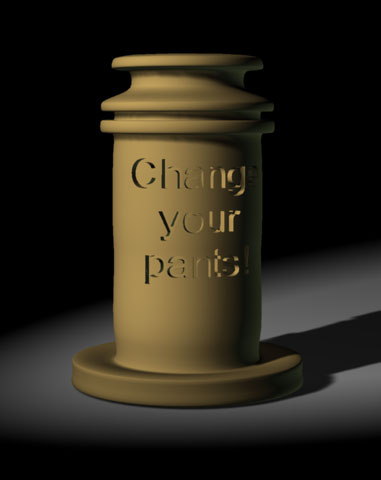
I did these two samples using the same text mesh from the Font wizard. It would work with the AI wizard as well. After extruding the text I just "curved" it using the distortion grid in the modeling window. Just move and rotate the points of the distortion grid to make the extruded letters or "glyphs" line up with the shape. One set was assigned to a boolean cutter bone on one side of the cylinder object. The other just stuck on the other side. In: Out: Project file: text_carving.zip -vern
-
Depending on how "deep" they need to be "cut" or how far out or "3D" they need to be a bump map could work. If you need more distortion, try using a "displacement map" decal. Displacement is sort of like a bump map but it distorts the actual mesh.... uh... not really but it does show as 3D in preview at higher preview settings (hit page up key) and it shows in render. Displacement I believe is a "polygon" modifier so it looks pretty good even on low density meshes. The "older" displacement method required a higher density mesh. Here's another trick for using booleans if you want to experiment: In the Obelisk model, use the AI wizard to create your "text" or "glyphs". Bring in the art work for those shapes and extrude them. Now assign those glyphs to a bone that is a boolean cutter. Lay them over the shape to cut into. If the object is "roundish" or an odd shape you can adjust those glyphs to fit the shape better. This of course is cut "in" to the shape. If you want to cut them out around the glyphs, having the glyphs "stick out" you would need to use the AI import to create a "reverse mold" of the glyphs. Not as hard as it sounds. Of course you would need access to Adobe Illustrator or a similar application that can create the AI files needed. -vern