markw
-
Posts
635 -
Joined
-
Last visited
-
Days Won
3
Content Type
Profiles
Forums
Events
Everything posted by markw
-
That's neat! Its all in English here on my Mac. But on export I get some very odd results. Some are definitely not the shortcuts I'm using... KeyboardShortcuts.html
-
Well now that is perplexing. I have one thought and it may be a bit of a long shot but… The models you list along with Pappa Bear as troublesome all use decals, the others don't. Maybe your A:M is having problems loading the images for those decals and that's what's causing it to crash? You could perhaps try this theory out with some other models. Here's my copy of KeyKat, slightly renamed, maybe try loading him and skip over loading the images when asked and see if he works. TESTKeeKat.mdl
-
Hi Paul PappBear opens just fine here and switching view modes is fine too. He's a great looking character! My only comments would be that some of the rigging/CP weighting is a bit off in places, most noticeably around the shoulders. He also opens in an Action or Chor hovering in the 10cm air! and the front of the shirt is in his chest. The bones all look in the right places in the model so it might be that you've inadvertently moved some, like the BodyNull, when setting up a pose or something? So when he opens in a Chor/Action the null jumps up 10cm.
-
And a Happy Birthday from me too!
-
Hi Cybrknight and a Happy New Year! Ah, the interface I know what you mean, perhaps not the sexyist looking one out there for CG but it dose have, for me at any rate one big plus, and thats that it still looks the same! One of my personal dislikes of some other software is the frequent need to relearn the interface after an update. One of A:M's strengths is that if you go away from it for a long time and the come back, the interface is just the same and you can get back up to speed again real quick. As for the Dock, well you do get used to it. And it still there, just drop your cursor to the edge of the screen where it was and it pops right back up. As for the big bug, there is a standard workaround for it which soon becomes second nature when events present themselves. You may not have looked at the 'Read Me' when installing A:M, most people don't ;o) So just in case heres what it has to say. (the bug work-around is in the second half) For me option 1 of the work-arounds works 9 times out of 10 and I only need to resort to number 2 very infrequenttly. "This is an Animation:Master (Intel Binary) installer for MacOS X. This version will ONLY run in MacOS 10.6 or greater. You must have admin privileges to successfully install A:M. If You are running A:M on MacOS10.7 (Lion), please remove the plugin Simbiont2.atx from /Applications/Animation Master v17.0/Textures/ , this plugin is not compatible with OSX 10.7 and You will get otherwise at each A:M start a error message . No icon will be created in the dock, you will need to launch A:M from the desktop, or from the folder you installed it to. (the default location is Applications/Animation Master v17.0) once it's running, you can control click on the master icon in the dock, and choose "keep in dock". If you don't like the alias on the desktop, feel free to delete it. Some versions of OSX may make Animation:Master appear to freeze while you are browsing for files to import or save. We are working to find the cause of this, in the meantime there is an easy work-around: 1)If it's an "open" or "save as..." window (i.e. one window), Use the dock or command-tab to select another app and then go back to A:M., or hide A:M and go to another app and then back. 2)If it's a case where you have two windows (like "save as" from the render panel) go to the application menu and select "Hide Animation Master" from there. Then go back to A:M."
-
Welcome to the family Cybrknight! If you want a specific tutorial on lighting in A:M then HolmeSlice has a basic introduction to lighting amongst his other excellent tutorials here: http://www.hash.com/forums/index.php?showforum=207 (Direct Link) Also as mentioned by Rodney, Jeremy Brin's book on lighting is a must have. If you do have it then forum member Robcat has made some very useful notes on translating it into A:M specific terms. You can find that here: http://www.hash.com/forums/index.php?showt...st&p=320978
-
And welcome back to you too Lloyd! Good to see you on the forums again
-
Yes, what Robert said! And not finishing it in time would only have been a tragedy if you had learnt nothing from the experience but actually you'v learnt a ton of stuff, some of which your probably not even consciously aware of yet. And all that will feed back into the next project. And the other good news is that I hear they're planning on having another Christmas around this time next year too, so I shall look forward to seeing this project again then!
-
Hi Rodney, I too played some more with this this morning. After making 10 or 12 of these I did notice that the end of the sphere that distorts seems to be dependant on which side of that initial spline circle is removed. Removing the left side gets you distortions at the top of the sphere and removing the right side gets distortions at the bottom of the sphere. Interestingly I never saw the distortion at the end of the 'C' shaped spline that you captured in your screenshot before making the sphere with it?
-
Yes that's a bug you've found there Rusty I just tried it in v18 and v17g and get the same as you. So yes probably worth you submitting a bug report. Its the Alpha and Gamma settings that are getting reset on some splines. You can open the properties for them and just type in 0 to correct the affected ones. Interestingly its only ever the top of the sphere that gets distorted not bottom, regardless of the direction turned and only seems to happen on that first rotation. As Robert says, manually turning the sphere with the Rotate handles still works with no unexpected results.
-
Yes, that's just the sort of thing Gatekeeper would say! If you want to see what Apple have to say... http://support.apple.com/kb/PH14365?viewlocale=en_US
-
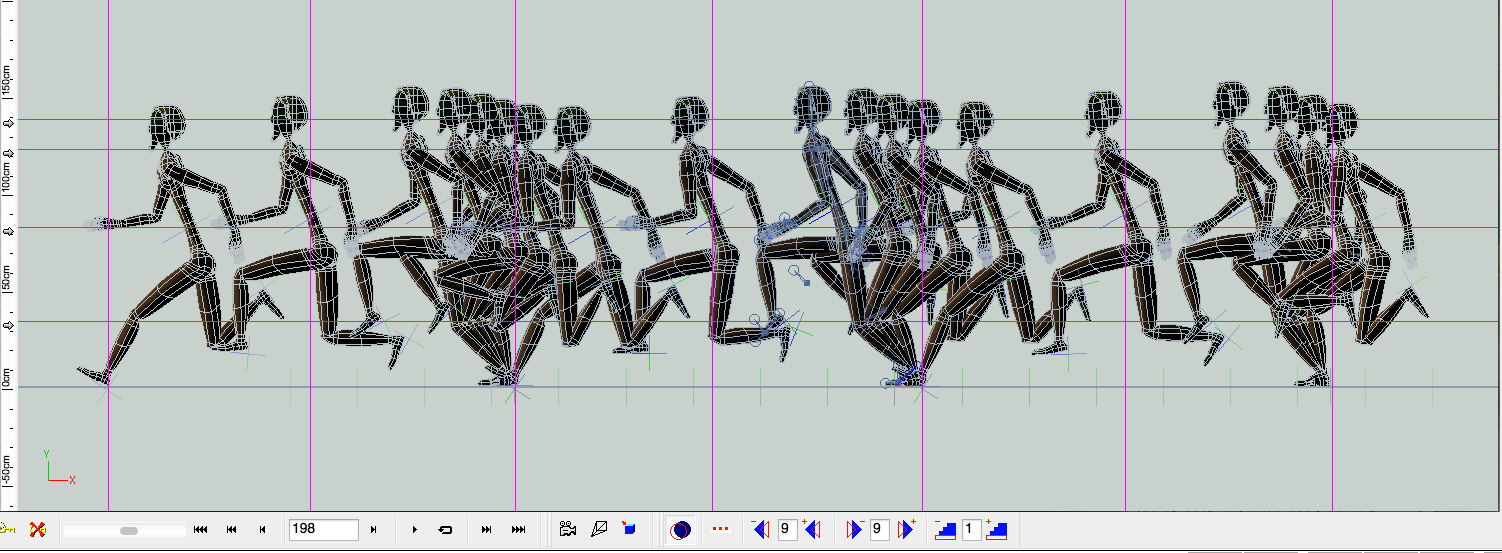
Well, I think I might have to retract my earlier post about the runners speed bing constant! I just took another longer look at this and the runners forwards motion is not consistent. My apologies Simon! As you can see in this screenshot with Onion Skin Mode on, there is a clear deceleration during foot contact with the ground. As I side note there's possibly to much vertical movement of the torso maybe?

-
Looking at the actual animation, I think maybe you could get a bit more twist into the runner's body motion. At the moment his body is a bit stiff. Of course twisting the hips will mean you will have to adjust his stride length! As soon as you twist a hip forward that leg will loose it's full extension/straightness on the contact pose and you will have to move that leg's foot controller slightly forward to compensate and maintain the leg's previous full extension. And so on… Ah, the joys of animating!
-
Hi again Simon, I've looked at Chor Sprint 002 and I was both right and wrong! The runners speed is in fact constant but the way you have set up the camera to follow him means that the camera's speed isn't! In your original Chor 002, go to Top View and select Null1 (which the camera is constrained to with an Aim At...) As you advance the animation you can see that the relative position of Null1 to the Body Null of the runner regularly decreases and increases as he runs which, from the camera's point of view, makes the runner seem to speed up and slow down in a regular cycle. In the attached here I've removed the keys for moving the camera but it still has an Aim At... to Null1. Null1 now has a Translate To... with the Body Null of the runner. See what you think... Sprinting_MW_adjusted.prj
-
Hi Simon, Definitely better leg and foot work in the new one! I see what you mean about the strobing, hard to tell whats going on just looking at the render. Would you be able to post the project file for a closer look? My first guess is that the forward momentum of the runner is not constant but the camera's motion, more or less, is, so that at times the camera is turning forward slightly faster than the runner is moving forward, the effect of which makes the runner appear to move back slightly every few frames. One other thing is that at the moment it is quite hard to tell relative speed. The logical part of our brains says that they are moving forward, probably at speed, but our eyes are not getting any real visual confirmation of this fact, which is a bit disorienting. Adding markings at regular intervals to the running surface would help as well as possibly some sort of texture. And/or by putting markers at the side of the track at regular intervals could also help.
-

"Drop-In" rigging method for Animation Master
markw replied to Mechadelphia's topic in Saucy (S.o.S.S.C.) Rig
Excellent, very interesting. As a life long hater of rigging I take my hat off to all who actually enjoy doing it let alone developing rigs! Do keep us posted as you develop this system further and let us know when you have something you feel ready for the rest of A:M community to try out. -
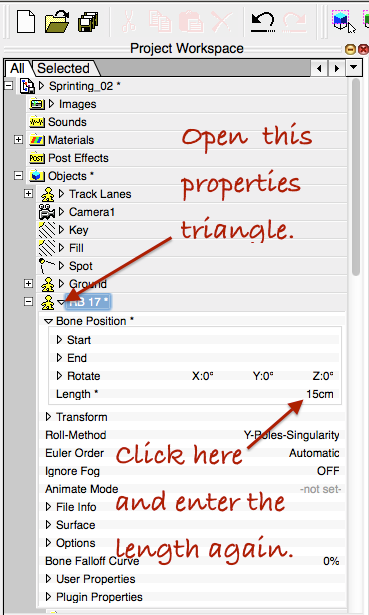
Hi Simon, the other Mark here! I must say this is the first time I've seen this happen, quite odd. Any way, I think this is where Mark meant for you to change/re-enter the bone size. It works here.
-
Hi and welcome to the family esolc In the default Data folder that instals with A:M there is a goose model. If you go here: ftp://ftp.hash.com/pub/misc/ you can find a file called Data.zip. In it is an eagle and a duck as well as the goose. Plus a lot more props and things than comes with the basic default Data folder. If you want to buy the Extras DVD from the Hash website, then there are some 26 assorted birds on that.
-
Ah, I see, so it's a whole toolbar of it's own now. I like it! Thanks Rodney!
-
Is anyone else missing this? It used to live in the 'Draw' section of Tools > Customise > Commands, if you wanted to drag it into the toolbar but it's not in mine.
-
Ah, forgive me Heiner I did not mean you, no I think your English is excellent! Actually I was referring to the wording on the 'Latest Info' page here on the forums about the v18 release. I had to read it twice before deciding this update would be free for current v17 users.
-
You do enjoy giving your characters a hard time! Two things from me here. First the actor, well he still has those oddly flexible feet! Maybe try pointing them out more to the sides as he goes down rather than folding flat against his shins. The other is the flat tire. At the moment it looks more as though the wheal just got stuck in soft ground. Though everything prior to this would suggest a hard surface. One possible way to get a flat tire, would be to use 'Muscle Mode' in the Chor as your animating. (you may possibly need to add more Cps to the wheal first) Note which Cps need to go flat and spread out and set a Keyframe on them at the point just BEFORE the tire bursts. (in QuickTime7 that looks to be around frame 82) Now go to the final "deflation" frame (it looks to be around frame 86) and pull out and flatten the tire to taste. One general note about Muscle Mode, if you want to get back to the original mesh shape, before distorting anything set Keyframes for the same Cps at the point AFTER your animating in Muscle Mode. This "bracketing" will ensure any mesh changes are contained to where you want them. Another possibility would be to use a 'Distortion' box to flatten the tire but again you may need to add CPs fist to the model to make it convincing. I've not animated much with Distortion boxes, so others may be better able to advise about their possible use here.
-
Hi Heiner, Yes, the wording is perhaps a little ambiguous about the v18 update. But if you have a valid licence at the moment for v17 then just download and instal the new v18 and copy your current licence from v17 into it and enjoy!
-
Hello ToreB Have you considered using a transparency decal on the dress? This should render faster and maybe give you the transparency+opaqueness you are looking for. Attached if a very quickly thrown together example using an image of some lace for the decal.
-
Oops! I see what's happened there. Its looking for the wrong path. Looks like Steffen didn't update it for v17! No matter, its simple to fix. Open the MultipleMaster script file (MultipleMaster.scpt) with AppleScript Editor. (That's the default app for opening applescripts and lives in the 'Utilities' folder). In the script file, change both instances of 16.0 to 17.0 Click 'Compile (the hammer icon) If you want to test it click 'Run' now. Next 'Save' but don't close the window just yet. From AppleScript Editor's menu bar go to 'File' and choose 'Export…' or 'Save As…' In the drop down window change 'File Format:' to 'Application' and then click 'Save'. You can let it overwrite the existing MultipleMaster app.