Rodney
-
Posts
21,649 -
Joined
-
Last visited
-
Days Won
119
Content Type
Profiles
Forums
Events
Everything posted by Rodney
-
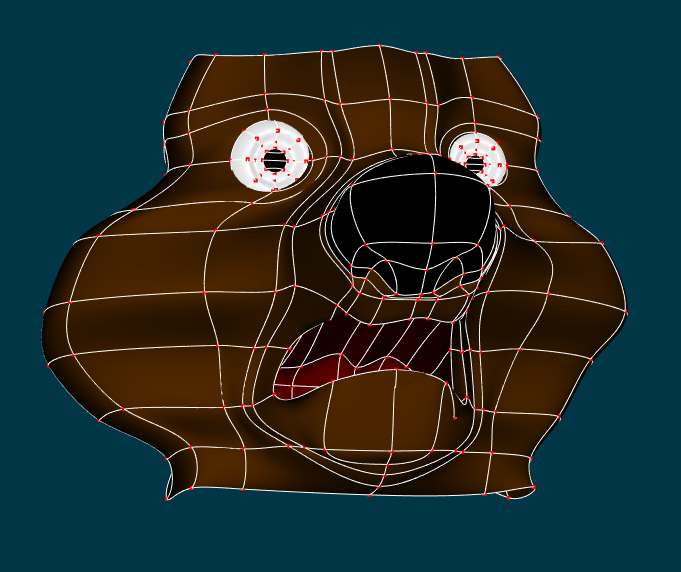
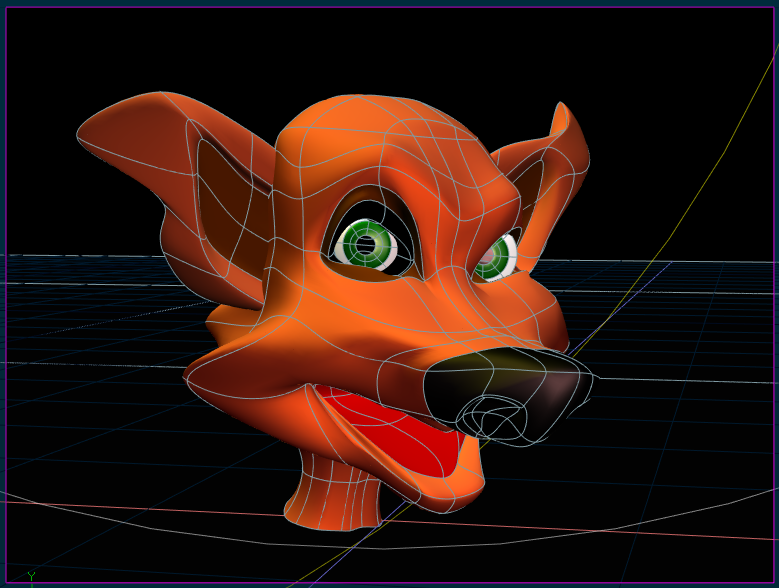
Here's a quick try on a bear shaped face... with spherical eyes. (The grid shows mid way stage right after thinking 'I should add some nostrils') Yes, all these characters need teeth.

-
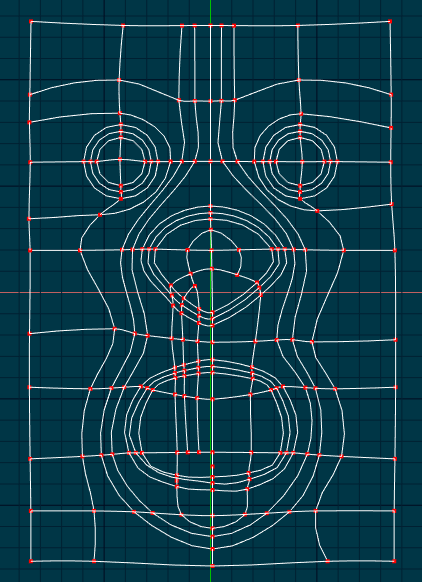
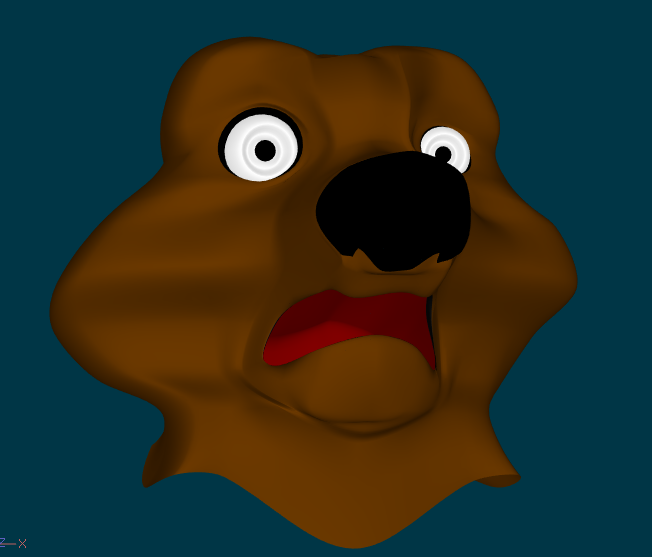
Here's a variation on the theme... In this case I started with the four 'holes' of the face*; 2 eyes, nose and mouth and modeled them toward the basic grid shape. Then distorted them from that 2D plane into 3D space. In this one the mouth doesn't quite get enough splines flowing into it to get at proper shaping. Unlike most of the grid-models I've made I modeled the eyes as connected parts of this face. Usually the eyes work better as spherical objects that can be rotated separately. *Technically I guess we could say there are seven 'holes' in the head (if we don't count nostrils) when we include the two ears and the neck. Added the initial grid. Those with an eye for detail may note that I've reformed the splines that move down just to right/left of mouth so that they wrap around to follow the contour of the jaw and connect.
-
I've yet to come up with a rigging approach I like for a fully articulate... and highly expressive... exaggeration-ready... mouth but... As far as I can ascertain there are two basic needs for rigging of a mouth. The first is the jaw (rotation and lowering) to get at the basic shape of an open mouth that can stretch while still maintaining a since of the solid jaw underneath. The second is a ring of bones around the mouth to provide the shapes necessary for lipsync/dialogue. The most successful tests I've come up with only have the jaw bone and the mouth shapes are manually animated. This matches the general approach of lipsync with phonemes ala the Dopesheet/poses. Two areas of concern seem to be most prevalent when modeling the lower face and the first is that the mouth needs to wrap around to the sides of the face at least enough to gain the ability to pose the mouth in front, side and (perhaps most importantly) three quarter views to aid in the viewer actually seeing the shapes. My own goal is to make sure the mouth can be moved into extreme positions beyond simple dialogue shapes in order to target and really push expressive emotions. When drawing these extremes can be pretty easy to achieve but with a rigged character the animator may find they've hit a limit that they can't move past that they require to get the shot they want. I've found a useful approach to modeling the mouth is to model it in an extreme open position first, to more easily have access to all the control points, then adjust the jaw/mouth/lips back into a proper position for a relaxed state. I can't say that I've achieved success with this yet but I've failed enough in the attempt to know what doesn't work so well. I can see where Papa Bear's mouth might prove troublesome. Like most articulate faces I would think the snout would be maintained with the upper skull (and move very little) and the mouth follow the jaw.as it rotates and moves. The skinning/mesh between skull and jaw then needs to be able to accommodate the resulting squash and stretch.when the jaw's movement forces changes of shape. As with most things I always think I'll record a session and share it but I haven't quite got to that point yet. I will say that it might be well worth the time to model the skull area and the jaw area separately and then later stitch them together. Thus far I've mostly been modeling them together. To get from 2D plane to 3D shape I generally start with a 3x3x3 distortion cage, grab the middle four CPs of the cage and move them forward (from side view) and then start to adjust and fill in shapes and details. There is always grunt work to do... fill in 5 point patches... add additional spline rings around eyes, nose and mouth... etc.
-
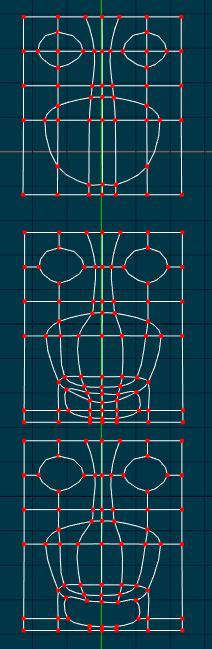
Random fox-like character's head... This was an experiment in modeling from a simple grid* and working toward as simple a head as possible. I won't say it was an entire success because the model didn't stay as simple as I had hoped but it did exercise my modeling muscles a little. I've attached an image with three of the initial grid progressions that (eventually) was modified into the head. It should be noted that deleting the splines/CPs in the mouth and eyes was not strickly required... it was based on prior experience. Leaving those in the grid would very likely have saved me some struggling later on when my brain had to shift from 'stitching' details into place to 'extruding' forms in 3D space. My thought now is that it would be better to stay in the 'stitching model' as long as possible before distorting the grid into shape and might have the advantage of removing the requirement for extrusions entirely. Keeping the patches flat would also be useful when considering additional detail to be added via decals and texturing. *Mark Largento mentioned this approach the other day and we must have been inspired by something or someone similar because I had just experimented with the grid-modeling approach the day prior. Coincidence? I don't think so but the source of that approach is a mystery to me short of playing with features found in v19 Beta... so perhaps that experimentation in the beta led to that form of experimentation.
-
I'm a little more practical than that as wishing might get one oriented but tends to prevent movement in the desired direction*. The primary point of posting these links is to provide a seed for those that might already be moving in a given direction. Someone that works outside of A:M for instance may have insights into Sitex that I would never have because I don't have a greater interest in the outcome (at least not enough to motivate me to proceed further). And conversely, someone who has already worked with Air might be able to fill in a few missing pieces if they ever find themselves working with A:M. The bridging process is what we have to work with while we wait for underlying technologies to move closer together. I don't expect a direct correlation to appear (because many incompatibilities exist) and am often amazed when one is discovered. Regardless, it's important to occasionally survey the scene and determine what is actually there. I get the sense that Sitex Air is older technology striving to be relevant, hence the release on Windows for free. It's usage is mostly in commercials but it does have a hook into procedural modeling (and crowd simulation ala Massive) that captures my attention and because others have expressed interest in Renderman, Air's use of the RIB format is of peripheral interest to me as well. *While we may offer up a token representation of our formal desire... a penny tossed into the wishing well.. wishing implies we have some expectation the object of interest will magically compel itself to move in our direction... and the sooner the better! Added: I have an interest in external renderers but that is moderated by the fact that I know from experience that even given a direct link to 'modern' renderers it would not be long before that bridge was seen as insufficient as well. That doesn't mean such shouldn't be pursued but it does suggest there must be very good reason to justify the investment, especially where no one else is interested/willing/able to invest.
-
I didn't get far in my initial look into this suite of applications. Perhaps others may fair better. http://www.sitexgraphics.com/html/air.html Note: I've bolded a few areas that piqued my interest for any number of reasons. The primary difference between paid and free versions is reportedly texture/image size. Note that Air itself (like Renderman) is command line driven but has applications/plugins associated with it that provide graphical user interfaces. For WIndows and Linux. Sorry Mac users.
-
In re-reading your topic/question it occurs to me that you might think there are topics in the forum titled 'Open Forum Archives'. That would seem to be a logical conclusion, however, to the best of my knowledge that is only a placeholder for topics to go when they are 'archived'. Currently there aren't any topics in the Open Forum that are archived. (There are topics in the greater forum that are... they can be found elsewhere) Archiving is something the forum software can do behind the scenes but for the most part I have unarchived almost every topic in the forum because archiving limits interaction by forum members (i.e. we cannot reply to an archived topic). So, I believe the direct answer to your question of 'How can I search the Open Forum Archive?' is: There is nothing in that forum to search. The plan would be to move things there eventually that don't have any particular relevance to A:M Users but relevance is often a judgement call. I'd remove that particular archive forum but then someone might fear topics (that were never there in the first place) are forever lost.
-
When we search from the main forum the search filter usually defaults to 'Forums' (i.e 'All Topics') *BUT* when we are inside a specific forum... such as the Open Forum that default changes to 'This Topic' or 'This Forum'. That more often than not results in few (if any) results. So, how to proceed? Make sure the filter (that button in the search panel) is set to anything other than 'This Forum'. Set it to 'Forums' or 'All Topics' or 'Member' (if looking for posts from certain members... before launching the search. Also, standard rules of search tend to apply so we will get fewer results if we specific too much information. Example: If I search for "All cool topics with the word 'Model'" I am not going to get any matches. If I search for "Models" I may get too many. So I need to refine my search. And... it can help to drop end characters off of word like "Models". Search for "Model" instead. The first will return fewer results while the second will return the results of the first *and* all the rest of the occurrences of the word 'Model'. I should say that I almost never use the full search editor... usually don't have to... but more specific criteria can be identified there. More often than not however we want MORE results rather than fewer so it's best not to limit our searches with too many filters. The number one reason for few/no results however is 'All Forums' vs 'This Forum'. I looked for a setting to try to get the default to set to 'All Forums' but couldn't find one so the user must specify that as an option.
-
I"ve been wondering what you've been up to. Glad to see you are still plugging away at this.
-
v19 is currently in Beta Testing (with Beta 2 very recently released). If you'd like to join... the call went out for testers here: https://www.hash.com/forums/index.php?showtopic=47876
-
I'll say! Looks like success to me.
-
This is a placeholder for information relating to the feature Birdseye View Queue. As we move around in the Choreography to find the exact view we want it can be advantageous to move back to previous views that we've visiting before. Now in similar fashion to Undo we can not only move back in time to previous views but move forward again. When used in combination with the 'Set Camera to bird view' and keframes on the timeline this becomes quite a powerful tool for the director to use. For instance, we might run through a scene plotting out what we think are our optimal points of view then move back through the Birdseye View Queue and key those positions as we move forward and back in time via the timeline. Then with those shots set we can move to 'inbetween' those to roughly direct the cameras performance, creating new positions to test in the Birdseye Queue, toggling back and forth between them and finally selecting the view we want to use. Finally, we inspect our channel splines and finesse those to smooth out the cameras move, add camera shake, etc. New icons are added to the toolbar next to the standard Undo/Redo and I like using those. The shortcut keys associated with back/undo and forward/redo are: view undo Shift+Alt+Z view redo Shift+Alt+Y If A:M isn't freshly installed the icons must be manually installed or the 'Reset Default Toolbars' option on the Help menu can be used. This is a very handy feature.
-
We need to run some test to find out.
-
Make sure its to jason@hash.com!
-
Bump. Needed to locate this.
-
Fuchur/Gerald, Can you still assist with this? Or is that just for the trial.
-
Not in person. Looks like great fun though.
-
No I won't be getting one but sure... I want one. https://www.kickstarter.com/projects/line-us/line-us-the-little-robot-drawing-arm?ref=NewsDTFeb2317 More evidence of robots invading the home. What I like about this is how it combines several technologies together in ways that haven't been merged before. The magnetic base is an example of that. Edit: It appears there are no longer any units available in the first batch (of 1000 units). Not sure when the next will be available.
-
All known rigs gravitate toward the Featured Rigs forum: https://www.hash.com/forums/index.php?showforum=231 There are some (particularly one) notable exceptions such as the ubiquitous 2001 rig. We should probably have a subforum for that as it's still the default most will encounter as they work through TaoA:M. The 2001 rig comes standard with A:M and there is even a bare rig (without mesh) for use with the tutorial from TaoA:M installed with every copy of A:M. After all this time the 2001 rig is (still) the standard by which other rigs are measured. Just crack open your library, navigate to Models tab and look for the Skeletal Rigs folder. The 2001 rig is the only one there - perhaps another oversight but I suppose that it's useful to only have one rig there to choose from for beginners. See the Featured Rigs forum for more about the Lite rig.
-
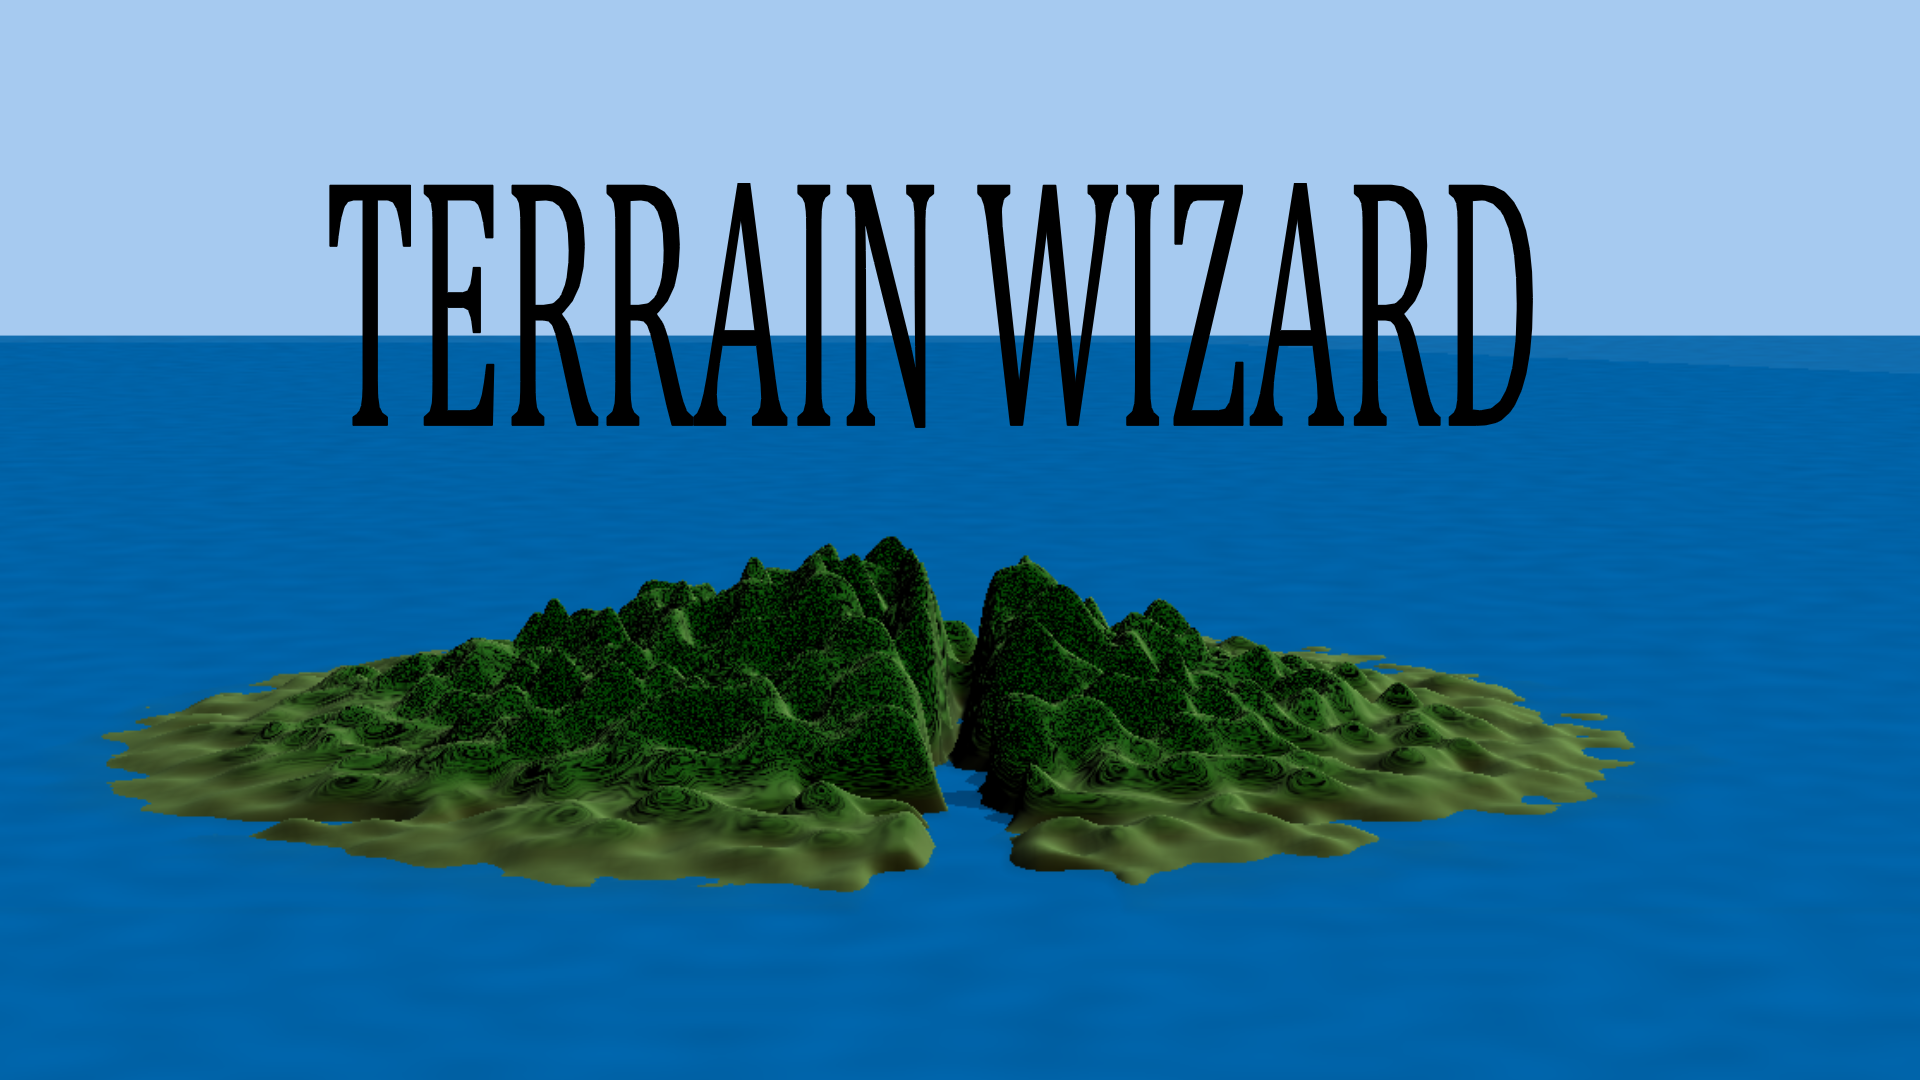
Random island created with the Terrain Wizard.... (The secret sauce in the vegetation and water is surface roughness)
-
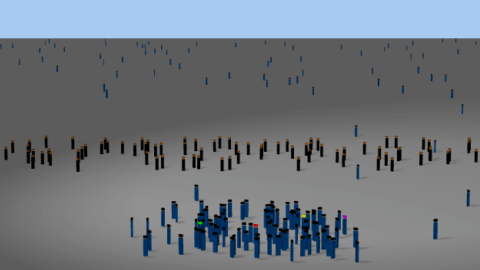
Random crowdtest... It might seem overly ambitious but I can't help but think we can achieve Zootopia level quality of crowd movement with pretty basic setup and straightforward workflow. This setup and execution only takes a few minutes. Swapping the proxies out for articulated characters with walk cycles would take considerably more time in order to suggest proper detail and personality. No particles used.
-
Probably take more than one session though as the setup, breakdown/analysis and solution would surely take longer than one hour. Perhaps where we know the subject matter in advance we can have an extended session.
-
It doesn't surprise me to hear that shoulders/arms are troublesome and it does make sense that flexibility at the top of the legs might be an issue. Those are areas that might require some additional smartskin to maintain proper shapes. Are you using any smartskinning?