Rodney
-
Posts
21,649 -
Joined
-
Last visited
-
Days Won
119
Content Type
Profiles
Forums
Events
Everything posted by Rodney
-
They certainly could be smoother but import file size appears to be limited to 64MB. That's a pretty big file but required for smooth STL files. As I recall, in the Loosh model above I could only use 256 for the level of detail in exporting to STL. A model with flatter surfaces could likely be exported with higher resolution. The pipeline you outline should certainly work but that is likely overkill for those only desiring to use free programs. I'll guess that working through Blender with Nemyax's plugins will cover that angle. Of more interest to me would be that of getting models back into A:M and again, Blender may be the ideal route. I would imagine if I printed the Loosh model out via 3D printer I might be quite satisfied with the results. (But I have no plans to do that) Added: It's important to be able to use the output of any program with A:M and barring a more direct route back into A:M I'd say the primary output will be that of imagery used as layers, decals, patch images, rotoscopes, etc. This may be just as well because the formats used in Paint3D are stills (whether of models or images). So, environments, props etc. might be created with Paint 3D and shoehorned into A:M by rendering out the object. There is much more to delve into of course. For instance, as a model painter, finding a way to extract the painted surfaces might be useful. At any rate, I hope the technology is useful to Windows users because what is used often gets developed further. There is much more to try/test to include 'drawing' in 3D. Still need to do that.
-
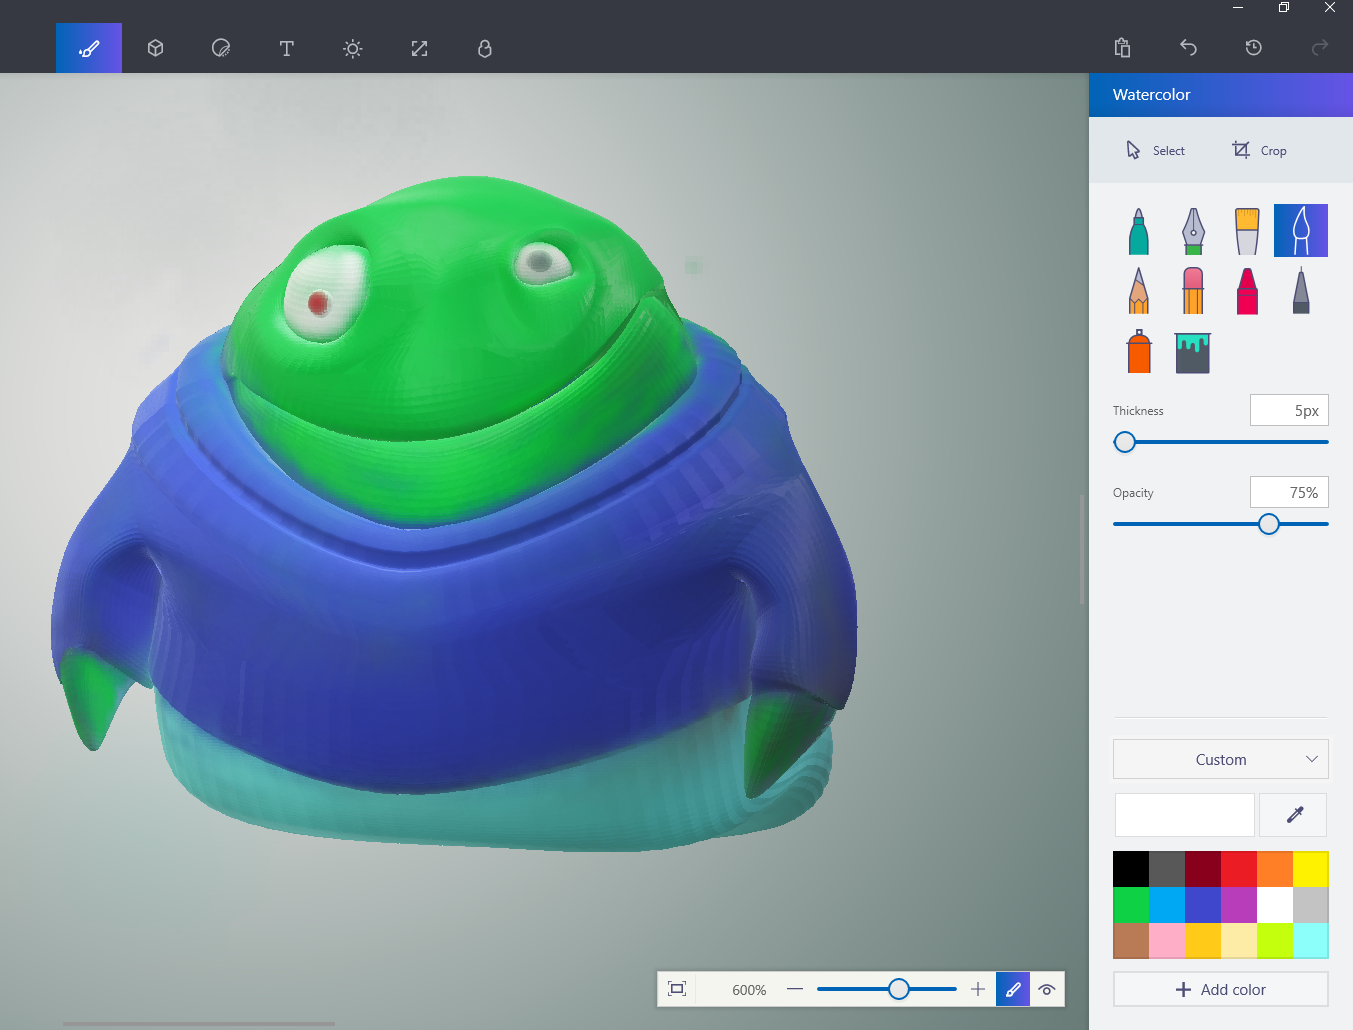
Loosh making his appearance in Paint3D and Remix.com Link This surely would have turned out better if I'd have used the fill tool.

-
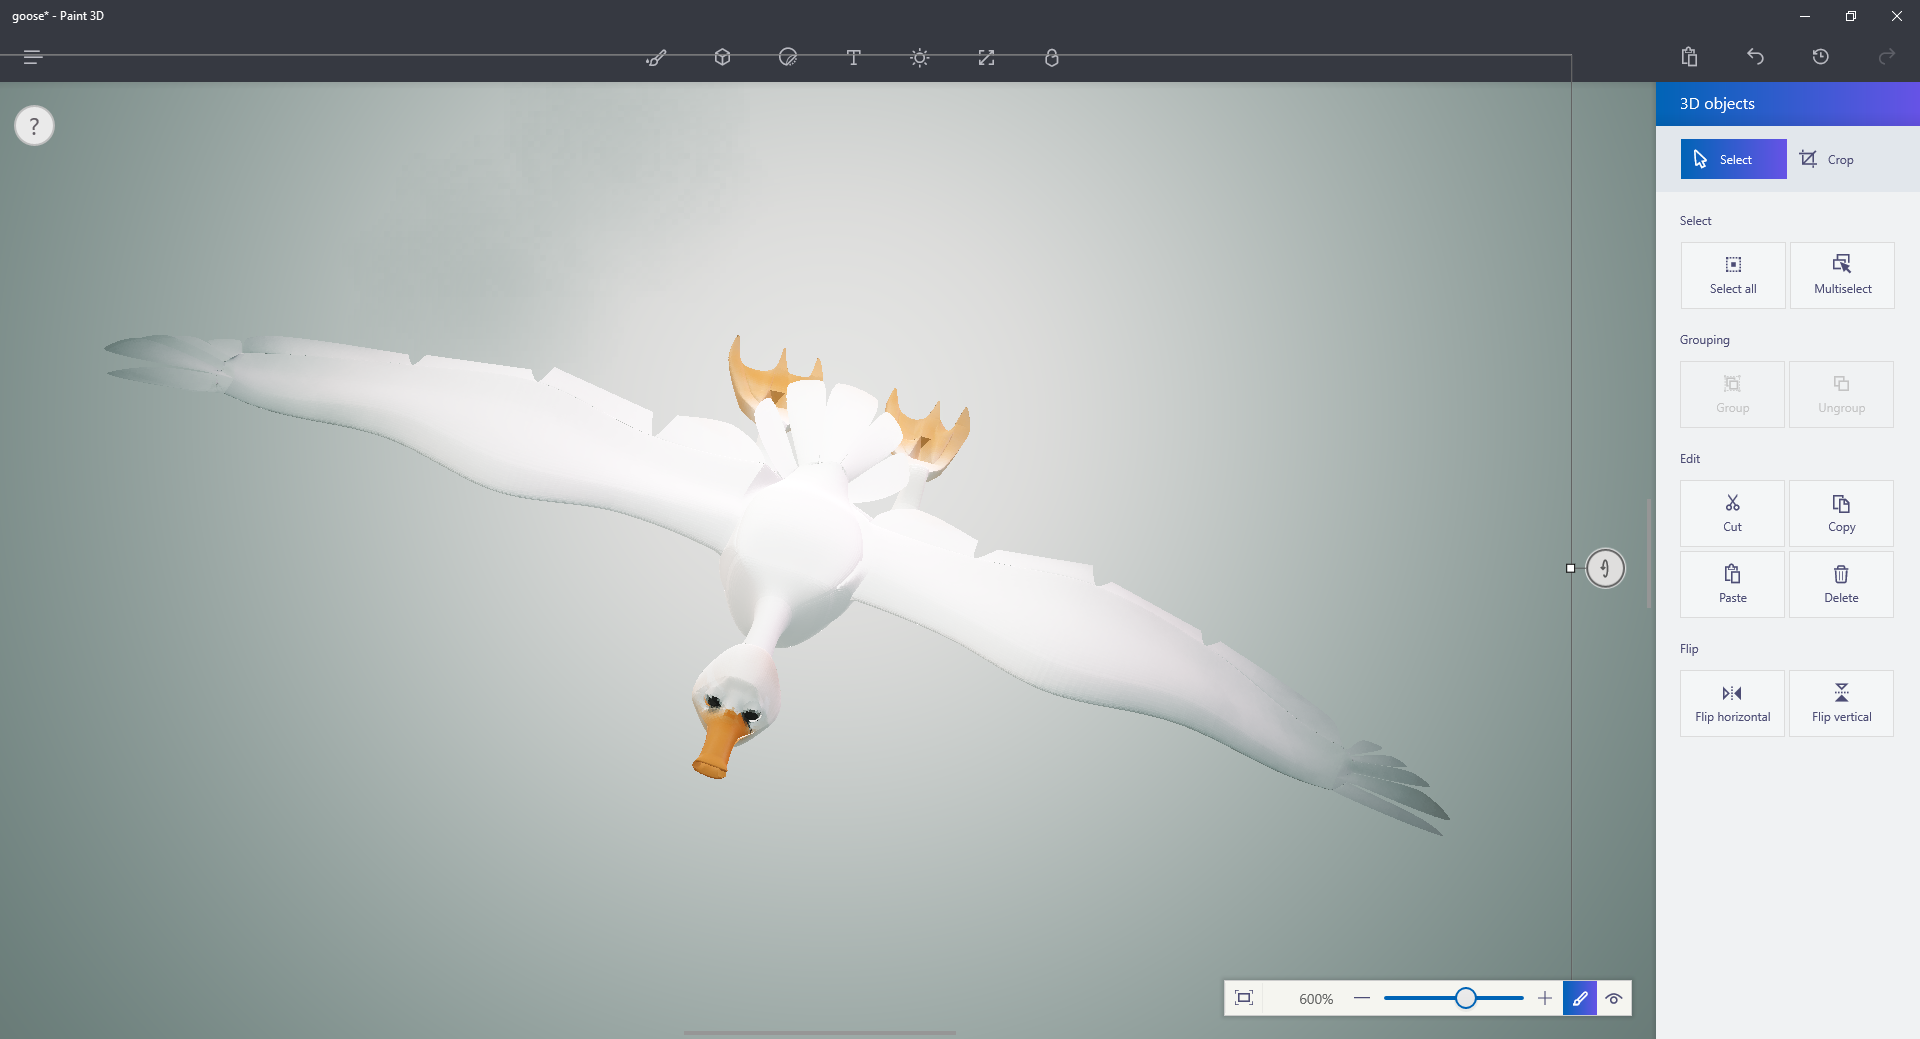
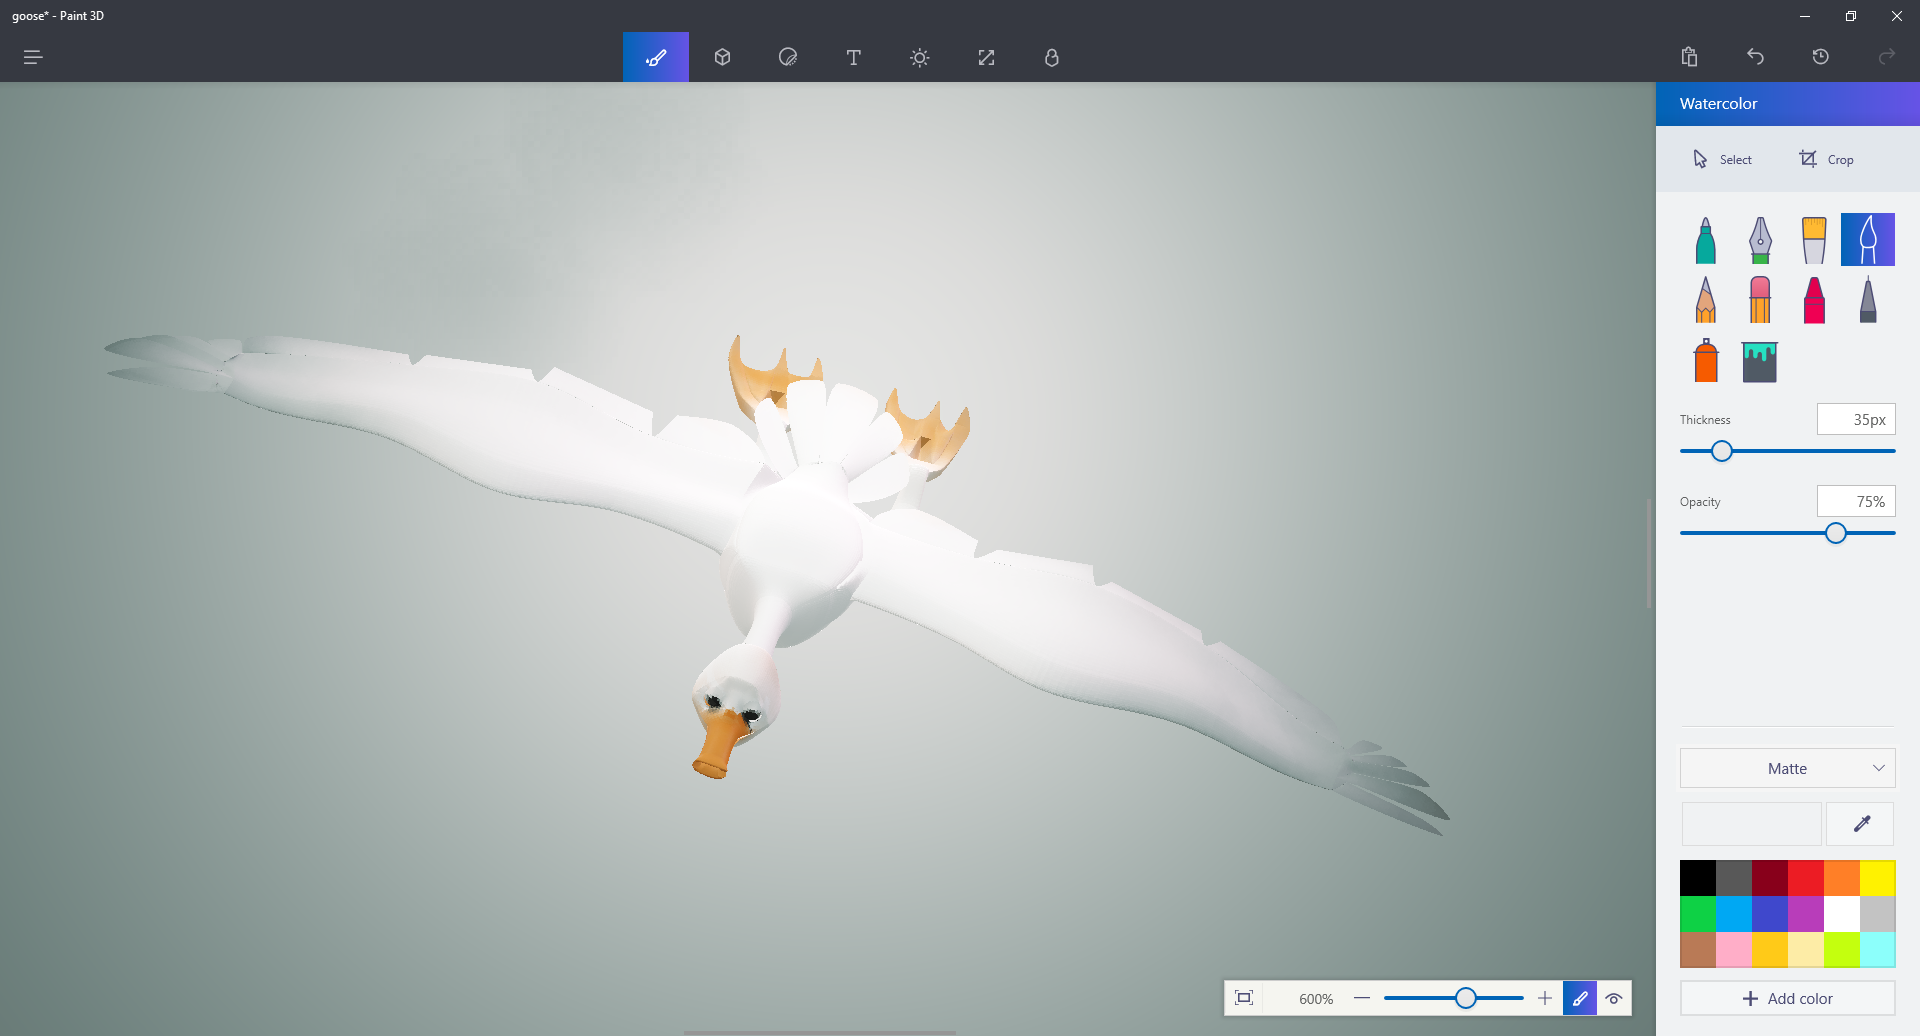
Here are a few screenshots of the Paint3D interface. In order to rotate selecting the model (in this case the goose) is required.
-
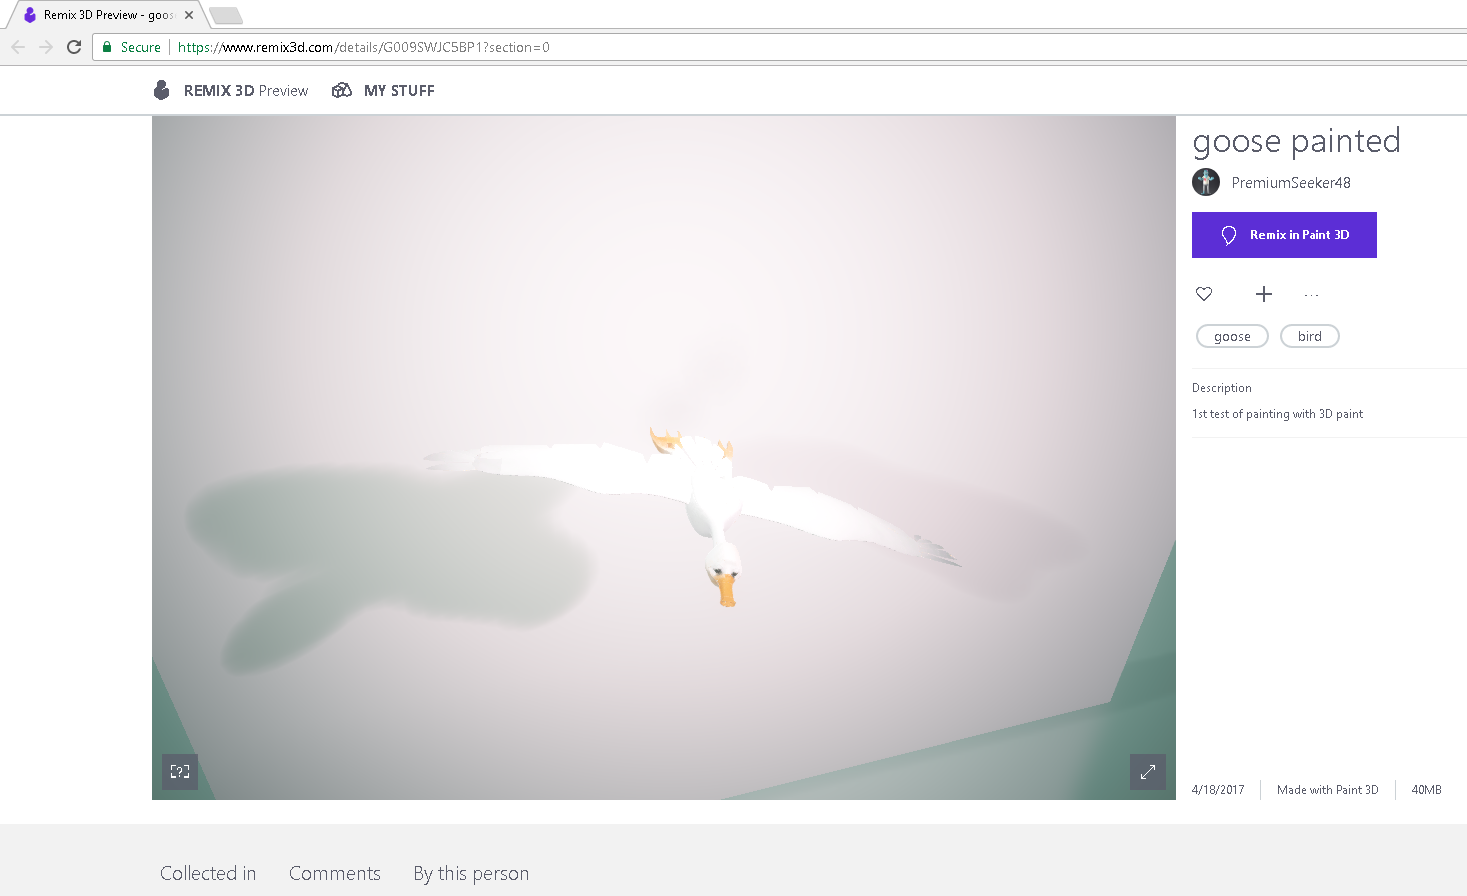
Installed the Win10 Creators update and everything appears to be working fine. My primary interest of course is gaining access to Paint 3D and testing that out and while it's basic beyond belief I must confess that I'm excited by the prospects of the average Windows user being able to paint 3D models. I chose as my first model to paint the Goose from the A:M Library. Painting is pretty straightforward but minimum size for paintbrush is limited to 5 pixels in size. For smaller detail a pencil, pen or marker must be used. So... laying in a base color with the brush and then zooming in and adding detail is a must. Format-wise the trip from A:M to Paint 3D is not entirely direct. FBX and 3MF are the formats used (because they can store paint data). The most direct way from A:M to Paint 3D is via STL export from A:M into the Remix 3D site where the file can then be sent to Paint 3D (and/or exported to FBX, etc.) The big downside (as far as I can tell at this point is that there is no direct means to get the painted model back into A:M. Remix 3D is a site similar to SketchFab but with an emphasis on sharing and reuse ('remixing'). Unlike SketchFab the Remix site does not at this point support animation. Other Oddities When signing up for Remix3D a username is given that, according to documentation, can be changed 'for a fee'. Ridiculous.**Edit**Apparently users can change their name/xbox gamertag once for free. Rodney3D was available so that is now me. More to follow.. Link to painted Goose on Remix.com
-
One down, billions to go.
-
There are some interesting components of the AV1 codec that catch my eye. It would appear that with Google as part of the Alliance for Open Media that they will likely deprecate the VP9 format in favor of AV1 (and eventually AV2 etc). Here's a bit about that: Regarding comparison to HEVC: More importantly is what the codec might bring to use but first a little background: The most promising of the coding tools (experiments) are said to be: While not necessarily related, I like the thought of 'predictive' rendering and when directions (in timespace) are analyzed it can inform and reduce processing time. While there is much to be found herein what comes immediately to mind is 'seam carving' for video. For still imagery this technology is often referred to as 'healing/healing brush' because that is the effect accomplished in programs such as Photoshop. Hey if it helps to identify objects in depth and separate them (ala automated masking) then I'm all for it. All quotes source from: Link
-
It looks like the Alliance for Open Media's first foray into video (AV1 codec) is making some progress. As for the Thor codec (topic title), while still presumably proceeding, it looks to me like the tech involved has mostly been gobbled up for use in other product. Added: The early roll out of AV1 likely won't effect the low hanging fruit of the non-corporate world as there is money to be made and recouped. I only highlight the emergence of new codecs/standards because they appear to be headed (eventually) toward us.
-
Thanks Martin, I'm still convinced the best is yet to come.
-
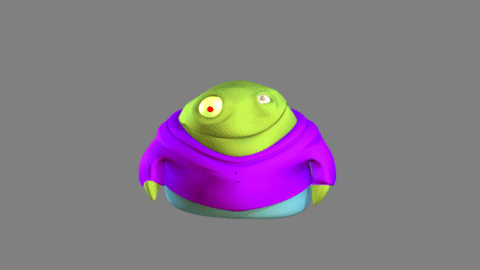
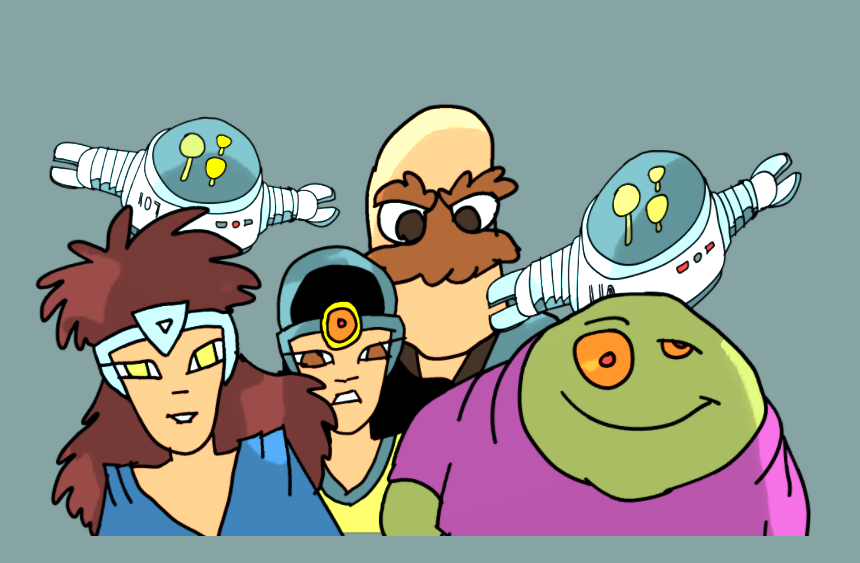
Another of Koiby's crew. This is Loosh (Luis). I don't know much about him other than that. He kinda looks like a poor man's Jabba the Hutt. I didn't quite capture that naive and kind happy goof in the drawing but ya gotta start someplace.
-
I should add a few thoughts related to the last post that relate to thought and theory of production and I welcome your own insights. In the case of a fully formed story (which is certainly preferred) that 'script' drives the requirements of production. In the case of 'free form' storytelling in the tradition of those old classic serials published in pulp magazines at the turn of last century (think: Tarzan, etc.) the requirements are fluid and can quickly change. This makes the imperative that of producing what is needed right now vs what might (theoretically) be needed someday. Of course, writing a few descriptive words in serialized fiction is always going to be easier than populating that same world of words in 3D. There is some gold to be mined in this arena in that more often than not the models we create are overproduced. I've seen this first hand where props that don't get used (or are barely seen) in production get lots of attention and time devoted to them. This time surely would be better spent on those things that will 'feature'. This isn't to say considerable forethought shouldn't go into the detail of everything that will appear in a scene but in those cases some thought should be given to whether that object is known to play an important role... or is expected to play a significant role later. Even then, with budgeting of production time at a minimum it might be best to build a proxy that will satisfy the needs of production today and then improve upon it later when more detail is needed. If, models are not programmed for reuse, that is to say 'shared with others' or recurring, then very likely simplicity should prevail. So, why aren't we completing those short films and movies? Could one important barrier to success be that we tend to get lost in needless and unnecessary detail? Some productions do call for lavish attention to even the most minute detail. But if they do, they need to adjust their production budget and schedule... and therefore productions expectations... accordingly to allow for such detail.
-
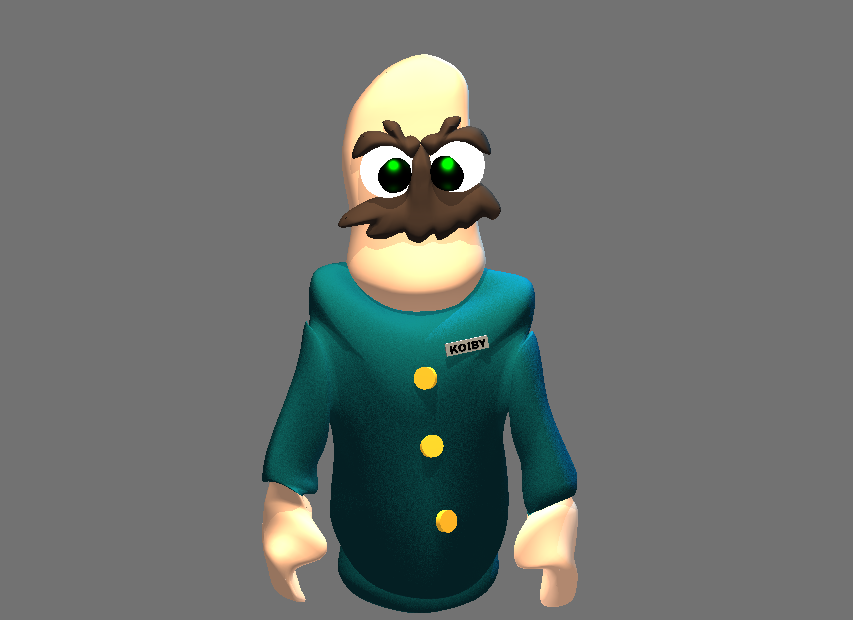
Here's a first pass at Captain Koiby... Even for random characters I often try to give them a name, background or attach them to a story. That way, while I may never have use for them again at least they can go off and have their own adventures. If they seem to gel, and putting characters together often accomplishes this, I might even give them a title to one of those adventures. That title often gives a framework to their story that supplies opportunity for plot and character development. In this case, the 'story' title is 'Koiby's Edge' and the basic 'feel' of the story follows that of the novel, 'City at Worlds End' by Edmond Hamilton. You can hear that story read over youtube here: LINK Does 'Koiby's Edge' track closely to that novel? No. Thus far it can't because I'm not familiar with that story myself. That's why I'm listening to it on youtube. I wouldn't rule out some kind of homage or tribute but I doubt I have the patience for that. At any rate, here's a WIP of Captain Koiby. When splining undeveloped characters such as Koiby, as each spline and patch is placed a personality and character begin to surface. And a few of the character's secrets as well.
-

Checking things out again - But what happened to moving CPs?
Rodney replied to ernesttx's topic in Open Forum
Looks like you diagnosed and solved the problem. No, that wouldn't have helped as that relates to constraint offsets for bones and such. It's great to see you again Ernest! -
Nicely done. That's a lot of work in there and you are making production look easy. Keep it up! P.S. I don't recall saying that but I'll take whatever credit I can get. Nothing against 'Breckridge' (I like it!) but 'Nicer' fits you.
-
Figured I should make a quick 3D version of the robot as the basic shapes are all simple...
-
Random test of 2D Layers in A:M. A file naming issue where extra periods in a filename is causing Layers not to be correctly saved in a Project and that is quite a pain. Workaround: Use rename utility to remove the extra periods in the file names. I use Irfanview for the batch renaming. Characters are just randomly doodled characters each placed on their own separate layer in A:M. Shadows are working but hard to make out in this render. Added: Not quite successful attempt to automate shading of the characters by using a second instance of the layer to cast a shadow over the other layer(s). This technique is quite useful when trying to cast a shadow onto a scene, such as characters walking through a forest and into shadow of the sun-blocking leaves.
-
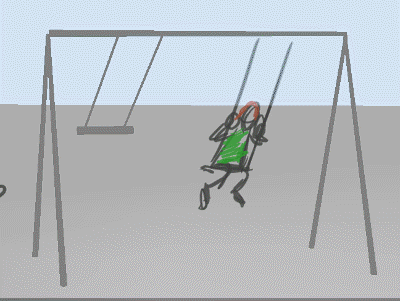
I just saw the Joe Daniel's video walkthrough of VR drawing here: xhttps://vimeo.com/211768999 And thought... hmm... I wonder how close I can get to that basic premise using A:M. After quickly modeling, rigging and animating a swingset like the one in the demo I quickly got to the point of drawing over the animating swing while the sequence was playing. A problem arose where I couldn't get A:M to keep playing while drawing so I used the HAMR viewer instead. Ran into one problem with the HAMR viewer in that it didn't want to recognize the swingset model. Turns out HAMR just needed a Choreography. Cool. While none of this is much to look at... I'm pleased that it only took about 30 minutes from seeing the video to satisfying my curiosity. I doubt I'll press much more into this but If I can figure out a way to 'turn' models and drawings more easily this might be worth pursuing further.
-
I can't imagine those characters with any other voices. I don't have any good guesses as to why Hippogyraph Song has more views. Okay, perhaps one guess; the people involved with this sequence might have pointed people to it and the sequence has quite a few people involved. For instance, I understand the voice of Hipposgyraf, Greg Schumsky has quite a following in the (way off broadway) theatrical world. The modeler of Hippogyraf, Will Sutton is well respected as a modeler of splines and patches. Riggers... can't quite recall who rigged Hippogyraf; Ken Heslip? The supporting cast with Teresa (Woot), Robert (StrawBear)... drat, I knew I shouldn't start naming people because I'd forget someone. And to add to the mystery, Hippogyraf is one of my favorite characters in TWO although I'm not exactly sure why. I'd say it's a combination of things from design to voice to entertainment value.
-
Martin, It's seems more than fitting the creator of A:M be here as the A:M Forum approaches its 15th anniversary. I have questions... none very well thought out... but all relating to splines, patches and the production of animation. I'll see if I can dust those off. I'm also more than a little curious to know if there will be much adjustment required on your part to reorient to the world of A:M after diving so deeply into the realms of politics, philosophy, etc. I'll guess not. And will the return meet and exceed your expectations? I certainly hope so. I'm looking forward to lively discussion on animation thought, theory and practice with the mind that created Animation:Master. Even after all these years A:M is still the best thing going.
-
Welcome back Martin! This is going to be a great year.
-
Did the Anzovin video tutorials ever get distributed to a location where they can be regularly and reliably obtained?
-
I'll add this because it relates to the topic of adding color into an image only to take it away later (via chromakeying or whatnot). In another forum I was curious about the difference between RGBA and RGBM. The later of which is what is generally referred to in the Japanese animation industry. Of note is that the entire industry basically goes through that extra process of adding color (pure white in their case) only to remove it later (with a few exceptions as noted in the text below). Shun Iwasawa is a technical director that was with Studio Ghibli for many years and now heads up development on the OpenToonz software (primarily through grants from the Japanese Government) and through agreement with the originators of the Toonz software which OpenToonz was extended by Studio Ghibli. At any rate, here is a little of what he had to say relating to the use of the M (that is to say 'Matte') channel in RGBM/RGBA: (Note that the initial quoted text is from me. The follow up/answer is from Iwasawasan) Exactly. In Japanese animation production, they never use "255-white" color (= R255 G255 B255 M255) for any part of characters, since it is reserved for transparent area. Instead they use light gray for "white " part such as the white of the eye, the head of Gundam, etc. Actually avoiding to use 255-white color in characters is more for visual effect, than for software restriction written in the above. Any light effect applied on the 255-white pixels will become useless since all channels are already saturated. So they use light gray, in order to leave dynamic range for representing "brighter than white" area. So, similarly, if/when we add color to an image that will later be taken back out we must take some care to make sure it is not a color that will be inadvertently removed during the composting stage. It is interesting to note also that this 'extra step' they are performing is largely through tradition in much the same way dealing with transparency in Photoshop; that's the way it has always been. Of course, the desire to get at higher dynamic range is an important aspect to consider and Shin emphasizes that as current industry practice. Of note, this is unlike adding green, blue or other color to an image with a goal of removing it later. There is little to no point in doing that unless... the program under consideration can't be made to work with alpha channels. In the case of Japanese animation many studios have a fairly good reason for maintaining the workflow because hand drawn images on paper are still scanned into computers and drawings on paper do not have transparency. As such that has to be dealt with at some stage. However, this is not the case with drawings made in digital programs! (Footstomp in case there is a test later) *IF* we can have transparency from the outset there is rarely a need to get rid of that transparency... replacing it with a temporary color... and then removing it again later. To do this makes very little sense. One of the problems with use of the Alpha Channel/Transparency is that not all programs display that transparency in a way that users can interact with it. This is why Photoshop create those 'crawing ants' so that masks could be readily seen. But a mask/matte and transparency is not neccesarily the same thing. Even A:M has some issues with this in that transparency may appear as black in some cases (such as preview images in the Project Workspace). This can lead users to mistakenly think their background is black when in fact it is completely transparent. Many programs use a checkerboard pattern to aid in the identification of transparency. All of this is further complicated by modern image formats (such as EXR) that store additional data in the Alpha Channel and perhaps especially for EXR 2.0 that allows depth and multiple images to be stored within the same channel in arbitrary manner. The film industry has been trying to standardize the expanded use of the Alpha Channel and has made great strides but to date no standard has been set.
-
Well said. File output from A:M has been very consistent (one of the benefits of code not changing over the years). If you had said, "New versions of A:M do not often change how these exports work" I'd be in full agreement. Any bugs that are identified get quickly addressed. Downloaded and played around with it a bit. Thanks for the heads up. There are some drag/drop effects in there that I haven't seen readily available in other/similar programs.
-
Random scene created in 'Make Dragon' button testing. This was more of a 'make.horse>make.lizard>make.dragon' test because that's the way it was developing (I started trying to automate the creation of a horse-like shape). For some unknown reason, at the point where I added the rock for the lizard to perch on top o (left of screenshot), A:M crashed. Posting this because I don't think I saved much of the test and want to revisit the general idea some day. Added: Found/posted screenshot of the splines used to create the creatures (horse and lizard). The lizard was a modification of the horse. The dragon splines (not seen) was a modification of the lizard. And Added: alternative approach using cylinders with dangling splines (splines not seen). The idea being that the dangling splines would then be connected to cylinders in close proximity.
-
Yes, it seems that the sections of the explode rebuild model are reacting too quickly. I haven't been able to find an ideal setting to change to bring it down to something reasonable. BUT... at least it's breaking. I'm wondering if there might be a bug in the Bullet Joint Setting. Although it is set to 1 for a value the main setting is OFF and that cannot be changed. That seems odd to me. I need to review the Bullet Physics documentation Steffen has posted. If you haven't done so already I recommend playing with the project files he posted. That angular motor is very cool... and I've played a little with that. Automated motor in A:M... that's sure to be useful!
-
John, You forgot to embed the models. A:M states that 2 coins and 2 spheres are missing which I suspect might be 2 instances of the same coin and sphere. The sphere is easy enough to replace but the coin... I don't think I can properly assess the project if one of the models (the coin) was created with the Explode Rebuild plugin. I'll go into a holding pattern pending your response. Edit: From what I can tell it appears you have not made the Coin (the explode rebuild model) a Bullet Body. To do that: Right Click on the Model's listing in the PWS, Add Constraint, Bullet Body.