


Caroline
-
Posts
1,248 -
Joined
-
Last visited
Content Type
Profiles
Forums
Events
Posts posted by Caroline
-
-
.mov works for me.
Try this:
1. Import the .mov as an animation sequence. It will show up under Images.
2. Drag the .mov onto your model.
3. Choose Decal.
4. Position the decal (.mov) and right click it and click Apply. Right click it again and click Stop Positioning.
5. Drag the model into the choreography.
6. Render.
The .mov does not show for me until Render time.
However, if this does not work for you, it could be some codec issue. You could try a sequence of .tgas as noted in the above thread.
-
The working .chm help file can be downloaded from:
ftp://ftp.hash.com/pub/updates/windows/Am2007/Master.chm (50MB). Put Master.chm in the A:M program folder (mine is C:\Program Files\Hash Inc\V15.0), overwriting the small Master.chm that may already be there.
-
I don't know if the image has changed for 2008, has it? I looked at the support site, and it says that the Volume name is HASH, which seems to imply that the image has not changed.
What is the volume name of your CD (look at My Computer)? My CD has the castle picture, but the volume name is HASH2007, so I assume that v15 will not work with my CD.
If your volume name is HASH, the latest download is at:
http://www.hash.com/2007web/updates.htm at the bottom of the page, for a CD - the top one is the subscription one.
If the volume name is HASH2007, then the update is at:
ftp://ftp.hash.com/pub/updates/windows/Am2007 and download AM2007.exe. This is v14.0c.
-
With the advent of the downloadable version of Animation:Master, the manuals are available virtually.
As Rodney says, the best chance of success with A:M is to do complete The Art of Animation:Master (TaoA:M) course. It's fun and rewarding! You can post all your exercises in the relevent thread in the TaoA:M Forum, where you may get feedback and encouragement from other members of this forum.
You can download both The Art of Animation:Master manual and the Technical Reference from:
http://www.hash.com/2007web/reference.htm
The data to complete the exercises is at:
ftp://ftp.hash.com/pub/misc/Data.zip (162MB)
Videos of most of the exercises are at:
http://www.hash.com/2007web/vm.htm
We look forward to 'meeting' you!
-
The Art of Animation:Master Manual is an introductory manual that comes with the program. and can be downloaded from:
http://www.hash.com/2007web/reference.htm.
If you have the internet version of A:M v15.0, you will need the data that comes with A:M, downloadable from ftp://ftp.hash.com/pub/misc/Data.zip
If you have an earlier version, you will find the necessary tutorial data on your CD.
If you find that your settings look different from the ones in the manual, then click Help Menu > Reset Settings, and restart A:M. This will put all settings back to the way they were in the beginning.
When you work through this book it will answer many of the early questions that you will have.
-
-
Hi - to get the most out of Animation:Master, there is an introductory manual that comes with the program. The Art of Animation:Master Manual can be downloaded from:
http://www.hash.com/2007web/reference.htm.
If you have the internet version of A:M v15.0, you will need the data that comes with A:M, downloadable from ftp://ftp.hash.com/pub/misc/Data.zip
If you have an earlier version, you will find the necessary tutorial data on your CD.
Work through each exercise from exercise one, and you will get an idea of most of the features in A:M. It will probably answer your question also about changing your project into a jpeg (called rendering). Exercise 1 has Render in it.
If you find that your settings look different from the ones in the manual, then click Help Menu > Reset Settings, and restart A:M. This will put all settings back to the way they were in the beginning.
-
Tools > Options > Rendering > Turn Particles OFF
Before you close the rendering window.
I have tried doing shift 8, but it is not always reliable.
And what Ken says - when doing the hair, I turned realtime down to about 1%, unless I was doing a portion with the rest of the model hidden.
-
the winning entry in this month's landscape contest
Huh. And you let us help you in all innocence. Never mind - you're going to need all the help you can get

Hair is a good idea. That's one of the things that's so great about A:M is there are multiple solutions.
-
Welcome to the A:M Forums!
I don't think there is one.
Where are you having problems? Are you going through The Art Of Animation:Master book?
-
Have you worked through The Art of Animation:Master exercises? This will answer a lot of your questions.
In Exercise 7 Can you Say That? you get to use a premade model and lip sync.
In Exercise 12 Lip Poses you get to use a model and move the control points to make the lips move.
You might need to rig your character's mouth with a bone to make the jaw open and close. Rigging is introduced in Exercise 9 Flower Power.
Screen shots of where you are at and where you are having problems would help.
-
Maybe if you used material effectors, it could be rendered in layers. I guess particles are OK with an alpha channel render.
-
Perhaps particles are turned off?
To turn them on again, Tools Menu > Options > Rendering. Final Shading, click Draw Particles / Hair ON.
Or Shortcut key is Shift 8.
-
What sort of help? Where are you getting stuck?
Have you looked at Colin's tutorials?
http://www.colins-loft.net/tutorials.html
And this?
http://dement3d.com/tutorials/toontutorial...eling/head.html
(Sorry, haven't a clue who you are talking 'bout - shall google
 )
)Edit: I should have googled first - the mouth is flat and simple.
I wonder if this document would help you:
http://www.hash.com/users/jsherwood/tutes/SkyLark.pdf
It's a very old tutorial, but is one of my favourites.
-
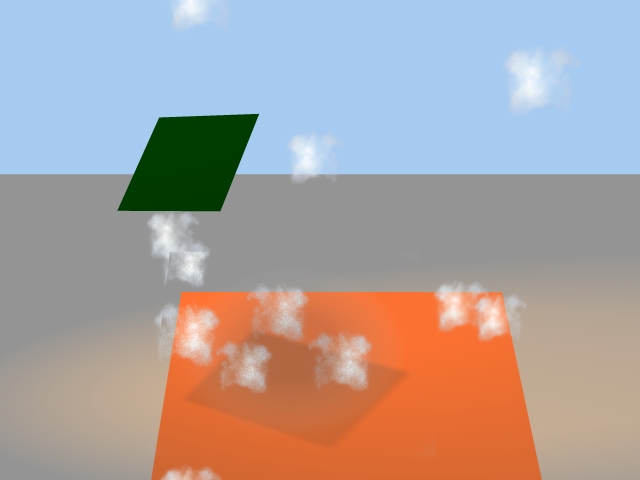
Overlay geometry in A:M could work. Depending on the resolution and quality needed, because this is a bit hazy on the particles.
This is a mess, but I don't have a lot of time today, and my particles would not go where I wanted them.

The green square is casting that square shadow on the orange. Notice that the 3 particles around the shadow square are a bit darker than the others. The shadow square has no influence on them.
As an experiment, I created a square that has a spherical combiner - spherical because I wanted the edges blurred, and i wanted it round so that I could tell what was what. The spherical combiner consists of one circle 100% transparent, the other 70% transparent and grey. They are blurred too.
In the picture you can probably make out the circular dark haze above the shadow square.
So you could move this square with the transparent material around and make it act like a shadow, and the particles are seen through the 70% transparency.
-
I have also failed to get help going. The chm files and the help.zip that I downloaded just point at the .pdf files. On the disks there used to be searchable html help. This is online at:
http://www.hash.com/Technical_Reference/Te...l_Reference.htm
-
I had a go, just because I was wowed to be mentioned in the same breath as johnl3d. My blobbies appeared to hold a shadow - they looked less bright in the shade, but had the same specular appearance, but sprites would only cast a shadow. I think as robcat says it needs to be something with an actual 3d shape to hold a shadow.
-
If you have v13 (?) up, the plugin is built into A:M - create the material, right click the Attribute, change type to > Plugin > Darksim > SimbiontA:M. You then load the DarkTree material under Properties.
Otherwise you need to go to http://www.darksim.com/html/simbiontam.html and install SimbiontAM. I have not ever done this.
If you mean where do you find the DarkTree Material, they are on the same site in the Downloads section under Shaders.
-
I use photoshop elements as well - it's not quite so alpha channel friendly as photoshop, but it works for my little projects.
1. Create a new blank file in PSE
2. Create a new layer.
3. Delete the background. - Now you just have one transparent layer.
4. Create a white circle using the shape tool (or brush paint your decal).
5. If you used the shape tool, or text, or another vector tool, right click the layer and click Simplify.
6. Control Click the layer thumbnail picture on the layer panel. - this creates a selection.
7. Click Select Menu > Save Selection
8. Name the selection and click OK.
9. Click File Menu > Save As and save as 32 bit tga file.
Import into A:M, drag onto the model as a decal, and the transparent area should show the model's diffuse colour through it.
-
problems with my rotoscope feature
More details? We might be able to help you with that.
To get a rotoscope onto the model - first import the image, then drag the image onto the model screen, then choose rotoscope. Have you tried different types of image? jpg, png, tga, etc?
cat eyes?You could try Colin's Uber Eyes:
http://www.hash.com/forums/index.php?showtopic=22404
And you could try a search for "eyes" - don't do "eye" because it is is too short.
-
Thanks - I never realised that you could apply an image to the hair like that - I always apply it as a decal and change the type of decal to Other > Hair > Diffuse Colour. I wonder which is better. I would have thought you could apply the decal more accurately.
-
After each extrusion, you need to move the splines and control points to match the picture.
To move a whole spline, click on the spline between two control points, and press the comma key. This will select all the control points along the spline so that you can move it sideways in the front view, and forwards and backwards in the side view.
Have you done exercises 8, 9, 10 and 11? Because they should help with modelling expertise.
-
It is not working for me in v15, and I don't think it did for me in v14 either, as I have put in a couple of reports - the same project does in v13. However, as thefreshestever says, the decal method works well. Applying it is a bit confusing - you may need to revisit the wookie exercise in TAOA:M.
This project renders correctly for me in v13 but not v 15.
-
Have a look at the Technical Manual:
http://www.hash.com/Technical_Reference/Te...l_Reference.htm
Click the Search tab, and type in Constraints.
The first articles that come up are About ones, for example "About Kinematic Constraint Objects". Many of the articles have specific examples.
And http://www.hash.com/2007web/vm.htm at the bottom of the page for a video on how to use several constraints.
Adding Video.. What file type?
in New Users
Posted
Are you able to use .tgas instead of the .mov?
What format is the .mov (ie, compression type). You should be able to see that in QuickTime - Window Menu > Show Movie Inspector > Format. Maybe it is a weird compression.
But .tgas always (?) work.