


Caroline
-
Posts
1,248 -
Joined
-
Last visited
Content Type
Profiles
Forums
Events
Posts posted by Caroline
-
-
Now, how about exercise16? I have finished everthing, except trying to use it to creat a movie
I don't understand the question - when you say "create a movie", do you mean "render it out to a .mov?".
You shouldn't need any 'actions' for Ex 16 - I got a bit confused when you were creating actions last time, but I assumed you wanted to save it as a reusable action for another time.
You should put it all together in the choreography, then render it to a Quicktime Mov, using Sorenson 3 compression.
-
You mean it does not show up in the library?
I find the easiest way to add something to the library is to drag from the folder showing in Windows Explorer and drop it into the correct folder in the Library in A:M.
-
That's interesting, because mine has started working since about a month ago. In Firefox the Hash site used to collapse up, so I could not read it, so I was having to use IE to look at it. But it works for me now in 2.0, and the link to the forums from the Hash page also work for me.
-
Exercise13.
He walks! I remember I enjoyed this exercise - the feeling of power of being able to inject life.

-
Another way to check is to click the spline near a CP, not quite on it, and press the Comma key. This will highlight the current spline, so you can see how far it extends.
-
Just wandering through the forum - http://www.hash.com/forums/index.php?showforum=64 - it looks fabulous. I should not single out my admiration of Nancy's lavish treatments (but I will), as all of it looks wonderful so far.
-
I have to admit that I've never noticed too much distortion, but then I'm not super picky.
So small and flat is good for them.
(And congrats on your win - there were some fantastic entries!)
-
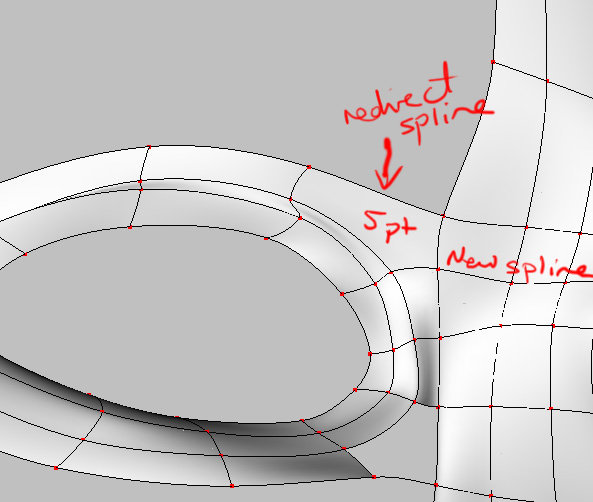
generally you don't want to place two 5 point patches next to one another.
I've read this a lot, and I don't understand why. What's the reasoning behind this, Rodney? When you put in a round something like a leg, or the horns on the giraffe head, you get 4 5-pointers at the base. I've never had a problem creating those 5-pointers together. Would it be for animation's sake? In that case, if you make them really small, is it OK?
-
So you got all 5-pointers except that last one?
I can't see anything wrong with the splineage there - are you ABSOLUTELY sure that you are ONLY selecting those 5 points, and then hitting the period key till your fingers bleed
 ? (In that last screen capture if you lassoed, you would get all the points behind as well. Similarly, if you shift select, you may be getting others selected.) Make sure that before you start selecting, you use the T key to turn your model so that no other control points are behind the ones you are selecting.
I had the decal on, and the distortions went away when I did a partial quick render.
-
And I think it's great that you are spending time analysing this - to me this exercise and exercise 6 (Shaggy & the door) are the most important exercises, that really define the zen of Animation:Master.

-
I'm a bit confused - I've lost sight of what the problem is.

Anyway, looking at your model, the way I think you've 'fixed' it is a no-no.
It does not have the 2 crossed splines that you should; it has several splines going into one control point. You can see the marked green spline is unhappy.

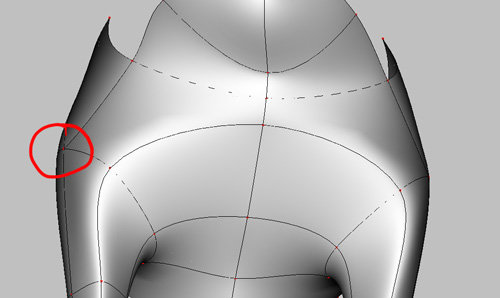
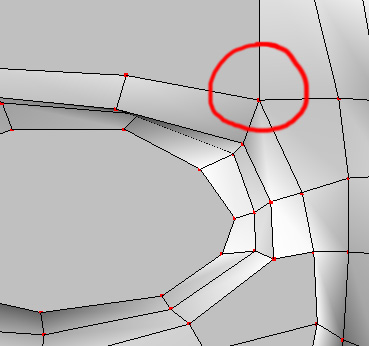
I put the 5-pointers back, and selected the 5 points around one, holding down the Shift key. The 5-point patch tool appeared no problem. I did the same for the second patch, and I had to use the period key twice to get the tool to appear. Note I have hidden the part of the giraffe that I don't need at the moment. The red circle is explained in the third picture here.
This next picture is also a spline no-no, and will cause distortion. You should only have two splines crossing. You have a third coming in dead-ending. If you are going to make a hook instead, keep it away from 5-pointers.

It appears to me that the decal distortions go away on render.
Can you simplify for me what the current problem is?
-
I think this is the same as Rodney's, but simpler and with .pngs.
You just have 2 decals one on top of the other, and you animate the percentage of each decal over time. And you do need to click Show More than Drivers to get the decals to display in the choreography.
Project+pngs.
If you need a third static decal underneath the animated two, you can do that too.
-
Or the normals may be flipped? To test this, go to Tools Menu > Options > Modelling Tab. Check Display Normals.
All your patches should be pointing out with a yellow thing. If those 5 pointers have the yellow thing pointing into the middle, then you can flip the patch.
Click on the Patch tool on the right, select the 5 pointer and press the F key.
Don't forget to turn off normals again, otherwise you have a yellow hedgehog forever more.
Another tip, sometimes for 5 pointers you can hide most of the mesh and use the lasso tool to select the 5 points. Then press the period key twice. That always works for me.
It's great to see you progressing and absorbing all this knowledge
Edit: Of course if the giraffe were rendered to a tga that distortion might disappear. I remember now that I had distortion until I rendered.
Edit2: I've just read your other thread where everything is sorted - ignore the above
-
I'm not sure how you are currently doing it? Decal going transparent to show diffuse?
I have to go to work now, but I'll have a look later.
Fireworks will save a .png, I think? That should work with transparency.
Also you will probably need to click the Show More Than Drivers if you are animating a decal to fade in and out:

-
Tutorial on using SmartSkin here (in Wink):
http://www.clipsandscripts.com/tutorials/c...a_smartskin.htm
And Holmes' Smartskin:
http://www.hash.com/forums/index.php?showtopic=29742
I find SmartSkin is easier to understand than cp-weighting, but if you are using the same character in an animation a lot, then cp-weighting is probably better than smartskin.
-
In TaoA:M there is an Exercise 17, which uses Dynamics. A while ago I wrote an alternative method using Steffen's Newton Physics plugin (it's a small pdf document):
http://www.hash.com/forums/index.php?act=a...st&id=23696
That should give you the basic principle.
Here you will find the usage of the other things it can do:
http://www.hash.com/NewtonPhysics/
And here are the example movies that have been created using the plugin:
-
I turned the alpha off but still show the black sky in my render
That's odd. Does your screen look like this one?
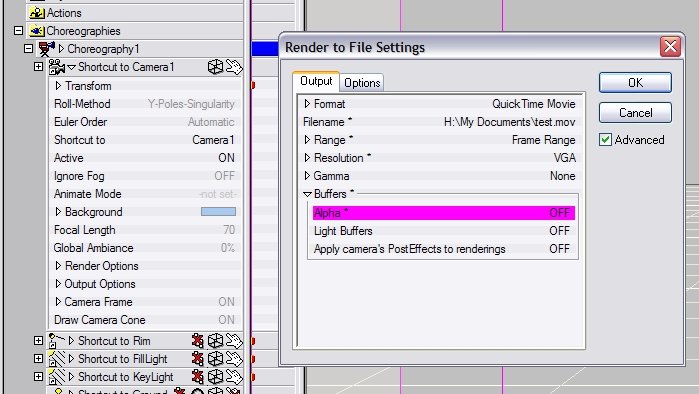
Check both the Camera1 Background colour (should be blue) and the Buffer Alpha = Off.
-
Exercise6.
Well done - I especially like the timing; the way he jerks backwards.
-
I thought I had the answer - and just upgraded to 15.0c, and I don't have the answer.
I don't get a new smartskin option either.
Edit: I GOT IT!!!!
Tools Menu > Options > Global and Tick Show Advanced Properties
-
The .mdl file is just a text file - mine always opens in a new tab too, so I copy the whole page and create a new text document called x.mdl and paste the text into it, then I can load it into A:M. Same with .prj.
-
That's great - it looks like you've got good curvature on the cheeks - that's what I find hard, not making flat faces.
This software is more fun than any game ever invented!I hear you - I'm no longer a Civ addict.
-
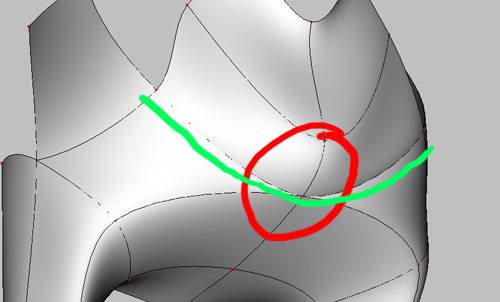
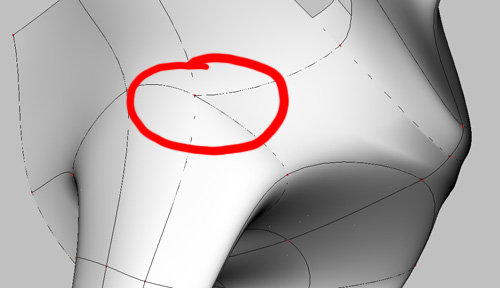
It's a good start to the Cooper exercise.
However, you have a star at the top right of the eye. If you see 5 lines going into a control point, you will have creasing problems. Splines are a continuous line, so when they cross, the control point only has 4 lines into it, ie 2 splines.
Problem:
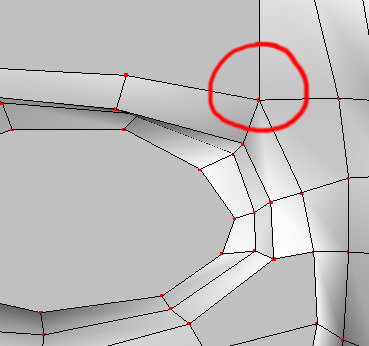
Solution:
You will need to use the K key to break a spline, after you have clicked on it, or if the spline does not break, then the delete key. My solution was to break the two problem splines, then add a new spline in for the lower one. (You could use a hook somewhere, probably.)
Also a very useful key for checking your splineage is the comma key. This will show you where your splines run nicely across or down your face, and highlight any problems where the splines look continuous, but aren't.
-
I use the patch tool when selecting patches for grouping for decalling. Also, when selecting for flipping normals - when you come to put hair on objects, the hair sometimes grows inwards, which means that the 'normals' are flipped - ie the patch is inside out. Otherwise I don't use it, I don't think.
Glad you got your 5 pointers sorted out.
-
Feel free to start a new topic for this!
Actually it would be very hard to diagnose the 5 point patch problem from a jpeg, we would need the project file to be attached. It also looks like you may have a spline problem above the eye too.
To get the wireframe in the jpeg, under Advanced render options, you can render "shaded + wireframe" instead of "final".
To get the 5 point patch filled, you can hide everything else, and then use the lasso tool, making sure you only get the 5 points selected, then if the 5-point patch tool does not become available, use the period key twice. I have never had a failure using this method. Unless of course it is not a valid 5 pointer, for which we will need to see the project.
There are 'rules' to using splines - the best tutorial is here:
http://www.alienlogo.com/tincan/ - the Basic Splinemanship tutorials.


TAOAM by StormedFX
in TaoA:M and the A:M Technical Reference
Posted
Eyelashes:
1. In the Model window, hide everything that you don't want to see
2. Create a New Action, make sure you are in front view (that's 2 on the keyboard), and go into Muscle Mode (F7). Select all the CPs, and click Scale Mode (or 'S') - 'a' on the pic, Click Show Manipulator Properties - 'b' on the pic, and change the Z scale to 0 - 'c' on the pic.
This will flatten the model. You can move the points around too to show all the patches better - remember you are in an action, so this is not permanently affecting your base model.
3. Print the screen (Shift + Prt Scr) and paste it into Photoshop or equivalent (I use Photoshop Elements / Twisted Brush / Dogwaffle). Crop it so you only have the relevant area showing. Create a new layer below this one, and change the pasted layer blending mode to Multiply (so you can still see the lines while you paint). I changed the grey to a white too. And Paint. Save the decal as a jpg. Keep the lines layer in the jpg until you are happy with the way it lines up.
This is my decal - you can see how I moved the CPs
4. Back in A:M - Make sure you don't touch anything. Don't zoom, or change anything. You should still have your action up on the screen.
5. Right click Images and import your decal.
6. Right click the MODEL and click New > Decal and choose your decal image.
7. This image should now show on the Action window. It should also be exactly the same size as your model, so you can line it up easily. If not, you will have to stretch it. Right click the decal, left click Apply, and right click the Decal and left click Stop Positioning.
8. A spot render gives me this:
(And don't comment on too many splines, it's a WIP!)