


Caroline
-
Posts
1,248 -
Joined
-
Last visited
Content Type
Profiles
Forums
Events
Posts posted by Caroline
-
-
There are the exercises in The Art Of Animation:Master, exercises 10 and 11 Plane and Giraffe. They show you the basics of decalling, but not flattening.
Try Colin's Texturing:
http://www.colins-loft.net/FaceTexture.html
and if you are going very advanced, Rusty's Facial Layered Mapping Tutorial:
http://www.virtualmediastudios.com/tuts/mapping/
For purchase, there is the Siggraph 2006 training DVD from Hash for $50, which has William Sutton's decalling video. This is the one that made me understand decalling.
-
No network features in A:M 15 at all. It works just the same as A:M 13 and 14 in that way. So you can have multiple instances of A:M running on one machine.
Where you might be confused is that you might have read the posts where you can assign (through XP) a particular processor to a particular instance of A:M.
Or you might be confused about Web Render, which is not available to us, but is being run from and by Hash to render the TWO movie. Rodney has hoped that one day it might be made available.
-
That's a great exercise, but very difficult. If you need some help, here's a thread where we went through some of the problems:
-
Have you tried restarting the computer?
Was it working before? If so, what is different about your computer now? Have you installed anything? Updated drivers?
-
Looking good.
To delete a pose completely, as well as deleting in the relationships folder, under the model's User Properties, right click the pose there and delete too.
-
Did you have the mask enabled when you did the Solidify? (I did several times)
My steps are - create the mask. Save the mask. Disable the mask. Run Solidify. Save the tga.
If you run Solidify with the mask enabled, the filter will only work in the area unmasked.
I can't test PSP, as I can't find my old disk for the moment, but Photoshop Elements works fine on a cookie cut.

The one on the left is without Solidify, the one on the right with.
(That was fun, I don't think I've used Cookie-cut. It's neat.)
-
http://www.hash.com/forums/index.php?s=&am...st&p=265900
This works well.
The Flaming Pear Solidify plugin is at:
http://www.flamingpear.com/goodies.html
and works with Photoshop Elements as well as Photoshop.
-
There's a page on their website that directs older users to the ftp site, where they all are:
http://www.hash.com/2007web/updates.htm
The Hash site never works for me in Firefox.
-
Oh I get it, this is like your fire tutorial. Looking good. (When did you last make such a controversial model?
 )
) -
Is this the Olympic torch? Can the flame trail behind as it moves?
-
The image needs an alpha channel, possibly?
In Photoshop Elements, select your transparent bit with the magic wand, then click Select Menu > Save Selection, and save it. Then save your image as a 32 bit tga.
Oh, if that doesn't work, you might have to invert the selection - after selecting with magic wand, Select Menu > Invert, then save the selection then the tga. I can't remember if that's necessary.
Edit: I found this post with all the steps (same name as yours!)
-
I didn't realise that one was yours. I remember that.
That is a good idea to have a blog of WIP. A way of remembering how far you have come.
-
Well done, what do you plan as your graduate project?
With the hair, I had great difficulty too, but I've since realised that one of the settings in the hair is Realtime, and if you put it down to 2%, only 2% of the hairs show, which is enough to groom it.
-
A klieg light.
I created this by deleting all the lights in the choreography, then creating a Klieg light (right click in chor > new > light) called Light1. I then played with the settings until I got the effect I wanted, then animated it to move.
Width: 30cm
Width Softness: 100%
Falloff: 500cm
Cone Angle: 20°
Project:
The A:M manual has this to say about lights:
http://www.hash.com/Technical_Reference/Ge...Html/LightP.htm
It explains the three types of lights.
-
They all look pretty spiffy - well done on Exercise 6.
-
Ok there's 2 hard things in here - the curve at the top, and the hole cut out of the cube.
This is my best shot, and it's not so good, I will admit to a crease at the top, and there are people out there that can do much better. But perhaps it will give you an indication of how few splines you need.


The best tutorial for learning splines is at:
http://www.alienlogo.com/tincan/
Have a look at the basic splinemanship tutorials.
-
Umm. There's a heck of a lot of splines in there. It must have been a bear to make smooth. Let me see if I can come up with something.
Just so you know for next time, if you have finished with this one.
-
I guess it makes sense if you don't need too much detail.
-
No, don't retract - if you've had this problem then others probably will too, and if they search the forum, then they may find the solution.
Also, it's a happy reminder to check 1) Mirror Mode and 2) Animate Mode (when things won't animate). I for one need this reminder.

-
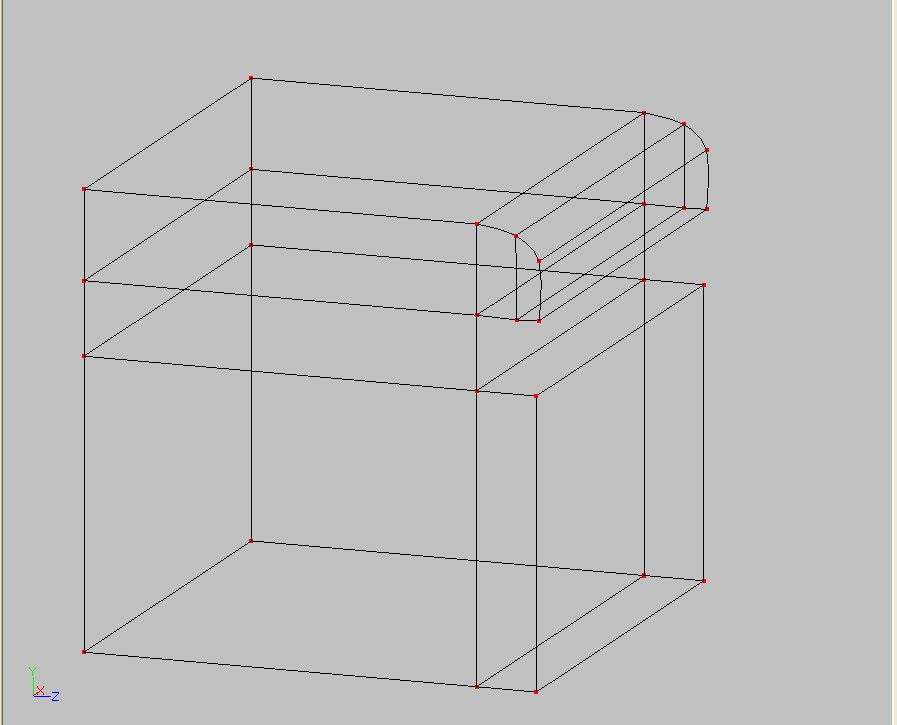
Hi, Alejandro - nice texturing.
I think you may have a 'crease' - if you post a wireframe of the splines then we can check your splines are good. (Render to wireframe, not final in advanced render settings) (Or a screen print will work too)
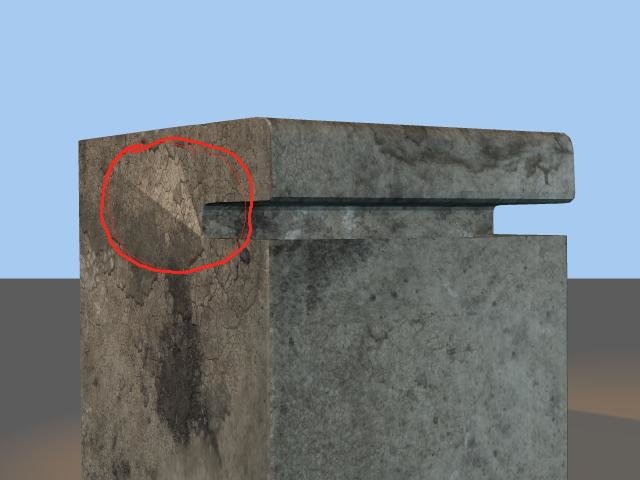
Also, the bunker looks solid. When you look through the eye hole there doesn't appear to be any room for anyone inside.
-
www.mytoons.com allows you to upload animations.
-
And render to tgas not a mov, because if something happens half way through at least you have half of it rendered. Looking forward to seeing it.
-
Masna - it's a worthwhile pay for tutorial at:
http://www.rafhashvideotapes.com/animatecdroms.html
I have a few of Anzovin's videos, and they are all good.
-
Hello, Ishida - I'm not quite sure what you want to do - is it a 'slideshow' of 1500 pictures?
You should just be able to drag an image into the choreography and use it as a layer.
Like this post:
http://www.hash.com/forums/index.php?s=&am...st&p=266940
This post has a background image, then the yellow 3d character, then a foreground image on top.


Tutorials Decals
in New Users
Posted
You have two problems - the first is that you are in modelling mode, and not in the pose window. The second is that you have not selected the rotate manipulator.
I notice that it says to create a pose - I do the flatten in a new action, so that the flatten can be discarded after decalling.
Also, while decalling, you should turn off hair - Shift 8.