


Caroline
-
Posts
1,248 -
Joined
-
Last visited
Content Type
Profiles
Forums
Events
Posts posted by Caroline
-
-
Water is pretty hard to do - you could try a search for "+water +material" (without the quotes)
Although a puddle is just reflectivity and maybe transparency / refraction? You could try changing the surface attributes, like in this thread:
http://www.hash.com/forums/index.php?showtopic=10187
There are the DarkTree materials from
http://www.darksim.com/Repository/
with rendered examples here:
http://www.pixelburg.com/am_materialtest/d...nt21/index.html
There's a fairly complicated tutorial (that I have not done yet) here, using animated displacement maps, I think:
-
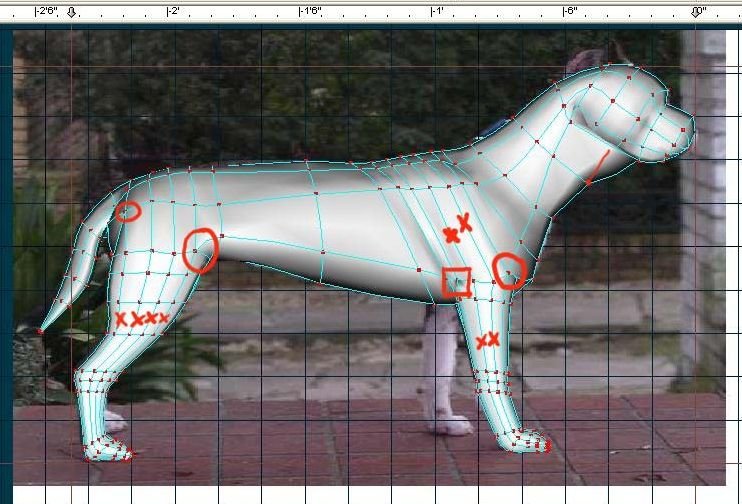
The circles are where you have 5 lines going into a control point, as described in the previous point - these won't lie nice or animate nice. Interestingly you don't seem to have any 5 point patches - these work better than having the 5 lines going into one point.
The square is something happening - maybe a flipped normal? Did you check with the comma key that your splines run continuously without breaks where you don't want breaks?
The x's are where you might be able to combine the spline - in the back leg change those 4 splines to 2 splines, and the front leg 2 splines to 1 spline. The extra splines don't seem to be doing anything interesting.
-
That giraffe conversion was a good idea - the model looks so much smoother. Although there is still something happening with those front legs. Do you have a picture with splines?
-
And you tried Help Menu > Reset Settings?
-
Just a few suggestions

The blue circles show splines that are not meeting properly - imagine the most perfect splineage as a grid, where one spline crosses another in a 4 way cross. You have splines dead ending so they meet in a 5 way cross.
I'm not sure that the splines you think are continuous actually are - you can check a continuous spline by clicking the spline near a control point, then pressing the comma key. This will highlight the cps on the spline.
The circular spline at the top of the front leg is not necessary, you could continue the splines of the leg over the body rather than making this circle.
And You might have too many splines going lengthways? There seem to be a lot going into the back leg.
And Chris is right - you only have to do half the body, then line it up and copy/flip/attach - do a search for +copy +flip +attach for pointers on how to do this successfully.
A good start. Very tricky model!
-
Welcome to splining!
I'm not sure what you are doing, so these are the basic steps to laying down splines:
1. Make sure you have the PWS (Project Workspace) showing - that's View Menu > Project Workspace
2. Right click Objects, left click New > Model.
3. Press the A key (or the second icon down on the right)
4. Click. Move the mouse. Click again. Move the mouse. Click again.
You should have a spline with 3 control points that you can move into a curve.
The next step is to read the Splinemanship Tutorials:
http://www.alienlogo.com/tincan/
Does that work for you?
-
To make it less than 23mb, in Advanced Mode, where you set to Render to QT format, you can choose Set. Then choose Sorensen 3 from the drop down, and set to medium.
Sorensen does not appear for everyone, so there are other compression formats you could try - mpeg?
Good beat, by the way!
-
You'll also want to consider whether to embed all the resources
This 'embedding' is important to understand - on occasion I have been religiously saving my project as 0001, 0002, etc, but my model was not embedded. This meant that it was saved as a .mdl on disk, and each time I saved to a different project, the same model was being overwritten, so I could not go back in time.
Also, I keep accidentally overwriting the Hash data I have downloaded.
Now on my own small projects I am trying to click Project Menu > Embed All regularly. On a big project with lots of data and different projects using the same data, then that would be impractical, so a good back up system are worth their weight.
On my current project, to go backwards and forwards in time, I am using MOGware FileHamster, which keeps revisions of files every time they are saved. This seems to be working well enough for me, but I haven't tested it over a long time.
-
There's a 162mb data download at:
ftp://ftp.hash.com/pub/misc/Data.zip
This is for Windows - I don't know how a Mac works - you should extract this into your animation master program folder.
The video lessons are here:
http://www.hash.com/2007web/vm.htm
Good luck with the exercises - it's so much fun!
-
Instead of left clicking the link, try right clicking and left click Save Target As (Internet Explorer).
The prj and mdl etc files are in xml format, so your computer thinks they are just text.
-
Frontal like this is how you get to see tennis players in the 5th set 3 games down.
-
-
Sounds like a keyframing problem.
You could read this post from earlier today
http://www.hash.com/forums/index.php?showtopic=31430
and watch robcat's movie:
http://www.hash.com/two/RCHolmen/MakinBone...yInPlaceMP4.mov
-
Hi, Shelley - welcome to the forums! Your site looks attractive - I'll have a wander.
The Art of Animation:Master is a great book to get started with, as it will introduce you to almost every aspect of A:M. And it's good that you have someone to work through it with. Exercise 6, I think, was the hardest of all the exercises.
There's a special forum for working through the exercises:
There is a thread for each of the exercises, and you can tag your offering on the end for people to marvel at

There is a video for each of the exercises at:
http://www.hash.com/2007web/vm.htm
Except, wouldn't you know it, of the hard ones, Exercise 6 and Exercise 11.
Looking forward to seeing your exercises as you post

-
That looks good - this is one of those make or break exercises like exercise 6, but it has been awhile.
Of course you know about N S and R? I quite often have little bits of my model that are in the wrong place and the wrong angle, so you can highlight that little bit, use the N key to move, the S key to scale and the R key to rotate. Sounds as if your extruded legs needed an R.
In addition, although for some reason I don't do this much myself, you can click Window Menu > New Window, then Window Menu > Tile Vertically, so that you can have two viewpoints of the same model at the same time.
I tend to add points and use the T key to turn the model. But then I'm a lot slower and less talented than a lot of people here!
-
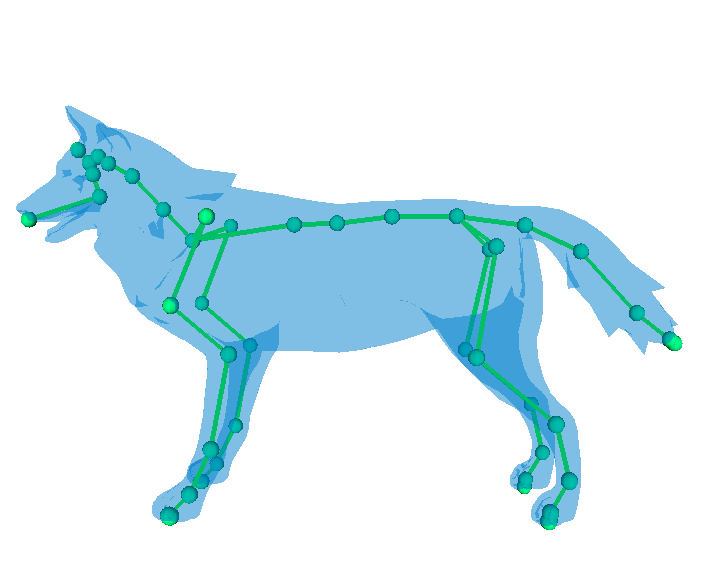
I'm playing with making a dog at the moment, trying to work out the movement of the front legs.
I think your legs might be back to front - the back legs bend backwards, and I think, although different pictures tell different stories, that the front legs bend forwards, and at the top of the front legs they bend backwards there.
Different types of wolves have longer legs - in the pics below, one has much longer legs.
Your jaw looks a little heavy underneath too.
Also, if you are rendering a still image, it would be better in jpg format rather than mov format.
Good start though - I know how hard it is!
Reference images:
http://www.billybear4kids.com/animal/whose...olfStanding.jpg
http://www.dkimages.com/discover/previews/739/178655.JPG
This is the one where the front legs look as if they bend forwards:
http://upload.wikimedia.org/wikipedia/en/1/15/Duma_roll.jpg
This is interesting:
http://evasion.imag.fr/Membres/Franck.Hetr...Images/wolf.png
A rigging mesh for a different program. I think I will bookmark this page:
http://evasion.imag.fr/Membres/Franck.Hetr...on/gallery.html
And a great quadruped reference site:
-
Thanks, Rodney - someday I must go through that - it's a gold mine. However, the material info was there, but I could not find the AO I thought was there.
-
I thought I'd have a go at Ambience Occlusion, and remembered the amazing A:M Features, but neither of these links work:
http://wikiold.hash.com/amfeatures/published/HomePage
http://wiki.hash.com/amfeatures/published/HomePage
Have they gone forever?
-
That's an interesting thought, Rodney. It brings up a different problem.
It was 100cm, with the Fractal scaled to 500%. This is 10cm with 100% fractal scale.
It has definite cross lines in the middle of each face. And the stretching.

1000cm has the same stretching too.
Edit: 3d Paint recognises it correctly, then stretches when I paint, so maybe it is just that it is a straight surface. It seems to do curved surfaces (Thom) very well.
-
Am I doing baking right? Do I need to do any preparation?
I created a material - Fractal Sum black and white, and applied it to the primative Cube. This is what I got (with a 25 second render time):

I then baked it, and this is what I got (with a 32 second render time - I thought it would be smaller):

The edges are very stretched. This is a screen print of the image diffuse map which is stretched:

The image is created with a name diffusecolor, but when I save the project and close A:M the image map goes away - how do I save it as a real jpg?
-
The bones are supposed to turn blue when they have a keyframe on them.
Your problem of being able to move them is something else entirely. Do you have a constraint? If you are constraining the hand to the doorknob, then you will be restricted in how much you can move that hand. Maybe try rotating his forearm / biceps / elbow?
-
To get the bumpy texture, you can add a second material on top of the first material. Using a black and white turbulence, you then change the second material's properties to bump.
I haven't got close to yours yet, but I'm sure it can be achieved with experimentation. I am beginning to have enormous respect for materials.
-

Just playing.
1. New Material
2. Change Attribute to Combiner > Gradient
3. Change Attribute 1 to 100% transparency.
4. Change Attribute 2:
Surface Colour - mid blueyAmbience Colour - slightly darker mid bluey100% Ambience0% TransparencyEdge Threshold 50%The Ambience gives it that glowy look
I bet a bubble could be achieved like this - I have spent many hours trying to get one over the last couple of years....
-

This is a sphere with Thom behind.
1. New Material
2. Right click the Attribute
3. Change type to > Plugin > ToonNation > Xray
4. Change the colour property
5. This falloff is 0.5
6. Add the material to the sphere.


Exercise 11: Giraffe
in TaoA:M and the A:M Technical Reference
Posted
Hi, Sean - nice contributions. As you know the decals are a bit too stretched on this and the previous one. I think everybody finds that, as there is only side and top. When you come to make your own models, you will have more decals and be able to match them better.