


Caroline
-
Posts
1,248 -
Joined
-
Last visited
Content Type
Profiles
Forums
Events
Posts posted by Caroline
-
-
I'm only a wannabe, but from my experience on TWO, the only time I touched the model bone I lived to regret it, and redid the scene.
If you rotate the model bone in the animation, you are rotating the whole model. If it is a person-type model, that would not be very good animation, as to rotate yourself, you move your shoulders, then hips, then feet. Those movements would be on different key frames.
So I used the model bone to put a character into the right position for the first frame, then didn't touch it after that, unless of course he was making a sudden jump not in the camera view.
-
-
-
Hi, evan - It's a great thing to experiment, but sometimes things can disappear before you know it.
When that happens, click Help Menu > Reset Settings. Then exit Animation:Master and restart it.
All settings will have returned to when you first installed.
-
Tools Menu > Options > Rendering Tab > Draw Particles / Hair = OFF
Or the shortcut key is Shift 8
When you render and turn particles on, they will stay on in your chor until you turn them off again. And vice versa.
-
Search is good - you've probably found it already.
Just in case, it's called Treez and Holmes's tutorial is here:
http://www.hash.com/forums/index.php?showtopic=30938
It's brilliant.
-
Isn't that also what the new NLE (non linear editor) can do? Someone did a tutorial, but I can't find it because "NLE" is too short to search for, and I can't figure out how it works.
Edit:
I found it:
http://www.hash.com/forums/index.php?showtopic=29222
But it does not seem to work for single tgas, just sequences, as john says. I was hoping you could specify the length to show a single photo.
-
Hi, qbmlm!
What version do you have? Is it version 15 on the CD?
This is a link to a post from earlier today, where Robert Kelley fixed the problem that you may have.
-
-
Are DarkTrees now included in V15? If so, where can they be found?
New Material.
Right click Attribute
Change Type To > Plugin > DarkSim > SimbiontAM
Then in the SimbiontAM properties click Load DarkTree. This is where you have to have the Darktree materials from john's link downloaded.
This site has rendered them and shows what they are:
http://www.pixelburg.com/am_materialtest/
Only the
DarkTrees from Darkling Simulations FREE(!) Simbiont 2.1 package
and
DarkTrees from Matt Andersen
are still available for download.
-
I don't know what is wrong with your settings. Maybe someone else can immediately pin point it?
What I would try is changing the Rendering Options to use This Dialog, rather than The Camera, and then render to tga with all options turned OFF except particles, and see how that goes.
-
-
I have not seen this message, but here are a couple of things you could try:
1. Restart the computer then start A:M.
2. Uninstall A:M, restart the computer, reinstall A:M, restart the computer and start A:M.
3. Go into Task Manager (Ctrl + Alt +Del), click the Processes tab, and see if there is a process Master.exe, and end the process(es). (Note - it looks like you may be running Vista, so I am not sure whether Task Manager is the same under Vista as it is in XP.)
I don't know why it would worry about another A:M process, as I often run several instances at the same time working on different projects.
Good luck.
-
-
AM2007.exe is just the setup file, so you can put it onto your desktop, or in a folder called for example "internet downloads", or anywhere. You then double click it to run it, which runs the installation process, which distributes all the program files into a folder called Program Files\Hash Inc\v1?.?, which you shouldn't touch, generally.
You can then delete AM2007.exe because it is not part of the installed programs.
Just for info, if you are using Windows, the installation also adds items to the "windows registry". The registry holds settings and options for programs, like what were the most recently used files. That is why you must use "uninstall" to get rid of a program, and not just delete it, otherwise you will leave all the registry information there.
-
I installed v14, and I get the same result as you.
To use v15, you would have to buy the annual subscription.
-
On my Help>About screen the last line, in the licensed to area, shows the expiry date. I have the web (no student) edition that lasts one year.
If you got a CD, that will not expire.
Welcome to A:M - it really is a cool piece of software.
-
This probably does not help you, as I am not using v14, although I would have thought v15 would have a problem there if v14 has.
I created a new chor in v13 and v15. I dragged thom into it. I right clicked and clicked New > Volumetric > Dust.
This is my result in v13:

And in v15:

They both appear to have the same turbulence applied.
What results are you getting? Are you right clicking and choosing New > Volumetric > Dust?
-
Well done - that was a lot of work in many different areas of A:M. Great atmosphere.
Maybe Ex 20 - fur on the pitbull?
-
Holmes to the rescue:
http://www.hash.com/forums/index.php?showtopic=31432
And TechTalk #6 Font Wizard:
http://www.hash.com/forums/index.php?showtopic=13249
And cool examples from johnl3d:
-
For alpha channels, you could look at the Alpha Channel tutorial from this page:
-
I hope you are familiar with Photoshop, or its equivalent.
You basically do it in layers, using different tgas with alpha channels, and build up the photo.
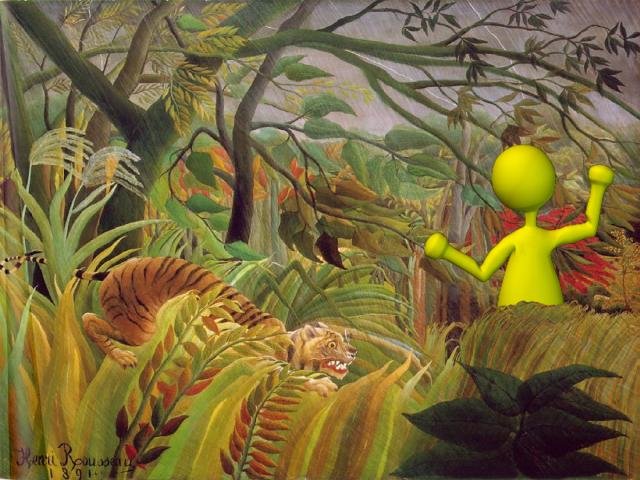
This is a painting by Rousseau with Thom added to it.
1. Create a new project.
2. Import the background image (this can be a jpg, as an alpha channel is not required on this one).
3. Import the Thom model (or your own).
4. Create a choreography, and position Thom in it. Delete the ground from the choreography. Render the chor to a tga. Render with the advanced settings, and under Buffers, make sure alpha is turned on. This will create a tga with black around Thom, but with an alpha channel defining where he is.
5. Import the Thom.tga you just created.
6. In Photoshop (I used photoshop elements), create a selection (alpha channel in photoshop) around the part of the picture that you want to have in front of Thom, save the selection (Select Menu > Save Selection) and save the picture as a 32 bit tga.
7. In A:M import that picture.
8. Create a new choreography. Delete the ground. Right click the camera > New > Rotoscope. Select the background picture.
9. Right click the camera > New > Rotoscope. Select the Thom.tga.
10. Right click the camera > New > Rotoscope. Select the tga you edited in Photoshop. Only the part that was selected in Photoshop should show, allowing Thom to appear behind it.
11. Render.
-
When you add a model to the choreography, all the attributes (including materials) are shown as well, so they can all be animated in the choreography (or action).
You will need to click the Show More Than Drivers icon, to show all the properties including properties of the material.
Here is the icon as pictured in an Action (same in Chor, though):

-
Online manual page for various options with rendering:

textures vs material
in New Users
Posted
You could look at the TWO (Tin Woodman of Oz) thread - this is the movie made in A:M, and I believe each frame is between 15mins - 1hour each.
This is from Ice Age:
Try the material baking if you have v15, because it will be quicker than materials. (Search for +bake +material, I guess).